7. Configure system settings as the super admin
This chapter explains how the System Administrator configures functions under the Settings tab in the Super Admin Portal. Configurations made by the Super Admin using the Super Admin portal are globally applied to your Vidyo conferencing system and are done in a specific order.
The Settings tab enables you to configure the following global settings:
- System License
- Platform Network Settings
- Upload Endpoint Software
- Maintenance
- Super accounts
- Customization
- Security
- Inter-Portal Communication
- Endpoint Network Settings
- Feature Settings
- Hot Standby (only visible once the Hot Standby license is applied and Hot Standby has been configured via the System Console menu)
To make these configurations, you must log in to the Super Admin portal using your Super Admin account.
Apply system license keys to your system
Your VidyoPortal ships with factory default licensing. You need to apply your full Vidyo system license keys to access the license quantities and options you purchased.
|
Note If you do not possess these licenses, you may request them after providing your configured system information. See Request your Vidyo licenses. The procedure differs for applying system license keys to your system if you are running the Hot Standby software option. See Apply system license keys to your system using the Hot Standby software option. System ID-based licenses and FQDN-based licenses were sent to the email address you provided when making your purchase. However, if you do not possess these licenses, you may request them after providing your configured system information. |
You will receive an email from Vidyo Customer Support to the address you provided with your purchase order from the license request web page. This email contains a single .zip archive containing specific files based on the VidyoPortal version you are running as follows: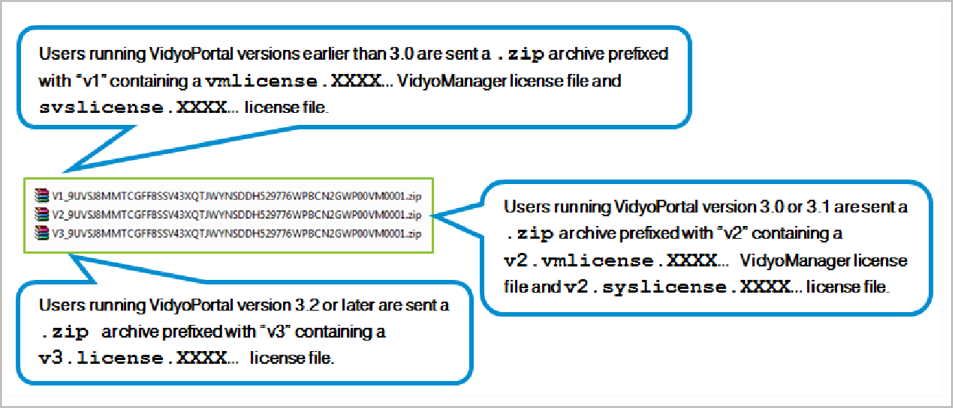
The email also includes a license information text file that includes license information details. This file is prefixed with “LicenseInfo.”
Your VidyoPortal system-wide license defines the term (length) of your license, the number of VidyoLines, and installations available for use as well as whether it is currently being used:
- A single- or multi-tenant system
- Licensed for UC integration, encryption, Hot Standby, Executive lines, and APIs (the API license is also used to enable Adobe Connect integration)
To apply the system license keys to your system:
- Log in to the Super Admin portal using your Super Admin account. The Components page displays by default.
- Click the Settings tab. The Upload System License page displays by default.
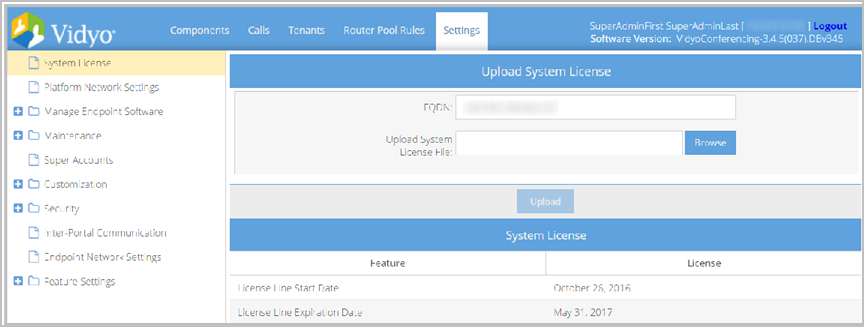
- Click Browse.

- If you are running a VidyoPortal version earlier than 3.2, upload your VidyoManager license:
- Select the appropriate VidyoManager license file based on the VidyoPortal version you are running.
- Click Upload to apply the VidyoManager license.
- Upload the license file for all VidyoPortal versions:
- a. Select the appropriate license file based on the VidyoPortal version you are running.
- Click Upload to apply the license.
- Click the Tenants tab and edit the Default Tenant by clicking the Default Tenant Name.
- Allocate the full set of licenses to the Default Tenant.
- Click Save.
- Restart the VidyoPortal Web Server for the licensing changes to take effect. See Restart your system.
|
Note The VidyoManager license file for users running VidyoPortal version 3.0 or 3.1 is prefixed with “v2” and contains vmlicense in the name. The VidyoManager license file for users running VidyoPortal versions earlier than 3.0 contains vmlicense in the name and has no “vx” prefix. The vmlicense file must be uploaded before the syslicense. |
|
Note The license file for users running VidyoPortal version 3.2 or later is prefixed with “v3.” The license file for users running VidyoPortal version 3.0 or 3.1 is prefixed with “v2” and contains syslicense in the name. The license file for users running VidyoPortal versions earlier than 3.0 contains syslicense in the name without a “vx” prefix. |
Apply system license keys to your system using the Hot Standby software option
Your VidyoPortal ships with factory default licensing. You need to apply your full Vidyo system license keys to access the license quantities and options you purchased. If you do not possess these licenses, you may request them after providing your configured system information. See Request your Vidyo licenses.
The way you apply Vidyo FQDN-based licenses vary based on whether they are being applied when you are initially configuring both your system and the Hot Standby software option or you are applying add-on licenses to a system already synchronizing via the Hot Standby software option. The following sections explain both procedures.
Apply Vidyo FQDN-based licenses when initially configuring both your system and the Hot Standby software option
The following procedure should only be used if you are performing an initial system setup with the Hot Standby software option.
To apply Vidyo FQDN-based licenses when performing an initial system setup with the Hot Standby software option:
- Perform the steps as explained in the previous section on both of your VidyoPortals. See Apply the system license keys to your system.
- Apply the same FQDN-based license on both of your VidyoPortals.
- For more information about Hot Standby, see Appendix E. Hot Standby.
|
Note If you have a Vidyo System ID-based license, contact Vidyo Support for a Vidyo FQDN-based license instead. |
Apply add-on licenses to a system already synchronizing via the Hot Standby software option
An add-on license may be additional client installations, features, and extensions.
|
Note Make sure you’ve already configured Hot Standby on your system and it’s running properly. See Appendix E. Hot Standby. |
- Log in to the Super Admin portal using your Super Admin account on your Active VidyoPortal.
- Perform the steps as explained in the previous section on your Active VidyoPortal. See Apply the system license keys to your system. The license replicates to your Standby VidyoPortal automatically.
Vidyo license consumption by user type
|
VidyoLines licensing model |
|
|---|---|
|
User type |
VidyoLines* |
|
Super Admin |
N/A |
|
Admin |
Y |
|
Operator |
Y |
|
Executive desktop |
N/A |
|
Normal user |
Y |
|
Guest |
Y |
|
VidyoRoom |
N/A |
|
VidyoGateway |
N/A |
*In the VidyoLines licensing model all users with a "Y" consume a line for all calls.
Licensing notifications
If you provided one or more licensee addresses when purchasing, they are embedded into your license.
The Super Admin, Admin, and Tenant Admins receive a license warning when only 25 installs remain. If you don’t purchase additional installation licenses, you’ll receive additional warnings at 15 and another warning when five installations are left. Your current installs never expire. If you run out, you won’t be able to add any new users who need to install the software until you purchase more installation licenses.
Check your platform network settings
You must configure your network settings using the System Console prior to performing your system setup. See Configure the network settings at the System Console. If you haven’t yet configured your network settings, complete that section before proceeding.
Platform Network Settings shows (read only) the settings you made using the System Console. The data is blurred in the following screen shot.
Manage endpoint software
You can choose whether you want to host software updates on an external file server or CDN (Content Delivery Network), allowing endpoints to automatically download them from there. Since CDNs can be geo-located, downloads are typically faster. Additionally, for large-scale client distributions, impact on the VidyoPortal performance is significantly reduced.
Otherwise, you may choose to perform installations directly on users’ machines. However, most administrators prefer having users install their VidyoConnect software by accessing VidyoPortal using the user name and password you assign them.
When your users access the VidyoPortal, the VidyoConnect software is installed even if users do not have administrator privileges.
When new versions of the VidyoConnect and VidyoConnect Room client software become available from Vidyo, you can provide this software to your users by uploading the new software to your servers using the Endpoint Software Versions page. A Tenant Admin user can also upload Vidyo client software for users on their own tenant. This helps the Tenant Admin decide when they want to make endpoint software available for their own users.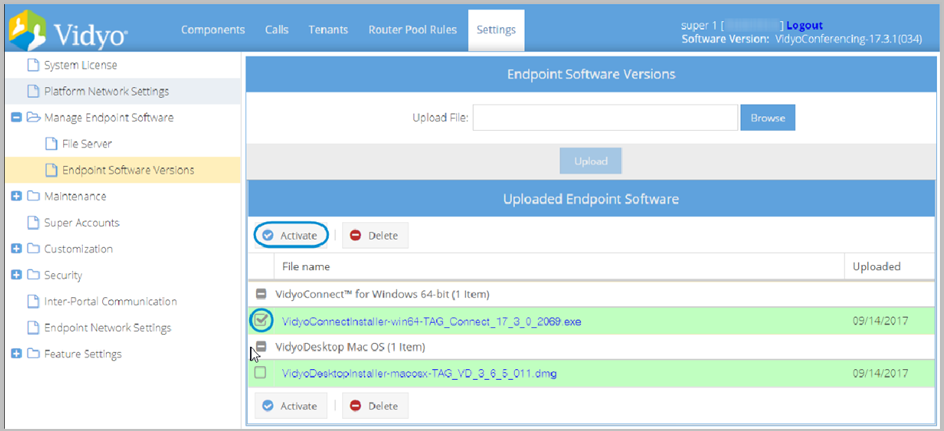
By doing this, your users are automatically prompted to download the new version the next time they log in. Users can choose not to update their software or install the update if desired.
Installation files for various client types include the following:
- VidyoConnect for Windows
- VidyoConnect for macOS
- VidyoConnect Room or VidyoRoom
In the Upload Endpoint Software page, you can upload up to four different versions of each type of endpoint software, but for each type you must make just one active. It is the active version that downloads automatically for VidyoPortal users when they first use the system or upgrade to a new version.
Choose a file server mode
To choose a file server mode:
- Log in to the Super Admin portal using your Super Admin account. The Components page displays by default.
- Click the Settings tab. The Upload System License page displays by default.
- Click the plus sign to the left of Manage Endpoint Software on the left menu.
- Click File Server from the submenu. The File Server page displays.

- Select the Deliver endpoint software from the VidyoPortal radio button if you want to upload endpoint software to VidyoPortal.
- Select the Deliver endpoint software from the external file server radio button if you want to upload endpoint software to an external file server or CDN.
- Click Save.
Upload endpoint software installation files
The radio button selected on the File Server page determines the layout of the Endpoint Software Versions page.
Upload endpoint software installation files to VidyoPortal
To upload endpoint software installation files to VidyoPortal:
- Log in to the Super Admin portal using your Super Admin account. The Components page displays by default.
- Click the Settings tab. The Upload System License page displays by default.
- Click the plus sign to the left of Manage Endpoint Software on the left menu.
- Click Endpoint Software Versions from the submenu. The Endpoint Software Versions page displays.
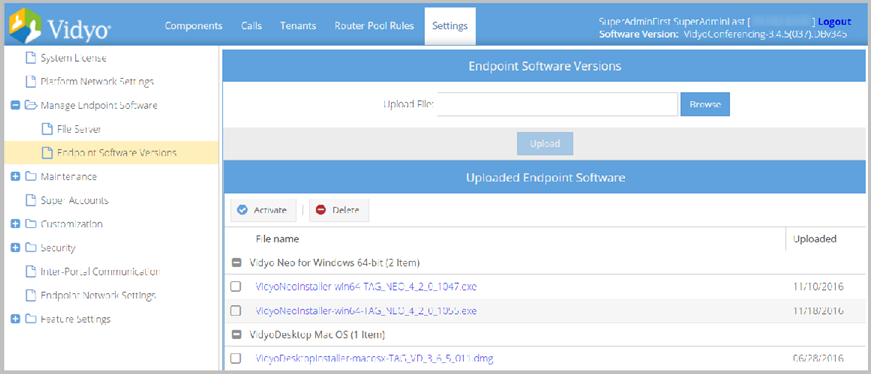
- Download the latest version of the software to your computer. The link is provided to you by your reseller or by Vidyo Customer Support.
- Click Browse.

- Locate the installation file on your computer and click Upload to import it.
|
Note To avoid failure messages, make sure you are uploading Vidyo software only. The software file name ends with an .exe extension for Windows and VidyoRoom and .dmg for Mac. Vidyo recommends uploading the latest version of the software when it becomes available to help make sure all system users are utilizing the most up-to-date Vidyo software. Since Super Admin endpoint software uploads overwrite Tenant Admin uploads, Tenant Admins should always upload files on their tenants after Super Admin uploads are completed. |
When the endpoint installation file is uploaded, it displays in the Uploaded Endpoint Software list under its corresponding heading. Scroll through this list to view all available installation files.
From the Uploaded Endpoint Software table, you can Activate an installer for your users or Delete installers from the list.
Upload endpoint software installation files to an external file server or CDN
To upload endpoint software installation files to VidyoPortal:
- Log in to the Super Admin portal using your Super Admin account. The Components page displays by default.
- Click the Settings tab. The Upload System License page displays by default.
- Click the plus sign to the left of Manage Endpoint Software on the left menu.
- Click Endpoint Software Versions from the submenu. The Endpoint Software Versions page displays.
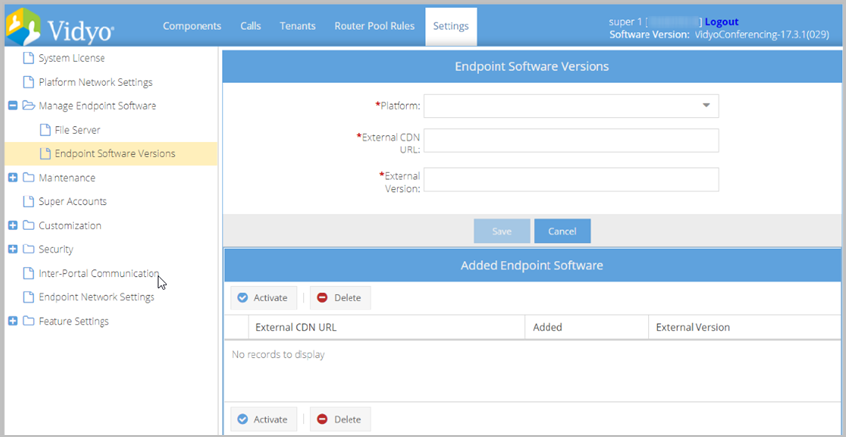
- Select the appropriate software version from the Platform drop-down.
- Enter the appropriate URL in the External CDN URL field.
- Enter the associated version in the External Version field.
- Click Save.
Activate an endpoint installation file
To activate an endpoint installation file:
- Log in to the Super Admin portal using your Super Admin account. The Components page displays by default.
- Click the Settings tab. The Upload System License page displays by default.
- Click the plus sign to the left of Manage Endpoint Software on the left menu.
- Click Endpoint Software Versions from the submenu. The Endpoint Software Versions page displays.
- Select the checkbox to the left of the file name that needs to be activated. Tip: Use the top-left checkbox to select or clear all the software file checkboxes.
- Click Activate at the top or bottom of the list. The file name displays highlighted in green.
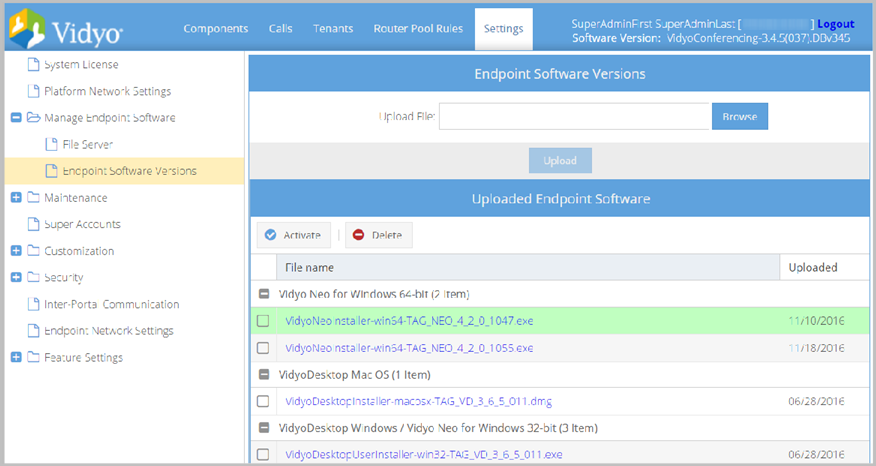
You can upload up to four different versions of each type of endpoint software (VidyoConnect for Macintosh, VidyoConnect for PC and so on), but for each type you must make just one active. It is the active version that downloads automatically for VidyoPortal users when they first use the system or upgrade to a new version.
Depending upon whether the VidyoConnect for Desktop or VidyoDesktop client installer file is uploaded and activated, either the VidyoConnect Client or VidyoDesktop Client is automatically pushed to users who are logged into the system. Users who do not have VidyoConnect for Desktop or VidyoDesktop installed will be instructed to download and install either application when clicking a room link or navigating to the VidyoPortal’s FQDN.
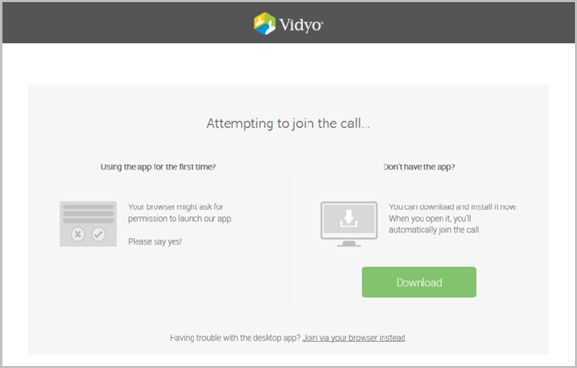
VidyoConnect for Desktop client landing page
After activating VidyoConnect for Desktop on the tenant and clicking a room link to join a conference, an HTML landing page displays. The HTML landing page appears as follows:
|
Note This page will look different depending upon the browser (for example, Chrome, Firefox, Internet Explorer, Safari, and Edge) and OS used (for example, OS X, Windows). |
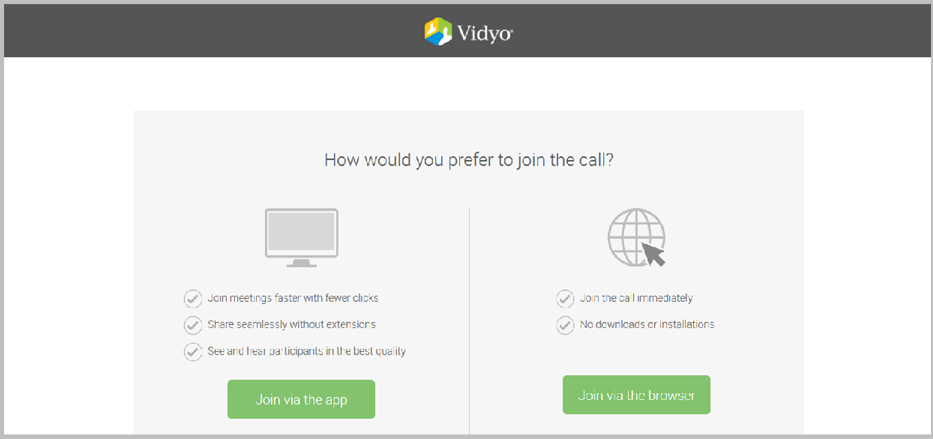
VidyoConnect for Desktop will attempt to connect if you already have VidyoConnect for Desktop installed. The client does not have to be running to launch, but must be installed.
|
Note Depending on the OS and browser used, a browser pop-up may display and ask for your permission to launch the application. For browsers (for example, Chrome and Firefox) that display this alert, you are advised to select the Remember my choice checkbox so that this alert doesn’t display again. This alert is automatic and Vidyo does not control it. |
The Join via the browser option displays if the Super Admin has enabled VidyoConnect for WebRTC access in the Super Admin Portal Settings > Feature Settings > VidyoConnect for WebRTC page. See Enable VidyoConnect for WebRTC access.
If you do not have VidyoConnect for Desktop already installed (hence you are not connected to the conference), you are advised to download the client by clicking Download.
- You do not need to enter a VidyoPortal FQDN in the VidyoPortal field upon logging in, which only displays when you click the VidyoPortal FQDN link at the top of the Login page, since it will be auto-populated when downloading VidyoConnect for Desktop. However, if you want to enter a different VidyoPortal FQDN, click the VidyoPortal FQDN link at the top of the Login page.
- You do not need to re-click the room link after downloading the client since the room key is automatically propagated upon clicking the meeting link.
Delete an endpoint installation file
To delete an endpoint installation file:
- Log in to the Super Admin portal using your Super Admin account. The Components page displays by default.
- Click the Settings tab. The Upload System License page displays by default.
- Click Upload Endpoint Software on the left menu. The Upload Endpoint Software page displays.
- Select the checkbox to the left of the file name that needs to be deleted.
- Click Delete.
|
Note Use the top-left checkbox to select or clear all the software file checkboxes. |
If you delete a file by mistake you always upload it again provided you have not deleted it from your computer. If the file you mistakenly deleted is the current version of the client you also have the option of downloading it again from your reseller or Vidyo Customer Support.
Perform system maintenance
The VidyoPortal database contains everything but the basic network settings of the system (IP, DNS, hostname, NTP), the SSL security certificates loaded and CSR information, and the license keys (each of these would need to be reset separately should a unit need to be replaced/rebuilt). For more information about the CDR database, see Appendix D. CDR.
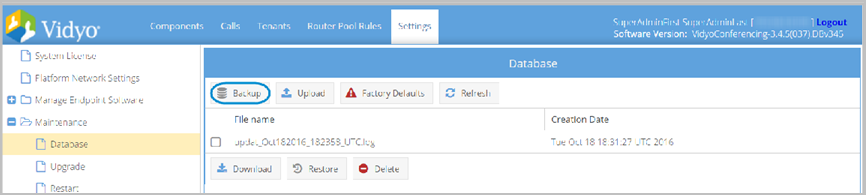
The Database page shows a list of backed up databases on the VidyoPortal hard drive, as well as the file creation dates.
Back up the database
To back up the database:
- Log in to the Super Admin portal using your Super Admin account. The Components page displays by default.
- Click the Settings tab. The Upload System License page displays by default.
- Click the plus sign to the left of Maintenance on the left menu.
- Click Database from the submenu. The Database page displays
- Click Backup.
- Enter an encrypted password in the Password field.
- Re-enter the password in the Confirm Password field to confirm.
- Click Backup.
- Click OK.
A pop-up displays.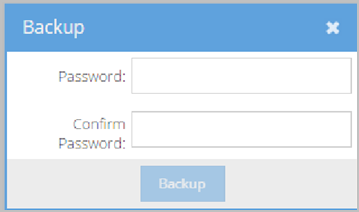
A backup copy of the database is made on the VidyoPortal. A pop-up displays confirming a successful backup.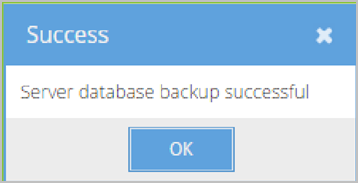
|
Caution Because the database is backed up on the VidyoPortal itself, making a backup does not protect you from a hard drive failure on the VidyoPortal. Therefore, you should download backups to an offsite computer as described in the following section. |
Download a backup file
To download a backup file:
- Log in to the Super Admin portal using your Super Admin account. The Components page displays by default.
- Click the Settings tab. The Upload System License page displays by default.
- Click the plus sign to the left of Maintenance on the left menu.
- Click Database from the submenu. The Database page displays.
- Select the checkbox to the left of the file name that needs to be downloaded.
- Click Download.
- Your selected .veb file or files then download through your Web browser. Now that you’ve downloaded the database, you have a true backup.
Upload a backup file
To upload a backup file:
- Log in to the Super Admin portal using your Super Admin account. The Components page displays by default.
- Click the Settings tab. The Upload System License page displays by default.
- Click the plus sign to the left of Maintenance on the left menu.
- Click Database from the submenu. The Database page displays.
- Click Upload at the top of the Database page.
- Click Browse.
- Locate and select the file from the file selection dialog box.
- Click Open.
- Click Upload in the Uploading backup file pop-up. The file uploads and is listed in the Database table.
The Uploading backup file pop-up displays.
Restore a backup file located on your VidyoPortal
|
Note Vidyo strongly suggests rebooting your VidyoPortal as the final step when restoring a backup database. Make sure you are able to reboot your VidyoPortal before starting to restore a backup database. The system license of the database you’re restoring must be equal to or greater than the number of Lines allocated to a tenant. |
|
Caution The following task destroys the current database file. It’s best to make a backup of the current database file before restoring a prior version. |
To restore a backup file located on your VidyoPortal:
- Log in to the Super Admin portal using your Super Admin account. The Components page displays by default.
- Click the Settings tab. The Upload System License page displays by default.
- Click the plus sign to the left of Maintenance on the left menu.
- Click Database from the submenu. The Database page displays.
- Select the checkbox to the left of the file name that needs to be restored.
- Click Restore. A Confirmation pop-up displays.
- Click Yes.
- Reboot your VidyoPortal. For steps to reboot your VidyoPortal, see Restart your system.
Restore a backup file no longer on your VidyoPortal
|
Note Vidyo strongly suggests rebooting your VidyoPortal as the final step when restoring a backup database. Make sure you can reboot your VidyoPortal before starting to restore a backup database. The system license of the database you’re restoring must be equal to or greater than the number of Lines allocated to a tenant. |
|
Caution The following task destroys the current database file. It’s best to make a backup of the current database file before restoring a prior version. |
To restore a backup file no longer on your VidyoPortal:
- Follow the Upload a backup file procedure for the desired version of the database on your local machine to put the file back on the VidyoPortal.
- Follow the Restore a backup file located on your VidyoPortal procedure to restore the backup file.
Delete a backup file located on your VidyoPortal
|
Caution The following task cannot be undone. |
To delete unnecessary or outdated versions of the database:
- Log in to the Super Admin portal using your Super Admin account. The Components page displays by default.
- Click the Settings tab. The Upload System License page displays by default.
- Click the plus sign to the left of Maintenance on the left menu.
- Click Database from the submenu. The Database page displays.
- Select the checkbox next to the version that needs to be deleted.
- Click Delete at the bottom of the Database page.
- Confirm the action in the pop-up that displays.
Restore the database to the factory default
|
Caution The following action cannot be undone. |
- Log in to the Super Admin portal using your Super Admin account. The Components page displays by default.
- Click the Settings tab. The Upload System License page displays by default.
- Click the plus sign to the left of Maintenance on the left menu.
- Click Database from the submenu. The Database page displays.
- Click Factory Defaults at the top of the Database page.
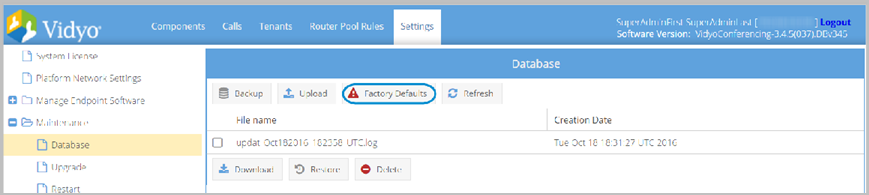
- Confirm the action in the pop-up that displays.
Upgrade your VidyoPortal system software
The System Upgrade page is used for upgrading the VidyoPortal and VidyoOne software version, as well for downloading installation logs history and applying system add-ons (such as SNMP or Hot Standby) or patches.
Before you perform a system upgrade, Vidyo highly recommends that you read the Release Notes that pertains to your upgrade version. The Vidyo upgrade filenames contain the server product abbreviation, version number and/or Add-on/Patch name, and have a .vidyo extension (example: TAG_VC_3_0_0_x.vidyo).
|
Caution Once the VidyoPortal is upgraded, it cannot be reverted to the previous version or other versions. |
|
Note The system doesn’t accept a file that’s versioned earlier than the version currently being used on the VidyoPortal, preventing you from accidentally downgrading your software. The system only accepts .vidyo files signed by Vidyo, protecting you from non-genuine files. The upgrade process terminates all calls in progress. You might want to email users ahead of time and perform the upgrade when system usage is lowest. |
To upgrade the VidyoPortal:
- Log in to the Super Admin portal using your Super Admin account. The Components page displays by default.
- Click the Settings tab. The Upload System License page displays by default.
- Click the plus sign to the left of Maintenance on the left menu.
- Click the Upgrade from the submenu. The System Upgrade page displays.
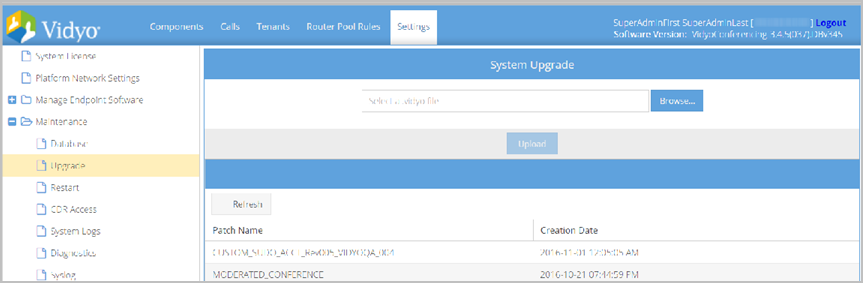
- Click Browse….
- Locate and select the .vidyo file from the file selection dialog box.
- Click Open.
- Click Upload. The upload process may take five to fifteen minutes or more depending on the bandwidth available between the upload file location and the VidyoPortal. Once the upload completes, the VidyoPortal will reboot. Wait two to five minutes before proceeding to the next step.
|
Caution Do not reboot the server manually during this process; doing so may interrupt the upgrade process and corrupt the data. Vidyo recommends running a continuous ping to the server to monitor the reboot process status. |
When performing a VidyoPortal upgrade, you also typically need to upload new endpoint software as well. See Manage endpoint software.
Restart your system
The Restart page is used to restart or shutdown the VidyoPortal. You can also restart the web server.
To restart your VidyoPortal:
- Log in to the Super Admin portal using your Super Admin account. The Components page displays by default.
- Click the Settings tab. The Upload System License page displays by default.
- Click the plus sign to the left of Maintenance on the left menu.
- Click Restart from the submenu. The System Restart page displays.
- Click the desired button from the following choices:
- Click Restart Web Server to restart the web server application (Tomcat) service on your VidyoPortal.
- Click Reboot to reboot your VidyoPortal.
- Click Shutdown to shut down your VidyoPortal.
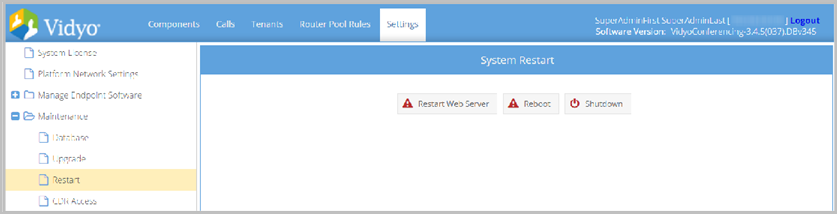
- Click Yes.
|
Note Once the server shuts down you can power it back up only by physically pressing the power button on the front of the unit. |
|
Caution When the system is restarted or shut down all calls in progress are disconnected. Therefore, you may want to email users ahead of time and perform the upgrade when system usage is at its lowest |
Configure the CDR database for remote access in the Super Admin portal
For more information, see Appendix D. CDR.
To configure VidyoPortal to grant remote access to CDR data:
- Log in to the Super Admin portal using your Super Admin account. The Components page displays by default.
- Click the Settings tab. The Upload System License page displays by default.
- Click the plus sign to the left of Maintenance on the left menu.
- Click CDR Access from the submenu. The CDR Access page displays.
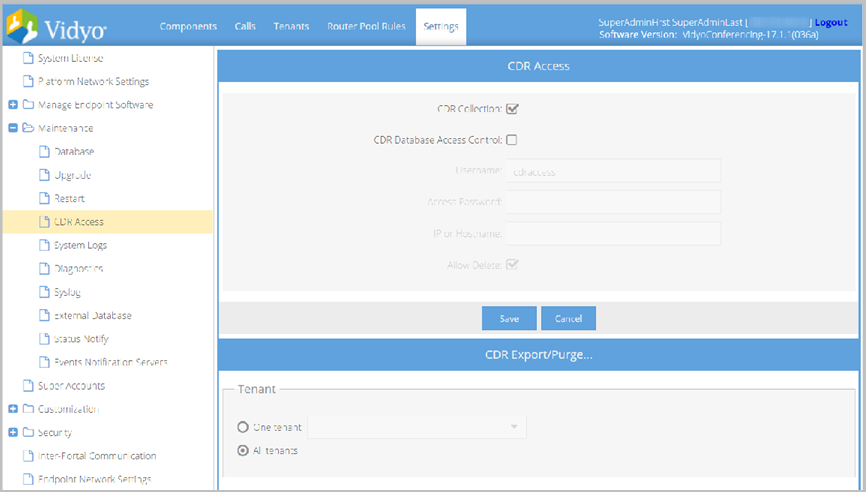
- Leave the CDR Collection and CDR Database Access Control checkboxes selected, and enter the following information:
- Enter your Username as cdraccess (limited to read and delete privileges).
- Enter your Password, which is configured using the VidyoPortal Admin portal.
- Enter your IP or Hostname.
- Leave the Allow Delete checkbox selected if desired.
- Click Save.
|
Note You can use the wildcard character “%” in the IP or Hostname. For example, 192.168.1.% or %.vidyo.com. |
Export and purge CDR files from the Super Admin portal
For more information about the CDR, see Appendix D. CDR.
To export and purge CDR records from the Super Admin Portal:
- Log in to the Super Admin portal using your Super Admin account. The Components page displays by default.
- Click the Settings tab. The Upload System License page displays by default.
- Click the plus sign to the left of Maintenance on the left menu.
- Click CDR Access from the submenu. The CDR Access page displays by default.
- Leave the CDR Collection and CDR Database Access Control checkboxes selected, and enter your username, password, and IP hostname.
- Leave the Allow Delete checkbox selected if desired.
- Select either the One tenant or All tenants checkbox and a Date Range for your CDR record Export or Purge in the CDR Export/Purge… section.
- Click Export or Purge as desired.
|
Note The export record limit is 65,000 records. If the export contains more than 65,000 records, a message displays warning you to restrict the range before proceeding with the download. The export data provided matches the fields and descriptions explained in the ConferenceCall2 table. |
Download system logs
Audit logs
The system logs all activity on the VidyoPortal. The information logged in the Audit Logs includes Record ID, User Name, Tenant Name, Activity (Log In, Log Out, Add Room), Status (Success or Failure), Date & Time, IP Address the user comes from, Event Details, and so on. See 15. Auditing. VidyoPortal audit logs can be generated using the Super Admin account.
To download Audit Logs:
- Log in to the Super Admin portal using your Super Admin account. The Components page displays by default.
- Click the Settings tab. The Upload System License page displays by default.
- Click the plus sign to the left of Maintenance on the left menu.
- Click System Logs from the submenu. The System Logs page displays.
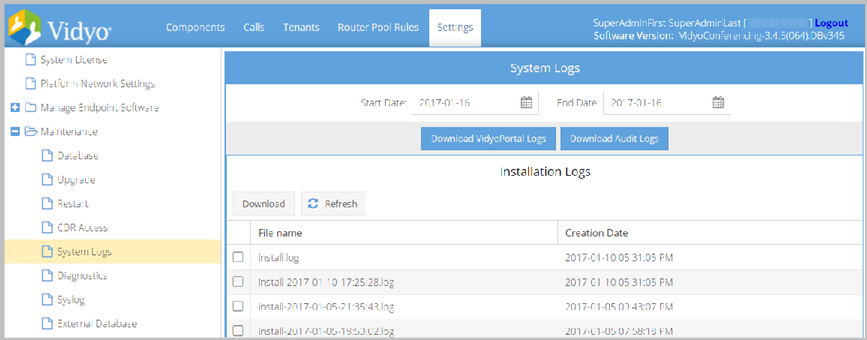
- Enter a Start Date and End Date to retrieve the Audit Logs within that specific time period.
- Click Download Audit Logs. The browser downloads the .csv file.
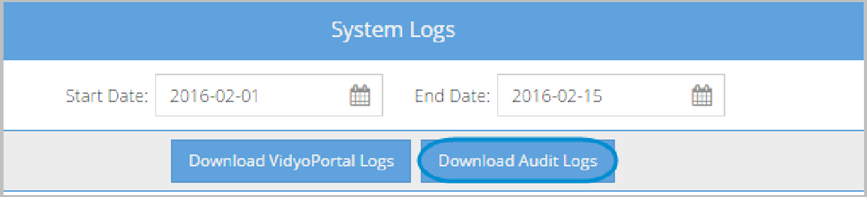
VidyoPortal logs
The VidyoPortal logs include information that may be used by the Customer Support team to troubleshoot an issue that occurred with the system.
To download VidyoPortal logs:
- Log in to the Super Admin portal using your Super Admin account. The Components page displays by default.
- Click the Settings tab. The Upload System License page displays by default.
- Click the plus sign to the left of Maintenance on the left menu.
- Click System Logs from the submenu. The System Logs page displays.

- Click Download VidyoPortal Logs. The VidyoPortal Logs pop-up displays for the administrator to enter a password for encrypting the data.
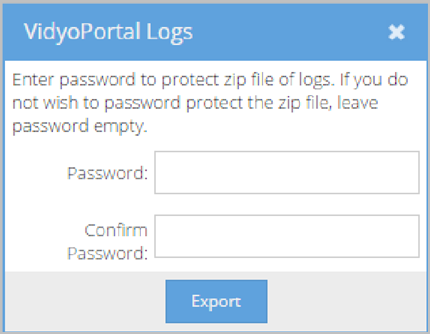
- Enter a password if you want to protect the .zip file of logs.
- Re-enter the password to confirm if necessary.
- Click Export. The browser downloads the .zip file.
|
Note This password will be required when attempting to unzip the file. Leave the Password and Confirm Password fields blank if you do not wish to protect the .zip file. |
|
Note The .zip file may take a few minutes to start downloading depending upon the size of the file and/or speed of your Internet connection. |
Download specific VidyoPortal installation logs
You can view your VidyoPortal installation patches from the System Upgrade tab.
To download specific VidyoPortal installation logs:
- Log in to the Super Admin portal using your Super Admin account. The Components page displays by default.
- Click the Settings tab. The Upload System License page displays by default.
- Click the plus sign to the left of Maintenance on the left menu.
- Click System Logs from the submenu. The System Logs page displays.
- Select the checkbox to the left of the VidyoPortal installation patch that needs to be downloaded.
- Click Download. The browser downloads the VidyoPortal installation log.
Create a system diagnostic file
You can analyze your system health by creating a system diagnostic file and viewing the results. Depending on your system, the diagnostic file shows the following information:
- Date
- Type of node
- FDQN
- IP address
- DNS server report
- Tenant report
- Status notification report
- EMCP report
- SCIP report
- VidyoProxy report
- SMTP configuration report
- Ports
- License tokens
- Ethernet hardware report
- Certificate check
To create a system diagnostic file:
- Log in to the Super Admin portal using your Super Admin account. The Components page displays by default.
- Click the Settings tab. The Upload System License page displays by default.
- Click the plus sign to the left of Maintenance on the left menu.
- Click Diagnostics from the submenu. The Diagnostics page displays.
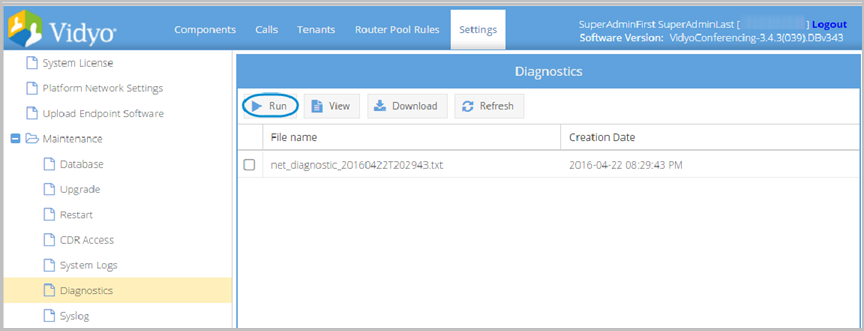
- Click Run. The Result pop-up displays.
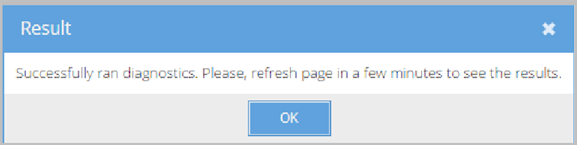
- Click OK.
- Refresh your browser. Your system diagnostic file now displays in the list.
View a system diagnostic file
You can view a system diagnostic file by viewing it on your VidyoPortal or downloading it for further analysis.
To view a system diagnostic file:
- Log in to the Super Admin portal using your Super Admin account. The Components page displays by default.
- Click the Settings tab. The Upload System License page displays by default.
- Click the plus sign to the left of Maintenance on the left menu.
- Click Diagnostics from the submenu. The Diagnostics page displays.
- Select the checkbox to the left of the file name you wish to download. Tip: Use the top-left checkbox to select or clear all the software file checkboxes.
- Click View.
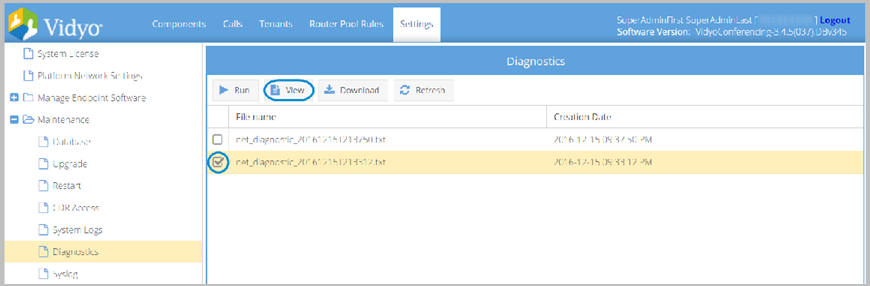
- Click Close.
The View Diagnostics Report pop-up displays.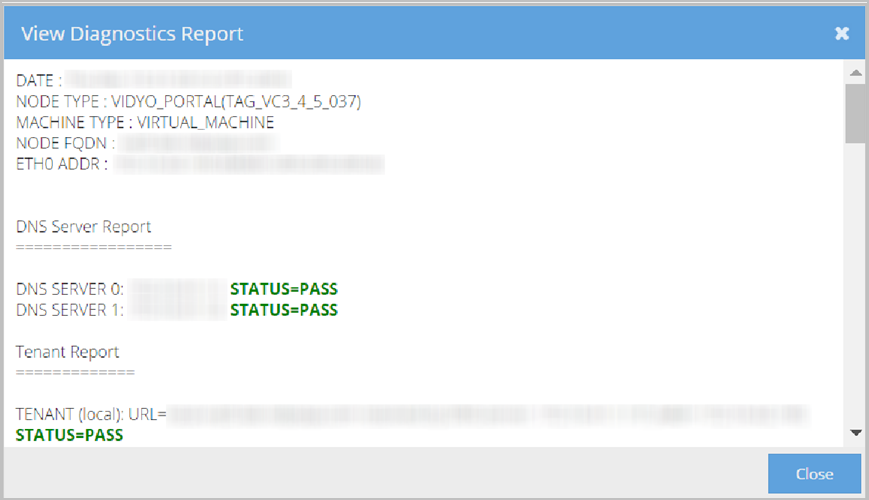
Download a system diagnostic file
You can download a system diagnostic file for further analysis.
To download a system diagnostic file:
- Log in to the Super Admin portal using your Super Admin account. The Components page displays by default.
- Click the Settings tab. The Upload System License page displays by default.
- Click the plus sign to the left of Maintenance on the left menu.
- Click Diagnostics from the submenu. The Diagnostics page displays.
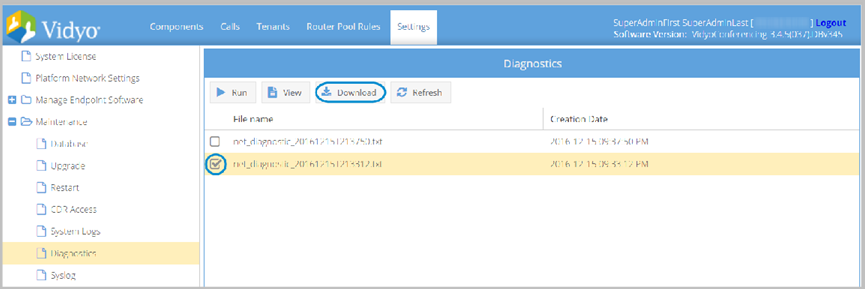
- Select the checkbox to the left of the file name you wish to download.
- Click Download. Your selected .txt file downloads via your Web browser.
Enable Syslogs
You can enable the use of a Syslog server for syslog message data storage in to a separate server of your choice.
|
Note Syslog is only supported over TCP. Syslog information consists of the audit log information. For more information about audit logs, see 15. Auditing. |
To enable Syslogs:
- Log in to the Super Admin portal using your Super Admin account. The Components page displays by default.
- Click the Settings tab. The Upload System License page displays by default.
- Click the plus sign to the left of Maintenance on the left menu.
- Click the Syslog from the submenu. The Syslog page displays.
- Select the Enabled checkbox. When the Enabled checkbox is selected, the Use Encryption, Remote Syslog Server, and Remote Port fields become active.

- Select Use Encryption if desired.
- Enter the Remote Syslog Server location.
- Enter the Remote Port for your syslog server.
- Click Save.
Enable status notify
To enable status notify:
- Log in to the Super Admin portal using your Super Admin account. The Components page displays by default.
- Click the Settings tab. The Upload System License page displays by default.
- Click the plus sign to the left of Maintenance on the left menu.
- Click Status Notify from the submenu. The Status Notify page displays.
- Select the Enabled checkbox. When the Enabled checkbox is selected, the URL, Username, and Password fields become active and you must enter the information in these fields.
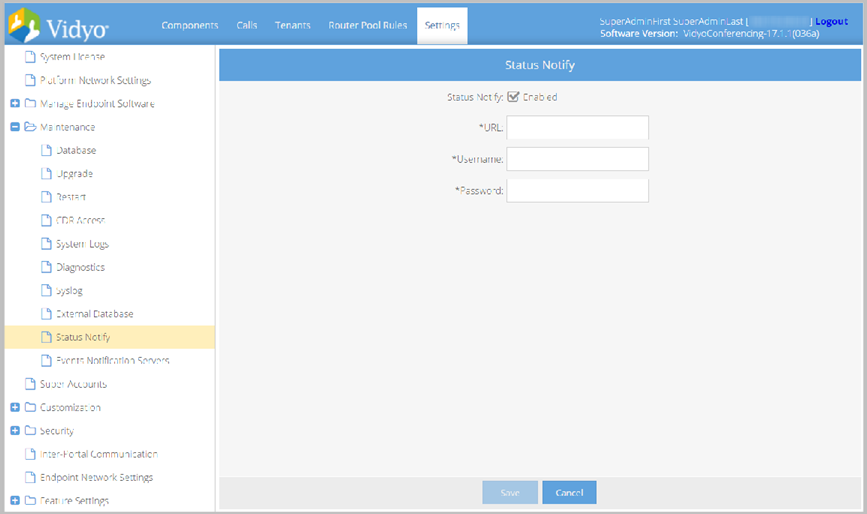
- Enter a URL.
- Enter a User Name.
- Enter a Password.
- Click Save.
Enable the events notification server
User-level and room-level events, such as a user logging in or joining a room, or a room being added or deleted, can be published in the JSON format over a TCP connection. Therefore, API users do not need to poll the VidyoPortal to see what rooms exist and which users have joined those rooms. As a result, events get pushed in real-time so that users can immediately apply business rules to those events.
- User events include the following:
- Offline
- Online
- Busy
- Call ended
- Room events include the following:
- Add room
- Update room
- Delete room
To enable the events notification server:
- Log in to the Super Admin portal using your Super Admin account. The Components page displays by default.
- Click the Settings tab. The Upload System License page displays by default.
- Click the plus sign to the left of Maintenance on the left menu.
- Click Events Notification Servers from the submenu. The Events Notification Servers page displays.
- Select the Enable Events Notification checkbox. The Primary Server, Port, Secondary Server, and Port fields display.

- Enter a primary events notification server URL in the Primary Server field.
- Enter the appropriate port for the primary server in the Port field.
- Enter a secondary events notification server URL in the Secondary Server field if necessary. If the primary events notification server fails, then the secondary server will be used only if configured.
- Enter the appropriate port for the secondary server in the Port field.
- Click Save.
Manage your super accounts
The Super accounts tab allows you to create and change Super Accounts. See Add multiple Super Admin accounts.
|
Caution Each Super Account is required to have a valid, resolvable, email address to function properly in your Vidyo conferencing system. |
View your super accounts
To view your super accounts:
- Log in to the Super Admin portal using your Super Admin account. The Components page displays by default.
- Click the Settings tab. The Upload System License page displays by default.
- Click Super accounts on the left menu. The Super Accounts page displays.
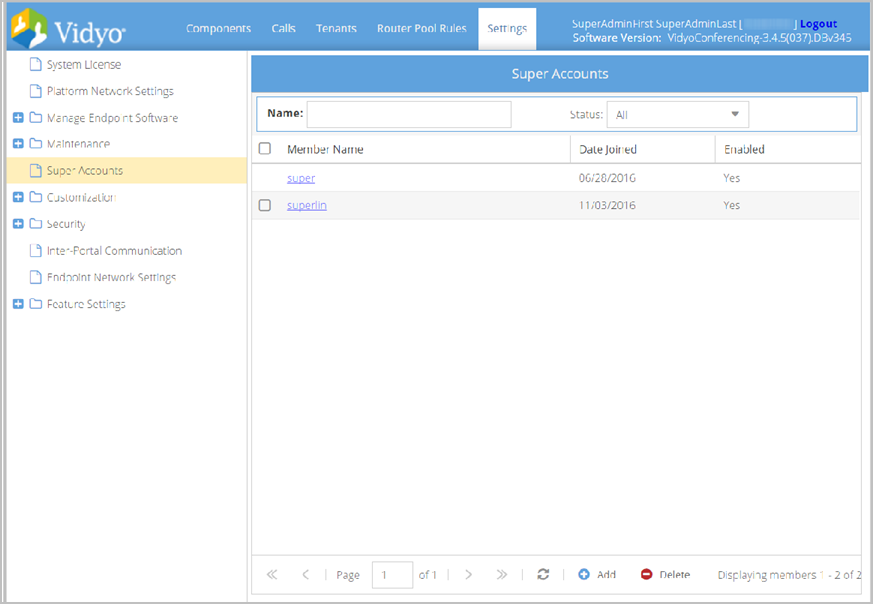
- Click an existing account Member Name to access its details.
- Modify field values for your Super Account as desired.
- Click Save.
You can also click Add below the Super Accounts list. Adding or Editing account details show the same screen with different headings. Fields marked with an asterisk cannot be left blank.
|
Note Change the default Super Account email address so you receive important system notifications. For security purposes, you should change the password for Super Admin access as soon as possible (as described in the next procedure). |
|
Note For information about adding multiple super accounts, see Add multiple Super Admin accounts. |
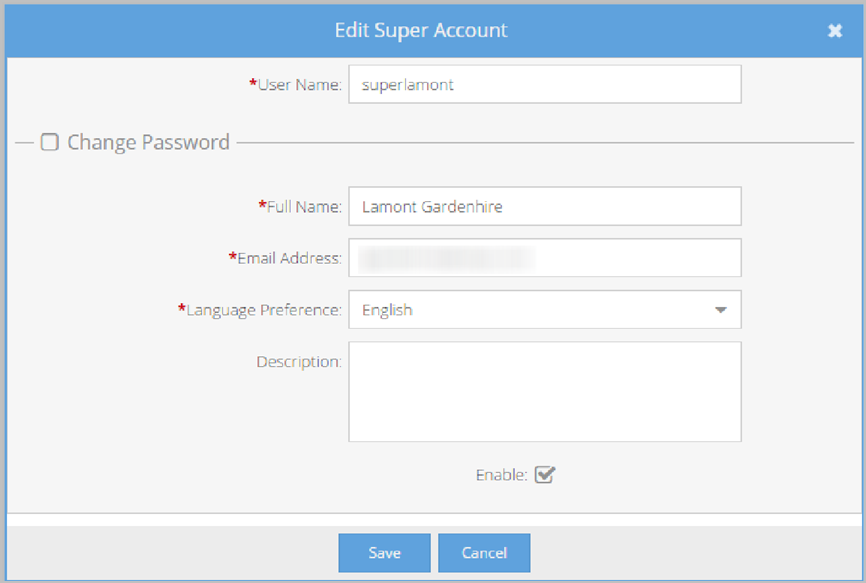
Edit super account information and change the password
To edit super account information and change the password:
- Log in to the Super Admin portal using your Super Admin account. The Components page displays by default.
- Click the Settings tab. The Upload System License page displays by default.
- Click Super accounts on the left menu. The Super Accounts page displays.
- Click an existing account Member Name to access its details. You can also click Add below the Super Accounts list. Adding or Editing account details show the same screen with different headings. Fields marked with an asterisk cannot be left blank.
- Select the Change Password checkbox. The Password and Verify Password fields display.
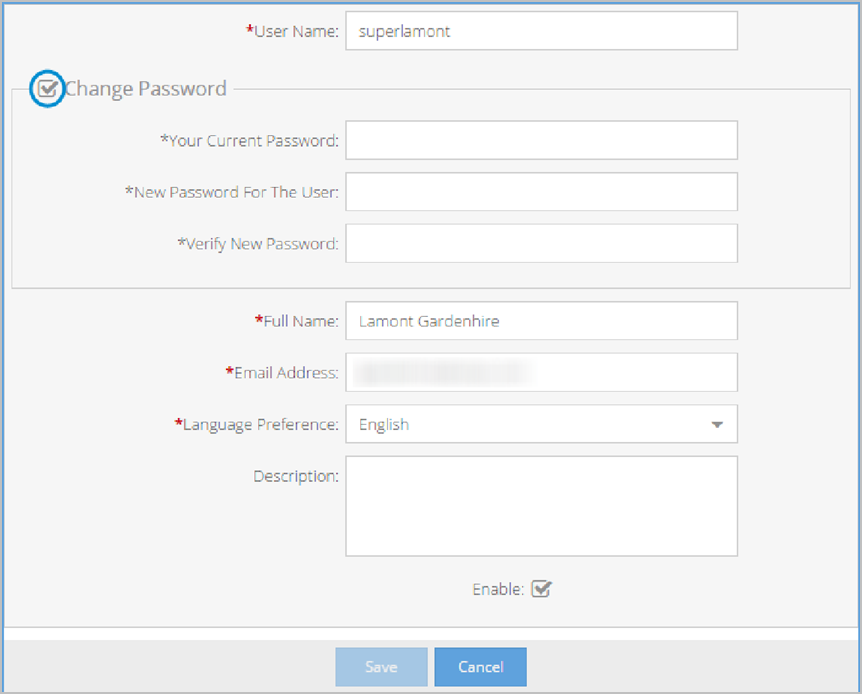
- Enter your current password in the Your Current Password field.
- Enter your new password in the New Password For The User field.
- Enter your new password again in the Verify New Password field.
- Click Save to complete the password change. The system indicates a password mismatch until the last letter is typed in the Verify New Password field.
Customize the system
The Customization left menu item allows you to customize information that end users see as well as perform other system customizations.
Customize the About info
The About info page enables you to create and format an About Us page that displays when users click About Us at the bottom of the VidyoPortal home page and the VidyoPortal Admin and Super Admin Portal.
|
Note Because of the limitations of Adobe Flash, URLs and other markup information can be inserted into the text but must conform to HTML 1.1 specifications. About us customizations created at the Super Admin level can be overridden at the Tenant level by Tenant Admins. |
For more information, see Configure customization on your tenant.
To customize the About Us information:
- Log in to the Super Admin portal using your Super Admin account. The Components page displays by default.
- Click the Settings tab. The Upload System License page displays by default.
- Click the plus sign to the left of Customization on the left menu. The About Info page displays.
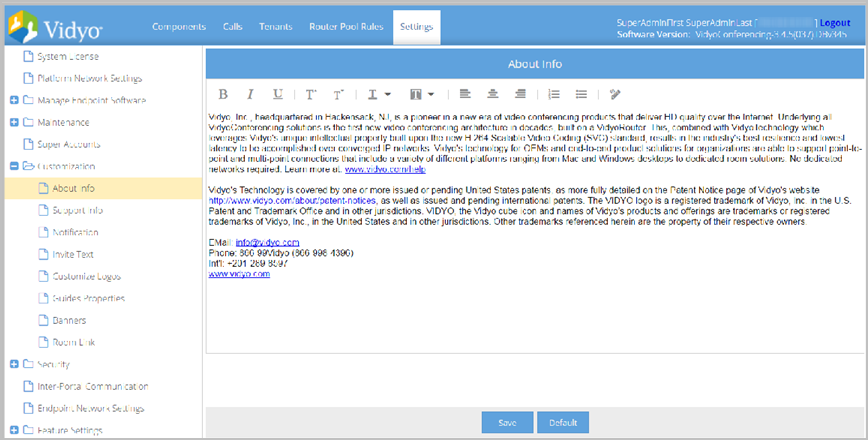
- Enter text or paste text you have copied from another application.
- Apply any formatting desired.
- Click Save.
Revert to default system text on the About Info screen
|
Note About us customizations completed at the Super Admin level can be overridden at the Tenant level by Tenant Admins. |
For more information, see Configure customization on your tenant.
To revert to default system text on the About Info screen:
- Log in to the Super Admin portal using your Super Admin account. The Components page displays by default.
- Click the Settings tab. The Upload System License page displays by default.
- Click the plus sign to the left of Customization on the left menu.
- Click the About Info from the submenu. The About Info page displays.
- Click Default to remove any previously saved customized text and revert to the default system text provided by Vidyo. A Confirmation pop-up displays.
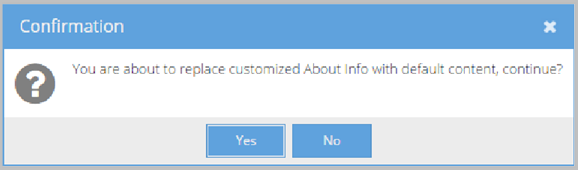
- Click Yes.
Customize Support info
It’s easy to keep your support contact information up-to-date. The Support Info page enables you to create and format a support page that displays when users click Support Info at the bottom of the VidyoPortal home page, the VidyoPortal admin and Super Admin Portal, and the login page. This is information your users need to contact the VidyoPortal Super Administrator.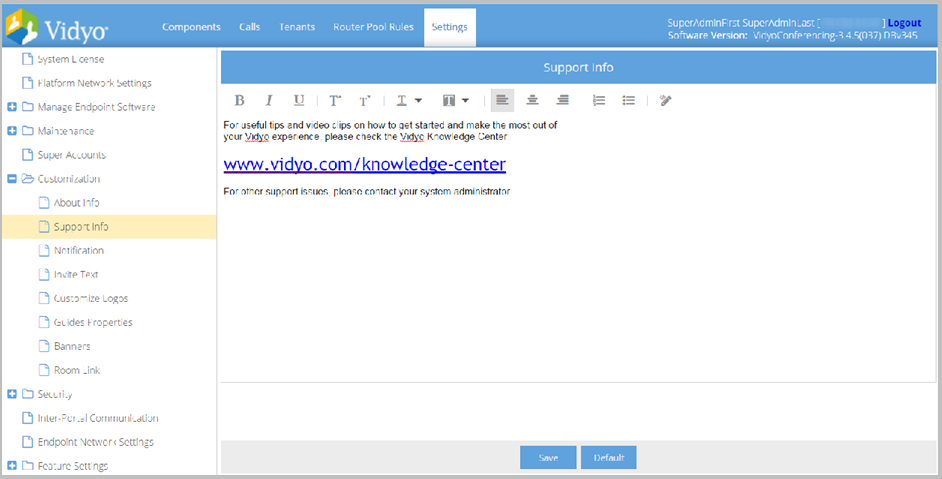
|
Note Because of the limitations of Adobe Flash, URLs can be inserted into the text but they must conform to HTML 1.1 specifications. Support customizations completed at the Super Admin level can be overridden at the Tenant level by Tenant Admins. |
For more information, see Configure customization on your tenant.
To add and edit Support Info:
- Log in to the Super Admin portal using your Super Admin account. The Components page displays by default.
- Click the Settings tab. The Upload System License page displays by default.
- Click the plus sign to the left of Customization on the left menu.
- Click the Support Info from the submenu. The Support Info page displays.
- Enter text or paste text you have copied from another application.
- Apply any formatting desired.
- Click Save.
Revert to default system text on the Support Info screen
|
Note Support customizations completed at the Super Admin level can be overridden at the Tenant level by Tenant Admins. |
For more information, see Configure customization on your tenant.
To revert to default system text on the Support Info screen:
- Log in to the Super Admin portal using your Super Admin account. The Components page displays by default.
- Click the Settings tab. The Upload System License page displays by default.
- Click the plus sign to the left of Customization on the left menu. Click Support Info from the submenu. The Support Info page displays.
- Click Default to remove any previously saved customized text and revert to the default system text provided by Vidyo. A Confirmation pop-up displays.
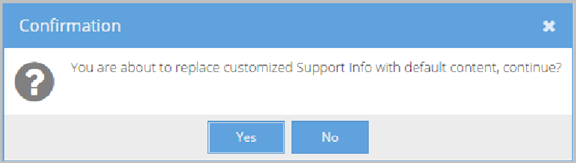
- Click Yes.
Customize notification information
The Notification page enables you to enter From and To email information that’s used by the VidyoPortal for automated emails. The From address you enter is used for automated emails sent out by the VidyoPortal, such as confirmations to new users that their accounts are activated, and other correspondence.
You can elect to have status updates about the Vidyo system sent to an IT staff person in your organization. The To address should be the email address of the person who should receive alerts for action required by the VidyoPortal. Configure SMTP and Security information as desired.
|
Note If a From address is not provided, SMTP servers may block emails or change email headers. Notification customizations completed at the Super Admin level can be overridden at the Tenant level by Tenant Admins. |
For more information, see Configure customization on your tenant.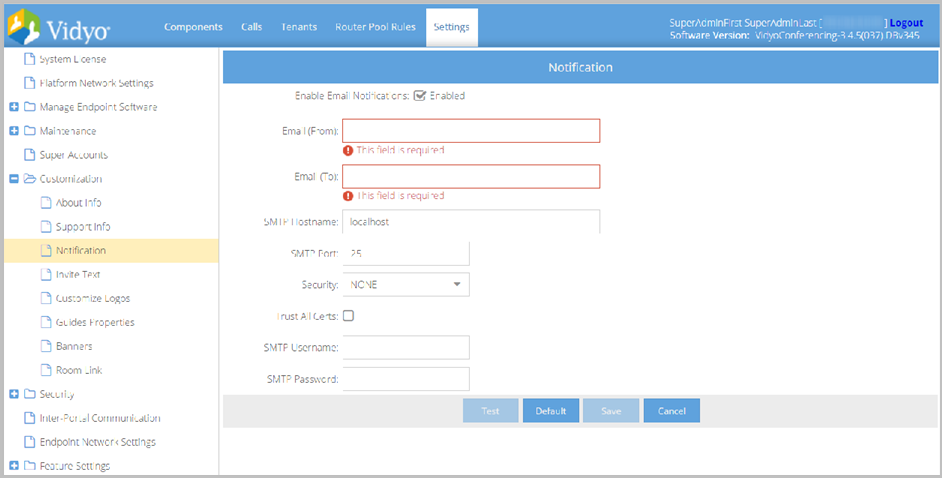
To customize notification information:
- Log in to the Super Admin portal using your Super Admin account. The Components page displays by default.
- Click the Settings tab. The Upload System License page displays by default.
- Click the plus sign to the left of Customization on the left menu.
- Click Notification from the submenu. The Notification page displays.
- Select the Enable Email Notifications checkbox to activate the addresses and settings you configured.
- Enter valid email addresses in the Email (From) and Email (To) fields.
- Provide the following SMTP and Security information:
- Enter the SMTP Hostname.
- Enter the SMTP Port.
- Select either NONE, STARTTLS, or SSL/TLS from the Security drop-down.
- Select the Trust All Certs checkbox if desired.
- Enter the SMTP Username.
- Enter the SMTP Password.
- Click Save.
|
Caution You can use the Test button to confirm your Notification customizations. |
Customize the invite text
The Invite Text page enables you to customize the boilerplate messages sent by users to invite others to attend meetings in their rooms.
There are three kinds of invitations.
- Email Content text is sent for VidyoConferences.
- Voice Only text is sent to those participating in voice-only mode via telephone.
- Webcast text is sent to participants accessing your webcast.
As with the other informational text boxes on the Customization pages, you can use the text as is or modify it as you wish. If you decide to delete the default text and replace it with new text, it’s important for you to understand how to use the green buttons in the upper right hand corner of the page.
|
Note Invite text customizations completed at the Super Admin level can be overridden at the Tenant level by Tenant Admins. |
For more information, see Configure customization on your tenant.
To customize invite text:
- Log in to the Super Admin portal using your Super Admin account. The Components page displays by default.
- Click the Settings tab. The Upload System License page displays by default.
- Click the plus sign to the left of Customization on the left menu.
- Click the Invite Text from the submenu. The Invite Text page displays.
- Change the text from the Email Content (Text), Voice Only, Webcast, and Email Subject sections as desired.
- Change the HTML variables from the Email Content (HTML) section as desired.
- The [DISPLAYNAME] variable inserts the specific user’s display name as it was entered into the system in the Email Content (Text) section.
- The [EXTENSION] variable inserts the room extension (if one is configured) along with the room PIN (if one is configured) into your invite text.
- The [PIN] variable inserts the room PIN (if one is configured) in the Email Content (Text) section.
- The [ROOMNAME] variable inserts name of the room for which the invite was issued.
- The [TENANTURL] variable inserts the name of the tenant in the Email Content (Text) section.
- Add a new dial-in number by navigating to the Dial In Numbers section and performing the following steps if necessary:
- Click Add.
- Enter the number in the Dial-in Number field.
- Enter a label for the number in the Dial-in Number Label field if necessary.
- Click Update.
- The Country Code field auto-populates upon clicking Update.
- Click Remove to delete the dial-in number if necessary.
- Click Save to save the invitations.
The following system variables (uppercase text inside of brackets) display and can be inserted in sections of your invite text and HTML using the following buttons:
|
Two-column table header |
|
|---|---|
|
Key |
Summary |
|
|
Available in the Email Content (Text), Email Content (HTML), and Voice Only sections, the [DIALIN_NUMBER] variable inserts the dial-in number of your room into your invite text and HTML. |
|
|
Available in the Email Content (Text), Email Content (HTML), and Voice Only sections, the [PIN_ONLY] variable inserts the PIN (if one is configured) of your room into your invite text and HTML. |
|
|
Available in the Email Content (Text), Email Content (HTML), and Voice Only sections, the [EXTENSION_ONLY] variable inserts the room extension (if one is configured) into your invite text and HTML. |
|
|
Required in the Email Content (Text) and Email Content (HTML) sections, the [ROOMLINK] variable inserts a hyperlink to your room into your invite text and HTML. When accessed from a tablet, room links may be used to join a conference, annotate, or manage a meeting. |
|
|
Available in the Email Content (Text) and Email Content (HTML) sections, the [LEGACY_URI] variable inserts the URI that participants will use to access your room from Legacy endpoints. |
|
|
Available in the Email Content (HTML) section, the [AVATAR] variable inserts the avatar link, which points to the specific user’s profile thumbnail, into your invite HTML. |
|
|
Available in the Email Content (HTML) section, the [USER_TITLE) variable inserts the specific user’s title into your invite HTML. |
|
|
Available in the Email Content (HTML) section, the [USER_DISPLAYNAME] variable inserts the specific user’s display name as it was entered in to the system into your invite HTML. |
|
|
Available in the Email Content (HTML) section, the [ROOMNAME] variable inserts name of the room for which the invite was issued into your invite HTML. |
|
|
Available in the Email Content (HTML) section, the [TENANT_LOGO] variable inserts the tenant’s logo into your invite HTML. |
|
|
Available in the Email Content (HTML) section, the [INTERNATIONAL_DIALIN] variable inserts the specific dial-in number that is defined in the Dial In Numbers section below. |
|
|
Available in the Voice Only section, the [DIALSTRING] variable inserts the phone number participants will use to access your room voice-only telephones. |
|
|
Required in the Webcast section, the [WEBCASTURL] variable inserts the URL that participants can use to access your webcast. |


Some additional variables (ones that do not have buttons or icons) and display in sections of your invite text include:
|
Note If applicable, modify the default text in the Email Content (Text) section with your VidyoGateway IP address for your participants accessing your conference from Legacy endpoints. |
Making common invite text changes
You can make the following common changes to invite text:
- If your organization uses mobile devices that support a tap-to-connect functionality, you can add the following template to your invite: Voice only users can tap-to-connect: “[DIALIN_NUMBER], [EXTENSION]#”.
- If your organization has disabled guest access, delete the line about joining as a first-time user from your desktop or mobile device, or to annotate with VidyoSlate on your iPad: Click [ROOMLINK] from the Email Content section.
- If your system includes a VidyoGateway, add the following sentence as part of your email content: To join from a non-Vidyo conferencing endpoint: Connect through a VidyoGateway [enter your VidyoGateway IP here] using H.323 or SIP and enter meeting ID [EXTENSION].
- If your organization doesn’t use IPC, delete the line about joining from another VidyoPortal using IPC: Enter [ROOMNAME]@[TENANTURL] from the Email Content section.
- If your organization doesn’t use VidyoVoice, delete the line about using VidyoVoice in the Voice Only section.
- If your organization uses more than one VidyoVoice number, add the additional number or numbers in the Voice Only section.
|
Note When accessed from a tablet, roomlinks may be used to join a conference, annotate, or manage a meeting |
|
Note Modify the [enter your VidyoGateway IP here] portion with your VidyoGateway IP address. |
|
Note Some browsers may not support email invitation generation due to a limitation on the number of characters in the invite text. Vidyo recommends that you generate the email invitation prior to making that text the default, and reduce the number of characters if needed. |
Revert to default system text on the Invite Text screen
Invite text customizations completed at the Super Admin level can be overridden at the Tenant level by Tenant Admins.
For more information, see Configure customization on your tenant.
To revert to default system text on the Invite Text screen:
- Log in to the Super Admin portal using your Super Admin account. The Components page displays by default.
- Click the Settings tab. The Upload System License page displays by default.
- Click the plus sign to the left of Customization on the left menu.
- Click the Invite Text from the submenu. The Invite Text page displays.
- Click Default to remove all custom invitations and revert to the default text supplied by Vidyo. A Confirmation pop-up displays.
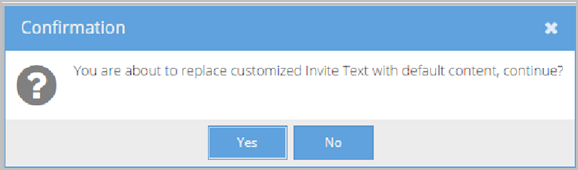
- Click Yes.
Upload custom logos
|
Note Logo customizations completed at the Super Admin level can be overridden at the Tenant level by Tenant Admins. See Configure customization on your tenant. The customized logos per tenant display on the HTML-based Control Meeting screen. See Control meetings. |
- Log in to the Super Admin portal using your Super Admin account. The Components page displays by default.
- Click the Settings tab. The Upload System License page displays by default.
- Click the plus sign to the left of Customization on the left menu.
- Click the Customize Logos from the submenu. The Customize Logos page displays.
- Click the Select File icons for the corresponding logo you wish to upload.
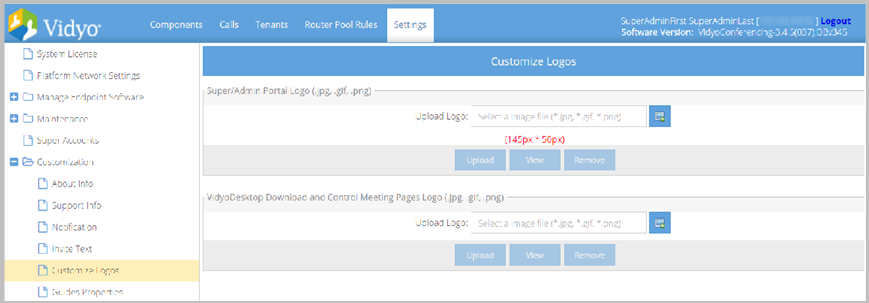
- The Super and Admin Portal Logo section updates the logo used on both the Super Admin portal and the Tenant Admin portal, replacing the Vidyo logo in the top-left corner of the page.
- The VidyoConnect Download and Control Meeting Pages Logo section updates the logo used for your VidyoConnect Download page shown to users when a software update is performed, and the Control Meeting page shown to meeting moderators. See Control meetings.
- Select your logo file and click Upload. Tip: For best appearance, use a logo saved with a transparent background.
- Click View to see the logo file currently in use. The logo file displays in a new browser tab.
- Click Remove to delete the logo file currently in use. After removal, your logo file is replaced with the system default Vidyo logo.
Logos can be uploaded for the following system locations:
|
Note The uploaded VidyoConnect Download and Control Meeting Pages logo must be 145 x 50 pixels and can be in the .gif, .jpg, or .png formats. |
Customize your VidyoPortal login and welcome banners
The Login banner is a dialog box that displays every time your users access the login pages of the Super Admin or Tenant Admin portals. The Welcome banner is a dialog box that first displays when your users access the Super Admin or Tenant Admin portals after logging in to the system. Both banners are activated and customized by the Super Administrator.
View and acknowledging the login banner
To view and acknowledge the login banner:
- Access the Super Admin portal. The Login banner displays with text customized by your Super or Tenant administrator.

- Click Acknowledge.
|
Note You must click the Acknowledge button to close the login banner and continue logging in to the system. |
View the welcome banner
To view the welcome banner:
- Access the Super Admin portal.
- Click Acknowledge on the Login banner.
- Log in to the Super Admin portal using your Super Admin account. See Log in to the Super Admin portal.
- Result - Refers to whether you successfully logged in to the system.
- Source address - This is your IP address when accessing the Super or Admin portal when you logged in to the system.
- Time - When you logged in to the system.
- Click Continue. The Components page displays by default.
The Welcome banner displays with text customized by your Super or Tenant administrator and your last 5 login attempts in a table.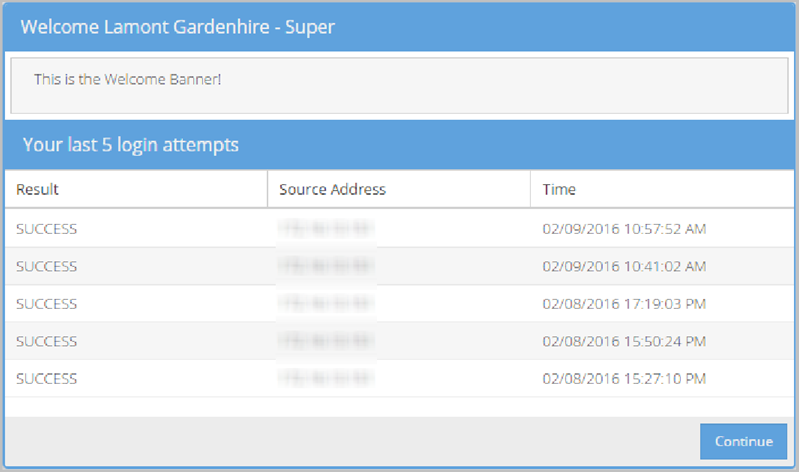
The following information is provided as columns in the table showing your last 5 login attempts:
Customize your login banner
To customize your login banner:
- Log in to the Super Admin portal using your Super Admin account. The Components page displays by default.
- Click the Settings tab. The Upload System License page displays by default.
- Click the plus sign to the left of Customization on the left menu.
- Click Banners from the submenu. The Banners page displays.
- Select the Login Banner checkbox to activate the login banner.
- Enter your desired text and formatting for your login banner.
- Click Save.
Customize your welcome banner
To customize your welcome banner:
- Log in to the Super Admin portal using your Super Admin account. The Components page displays by default.
- Click the Settings tab. The Upload System License page displays by default.
- Click the plus sign to the left of Customization on the left menu.
- Click Banners from the submenu. The Banners page displays.
- Select the Welcome Banner checkbox to activate the welcome banner.
- Enter your desired text and formatting for your welcome banner.
- Click Save.
Customize room links
You can customize the key length and format for guest room meeting links.
To customize room links:
- Log in to the Super Admin portal using your Super Admin account. The Components page displays by default.
- Click the Settings tab. The Upload System License page displays by default.
- Click the plus sign to the left of Customization on the left menu.
- Click Room Link from the submenu. The Room Link page displays.

- Enter a value between 8 and 25 in the Room Key Length field.
- Select the appropriate Room Link format radio button.
- Click Save.
The first format is the traditional format and the second format is a new simplified format. The selected room format will appear in all meeting invitations. Regardless of selection, both formats will always work.
Customize your password settings
You can customize the password settings for users accessing the Super Admin portal.
To customize password settings for users accessing the Super Admin portal:
- Log in to the Super Admin portal using your Super Admin account. The Components page displays by default.
- Click the Settings tab. The Upload System License page displays by default.
- Click the plus sign to the left of Security on the left menu.
- Click Passwords from the submenu. The Passwords page displays.
- Provide the following information:
- Enter the desired number of days in the Number of days before password expires field.
- Enter the desired number of days in the Number of days of inactivity before a password change is forced field.
- Enter the desired number of attempts in the Number of failed login attempts before account is locked field.
- Select the Enforce password complexity rules checkbox if necessary.
- Passwords must be at least 15 characters long.
- Passwords must contain at least two uppercase alphabetic characters.
- Passwords must contain at least two lowercase alphabetic characters.
- Passwords must contain at least two numeric characters.
- Passwords must contain at least two non-alphanumeric (special) characters.
- Password must contain no more than two consecutive repeating characters.
- Select the Disable password recovery for Super Accounts checkbox if necessary. When checked, the Forgot Your Password link will not be available for Super users and they will not have the option recover their password.
- Enter the desired number of hours for keeping the client session active in the Client Session Expiration Period (Hours) field. When the period expires, the clients will be automatically logged off and requested to re-enter their credentials.
- Enter the desired minimum length for the user configured PINs including Personal, Public, Webcast, and Moderator PINs in the Minimum Length for User Configurable PINs (Personal, Public, Webcast Moderator) field.
- Click Save.
|
Note The Number of days before password expires and Number of days of inactivity before a password change is forced settings do not apply to LDAP or SAML auto-provisioned accounts. |
|
Note When your LDAP or SAML auto-provisioned accounts are locked out of the system, they are disabled on the VidyoPortal. |
|
Note When password complexity is enabled on a system with user accounts already configured, only Admin and Super Admin users are forced to change their passwords on their next log in attempt. Normal users will not be prompted to change their passwords; however, if they choose to subsequently change their passwords, the complexity rules are enforced. The complexity rules are also enforced on any newly created VidyoPortal accounts. |
|
Note The Minimum PIN Length does not apply to PINs for Scheduled Meeting Rooms. |
Revert to default password settings on the Password screen
To revert to default password settings on the Password screen:
- Log in to the Super Admin portal using your Super Admin account. The Components page displays by default.
- Click the Settings tab. The Upload System License page displays by default.
- Click the plus sign to the left of Security on the left menu.
- Click Passwords from the submenu. The Passwords page displays.
- Click Default to remove all custom password settings and revert to the default values supplied by Vidyo.
- Click Yes.
|
Note Defaults are 0, 0, and 0 (0 meaning infinite) for the Number of days before a password expires, Number of days of inactivity before a password change is forced, and Number of failed login attempts before account is locked (respectively). |
A Confirmation pop-up displays.
Secure your VidyoPortal and other components
This section describes some methods of securing your VidyoPortal and other various components such as VidyoManager, VidyoRouter, and VidyoGateway. The Security section of the guide shows you how to secure your VidyoPortal exclusively. See Appendix C. Security.
Configure system-wide Inter-Portal Communication (IPC)
Inter-Portal Communication (IPC) allows users to join Vidyo conferences with someone on a different VidyoPortal. IPC also supports conferencing between tenants on the same VidyoPortal.
|
Note IPC works with both secure and unsecure VidyoPortals. However, IPC communication between secure and unsecure VidyoPortals is not supported. |
IPC is built into all Vidyo systems running VidyoPortal version 2.2 or later.
|
Note Global feature settings made in the Tenant Admin portal override settings made in the Super Admin portal. For more information about configuring Inter-Portal Communication (IPC) on tenants, see Add a default tenant or adding a new tenant. As the Super Admin, you can configure IPC to be globally available or unavailable on your entire system. |
If you do control system-wide IPC from this interface, then create a list of either Allowed or Blocked Domains and Addresses that work as follows:
- An Allowed List only permits domains and addresses included on your list to interoperate on your domain. This type of list is often referred to as a whitelist.
- A Blocked List specifically disallows all domains and addresses included on your list from interoperating on your domain. This type of list is often referred to as a blacklist.
To configure system-wide IPC:
- Log in to the Super Admin portal using your Super Admin account. The Components page displays by default.
- Click the Settings tab. The Upload System License page displays by default.
- Click Inter-Portal Communication on the left menu. The Inter-Portal Communication page displays.
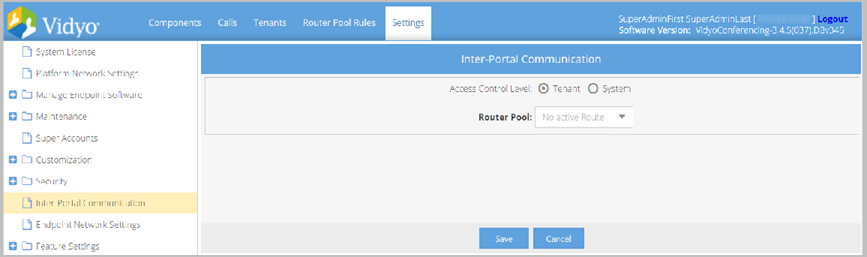
- Select Tenant to give Tenant Admins control over IPC. See Add a default tenant or adding a new tenant.
- Select System to configure system-wide IPC settings by adding or deleting allowed or blocked domains or addresses.
- Select the router pool from the Router Pool drop-down.
- Select your desired access control mode to add or delete domains or addresses from allowed or blocked lists as follows:
- Select Allowed List from the Access Control Mode options to add or delete a permitted domain or address as follows:
- If you want to add an allowed domain, click Add, enter the Internet domain to be added to the list, and then click OK.
- If you want to delete an allowed domain, click the existing domain you want to delete from the list, and then click Delete.
- Select Blocked List from the Access Control Mode options to add or delete a restricted domain or address as follows:
- If you want to add a blocked domain, click Add, enter the Internet domain to be added to the list, and then click OK.
- If you want to delete a blocked domain, click the existing domain you want to delete from the list, and then click Delete.
- Click Save to save your list.
The IPC-enabled router pool serves as a hub through which all IPC communication is routed.
For example, in the following configuration, this organization designated one of its router pools at the Chicago site to be IPC-enabled. (Chicago could have any number of any other router pools that are not IPC-enabled.)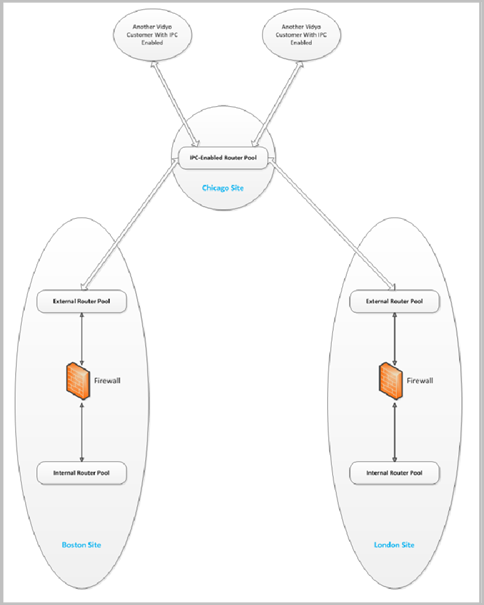
For more information about router pools, see Configure router pools.
|
Note You can add or delete Domains and Addresses at any time. |
It’s a good idea to advise your users that you have enabled IPC and they can use the VidyoConnect search box to place external calls to users on a different VidyoPortal and other domains (unless you have restricted them).
Use the following syntax as a guide for making an IPC call on different VidyoPortals:
[Username on other VidyoPortal]@[IP or FQDN address of other VidyoPortal].com
Tell your users about IPC
You should keep your users informed of IPC changes by following these suggestions:
- When you first enable IPC, whether upon installation or at some other time, be sure to send out a mass email to all your users informing them that you have enabled IPC.
- Be sure to tell them whether they can inter-operate with all domains except those on your Block list or if they can inter-operate only with those domains on your Allowed list.
- Let them know whenever you add or delete a domain. You might want to include the full list reflecting the change if it’s not long. You could also keep the list up-to-date on your intranet.
- It’s probably a good idea to recap how to use IPC:
In the Contact Search field, they must enter the Vidyo address of the person they want to call using this format: user_name@portal_name.
Remind your users that although this looks like an email address, it’s not. Rather, it’s a unique Vidyo address. To call the user hhakston (who is on a different VidyoPortal), your users would have to enter his Vidyo user name (hhakston), the @ sign, and then the domain name of his VidyoPortal (in this case, it’s vidyo.phu.edu). Then, they can click Join Room.
Remind them also that the Join Room button is the only way they can use IPC. The Call Direct button is dimmed because IPC can’t be used to make a direct call.
Configure endpoint network settings
This page allows you to set differentiated services code point (DSCP) values for audio, video, content, and signaling coming from your VidyoConnect and VidyoConnect Room endpoints to your VidyoRouter. Audio, video, content data, and signaling coming from your VidyoConnect and VidyoConnect Room endpoints are assigned corresponding values that you set on this screen.
With these specified values assigned to media types coming from your VidyoConnect and VidyoConnect Room endpoints, you can then configure your network router or switch to prioritize the packets as desired.
You can also configure the media port range and enable use of the VidyProxy on the Endpoint Network Settings page.
To configure quality of service values for endpoints:
- Log in to the Super Admin portal using your Super Admin account. The Components page displays by default.
- Click the Settings tab. The Upload System License page displays by default.
- Click Endpoint Network Settings on the left menu. The Endpoint Network Settings page displays.
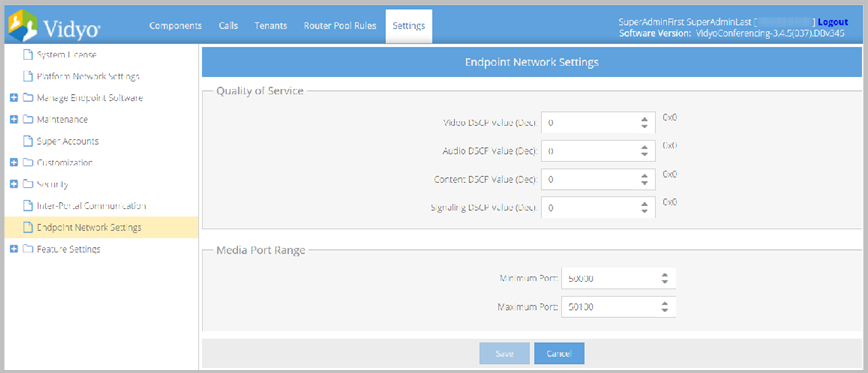
- Enter DSCP values for Video, Audio, Content, and Signaling. Values provided must be decimals from 0 to 63. The values default to 0.
- Enter the appropriate values in the fields in the Media Port Range section.
- Click Save. A Confirmation pop-up displays.
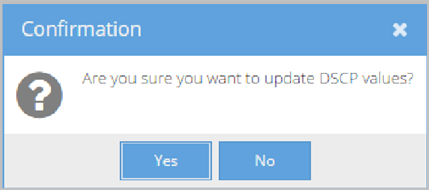
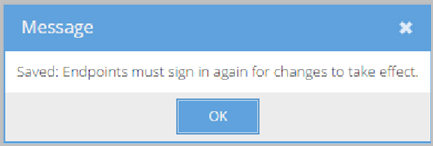
- Click Yes. A message displays stating that all endpoints using your tenant must sign in to the system again before values are tagged to corresponding media packets based on your saved changes.
Set global features
The Feature Settings left menu item allows you to control some system-wide behaviors, such as access for VidyoConnect for Mobile, search options, TLS for VidyoProxy, scheduled rooms, and more.
Enable VidyoConnect for WebRTC access
VidyoConnect for WebRTC allows you to use desktop and mobile browsers that support WebRTC to join conferences on VidyoPortal without installing browser plugins or extensions.
To enable VidyoConnect for WebRTC access:
- Log in to the Super Admin portal using your Super Admin account. The Components page displays by default.
- Click the Settings tab. The Upload System License page displays by default.
- Click the plus sign to the left of Feature Settings on the left menu.
- Click VidyoConnect for WebRTC from the submenu. The VidyoConnect for WebRTC page displays.

- Select the Enable VidyoConnect for WebRTC for guests checkbox if you want to allow invited guests to join calls via VidyoConnect for WebRTC.
- Select the Enable VidyoConnect for WebRTC for users checkbox if you want to allow users to join calls via VidyoConnect for WebRTC.
- Click Save.
- Configure the URL of the VidyoConnect for WebRTC Server for each tenant that will use VidyoConnect for WebRTC.
|
Note Enabling VidyoConnect for WebRTC for users is useful if you have users on platforms for which there is not currently a VidyoConnect Desktop client, such as Chromebooks and Linux desktops. However, users that are currently logged in will reserve the same resources on the VidyoConnect for WebRTC Server whether they are on a call. Once the Super Admin has enabled VidyoConnect for WebRTC, the tenant Admin may enable or disable the feature for their tenant. |
Enable mobile access
VidyoConnect Mobile brings the power of Vidyo conferencing to Android and iOS phones and tablets.
You don’t pay extra for VidyoConnect Mobile. It’s built into your VidyoPortal. However, when a new user connects to your VidyoPortal via VidyoConnect Mobile for the first time, one of your licenses is consumed.
As the Super Admin, you can configure VidyoConnect Mobile to be globally available or unavailable on your entire system. Global feature settings made in the Tenant Admin portal override settings made in the Super Admin portal.
To enable mobile access on your system:
- Log in to the Super Admin portal using your Super Admin account. The Components page displays by default.
- Click the Settings tab. The Upload System License page displays by default.
- Click the plus sign to the left of Feature Settings on the left menu.
- Click Mobile Access from the submenu. The Mobile Access page displays.
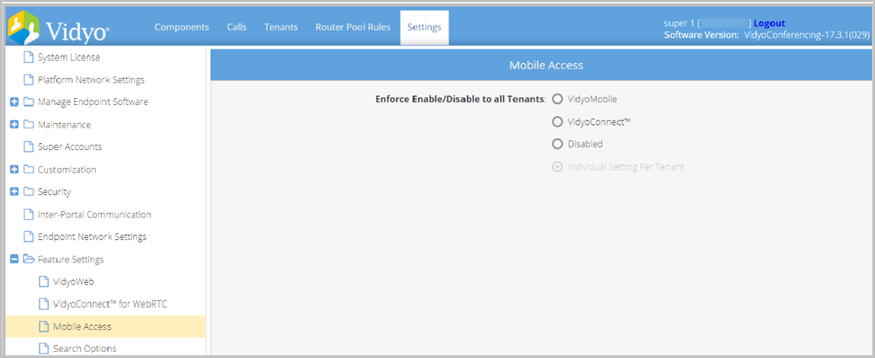
- Select one of the following options:
- Select the VidyoConnect radio button to give all your tenants access to VidyoConnect Mobile.
- Select the Disabled radio button to restrict mobile access for all your tenants.
- Regardless of whether mobile access is disabled here, creating a single tenant with an opposite setting overrides the configuration and the Individual Setting Per Tenant radio button automatically becomes selected here. The following examples provide clarification:
- If the Disabled radio button is selected, and at some later point VidyoConnect access is enabled for even one tenant (as described in Add a default tenant or adding a new tenant), then the Individual Setting Per Tenant radio button automatically becomes selected.
- Similarly, if at some later point in time after selecting the VidyoConnect radio button, mobile access is disabled for a specific tenant, the next time you look at this screen, the Individual Setting Per Tenant radio button will be selected.
|
Note For more information about enabling guest logins on tenants, see Add a default tenant or adding a new tenant. |
Configure system-wide search options
You can control whether disabled rooms display in search results on your VidyoPortal by using Search Options.
To configure whether disabled rooms display in search results:
- Log in to the Super Admin portal using your Super Admin account. The Components page displays by default.
- Click the Settings tab. The Upload System License page displays by default.
- Click the plus sign to the left of Feature Settings on the left menu.
- Click Search Options from the submenu. The Search Options page displays.
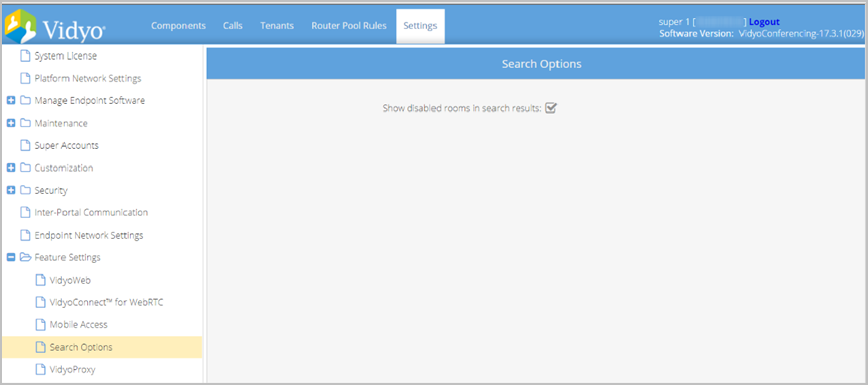
- Select the Show disabled rooms in search results checkbox to allow disabled rooms to display in search results on your VidyoPortal or leave deselected.
- Click Save.
Configure Transport Layer Security (TLS) VidyoProxy
You can enable or disable TLS for VidyoProxy on your VidyoPortal. Establishing a TLS tunnel between the VidyoProxy and the VidyoPortal significantly increases connectivity success rates as most firewalls block non-TLS traffic on port 443. This feature is disabled by default.
|
Note When turned on, only endpoints supporting this feature can connect via VidyoProxy. |
To configure the TLS VidyoProxy:
- Log in to the Super Admin portal using your Super Admin account. The Components page displays by default.
- Click the Settings tab. The Upload System License page displays by default.
- Click the plus sign to the left of Feature Settings on the left menu.
- Click VidyoProxy from the submenu. The VidyoProxy page displays.
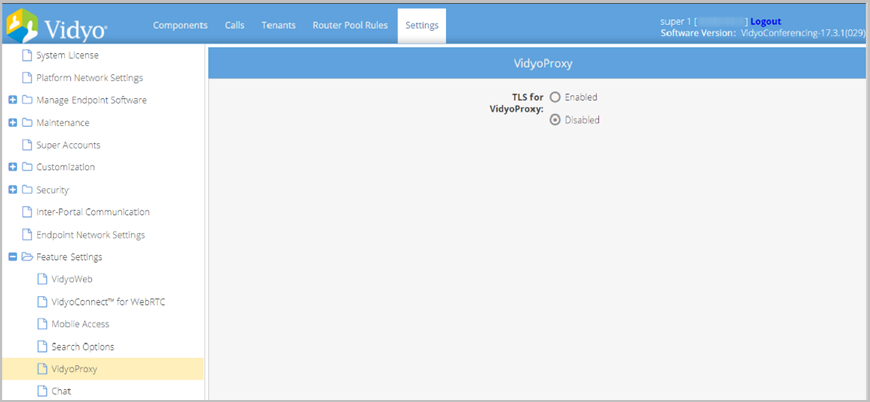
- Select the Enabled or Disabled radio button to enable or disable TLS VidyoProxy on your VidyoPortal.
- Click Save. All your VidyoProxies automatically restart.
Configure system-wide public and private chat
You can configure system-wide public and private chat.
To configure system-wide public and private chat:
- Log in to the Super Admin portal using your Super Admin account. The Components page displays by default.
- Click the Settings tab. The Upload System License page displays by default.
- Click the plus sign to the left of Feature Settings on the left menu.
- Click Chat from the submenu. The Chat page displays.
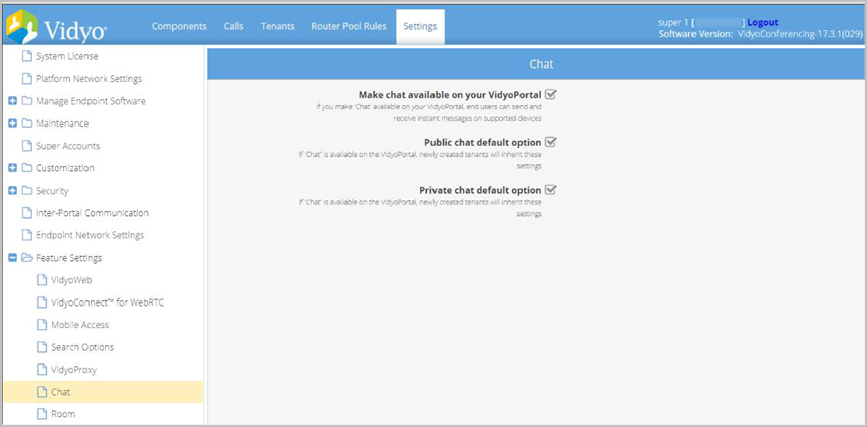
- Deselect the Make chat available on your VidyoPortal checkbox to deny the availability of chat on your VidyoPortal or leave selected.
- Deselect the Public chat default option checkbox to deny public chat on newly created tenants or leave selected.
- Deselect the Private chat default option checkbox to deny private chat on newly created tenants or leave selected.
- Click Save.
Configure scheduled and public room settings
By adding a scheduled room prefix, your users can then create ad-hoc rooms from specific endpoints on your system. The prefix you configure on this screen is used for all scheduled rooms created on your system.
To configure scheduled and public room settings:
- Log in to the Super Admin portal using your Super Admin account. The Components page displays by default.
- Click the Settings tab. The Upload System License page displays by default.
- Click the plus sign to the left of Feature Settings on the left menu.
- Click Room from the submenu. The Room Attributes page displays.
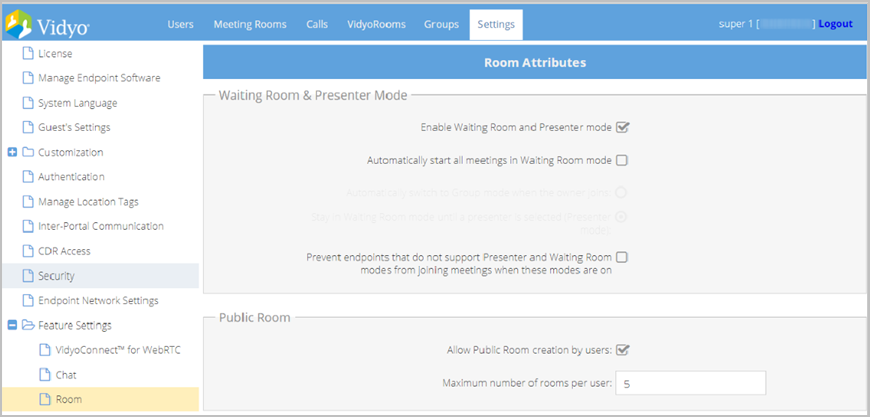
- Deselect the Make Scheduled Rooms available on your VidyoPortal checkbox to allow scheduled rooms on your VidyoPortal or leave selected.
- Enter a numeric prefix in the Scheduled Room Prefix field.
- Deselect the Allow Public Room creation by users checkbox to deny users the ability to create public rooms or leave selected.
- Enter the maximum number of public rooms that the user can create in the Maximum number of rooms per user field.
- Enter the minimum number of digits for auto-generated extensions in the minimum number of digits for auto-generated extensions field.
- Click Save.
|
Note If you do not provide a scheduled room prefix, no scheduled rooms can be created by your users from specific endpoints on your system. |
Configure user attributes
You can allow or restrict tenants from uploading their own thumbnail photos.
|
Note To use this feature, the Vidyo endpoint must also support it. |
To configure user attributes:
- Log in to the Super Admin portal using your Super Admin account. The Components page displays by default.
- Click the Settings tab. The Upload System License page displays by default.
- Click the plus sign to the left of Feature Settings on the left menu.
- Click User Attributes from the submenu. The User Attributes page displays.
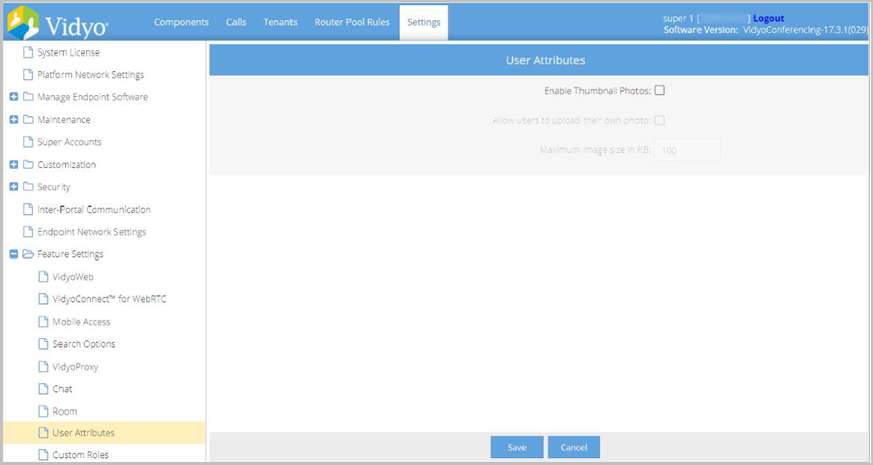
- Select the Enable Thumbnail Photos checkbox to allow the User Attributes menu item to display under Settings > Feature Settings in the Admin Portal, giving tenants the option to upload thumbnail photos. Additional fields display.
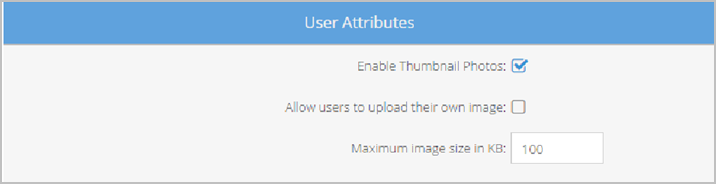
- Select the Allow users to upload their own image checkbox if you want to give tenants the option to allow their users to upload their own image, which causes the Allow users to upload their own image checkbox to display in the tenant’s Settings > Feature Settings > User Attributes page.
- Enter a value in the Maximum image size in KB field. The default value is 100.
- Click Save.
Configure custom roles
With Custom Invocation of VidyoConnect, third-party partners, developers, and admins can now customize the VidyoConnect client experience and workflow. Custom Invocation allows them to easily choose which features and functionality that they want to enable and disable for all your users. For example, you can use Custom Invocation to bypass the VidyoConnect Welcome screen orlogin pages to provide users with direct access to a conference, or you can use it to mute all participants’ microphones or cameras upon entry into a call.
You can also invoke VidyoConnect with iFrames. iFrames allow you to load content from your domain or a third-party system into VidyoConnect per tenant. For example, you can use iFrames to display content around the main in-call window or display a thank-you message at the end of each call.
As a Super Admin, you can now allow or restrict tenants from receiving customized VidyoConnect iFrame features and attributes by following the steps below.
|
Note To use this feature, the Vidyo endpoint must also support it. |
To configure custom roles:
- Log in to the Super Admin portal using your Super Admin account. The Components page displays by default.
- Click the Settings tab. The Upload System License page displays by default.
- Click the plus sign to the left of Feature Settings on the left menu.
- Click Custom Roles from the submenu. The Custom Roles page displays.
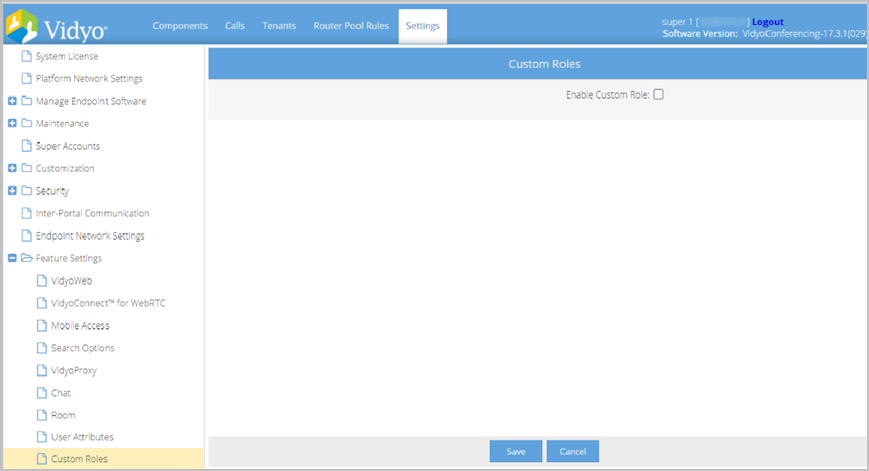
- Select the Enable Custom Role checkbox. When the Enable Custom Role checkbox is selected, the Enable Custom Role checkbox on the Tenants page becomes active for each tenant. See Add a tenant.
- Click Save.
Configure the EPIC version February 2019 integration with VidyoConnect Context-Aware Linking (CAL)
This information is now in the Vidyo for Healthcare section of the Vidyo Help, under Epic integration.
Configure the Status Notification Service
The Status Notification Service is an updated form of Enable status notify with these significant differences:
- Status Notifications are sent in REST/JSON format
- Status Notifications can be configured per tenant
The VidyoPortal can send Status Notifications to external entities using this interface. Every time the status of a user on the tenant changes (for example, logging in or joining and leaving a conference), the VidyoPortal sends a notification message with the various parameters for each action. The application is responsible for determining how the notification message is processed.
To configure the Status Notification Service for your Tenant Admins:
- Log in to the Super Admin portal using your Super Admin account. The Components page displays by default.
- Click the Settings tab. The Upload System License page displays by default.
- Click the plus sign to the left of Feature Settings on the left menu.
- Click Status Notification Service from the submenu. The Status Notification Service page displays.
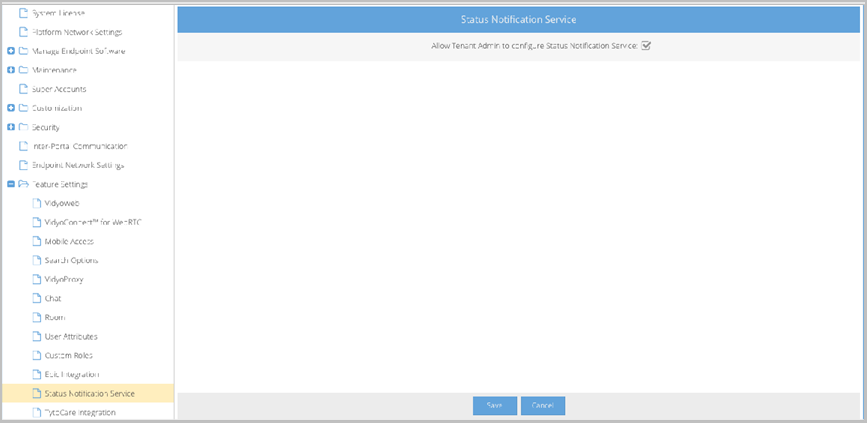
- Select the Allow Tenant Admin to configure Status Notification Service checkbox.
- Click Save.
Configure TytoCare integration
This information is now in the VidyoHealth section of the Vidyo Help, under Legacy TytoCare integration.
Configure Native WebRTC for the VidyoPortal
Use the information in this section to get details about how to configure Native WebRTC, including the supported platforms, compatibility data, network and firewall configuration, certificates and encryption, VidyoRouter configuration, and VidyoPortal CORS domain configuration. You can configure Native WebRTC only if you are using one of the following:
- Limited Availability releases of the VidyoPortal and VidyoRouter capable of Native WebRTC and SDK 2.4.0 support, such as the VidyoPortal 20.1.1 LA release.
- General Availability releases of VidyoPortal and VidyoRouter version 22.1.1 or later.
Supported browsers and platforms
The VidyoConnect for Native WebRTC application is supported on the following browsers:
|
Browser |
Supported versions |
|
Google Chrome |
Last two released versions on Windows, macOS, and Android |
|
Microsoft Edge |
Last two released versions on Windows |
|
Apple Safari |
Last released version on iOS/iPad OS and macOS |
The following table lists the platforms that support Native WebRTC on the VidyoPortal:
|
Platform |
Supported versions |
|
Windows |
10 and later |
|
macOS |
11.x and later |
|
iOS/iPad OS |
15 and later |
|
Android |
11 and later |
Compatibility
The following table displays the compatibility matrix for using Native WebRTC.
|
Key |
Summary |
|
VidyoConnect for Desktop |
20.1 and later |
|
VidyoConnect |
20.1 and later |
|
VidyoConnect Room and VidyoRoom |
20.2 and later |
|
VidyoGateway |
20.1 and later |
|
VidyoReplay |
20.1 and later |
Network and firewall configuration
For Native WebRTC, each VidyoRouter requires an additional two IP addresses (for a total of three). The two additional addresses are for TURN and websocket signaling. In addition, for these two addresses, you must configure two additional FQDNs as DNS entries with the format indicated in this table:
| IP address | Purpose | Public ports | FQDN in DNS |
| SCIP_IP* | Media and binary client signaling |
|
[vidyorouter].example.com |
| TURN_IP | TURN services for WebRTC | TCP 443 | [vidyorouter]- turn.example.com |
| WEB_IP | Websocket signlaing for WebRTC | TCP 443 | [vidyorouter]- web.example.com |
*The SCIP_IP is the same as in previous releases that existing clients connect over. In this table, only the public-facing ports are described; management ports like SSH are not mentioned since they are not expected to be public facing.
Certificates and encryption
For Native WebRTC to work, you must enable HTTPS and media encryption for your deployment. For more information on how to configure this, see Appendix C. Security.
Configure your VidyoRouter
To configure your VidyoRouter for Native WebRTC, you must first configure the TURN interface and then configure the WebSockets interface.
Configure the TURN interface
To configure the TURN interface:
- Log into your VidyoRouter using your System Console account.
- Enter m for more options.

- Enter A for Advanced Options.
- Enter 8 for TURN Configuration.
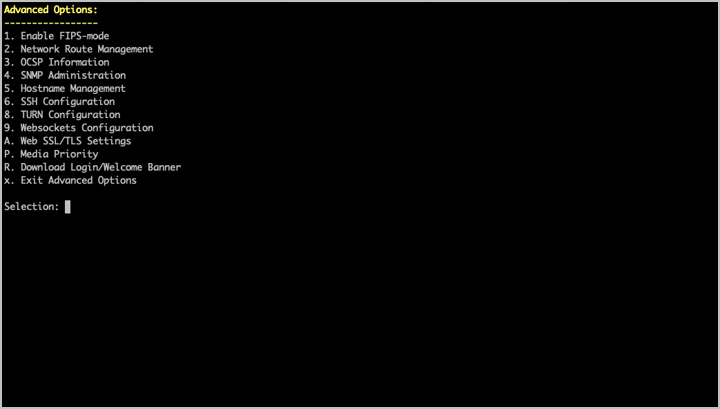
- Enter the TURN interface IP address and subnet mask.

- Enter y to save.
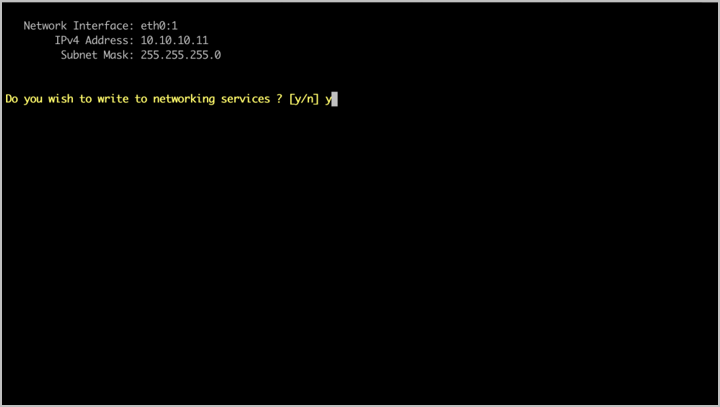
- Proceed to configure the WebSockets interface as described in the next subsection.
|
Note Press the Enter key after each prompt. |
Configure the WebSockets interface
To configure the WebSockets interface:
- If you have not already done so, log into your VidyoRouter using your System Console account.
- Enter m for more options.

- Enter A for Advanced Options.
- Enter 9 for Websockets Configuration.
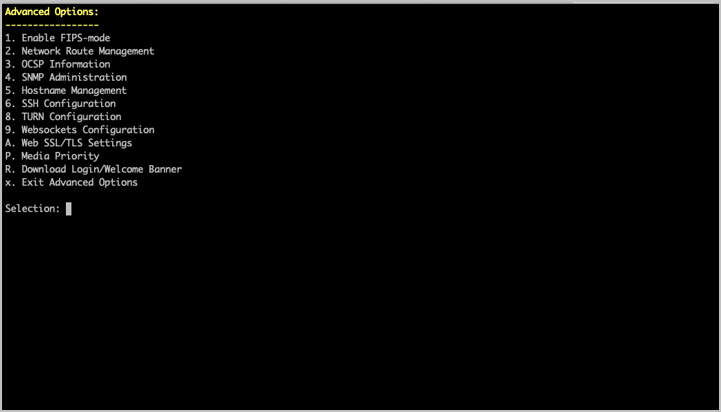
- Enter the WebSockets interface IP address and subnet mask.
- Enter y to save.
- Enter 14 to reboot the VidyoRouter.

|
Note Press the Enter key after each prompt. |
Configure the CORS domain on the VidyoPortal
If you are building your own web application using the VidyoPlatform Client SDK 20.1.0 or later, you will need to configure the CORS domain on the VidyoPortal. For information about how to do this, refer to REST CORS in the VidyoPlatform section of the Vidyo Help.
