9. Manage tenants as the Super Admin
Every Vidyo system has at least one tenant, called the default tenant. If your Vidyo conferencing system is licensed for multi-tenant mode, you can create multiple tenants.
Tenants are configured at the Super Admin level, so you must be logged in as a Super Admin.
|
Note You must set up tenants after you have configured the settings and components for your VidyoPortal system. If you have not yet configured system settings and components, configure them before attempting to add any tenants. |
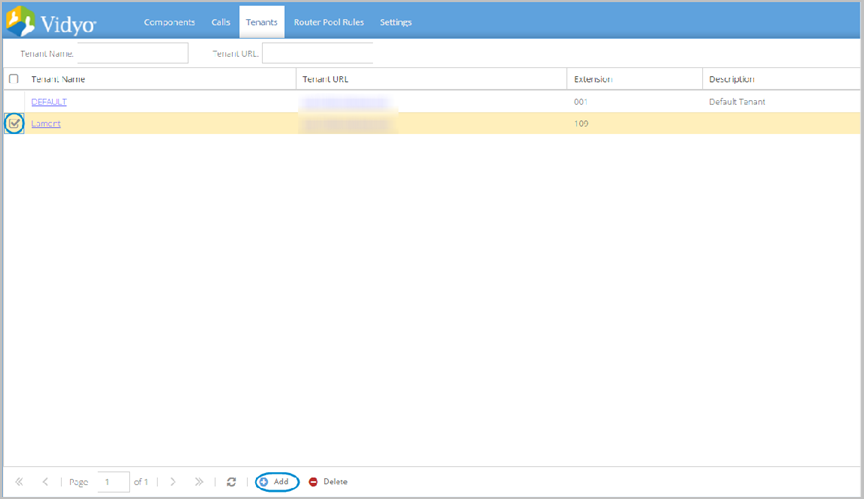
Tenants table
You use the Manage Tenants table to view, delete, and manage the tenants in your system.
To use the Manage Tenants table:
- Log in to the Super Admin portal using your Super Admin account. See Log in to the Super Admin portal. The Components page displays by default.
- Click the Tenants tab. The Tenants page displays. Tenants in your VidyoPortal display in the table and include Tenant Name, Tenant URL, Ext. Prefix, Description, and Delete as columns. You can drag and drop the column headings to arrange them in the order you prefer.
- Search by tenant name or tenant URL using the Tenant Name or Tenant URL search boxes above the table.
- Use the following buttons at the bottom of the page to change your view of the table.
- Click Refresh to refresh the table.
- Click the First Page, Previous Page, Next Page, and Last Page direction arrows to scroll through multiple pages of results in the table.
- Enter a page number to access a specific page of results in the table.
- Click Add to add a tenant.
- Click Delete to delete a tenant.
How to add a tenant
Use the following steps to add or configure a tenant. Some steps can be skipped if your installation or the tenant you’re configuring has not licensed certain capabilities.
- Configure basic tenant settings.
- Permit cross-tenant access.
- Assign VidyoProxy components.
- Assign VidyoGateway components (skip if VidyoGateway is not being used).
- Assign VidyoReplay components (skip if VidyoReplay is not being used).
- Assign location tags.
- Save the tenant configuration.
Add a tenant
This is step 1 of the steps needed to configure a tenant. For the full list of steps when configuring a tenant, see Tenants table.
Perform the following procedure to configure the default tenant or to add a new tenant to your system. Even if you are using a multi-tenant system, set up the default tenant before setting up other tenants.
|
Note A password change is required when your tenant admin first logs in to a newly configured tenant. |
Add a default tenant or adding a new tenant
To add a default tenant or a new tenant:
- Log in to the Super Admin portal using your Super Admin account. The Components page displays by default.
- Click the Tenants tab. The Tenants page displays.
- Click the Default name and perform the following steps. Alternatively, if your system is licensed for multi-tenant mode, click Add at the bottom of the Tenants page.
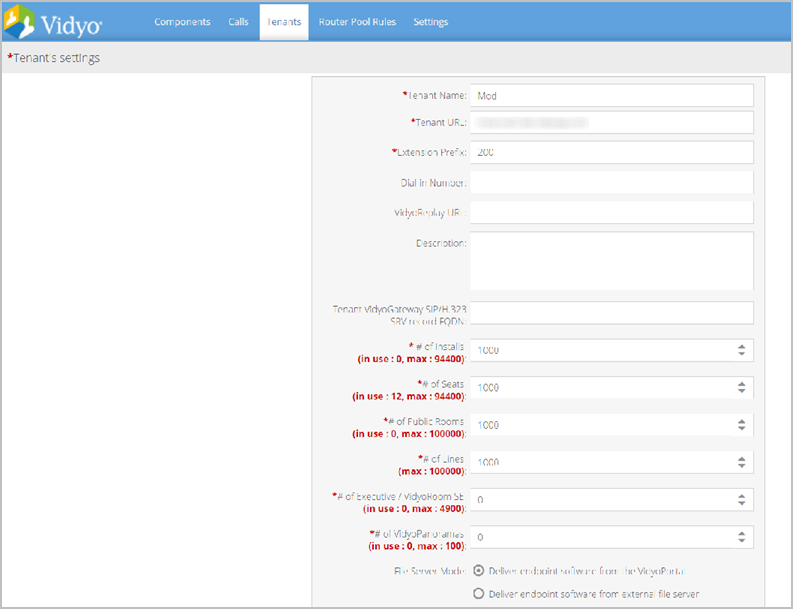
- Enter or edit the following information for the tenant:
- Enter a unique name identifying the tenant in the Tenant Name field. This name is displayed in the user directory and on the title bar of the client window when in a call.
- Enter a desired prefix in the Ext. Prefix field to be added to extension numbers. This allows multiple tenants to use the same extension numbers. An extension prefix is not required unless you have multiple tenants. (This can be likened to an area code on the phone system.)
- Enter the phone number dialed for voice-only participants when accessing conferences in the Dial-in Number field.
- Enter the URL the tenant’s users will use to access VidyoReplay in the VidyoReplay URL field. If the VidyoReplay option has not been licensed on your system, entering information in this field has no effect. This is also the case for Vidyo’s Federal implementation.
- Enter the URL that will resolve to the VidyoConnect for WebRTC Server to use for this tenant (for example, https://webrtc.example.com). It may contain the FQDN of the Session Manager or it may be an FQDN that will load balance across several Session Managers.
- Enter a short description in the Description field for informational purposes.
- Enter tenant support for inbound URI dialing from the VidyoGateway using SIP and H.323 protocols in the Tenant VidyoGateway SIP/H.323 SRV record FQDN field. For more information, refer to Call types and service examples in the VidyoGateway Administrator Guide.
- Enter the number of endpoint software installations in the # of Installs field to allocate to the tenant. The total number of installs for all tenants cannot exceed the total number specified in the system license.
- Enter the maximum number of seats this tenant can create in the # of Seats field. The maximum number of seats for all tenants cannot exceed the total number specified in the system license.
- Enter the maximum number of public rooms this tenant can create in the # of Public Rooms field. The maximum number of public rooms per tenant cannot exceed 100,000.
- Enter the maximum number of lines allocated to the tenant in the # of Lines field. Lines are pooled among all tenants.
- Enter the maximum number of Executive Desktop / VidyoRoom SE users allocated to the tenant in the # of Executives / VidyoRoom SE field.
- Executive Desktop users are a feature of the now standard VidyoLines licensing model. However, Executive Desktop licenses are purchased as separate licenses in your VidyoLines package. Each Executive Desktop has guaranteed system access. Therefore, if you purchase 100 VidyoLines and five Executive Desktops, then even when your system is at full capacity your five users with Executive Desktop privileges can still make calls.
- Select the appropriate File Server Mode radio button.
- Select the Deliver endpoint software from the VidyoPortal radio button if you want the tenant to upload endpoint software on VidyoPortal for their users.
- Select the Deliver endpoint software from external file server radio button if you want the tenant to host endpoint software (e.g. VidyoConnect for Desktop) on an external file server or a Content Delivery Network (CDN) for their users.
- Deselect the Enable Guests login checkbox if you want to prohibit guest logins on the tenant or leave selected.
- Deselect the Scheduled Room checkbox if you want to prohibit your tenants from using scheduled rooms or leave selected.
- Select the Enable Custom Role checkbox if you want to allow your tenants to receive customized VidyoConnect iFrame features and attributes.
- The Enable Custom Role checkbox only becomes active if the Enable Custom Role checkbox is selected on the Settings > Feature Settings > Custom Roles page.
- Enable or disable mobile access.
- Select the VidyoConnect radio button if you want to give the tenant access to VidyoConnect Mobile.
- Select the Disabled radio button if you want to restrict mobile access for the tenant.
- Allow inbound and outbound inter-portal communication by doing any of the following:
- Select the Allow Outbound checkbox and do not select the Allow Inbound checkbox to only allow calls to other Vidyo conferencing systems.
- Do not select the Allow Outbound checkbox and select Allow Inbound checkbox to only allow calls from other Vidyo conferencing systems.
- Click both checkboxes to allow both inbound and outbound calls.
|
Note Spaces are not valid characters. |
Enter the IP or FQDN address used by this tenant’s users to access the VidyoPortal in the Tenant URL field
|
Note If you have single-tenant system, you don’t have to define the URL of the system, but we recommend you do since the URL enables the link to the Admin portal. You can also use your server’s IP if it does not have a URL. Your tenants should be configured to use an FQDN and not an IP address to secure your Vidyo conferencing system with HTTPS and optionally encryption (using the secured Vidyo conferencing option). |
|
Note If you do create multiple tenants, it’s important to the proper functioning of the system that all tenants have extension prefixes with the same number of digits. If you assign the first tenant a two-digit extension prefix, you should assign all other tenants two- digit extension prefixes. If you assign the first tenant a three-digit extension prefix, you should assign all other tenants three-digit extension prefixes and so on. |
|
Note If a VidyoConnect for WebRTC Server is configured for a tenant, the tenant Admin will now be able to enable or disable VidyoConnect for WebRTC. |
|
Note Allocate only as many lines to each tenant as needed. For example, if you have a 50-line license, you could allocate up to 50 lines per tenant, which would permit one or two tenants to consume all the lines, leaving none for other tenants. |
VidyoConnect Mobile are built-in to your VidyoPortal. There are client apps for both Android phones and tablets and iOS iPhones and iPads. You don’t have to download the client programs to make them available to your users. End users just download them via the Android Market or the App Store respectively. They don’t have to pay anything to download them, but the first time a user logs in to your VidyoPortal, one of your licenses is consumed.
|
Note The Super Admin can enable or disable mobile access for all tenants, or the Super Admin can allow the individual Tenant Admins to control mobile access (this is the default). Regardless of whether the Super Admin enables or disables mobile access, creating a single tenant with an opposite setting takes precedence for every tenant. For more information on how to enable and disable mobile access as the Super Admin, see Enable mobile access.. |
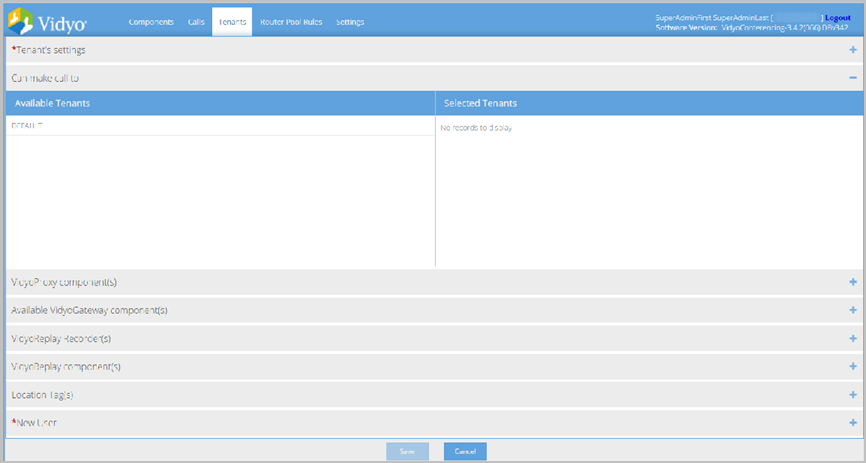
Enable cross-tenant access
This is step 2 of the 11 steps needed to configure a tenant. For the full list of steps when configuring a tenant, see Tenants table.
To enable cross-tenant access:
- Click the plus sign to expand the Can make call to section. If you have a multi-tenant system, you can enable cross‑tenant access for your tenants on this page. Cross-tenant access gives the users of one tenant the ability to place direct calls to and conference with users of another tenant. The list of available tenants displays in the Available Tenants list on the left.
- Select one or more tenants in the Available Tenants list and drag and drop it to the Selected Tenants list. This allows the users of the tenant that you are configuring to call users in the Selected Tenants list. To allow the selected tenant’s users to call the tenant being created or edited, you need to repeat this process for each selected tenant. (In other words, the operation provides only a one-way ability to initiate calls.) All tenants that display in the Selected Tenants list are eligible for cross‑tenant access. You can move a tenant from the Selected Tenants list back to the Available Tenants list by selecting it and clicking the Left Arrow button. You can also click Previous at any point and as many times as necessary to go back and change any of the data you entered.
Make the VidyoProxy components available
This is step 3 of the steps needed to configure a tenant. For the full list of steps when configuring a tenant, see see Tenants table.
This step is needed to assign the VidyoProxy to members of Tenants for VidyoManager (EMCP) proxy access.
To make the VidyoProxy components available:
- Click the plus sign to expand the VidyoProxy component(s) section.
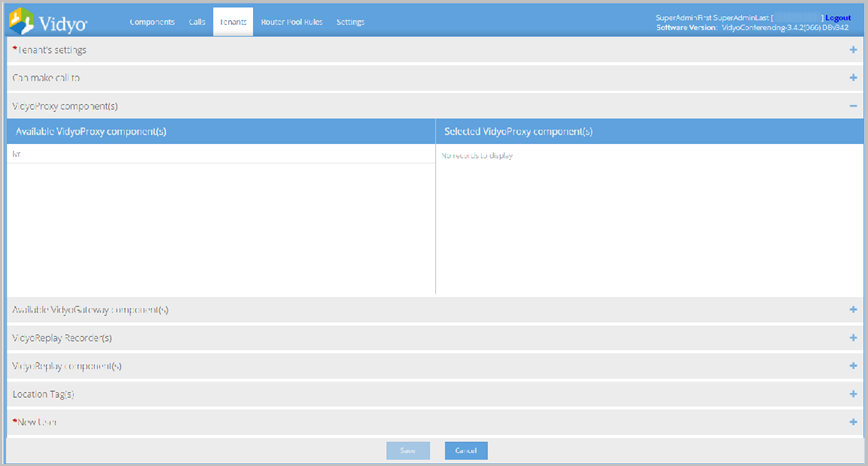
- Select one or more VidyoProxys in the Available VidyoProxy component(s) list and drag and drop it to the Selected VidyoProxy component(s) list. All VidyoProxy components that display in the Selected VidyoProxy component(s) list are available to the tenant. You can move a VidyoProxy from the Selected VidyoProxy component(s) list back to the Available VidyoProxy component(s) list by dragging and dropping.
In this section, you can make the VidyoProxy components you set up previously available to the tenant. The Tenant Admin can then choose among these components as necessary. The list of available VidyoProxys displays in the Available VidyoProxy component(s) list on the left.
Make the VidyoGateway components available
This is step 4 of the steps needed to configure a tenant. This step is optional. For the full list of steps when configuring a tenant, see Tenants table.
To make the VidyoGateway components available:
- Click the plus sign to expand the Available VidyoGateway component(s) section.
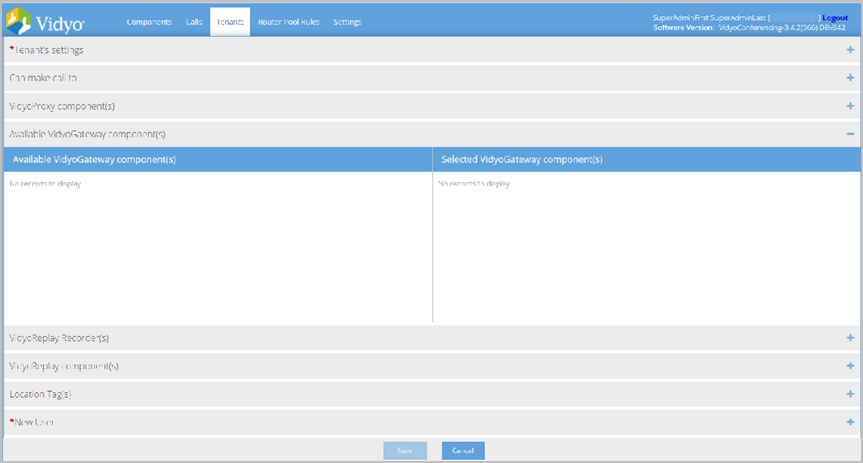
- Select one or more VidyoGateways in the Available VidyoGateway component(s) list and drag and drop it to the Selected VidyoGateway component(s) list. All VidyoGateway components that display in the Selected VidyoGateway component(s) list are available to the tenant. You can move a VidyoGateway from the Selected VidyoGateway component(s) list back to the Available VidyoGateway component(s) list by dragging and dropping.
In this section, you can make the VidyoGateway components you set up previously available to the tenant. The Tenant Admin can then choose among these components as necessary. The list of available VidyoGateways displays in the Available VidyoGateway component(s) list on the left.
|
Note If you are running a multi-tenant system and want to share a single VidyoGateway with multiple tenants, create a tenant that contains only the VidyoGateway(s) to be shared and set, in both directions, the visibility rules for each tenant. |
Make the VidyoReplay recorders available
This is step 5 of the steps needed to configure a tenant. This step is optional. For the full list of steps when configuring a tenant, see Tenants table.
To make the VidyoReplay recorders available:
- Click the plus sign to expand the VidyoReplay Recorder(s) section.
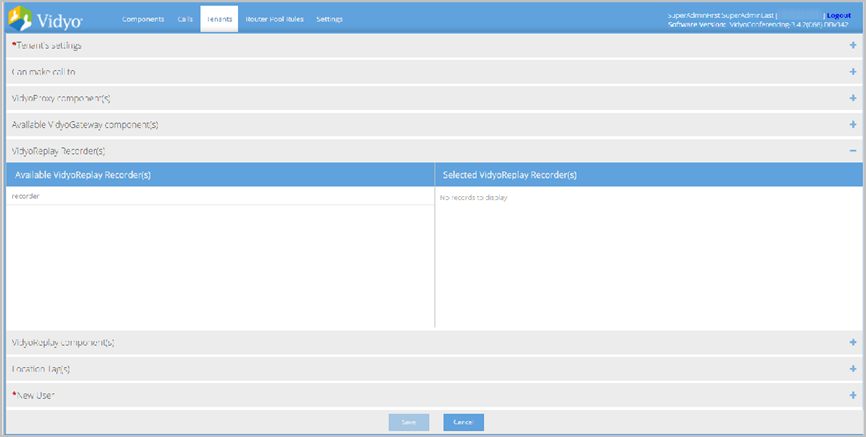
- Select one or more VidyoReplay recorders in the Available VidyoReplay Recorder(s) list and drag and drop it to the Selected VidyoReplay Recorder(s) list. All VidyoReplay recorders that display in the Selected VidyoReplay Recorder(s) list are available to the tenant. You can move a VidyoReplay recorder from the Selected VidyoReplay Recorder(s) list back to the Available VidyoReplay Recorder(s) list by dragging and dropping.
In this section, you can make the VidyoReplay recorders that you set up previously available to the tenant. The Tenant Admin can then choose among these components as necessary. The list of available VidyoReplay recorders display in the Available VidyoReplay Recorder(s) list on the left.
Make the VidyoReplay components available
This is step 5 of the steps needed to configure a tenant. This step is optional. For the full list of steps when configuring a tenant, see see Tenants table.
To make the VidyoReplay components available:
- Click the plus sign to expand the VidyoReplay component(s) section.
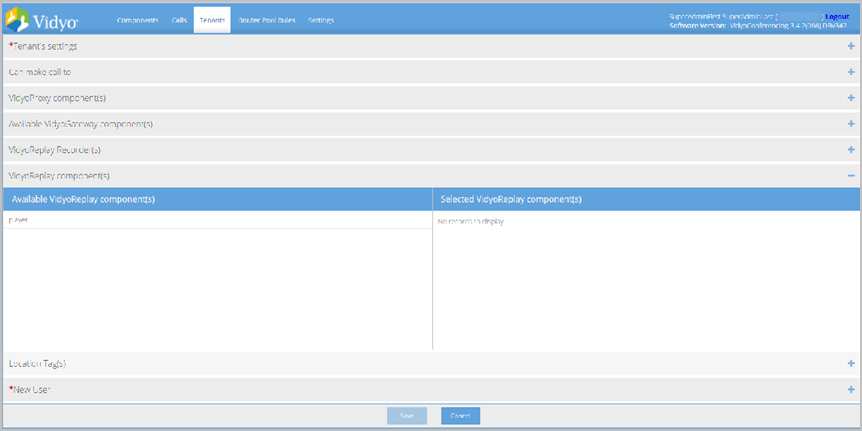
- Select one or more VidyoReplays in the Available VidyoReplay component(s) list and drag and drop it to the Selected VidyoReplay component(s) list. All VidyoReplay components that display in the Selected VidyoReplay component(s) list are available to the tenant. You can move a VidyoReplay from the Selected VidyoReplay component(s) list back to the Available VidyoReplay component(s) list by dragging and dropping.
In this section, you can make the VidyoReplay components that you set up previously available to the tenant. The Tenant Admin can then choose among these components as necessary. The list of available VidyoReplays display in the Available VidyoReplay component(s) list on the left.
Assign location tags
This is step 6 of the steps needed to configure a tenant. For the full list of steps when configuring a tenant, see see Tenants table.
|
Note Before you assign location tags, you must create them first. See Create user location tags. |
To assign location tags:
- Click the plus sign to expand the Location Tag(s) section. In this section, you can assign location tags to the Tenant. The Super Admin creates the location tags you can use. At a minimum you must at least assign the default tag to the tenant.
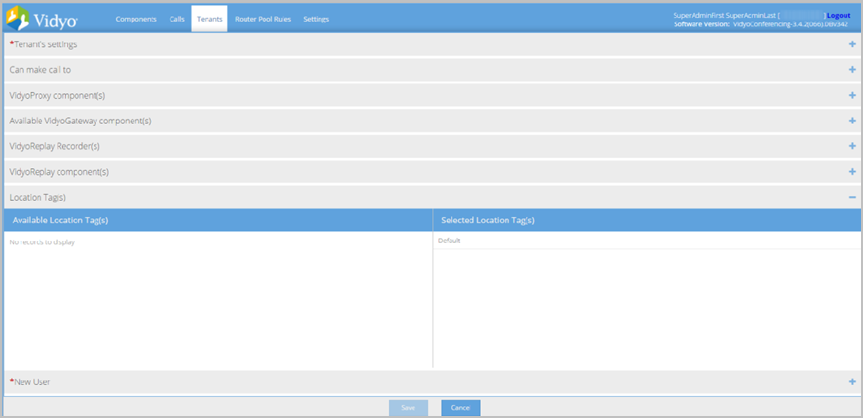
- Select one or more of the location tags in the Available Location Tag list and drag and drop it to the Selected Location Tag list.
Add the new tenant to your System
This is step 7 of the steps needed to configure a tenant. For the full list of steps when configuring a tenant, see see Tenants table.
To add the new tenant:
- Click the plus sign to expand the New User section.
- Enter the following fields:
- User Name
- Password
- Verify Password
- Display Name
- E-Mail Address
- Description (optional)
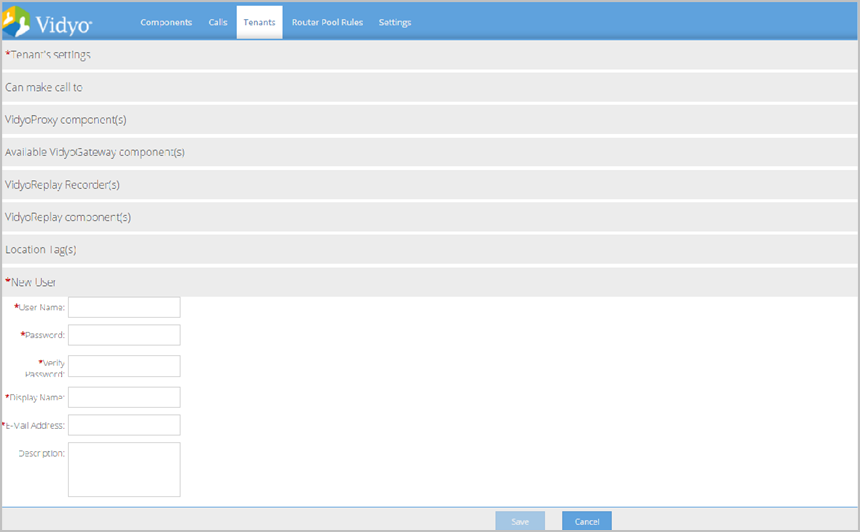
- Click Save to finish configuring this tenant.
Delete a tenant
Deleting a tenant deletes all its user accounts and public rooms.
To delete a tenant:
- Log in to the Super Admin portal using your Super Admin account. The Components page displays by default.
- Click the Tenants tab. The Tenants page displays.
- Select the checkbox for the tenant that needs to be removed.
- Click Delete at the bottom of the Tenants table.
- Click OK in the Confirmation pop-up that displays.
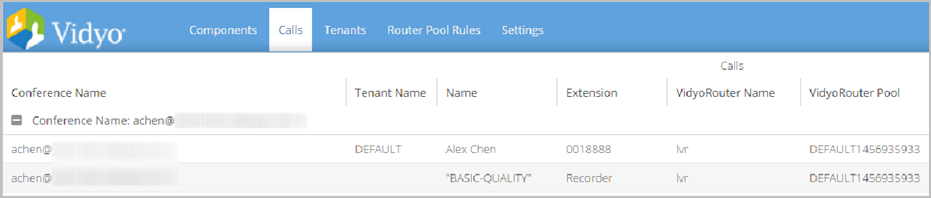
View current calls
The Calls page is available in both the Super Admin and Admin Portals.
- Click on the Calls tab to view current calls.
The Calls page in the Super Admin portal displays the following information:
- The Conference Name column shows the name of the conference.
- The Tenant Name column shows the name of the owner of the conference.
- The Name column shows the name of the caller.
- The Extension column shows the extension number of the caller.
- The VidyoRouter Name column shows which VidyoRouter the caller is using.
- The VidyoRouter Pool column shows the VidyoRouter pool to which the VidyoRouter belongs.
The Calls page in the Admin portal displays the following information:
- The Conference Name column shows the name of the conference.
- The Name column shows the name of the caller.
- The Extension column shows the extension number of the caller.
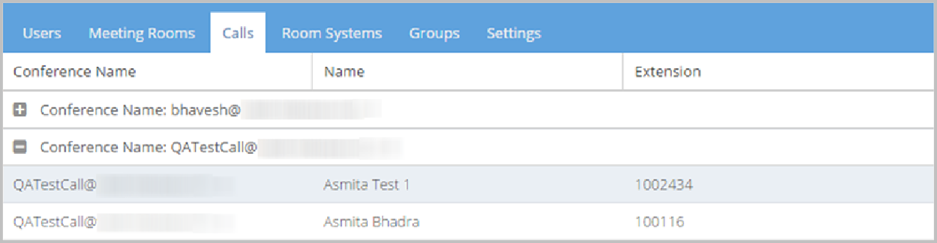
On both portals, the Conference Name column shows the name of the tenant to which the user belongs. You can hide the calls for a tenant by clicking the minus sign button to the left of the user’s name. It becomes the plus sign button (this button has toggle behaviour). Click it again to view the calls. Scroll to view calls by all tenants.
The information in this is page is for monitoring only. You cannot manage or control calls in the Calls page. For information about controlling a meeting, see Control meetings.
