4. Configure your server
Immediately after you have physically installed your Vidyo server, you must initially configure your Vidyo servers as described in this chapter.
For more information about installing the Vidyo server and for Vidyo server specifications, refer to the Vidyo Server Installation Guide. You can access this document and other Vidyo product documentation by registering at https://selfservice.vidyo.com/register/.
Super Admins are typically network system administrators responsible for the management of the VidyoPortal, VidyoRouter, and other Vidyo components.
As a Super Admin, after the Vidyo server is physically installed (as described in the Vidyo Server Installation Guide), you must do the following to initially configure your system:
- Vidyo utilizes SSH to provide remote access to the System Administrator Console on your Vidyo server over port 22 or 2222. In addition, Vidyo Customer Support may request access to your Vidyo server over this same port to assist in troubleshooting any of your customer issues.
- When setting up your Vidyo server, always be sure to configure your firewall to only permit SSH access from authorized networks and users. Vidyo strongly recommends blocking SSH access from the Internet. You can restrict Vidyo Customer Support SSH access by configuring your firewall or contact Vidyo Customer Support for other options.
- Restrict the access to your management applications (vr2conf and super) by performing one of the following:
- Change each management application to an alternate HTTP/HTTPS port and restrict access to them using your firewall.
- Move your management applications to the Management Interface (if you have not yet configured your Management Interface, it must be configured at this time). See 5. Configure RADIUS.
- Change your System Administrator Console default password. This must be changed after the first log in. For more information, see the following procedure.
- Change the default password of your Super Admin account.
- Configure the network settings are set at the System Console. You can view the settings (read- only) in the Super Admin portal.
Now you can perform additional tasks such as requesting Vidyo system licenses and apply the system license keys to your system, changing the remaining default passwords, selecting the system language, and making other configurations.
|
Note Some of these tasks may not be necessary when you first set up your system and are preset at the factory. However, you’ll need to know how to perform them if you want to change the factory defaults. |
Besides these tasks, the Super Admin can perform many other tasks, such as configuring the system settings, setting up components such as the VidyoManager, and configuring tenants. System configuration applies globally to the Vidyo conferencing system, including all the tenants of a multi-tenant system, and must be completed before creating users, groups, and rooms. Administrative tasks are managed by an Admin after the initial configuration has been completed. These tasks are explained in the following chapters.
Log in to the System Console of your server and change the default password
The very first time you log into your server, you are required to change the System Console default password to a more secure one. This procedure must be used to change the default password on all Vidyo servers including:
- VidyoPortal
- VidyoRouter
- VidyoGateway (an optional component)
|
Note The screenshots in this section show the System Admin Console (also known as the Shell menu) as seen after logging in via the terminal. The menu may look slightly different depending on how you connect and what tool you use for your connection. |
To log in to your server and change the default password:
- Connect a keyboard and a VGA display directly to your server.
- Log in using the default Administrator account:
- Enter admin at the “login as” prompt.
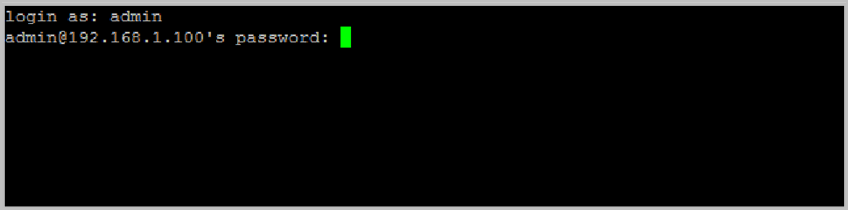
- Enter password at the “(current) UNIX Password” prompt. The password is case sensitive. You’ll be prompted to enter a new password and asked to enter it again.
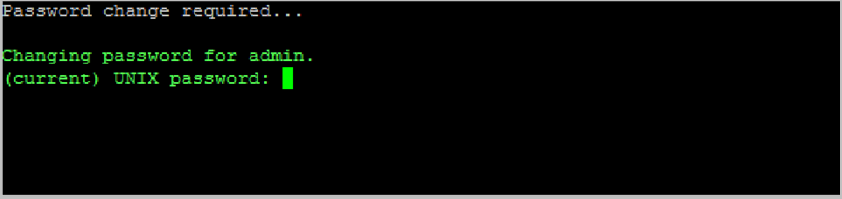
- Enter a new password at the “Enter new UNIX password:” prompt. When selecting a new password, follow these guidelines:
- The password should not be based on the dictionary.
- The password should not be similar to the old password.
- The default setting is at least three characters should be different from the old password.
- The password should not be too simple or too short. The algorithm here is a point system to satisfy the minimum password length (the default length is eight characters). The password gets extra points if it contains a number, upper case, lower case, or special character. Each point is equivalent to one character.
- The password should not be a case change only of the old password or should not be the reverse of the old password.
|
Note Press the Enter key after each prompt. |
User Name: admin
Password: password (case sensitive)
- Enter your new password again at the “Retype new UNIX password:” prompt. If the passwords don’t match, you’ll be prompted to try again. If the passwords match, the System Console menu opens immediately.
When you need to reset the password, use 13. Set 'admin' password.
Configure the network settings at the System Console
Each type of Vidyo server (VidyoPortal, VidyoRouter, VidyoGateway, or VidyoReplay) has a different default IP address and is necessary to perform the steps in this section:
- VidyoPortal: 192.168.1.100
- VidyoRouter: 192.168.1.105 (optional external component)
- VidyoGateway: 192.168.1.110 (optional external component)
- VidyoReplay: 192.168.1.115 (optional external component)
|
Note The basic network setup for each type of Vidyo server is basically the same. You must perform a network setup for each of your Vidyo servers. |
To configure the network settings at the System Console:
- Log in to the System Console. (The following illustrations show the System Console after you have logged in using a keyboard and VGA monitor plugged directly into the VidyoPortal.)
- Enter 1 to configure IP Address.
- Press the Enter key.
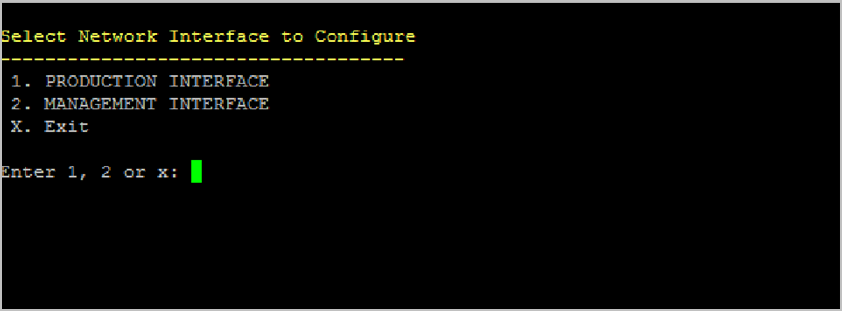
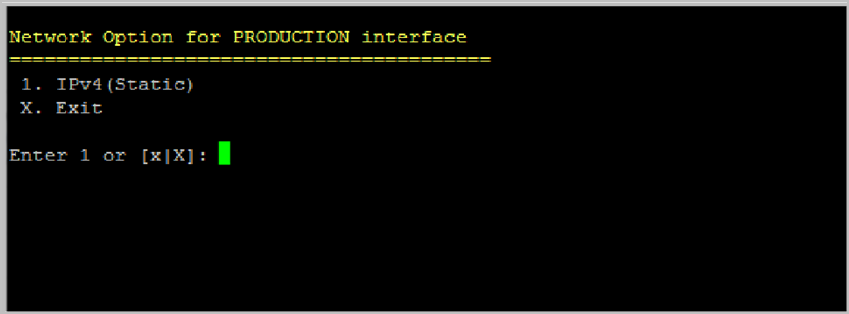
- Enter 1 to select the PRODUCTION INTERFACE option or 2 to select the MANAGEMENT INTERFACE option depending on which one contains the IP you want to configure.
- Press the Enter key.
|
Note The Management Interface should not be used to transfer any media. |
For more information, see 5. Configure RADIUS.
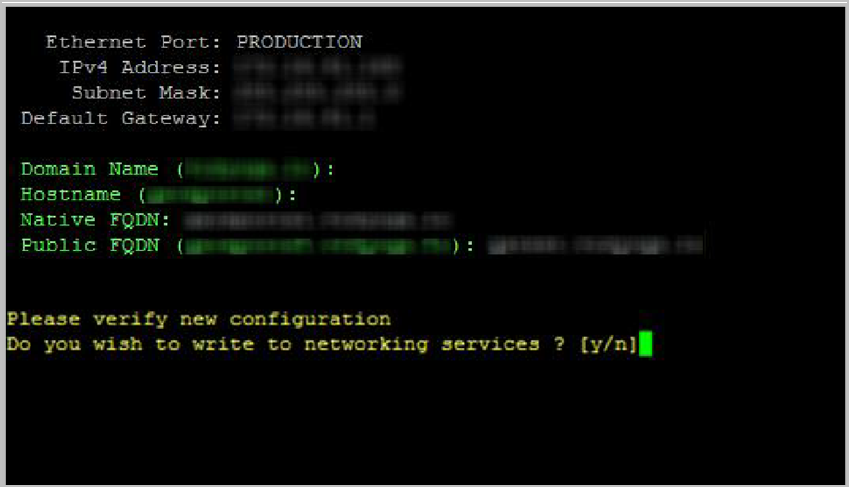
- Enter 1 to select the IPv4 (Static) option to set the server IP address, subnet mask, default gateway, and MAC addresses, hostname, domain name, and FQDN.
- Press the Enter key on your keyboard after providing each value.
- Enter y and press the Enter key after you have entered the required information.
- Enter 2 to configure DNS Nameserver to set the fully qualified domain name (if it exists) for the VidyoPortal and the IP addresses of the DNS servers:
- Enter two DNS server IP addresses.

- Enter y and press the Enter key once you have entered the required information. The System Console main menu displays.
- Enter the remaining network settings for the server as needed, confirming by typing y and pressing Enter after entering each prompt:
- Enter 3 to configure NTP Time Servers to set the NTP (Network Time Protocol) time server.
- Enter 4 to configure Time Zone to specify the time zone you are working in.
- Enter 5 to configure Ethernet Options to set the MTU (Maximum Transmission Unit) size if necessary.
- Enter 14 to restart the server.
- Press the Enter key.
|
Note Unless you’re using the Hot Standby software option, the Native FQDN and Public FQDN should be the same. If you are using the Hot Standby software option, the Native FQDN will be the Native FQDN of the Active or Standby VidyoPortal and the Public FQDN will be the same as the Cluster FQDN. See Apply the system license keys to your system and Appendix E. Hot Standby. The Public FQDN provided here is the same one you use when requesting your license keys from Vidyo Support. See Request system licenses and apply system license keys and Apply the system license keys to your system. |
If you have only one DNS server, use the same one twice.
When the server restarts, it will have the new network settings. Be sure to record your network settings, as you will need them for further configuration of your system.
Change the other default passwords
Besides changing the default password for the Vidyo Server (often referred to as the System Console or Admin Console), you should also change the following additional default passwords to ensure security and prevent unauthorized access:
- VidyoPortal/VidyoOne Super Administrator - To change this password, log into the Super Admin portal as described in Log in to the Super Admin portal.
- VidyoPortal/VidyoOne Administrator (per tenant) - Change the Administrator login as described in Edit a user. In a multi-tenant system, you must do this for each Tenant Administrator.
- VidyoRouter Administrator - This password is tied to the System Console password. See Log in to the System Console of your server and change the default password.
- VidyoManager Administrator - This password is tied to the System Console password.
- VidyoProxy Administrator - This password is tied to the System Console password.
For more information about System Administrator Console Menu Options, see System Console menu options and More Options System Console menu.
Multiple System Console accounts
System Console accounts can be used on the VidyoPortal, the VidyoRouter, and the VidyoGateway.
The System Console menu allows for the creation of up to ten System Console accounts. These accounts are created from the System Console.
To create System Console accounts:
- Log in to the System Console of your Vidyo Server.
- Enter m for more options. Enter 19 to access the User Maintenance menu.
- Enter A to add a user.
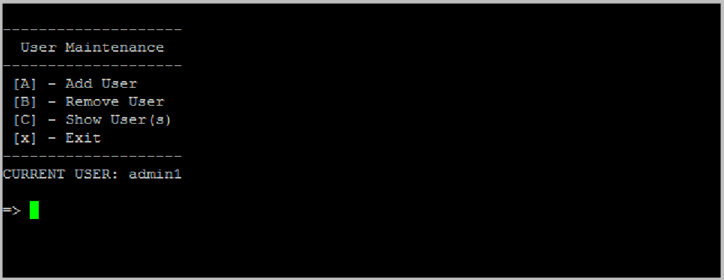
- Enter B to remove a user.
- Enter C to show all user accounts.
- Enter x to exit.
|
Note Press the Enter key after each prompt. |
The User Maintenance screen provides the following options:
The current user is also shown on the User Maintenance menu.
|
Note In addition to accessing the the System Console menu, the ten System Console accounts can also access the VidyoGateway Admin pages. Each new System Console account has a default password of password, which is case sensitive. The System Console accounts force a password change on first login. To prevent the use of default passwords, each new System Console user must be present at the local console during account creation. That user must log in and change their password and it must satisfy the password complexity requirements. |
System Console menu options
The following list takes you through configurations on the System Console menu options.
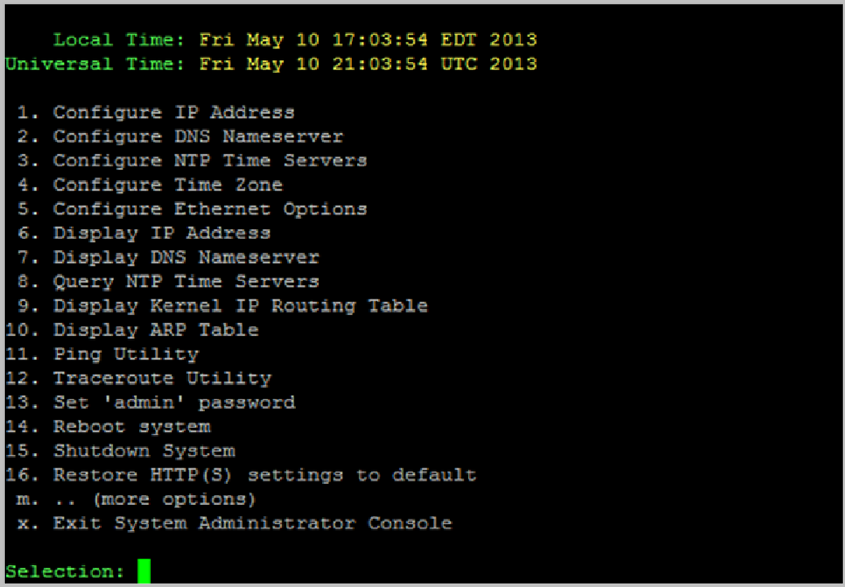
The following describes the options on the Main Menu.
- Configure IP Address – Enter 1 to configure your server IP address, subnet mask, and default gateway addresses. Initially, information must be configured locally. You can also use this option to configure the domain name, hostname, local FQDN, and public FQDN values. Configuration Example:
- Configure DNS Nameserver – Enter 2 to specify the Domain Nameserver.
- Configure NTP Time Servers – Enter 3 to set the Network Time Protocol (NTP) time server.
- Configure Time Zone – Enter 4 to specify the time zone of your server. Change as necessary for accurate billing records.
- Configure Ethernet Options – Enter 5 to set the Maximum Transmission Unit (MTU) size. The default is 1500. Only change this setting if your network MTU size is less than 1500. You can also turn autonegotiation on or off. Autonegotiation is on by default.
- Display IP Address – Enter 6 to view the IP address.
- Display DNS Nameserver – Enter 7 to view the DNS servers.
- Query NTP Time Servers – Enter 8 to query NTP server. This command doesn’t work if the domain name server is not defined.
- Display Kernel IP Routing Table – Enter 9 to view how your server is configured for Ethernet routing.
- Display ARP Table – Enter 10 to display router and MAC address information. This information is read-only.
- Ping Utility – Select 11 to ping network addresses. Use Ctrl+c to stop pinging.
- Traceroute Utility – Enter 12 to run the utility.
- If you provide an IP address but do not provide the port, the system will display the trace route to the IP address you specified.
- If you provide an IP address and also provide the port, the system will check if any ports in the firewall are blocking access to your Vidyo server, and then display them.
- Press Enter without providing an IP address to return to the Main Menu.
IP Address Mode: static
Network Interface: Production
IPv4 Address: 192.168.1.100
Subnet Mask: 255.255.255.0
Default Gateway: 192.168.1.1
Hostname: portal
Domain Name: example.com
Local FQDN: vidyoportal.example.com
Public FQDN: publicvidyoportal.example.com
|
Note The Public FQDN can match the Local or Native FQDN if desired. |
For more information, see Configure the network settings at the System Console and 5. Configure RADIUS.
Configuration Example:
Primary DNS Server for Host: 192.168.1.10
Secondary DNS Server for Host: 192.168.1.11
Change to synchronize the system with a different time server.
Configuration Example:
Primary NTP Server: pool.ntp.org
Configuration Example:
US/Eastern
Configuration Example:
MTU Size: 1500
Autonegotiation: On
|
Note When Autonegotiation is set to Off, it means 100/Full. |
Configuration Example:
Primary DNS Server for Host: 192.168.1.10
Secondary DNS Server for Host: 192.168.1.11
The system then prompts you for an IP address and port:
- Set ‘admin’ Password – Enter 13 for password menu options including functions to reset the admin password to the default value and change password.
- Reboot system – Enter 14 to restart your server. It can take up to a minute for your server to restart.
- Shutdown System – Shuts down your server.
- Restore HTTP(S) settings to default – Enter 16 to return HTTP settings to their default values (HTTP and port 80). This option is not available on the VidyoGateway and VidyoReplay System Console menu.
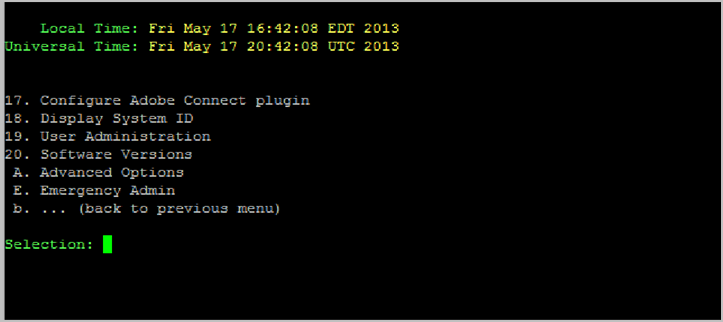
- ... (more options) – Enter m for a submenu containing additional options. See More Options System Console menu.
- Exit System Administrator Console – Enter x to close the SSH session. This command also closes SSH clients, if one is used.
More Options System Console menu
The following list describes commands on the More Options menu.
- Configure IP Address – Enter 1 to configure your server IP address, subnet mask, and default gateway addresses. Initially, information must be configured locally. You can also use this option to configure the domain name, hostname, local FQDN, and public FQDN values.
- Configure Adobe Connect Plugin – Enter 17 to configure your Adobe Connect Server and Adobe Connect Plugin.
- Display System ID – Enter 18 to display system identification data including the Local Time, Universal Time, and the System ID.
- User Administration – Enter 19 to perform user maintenance and create additional System Console accounts. See Multiple System Console accounts.
- Hot Standby – This menu item only displays if you have the Hot Standby option applied on your system. Select H to access the Hot Standby menu. See Appendix E. Hot Standby.
- Vidyo Support – This menu enables a two-stage authentication process for the Vidyo Customer Support team that enables them to remotely SSH into the VidyoPortal for troubleshooting purposes.
- Advanced Options – Enter A to access advanced options. See Advanced Options System Console menu.
- Restart Web Services – Enter W to restart your Web services.
- ... (back to previous menu) – Enter b to return to the Main Menu from More Options.
Advanced Options System Console menu
The following list describes commands on the Advanced Options menu.
- Enable FIPS-mode – Enter 1 to enable or disable FIPS-validated security. See Configure FIPS on your Vidyo server.
- Network Route Management – Enter 2 for Network Route Management options including functions to add, remove, or remove all routes; navigate routes using Next or Previous; and exit the Route Management menu and return to the Advanced Options menu. See Manage network routes.
- OCSP Information – Enter 3 to view OCSP settings and enable or disable OCSP. See Disable OCSP from the System Console.
- SNMP Administration – Enter 4 for SNMP menu options including functions to enable or disable SNMP, delete the local user-based security model, or configure traps. See Configure SNMP.
- Hostname Management – Enter 5 for Hostname Management menu options including functions to add, remove, or remove all hostames; navigate hostnames using Next or Previous; and exit the Hostname Management menu and return to the Advanced Options menu. See Manage hostnames.
- SSH Configuration – Enter 6 for SSH Configuration menu options. See Enable secure shell access on the Management Interface.
- TURN Configuration – Enter 8 to configure the TURN interface. See Configure the TURN interface.
- Websockets Configuration – Enter 9 to configure the WebSockets interface. See Configure the WebSockets interface.
- Web SSL/TLS Settings – Enter A for Web SSL/TLS Settings menu options. See Configure your web SSL/TLS settings.
- Media Priority – Enter P for Media Priority menu options including functions to add, remove, or remove all; navigate hostnames using Next or Previous; and exit the Hostname Management menu and return to the Advanced Options menu. See Configure your VidyoRouter media priority.
- Download Login/Welcome Banner – Enter R to download the welcome banner from your configured VidyoPortal.
- Configuration Service Accessibility – Enter S to configure whether you will allow VidyoRouters to register to the VidyoPortal on your production or your production and management interfaces. See Configure service accessibility.
- Web Server Mode – Enter W to access the Vidyo Web Server Mode menu, which allows you to enable or disable Privileged Mode.
- Exit Advanced Options – Enter x to return to the More Options menu from Advanced Options.
Configure FIPS on your Vidyo server
FIPS is the Federal Information Processing Standard 140-2. By default, FIPS mode is disabled on your Vidyo server.
FIPS Certified Modules include the following:
- Vidyo’s SDK has been FIPS 140-2 validated:
- Third party applications, such as Apache, Net-SNMP, OpenSSH, and OpenSSL, have been built using the FIPS-validated OpenSSL module.
http://csrc.nist.gov/groups/STM/cmvp/documents/140-1/1401val2012.htm
The following steps show you how to enable or disable FIPS mode from the System Console.
To disable or enable FIPS mode:
- Log in to the System Console.
- Enter m for more options.
- Enter A for Advanced Options.
- Enter 1 to disable FIPS-mode.
This setting toggles between disable and enable states. - Enter y to verify disabling (or enabling) the FIPS-mode change.
- Enter x to exit Advanced Options.
- Enter 14 to reboot the system.
When your system comes back online, FIPS is either disabled or enabled on your Vidyo server.
|
Note Press the Enter key after each prompt. |
Manage network routes
Static routes are used in deployments where Vidyo servers are in a DMZ between two segregated firewalls with no route for either internal or external traffic. Network Routes are also used when the Management Interface is enabled and you want to route traffic across that network.
|
Note Vidyo recommends this feature not replace adding proper network router to your DMZ to handle the proper subnet routes. Static route setup can lead to security vulnerabilities and should only be configured by advanced network administrators. Vidyo is not responsible for any possible security risk resulting from static route configurations. You can either add a static route for one host at a time or add a route covering a range of IP addresses using a subnet mask. |
For more information, see Add a network route.
To manage network routes:
- Log in to the System Console.
- Enter m for more options.
- Enter A for Advanced Options.
- Enter 2 to select the Network Route Management option.
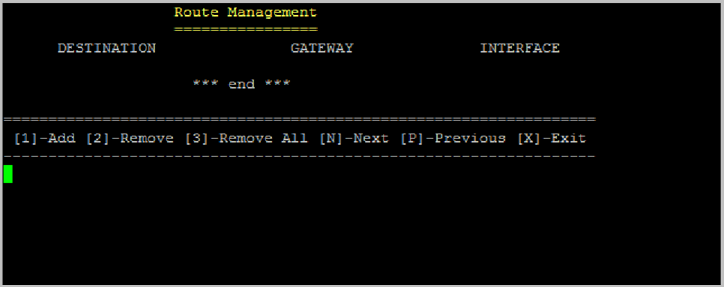
The Route Management screen displays. Use this screen to add, remove, or remove all routes, navigate routes using Next or Previous, and exit the Route Management screen. - Enter X to return to the Advanced Options menu.
|
Note Press the Enter key after each prompt. |
Add a network route
Currently, you can only add a static route for one host at a time. Adding static routes for a range of IP addresses (or subnet) is not supported at this time.
To add a network route:
- Log in to the System Console.
- Enter m for more options.
- Enter A for Advanced Options.
- Enter 2 to select the Network Route Management option.
- Enter 1 to add a Network Route.
- Enter the following information:
- Destination – Enter an IP address of the target machine for your network route.
You can either add a static route for one host at a time or add a route covering a range of IP addresses using a subnet mask. To specify a range (e.g.,172.16.1.0 – 172.16.1.255), you would enter 172.16.1.0/24, where 24 is the subnet mask. - Gateway – Enter the IP address of the Gateway through which your network route will travel.
- Interface – Enter the PRODUCTION (eth0) or MANAGEMENT (eth2) interface you want your network route to use.
|
Note Press the Enter key after each prompt. |
|
Note If you want to cancel adding your Network Route, press Enter while providing no Destination, Gateway, or Interface information. The system tells you that you must provide valid information and to press any key. Press any key to return to the Route Management screen. |
- Select y to confirm the change and add your Network Route.
Your Network Route is then listed and numbered on the top of the Route Management screen.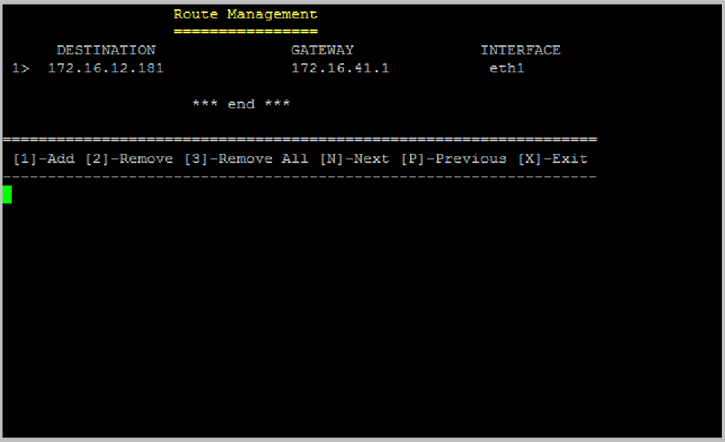
- Enter X to return to the Advanced Options menu.
Remove a network route
To remove a network route:
- Log in to the System Console.
- Enter m for more options.
- Enter A for Advanced Options.
- Enter 2 to select the Network Route Management option.
- Enter 2 to remove a Network Route.
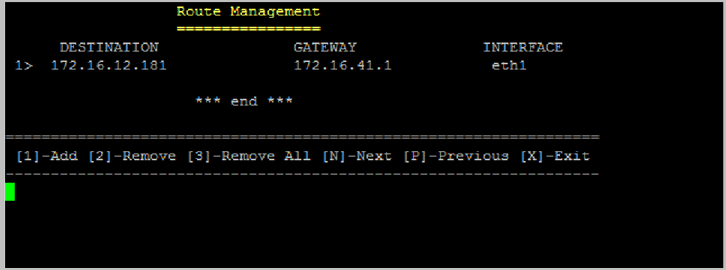
- Select y to confirm removing the selected Network Route.
- Select X to return to the Advanced Options menu.
|
Note Press the Enter key after each prompt. |
Remove all your network routes
To remove all your network routes:
- Log in to the System Console.
- Enter m for more options.
- Enter A for Advanced Options.
- Enter 2 to select the Network Route Management option.
- Enter 2 to remove allyour Network Routes.
- Enter y to confirm removing all of your Network Routes.
- Enter X to return to the Advanced Options menu.
|
Note Press the Enter key after each prompt. |
Navigate your network routes
To navigate your network routes:
- Log in to the System Console.
- Enter m for more options.
- Enter A for Advanced Options.
- Enter 2 to select the Network Route Management option.
- Enter N to navigate to the next Network Route.
- Enter P to navigate to the previous Network Route.
|
Note Press the Enter key after each prompt. |
- Enter X to return to the Advanced Options menu.
Configure SNMP
You can use SNMP (Simple Network Management Protocol) to manage and monitor the components over your entire Vidyo network. You can configure notifications or traps and send them to your network management server via SNMPv2 community strings or SNMPv3 users.
The VidyoPortal traps include the following object identifiers (OIDs):
- vidyoPortalManagerDown
- This trap indicates that the VidyoManager is not operational.
- Triggered when the VidyoManager goes down, this trap can be turned on or off by setting the notification in the System Console.
- This trap’s clearing notification is vidyoPortalManagerUp.
- vidyoPortalRouterDown
- This trap indicates that the VidyoRouter is not operational.
- Triggered when the VidyoRouter goes down, this trap can be turned on or off by setting the notification in the System Console.
- This trap’s clearing notification is vidyoPortalRouterUp.
- vidyoPortalVidyoProxyDown
- This trap indicates that the VidyoProxy is not operational.
- Triggered when the VidyoProxy goes down, this trap can be turned on or off by setting the notification in the System Console.
- This trap’s clearing notification is vidyoPortalVidyoProxyUp.
- vidyoPortalGatewayDown
- This trap indicates that the VidyoGateway component is not operational.
- Triggered when a VidyoGateway component goes down, this trap can be turned on or off by setting the notification in the System Console.
- This trap’s clearing notification is vidyoPortalGatewayUp.
- vidyoPortalReplayDown
- This trap indicates that the VidyoReplay component is not operational.
- Triggered when a VidyoReplay component goes down, this trap can be turned on or off by setting the notification in the System Console.
- This trap’s clearing notification is vidyoPortalReplayUp.
- VidyoPortalDown
- This trap indicates when the Tomcat or Apache web servers are not operational in your VidyoPortal.
- Triggered when the VidyoPortal goes down, this trap can be turned on or off by setting the notification in the System Console.
- This trap’s clearing notification is vidyoPortalUp.
- vidyoRouterVmConnLosAlert
- This trap provides an indication that the VidyoRouter has lost contact with the VidyoManager.
- Triggered when the VidyoRouter is unable to contact the VidyoManager, this trap can be turned on or off by setting the notification in the System Console.
- This trap’s clearing notification is vidyoRouterVmConnEstablishedAlert.
- vidyoRouterCascadeBrokenAlert
- This trap provides an indication that a conference cascade has been broken.
- Triggered when a conference cascade is broken, this trap can be turned on or off by setting the notification in the System Console.
- This trap’s clearing notification is vidyoRouterCascadeFixedAlert.
- vidyoRouterCascadeMediaQualityAlert
- This trap provides an indication that a conference cascade is having a problem with packet loss or jitter that may be affecting media quality in a conference.
- Triggered when a conference cascade is having a problem with packet loss or jitter, this trap can be turned on or off by setting the notification in the System Console.
- Specific threshold settings can be set for this trap via the SNMP manager as follows:
- vidyoRouterCascadeMediaAlertEnabled = TRUE
- vidyoRouterCascadeMediaJitterThreshold: 10000 (in µs)
- vidyoRouterCascadeMediaLossThreshold: 100 (1 = .01%)
- This trap repeats every 30 seconds as long as the condition persists.
- vidyoRouterParticipantMediaQualityAlert
- This trap provides an indication that a participant is having a problem with packet loss or jitter that may be affecting their media quality in a conference.
- Triggered when a participant is having a problem with packet loss or jitter, this trap can be turned on or off by setting the notification in the System Console.
- Specific threshold settings can be set for this trap via the SNMP manager as follows:
- vidyoRouterParticipantMediaAlertEnabled = FALSE
- vidyoRouterParticipantMediaJitterThreshold: 10000 (in µs)
- vidyoRouterParticipantMediaLossThreshold: 100 (1 = .01%)
- This trap repeats every 30 seconds as long as the condition persists.
- vidyoPortalFailoverOccurred
- This trap provides an indication that a VidyoPortal failover occurred.
- Triggered when a VidyoPortal failover occurs, this trap can be turned on or off by setting the notification in the System Console.
- This trap does not have a clearing notification.
- vidyoPortalLineConsumptionThresholdExceeded
- This trap provides an indication that the Lines license consumption threshold has been exceeded.
- Triggered when the Lines license consumption threshold has been exceeded, this trap can be turned on or off by setting the notification in the System Console.
- Specific threshold settings can be set for this trap via the SNMP manager. Measured as a percent, the default value is 0.
- This trap’s clearing notification is vidyoPortalLineConsumptionNormal.
- vidyoPortalInstallConsumptionThresholdExceeded
- This trap provides an indication that the installation license consumption threshold has been exceeded.
- Triggered when the installation license consumption threshold has been exceeded, this trap can be turned on or off by setting the notification in the System Console.
- Specific threshold settings can be set for this trap via the SNMP manager. Measured as a percent, the default value is 0.
- This trap does not have a clearing notification.
This value is enabled by default.
The default value is 10 ms.
The default value is 1%.
This value is disabled by default.
The default value is 10 ms.
The default value is 1%.
|
Note Some un-configurable object identifiers (OIDs) are standard on all Vidyo servers. With SNMP traps enabled, they provide notifications if the CPU, disk or memory utilization has reached its threshold (~80% utilization). The specific OIDs are cpuLoadReachedThreshold, diskReachedThreshold, and memoryReachedThreshold. For more information about Vidyo enterprise notifications, as well as Get, and Set Polling OIDs, download the Vidyo MIB file from the Vidyo Support Centre. If your VidyoPortal system uses the Hot Standby option and you are not using your management interface, your SNMP notifications will source from the shared IP address. Vidyo recommends configuring your VidyoPortal using a management interface so your SNMP notifications can be sourced from unique management interface IP addresses. In this case, your network management system (NMS) should be accessible over your management network. |
For more information, see 5. Configure RADIUS.
Enable SNMP
To enable SNMP:
- Log in to the System Console.
- Enter m for more options.
- Enter A for Advanced Options.
- Enter 4 to select the SNMP Administration option.
- Enter A to enable SNMP.
- Enter y to confirm the change and enable or disable SNMP.
- Enter X to exit the SNMP Administration menu.
- Enter x to exit Advanced Options.
- Enter 14 to reboot the system.
|
Note Press the Enter key after each prompt. |
The feature toggles between Enable and Disable states.
When your system comes back online, SNMP is then enabled (or disabled).
Configure an SNMP notification
You can configure notifications or traps that can be sent to your network management server via SNMP2 community strings or local SNMPv3 users. Notifications are created as either SNMPv2 or SNMPv3.
Delete an SNMP community string
To delete an SNMP community string:
- Log in to the System Console.
- Enter m for more options.
- Enter A for Advanced Options.
- Enter A to select the SNMP Administration option.
- Enter B to configure SNMPv2 Community String.
- Select from the menu based on the SNMPv2 Community String type desired:
- Enter 1 to delete the read-only SNMPv2 community string, and then enter y to confirm. After the read-only community string is deleted, the Delete ReadOnly Community String option toggles and becomes the Create ReadOnly Community String option.
- Enter 2 to delete a read-write SNMPv2 community string, and then enter y to confirm. After the read-write community string is deleted, the Delete ReadWrite Community String option toggles and becomes the Create ReadWrite Community String option.
- Enter x to return to the SNMP Administration menu.
|
Note Press the Enter key after each prompt. |
Configure an SNMPv2 community string
You can create two SNMPv2 community strings on your system that can access your network management server. One community string has read-only access and the other has read-write access.
To configure an SNMP community string:
- Log in to the System Console.
- Enter m for more options.
- Enter A for Advanced Options.
- Enter A to select the SNMP Administration option.
- Enter B to configure SNMPv2 Community String.
- Select from the menu based on the SNMPv2 Community String type desired:
- Enter 1 to create a read-only SNMPv2 community string, and then enter the read-only community string.
The user name must be at least eight characters and contain no spaces.
After the read-only community string is created, the Create ReadOnly Community String option toggles and becomes the Delete ReadOnly Community String option. - Enter 2 to create a read-write SNMPv2 community string, and then enter a read-write community string.
The user name must be at least eight characters and contain no spaces. - Enter y to confirm.
After the read-write community string is created, the Create ReadWrite Community String option toggles and becomes the Delete ReadWrite Community String option. - Enter x to return to the SNMP Administration menu.
|
Note Press the Enter key after each prompt. |
Delete an SNMPv2 community string
To delete an SNMP community string:
- Log in to the System Console.
- Enter m for more options.
- Enter A for Advanced Options.
- Enter A to select the SNMP Administration option.
- Enter B to configure SNMPv2 Community String.
- Select from the menu based on the SNMPv2 Community String type desired:
- Enter 1 to delete the read-only SNMPv2 community string, and then enter y to confirm. After the read-only community string is deleted, the Delete ReadOnly Community String option toggles and becomes the Create ReadOnly Community String option.
- Enter 2 to delete a read-write SNMPv2 community string, and then enter y to confirm. After the read-write community string is deleted, the Delete ReadWrite Community String option toggles and becomes the Create ReadWrite Community String option.
- Enter x to return to the SNMP Administration menu.
|
Note Press the Enter key after each prompt. |
Configure local SNMPv3 user (user-based security model)
To configure a local SNMPv3 user:
- Log in to the System Console.
- Enter m for more options.
- Select A for Advanced Options.
- Select 4 to select the SNMP Administration option.
- Select C to configure Local SNMPv3 User (User-based Security Model).
- Select from the menu based on the SNMPv3 User type desired.
- Enter 1 to create a local SNMPv3 user with read-only access, and then enter a user name for your local SNMPv3 user with read-only access.
The user name must be at least eight characters and contain no spaces. - Enter and verify an authentication password of your choice.
i. This password uses SHA authentication.
ii. The password must be at least eight characters.
iii. Vidyo does not currently support MD5 authentication. - Enter and verify a second authentication password of your choice.
i. This password uses AES encryption.
ii. The password must be at least eight characters.
iii. Vidyo does not currently support DES encryption.
After the read-only user is created, the Create ReadOnly User option toggles and becomes the Delete ReadOnly User option. - Select 2 to create a local SNMPv3 user with read-write access, and then enter a user name for your local SNMPv3 user with read-write access.
The user name must be at least eight characters and contain no spaces. - Enter and verify an authentication password of your choice.
i. This password uses SHA authentication.
ii. The password must be at least eight characters.
iii. Vidyo does not currently support MD5 authentication. - Enter and verify a second authentication password of your choice.
i. This password uses AES encryption.
ii. The password must be at least eight characters.
iii. Vidyo does not currently support DES encryption.
After the read-write user is created, the Create ReadWrite User option toggles and becomes the Delete ReadWrite User option. - Enter x to return to the SNMP Administration menu.
|
Note Press the Enter key after each prompt. |
Delete a local SNMPv3 user (user-based security model)
To delete a local SNMPv3 user:
- Log in to the System Console.
- Enter m for more options.
- Select A for Advanced Options.
- Select 4 to select the SNMP Administration option.
- Select C to configure Local SNMPv3 User (User-based Security Model).
- Select from the menu based on the SNMPv3 User type desired.
- Select 1 to delete the local SNMPv3 user with read-only access.
- Select y to confirm.
- After the read-only user is deleted, the Delete ReadOnly User option toggles and becomes the Create ReadOnly User option.
- Select 2 to delete the local SNMPv3 user with read-write access.
- Select y to confirm.
After the read-write user is deleted, the Delete ReadWrite User option toggles and becomes the Create ReadWrite User option. - Select x to return to the SNMP Administration menu.
|
Note Press the Enter key after each prompt. |
Create an SNMPv2 notification
To create a SNMPv2 notification:
- Log in to the System Console.
- Enter m for more options.
- Select A for Advanced Options.
- Enter 4 to select the SNMP Administration option.
- Enter D to configure SNMP Notification.
The SNMP Notification menu displays. - Enter 1 to select the SNMPv2 Notification option.
The SNMPv2 Notification menu displays. - Enter 1 to select the SNMPv2 Notification option.
- Enter the IP or FQDN address of your network management server.
- Enter I or T to configure an Inform or Trap notification type.
The system asks for the values in the remaining steps if your notification type is Inform or Trap. - Enter your community string.
The community string must be at least eight characters and contain no spaces. - Enter y to confirm.
After SNMPv2 notifications are created, they are listed in the top of the SNMPv2 Notification menu and Delete SNMPv2 Notification option displays as a second option. - Enter X to return to the SNMP Notification menu.
|
Note Press the Enter key after each prompt. |
Delete an SNMPv2 notification
To delete an SNMPv2 notification:
- Log in to the System Console.
- Enter m for more options.
- Select A for Advanced Options.
- Enter 4 to select the SNMP Administration option.
- Enter D to configure SNMP Notification.
The SNMP Notification menu displays. - Enter 1 to select the SNMPv2 Notification option.
The SNMPv2 Notification menu displays. - Enter 1 to select the SNMPv2 Notification option.
- Enter 2 to select the Delete SNMPv2 Notification option.
- Enter the number of the notification user you wish to delete.
- Select y to confirm.
- Select X to return to the SNMP Notification menu.
|
Note Press the Enter key after each prompt. |
Create a SNMPv3 notification
To create a SNMPv3 notification:
- Log in to the System Console.
- Enter m for more options.
- Select A for Advanced Options.
- Enter 4 to select the SNMP Administration option.
- Enter D to configure SNMP Notification.
The SNMP Notification menu displays. - Enter 2 to select the SNMPv3 Notification option.
The SNMP Notification menu displays. - Enter 1 to select the SNMPv3 Notification User option.
- Enter the IP or FQDN address of your network management server.
- Enter I or T to configure an Inform or Trap notification type.
The system asks for the values in the remaining steps if your notification type is Inform or Trap. - Enter your Remote Engine ID if necessary.
- Enter your user name.
The user name must be at least eight characters and contain no spaces. - Enter and verify an authentication password of your choice.
a. This password uses SHA authentication
b. The password must be at least eight characters
c. Vidyo does not currently support MD5 authentication - Enter and verify a second authentication password of your choice.
a. This password uses AES authentication
b. The password must be at least eight characters
c. Vidyo does not currently support DES authentication - Select X to return to the SNMP Notification menu.
|
Note Press the Enter key after each prompt. |
After SNMPv3 notification users are created, they are listed in the top of the SNMPv3 Notification menu and Delete SNMPv3 Notification User displays as a second option.
Delete an SNMPv3 notification
To delete an SNMPv3 notification:
- Log in to the System Console.
- Enter m for more options.
- Enter A for Advanced Options.
- Enter 4 to select the SNMP Administration option.
- Enter D to configure SNMP Notification.
The SNMP Notification menu displays. - Enter 1 to select the SNMPv3 Notification option.
The SNMPv3 Notification menu displays. - Enter 1 to select the SNMPv3 Notification option.
- Enter 2 to select the Delete SNMPv3 Notification option.
- Enter the number of the notification user you wish to delete.
- Enter y to confirm.
- Enter X to return to the SNMP Notification menu.
|
Note Press the Enter key after each prompt. |
Manage hostnames
Hostname entries can be added to a single hostfile on your VidyoPortal. These entries are used to map an IP addresses to a specific Hostname or FQDN.
|
Note Vidyo recommends that this feature not replace adding proper records to your internal and external DNS servers. It should only be used to support DMZ deployments where there is no DNS server access from the DMZ and allowing the different servers to properly locate each other. The Cluster FQDN of the VidyoPortal can be added to the hostfile to avoid making DNS queries from your VidyoManager, VidyoRouter, and VidyoProxy to the same VidyoPortal on which they reside. If you use the same Public FQDN as your Cluster FQDN, then it is not necessary to add the Cluster FQDN to your hostfile. |
To manage hostnames:
- Log in to the System Console.
- Enter m for more options.
- Enter A for Advanced Options.
- Enter 5 to select the Hostname Management option.
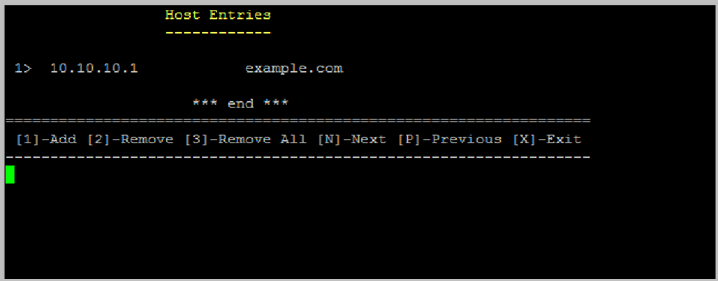
The Host Entries screen displays. Use this screen to add, remove, or remove all hostnames; navigate hostnames using Next or Previous; and exit the Host Entries screen. - Select X to return to the Advanced Options menu.
|
Note Press the Enter key after each prompt. |
Add a hostname
To add a hostname:
- Log in to the System Console.
- Enter m for more options.
- Enter A for Advanced Options.
- Enter 5 to select the Hostname Management option.
- Enter 1 to add a Hostname.
- Enter the following information:
- Hostname/FQDN – Enter a Hostname or FQDN you want to map to a specific IP address.
- IP Address – Enter the IP address you want to map to the specific Hostname or FQDN.
- Enter y to confirm the change and add your Hostname.
Your Hostname is then listed and numbered on the top of the Host Entries screen.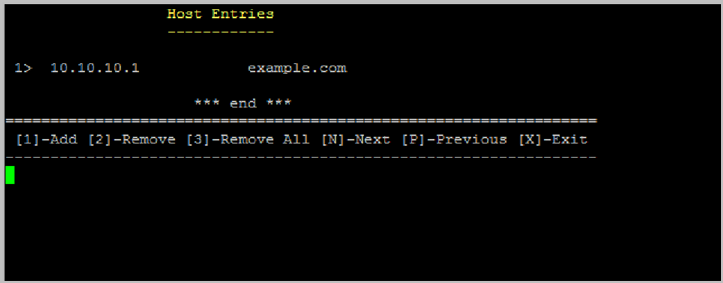
- Enter X to return to the Advanced Options menu.
|
Note Press the Enter key after each prompt. |
|
Note If you want to cancel adding your Hostname, press Enter while providing no Hostname/FQDN or IP Address information. The system tells you that you must provide valid information and to press any key. Press any key to return to the Host Entries screen. |
Remove a hostname
To remove a hostname:
- Log in to the System Console.
- Enter m for more options.
- Enter A for Advanced Options.
- Enter 5 to select the Hostname Management option.
- Enter 2 to remove a Hostname.
- Enter the corresponding number of the Hostname you want to remove.

- Enter y to confirm removing the selected Hostname.
- Enter X to return to the Advanced Options menu.
|
Note Press the Enter key after each prompt. |
Remove all your hostnames
To remove all hostnames:
- Log in to the System Console.
- Enter m for more options.
- Enter A for Advanced Options.
- Enter 5 to select the Hostname Management option.
- Enter 2 to remove all Hostnames.
- Enter y to confirm removing all Hostnames.
- Enter X to return to the Advanced Options menu.
|
Note Press the Enter key after each prompt. |
Navigate your hostnames
To navigate your hostnames:
- Log in to the System Console.
- Enter m for more options.
- Enter A for Advanced Options.
- Enter 5 to select the Hostname Management option.
a. Enter N to navigate to the next Hostname.
b. Enter P to navigate to the previous Hostname. - Select X to return to the Advanced Options menu.
|
Note Press the Enter key after each prompt. |
Enable secure shell access on the Management Interface
As a System Console Administrator, you can enable secure shell access (SSH) to the Management Interface of your system for you and other System Console Administrator accounts. This option is disabled by default.
- Log in to the System Console.
- Enter m for more options.
- Enter A for Advanced Options.
- Enter 5 to enable SSH.
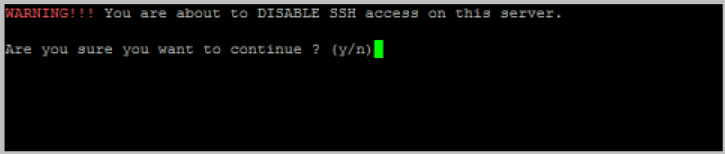
- Enter y to change the current setting.
|
Note When SSH is enabled on your Vidyo server, it runs on port 2222. Secure shell access (SSH) is only permitted on the Management interface. If you enable SSH, be sure to setup whitelist IP filters to ensure access is only granted to specific machines. |
Enable an Emergency Admin user
As a System Console Administrator, you can enable a single Emergency Admin user. This option is disabled by default.
|
Note The Emergency Admin user can only access the system with a directly connected keyboard and monitor. |
The Emergency Admin user can only log in via the System Console and re-enable and reset a System Console Admin user’s password. When enabled, the Emergency Admin user’s default password is password. You should immediately change this password; however, note that this password does not have to adhere to the password guidelines explained on page 26.
To reset a System Console Admin user’s password, you must know the username. The user’s password is automatically reset to the default password, which is password.
To enable an emergency admin user:
- Log in to the System Console.
- Enter m for more options.
- Enter A for Advanced Options.
- Enter 7 to select Emergency User.
- Enter A to add (or remove) the emergency account.
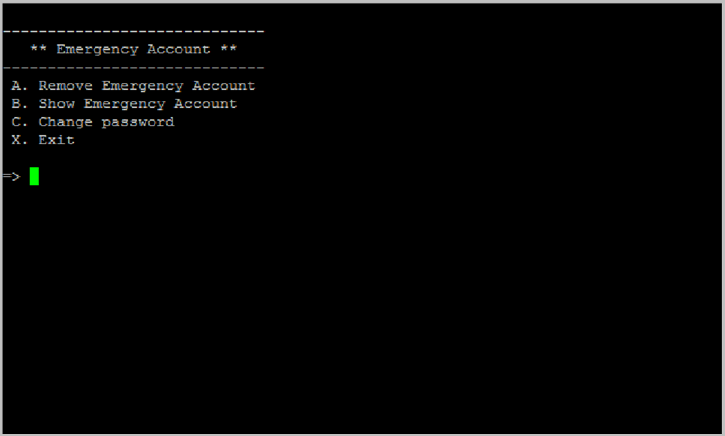
- Enter B to show the emergency account.
- Enter C to change the password of the emergency account.
|
Note Press the Enter key after each prompt. |
|
Note When enabled, the Emergency Admin user’s default password is password. You should immediately change this password; however, note that this password does not have to adhere to the password guidelines explained on page 26. |
Configure your SSH port
You can configure your SSH port to either 22 or 2222.
To configure your SSH port:
- Log in to the System Console.
- Enter m for more options.
- Enter A for Advanced Options.
- Enter 6 to select the SSH Configuration option.
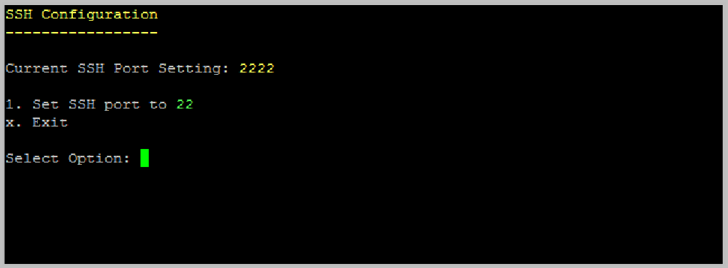
- Enter 1 to toggle 22 and 2222 options.
- Enter y to confirm.
- Enter X to exit.
- Enter x to exit Advanced Options.
- Enter 14 to reboot the system.
When your system comes back online, your SSH port is changed.
|
Note Press the Enter key after each prompt. |
Configure the TURN interface
This section describes how to configure the TURN interface. You must do this if you are configuring Native WebRTC for the VidyoPortal. See Configure Native WebRTC for the VidyoPortal.
To configure the TURN interface:
- Log in to the System Console.
- Enter m for more options.
- Enter A for Advanced Options.
- Enter 8 for TURN Configuration.
- Enter the TURN interface IP address and subnet mask.

- Enter x to return to the Advanced Options menu.
|
Note Press the Enter key after each prompt. |
|
Note Enter Y or N to confirm all changes after each selection. |
Configure the WebSockets interface
This section describes how to configure the WebSockets interface. You must do this if you are configuring Native WebRTC for the VidyoPortal. See Configure Native WebRTC for the VidyoPortal.
- Log in to the System Console.
- Enter m for more options.
- Enter A for Advanced Options.
- Enter 9 for Websockets Configuration.
- Enter the WebSockets interface IP address and subnet mask.
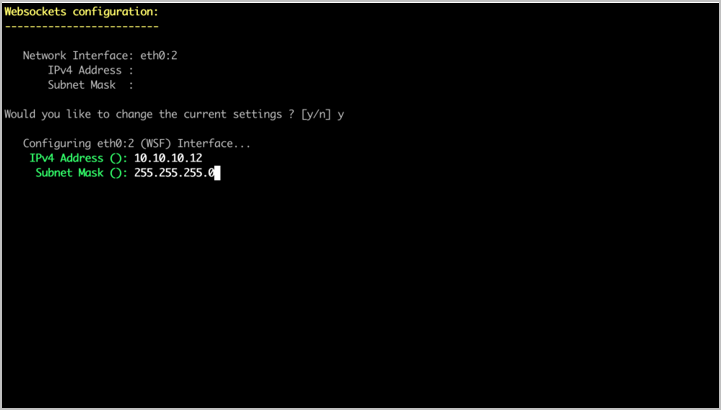
- Enter x to return to the Advanced Options menu.
|
Note Press the Enter key after each prompt. |
|
Note Enter Y or N to confirm all changes after each selection. |
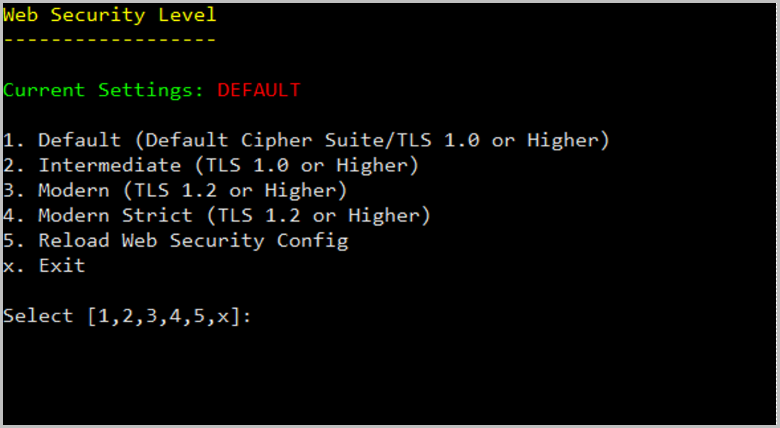
Configure your web SSL/TLS settings
You can configure your web SSL/TLS settings to ensure that your network is always secure.
To configure your web SSL/TLS settings:
- Log in to the System Console.
- Enter m for more options.
- Enter A for Advanced Options.
- Enter A to select the Web SSL/TLS settings option.
- Select the appropriate Web SSL/TLS setting to enable the desired level of security for your network.
-
Mode TLS Versions Cipher Suites (in server-preferred order) Default 1.0 (deprecated)
1.1 (deprecated)
1.2
1.3
TLS 1.3
- TLS_AES_256_GCM_SHA384
- TLS_CHACHA20_POLY1305_SHA256
- TLS_AES_128_GCM_SHA256
TLS 1.2
- TLS_ECDHE_RSA_WITH_AES_256_GCM_SHA384
- TLS_DHE_RSA_WITH_AES_256_CCM_8
- TLS_DHE_RSA_WITH_AES_256_CCM
- TLS_ECDHE_RSA_WITH_AES_128_GCM_SHA256
- TLS_DHE_RSA_WITH_AES_128_GCM_SHA256
- TLS_DHE_RSA_WITH_AES_128_CCM_8
- TLS_DHE_RSA_WITH_AES_128_CCM
- TLS_ECDHE_RSA_WITH_AES_256_CBC_SHA384
- TLS_DHE_RSA_WITH_AES_256_CBC_SHA256
- TLS_ECDHE_RSA_WITH_AES_128_CBC_SHA256
- TLS_DHE_RSA_WITH_AES_128_CBC_SHA256
- TLS_ECDHE_RSA_WITH_AES_256_CBC_SHA
- TLS_DHE_RSA_WITH_AES_256_CBC_SHA
- TLS_ECDHE_RSA_WITH_AES_128_CBC_SHA
- TLS_DHE_RSA_WITH_AES_128_CBC_SHA
- TLS_RSA_WITH_AES_256_GCM_SHA384
- TLS_RSA_WITH_AES_256_CCM_8
- TLS_RSA_WITH_AES_256_CCM
- TLS_RSA_WITH_AES_128_GCM_SHA256
- TLS_RSA_WITH_AES_128_CCM_8
- TLS_RSA_WITH_AES_128_CCM
- TLS_RSA_WITH_AES_256_CBC_SHA256
- TLS_RSA_WITH_AES_128_CBC_SHA256
- TLS_RSA_WITH_AES_256_CBC_SHA
- TLS_RSA_WITH_AES_128_CBC_SHA
Intermediate 1.0 (deprecated)
1.1 (deprecated)
1.2
1.3
TLS 1.3
- TLS_AES_256_GCM_SHA384
- TLS_CHACHA20_POLY1305_SHA256
- TLS_AES_128_GCM_SHA256
TLS 1.2
- TLS_ECDHE_RSA_WITH_AES_256_GCM_SHA384
- TLS_ECDHE_RSA_WITH_AES_128_GCM_SHA256
- TLS_DHE_RSA_WITH_AES_256_GCM_SHA384
- TLS_DHE_RSA_WITH_AES_128_GCM_SHA256
- TLS_ECDHE_RSA_WITH_AES_256_CBC_SHA384
- TLS_ECDHE_RSA_WITH_AES_256_CBC_SHA
- TLS_DHE_RSA_WITH_AES_256_CCM_8
- TLS_DHE_RSA_WITH_AES_256_CCM
- TLS_DHE_RSA_WITH_AES_256_CBC_SHA256
- TLS_DHE_RSA_WITH_AES_256_CBC_SHA
Modern 1.2
1.3
TLS 1.3
- TLS_AES_256_GCM_SHA384
- TLS_CHACHA20_POLY1305_SHA256
- TLS_AES_128_GCM_SHA256
TLS 1.2
- TLS_ECDHE_RSA_WITH_AES_256_GCM_SHA384
- TLS_ECDHE_RSA_WITH_AES_128_GCM_SHA256
- TLS_ECDHE_RSA_WITH_AES_256_CBC_SHA384
- TLS_ECDHE_RSA_WITH_AES_128_CBC_SHA256
Modern Strict 1.2
1.3
TLS 1.3
- TLS_AES_256_GCM_SHA384
- TLS_CHACHA20_POLY1305_SHA256
- TLS_AES_128_GCM_SHA256
TLS 1.2
- TLS_ECDHE_RSA_WITH_AES_256_GCM_SHA384
- TLS_ECDHE_RSA_WITH_AES_128_GCM_SHA256
- TLS_ECDHE_RSA_WITH_CHACHA20_POLY1305_SHA256
- Enter 1 to select the Default (Default Cipher Suite/TLS 1.0 or Higher) option.
- Enter 2 to select the Intermediate (TLS 1.0 or Higher) option.
- Enter 3 to select the Modern (TLS 1.2 or Higher) option.
- Enter 4 to select the Modern Strict (TLS 1.2 or Higher) option.
- Enter 5 to select the Reload Web Security Config option to reload the Apache server with the new settings without dropping active calls. New sessions will automatically use the updated settings.
- Anchor Version 21.6.14 or later (21.6.x Anchor branch)
- Anchor Version 22.4.11 or later (22.4.x Anchor branch)
- Feature Version 23.1.1 or later
- Enter x to return to the Advanced Options menu.
|
Note Press the Enter key after each prompt. |
|
Note Enter Y or N to confirm all changes after each selection. |
|
Note You should use the Reload Web Security Config option after selecting the appropriate mode to apply the changes. |
|
Note MODERN STRICT mode is only available in the following versions: |
|
Note For additional information about these settings, refer to the following web page: https://wiki.mozilla.org/Security/Server_Side_TLS. |
Configure your VidyoRouter media priority
You can configure the media priority to allow media traffic on your production interface only, or you can allow it on both production and management interfaces but must give priority to either one.
To configure your VidyoRouter media priority:
- Log in to the System Console.
- Enter m for more options.
- Enter A for Advanced Options.
- Enter P to select the Media Priority option.
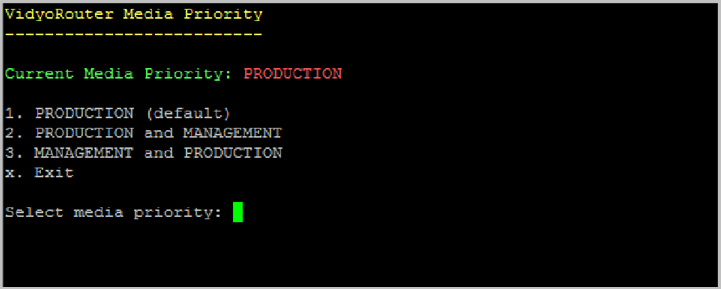
- Enter 1 to select the PRODUCTION (default) option to only allow media traffic on your production interface, and then enter y to confirm.
- Enter 2 to select the PRODUCTION and MANAGEMENT option to allow media traffic on both production and management interfaces, but give priority to production, and then enter y to confirm.
- Enter 3 to select the MANAGEMENT and PRODUCTION option to allow media traffic on both production and management interfaces, but give priority to management, and then enter y to confirm.
- Enter x to return to the Advanced Options menu.
|
Note Press the Enter key after each prompt. |
|
Note Confirming any change to your VidyoRouter media priority selection will disrupt active calls on your system. |
Select from the menu based on the interface prioritzation you want your VidyoRouter to give media in your system:
Configure service accessibility
You can configure whether you will allow VidyoRouters to register to the VidyoPortal on your production interface only, or both your production and management interfaces.
To configure service accessibility:
- Log in to the System Console.
- Enter m for more options.
- Enter A for Advanced Options.
- Enter S to select the Service Accessibility option.
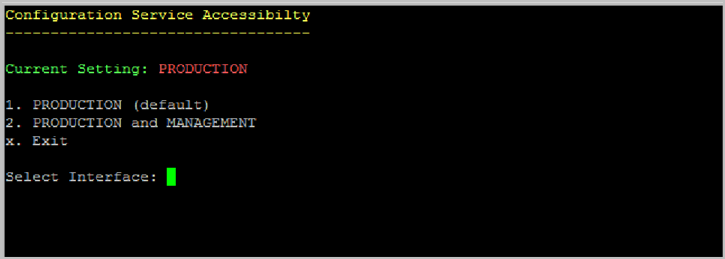
- Enter 1 to select the PRODUCTION (default) option to only allow VidyoRouters to register to the VidyoPortal on your production interface, and then enter y to confirm.
- Enter 2 to select the PRODUCTION and MANAGEMENT option to permit media traffic on both production and management interfaces, but give priority to production, and then enter y to confirm.
- Enter x to exit Advanced Options.
|
Note Press the Enter key after each prompt. |
|
Note Confirming any change to your service accessibility selection will disrupt active calls on your system. |
Select from the menu based on which interfaces you want to allow your VidyoRouter to register to the VidyoPortal:
Log in to the Super Admin portal
Now that you have connected your Vidyo Server to the network, you must log in as the Super Admin and configure the VidyoPortal to ensure that it can function within your other Vidyo servers.
To log in as the Super Admin:
- Enter the IP or FQDN address (Fully Qualified Domain Name) for the VidyoPortal in the address bar of a web browser, followed by a forward slash and the word “super”: http://[IP or FQDN address]/super
- Log in using the new password that you have set. Otherwise, log in using the default Super Admin user name and password:
User Name: super
Password: password (case sensitive)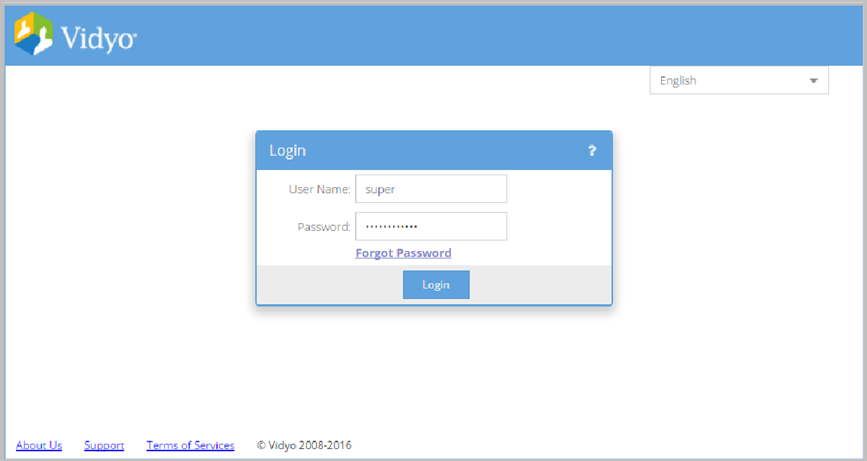
Check the status of the components
To check the status of the components:
- Log in to the Super Admin portal using your Super Admin account.
- Click the Components tab.
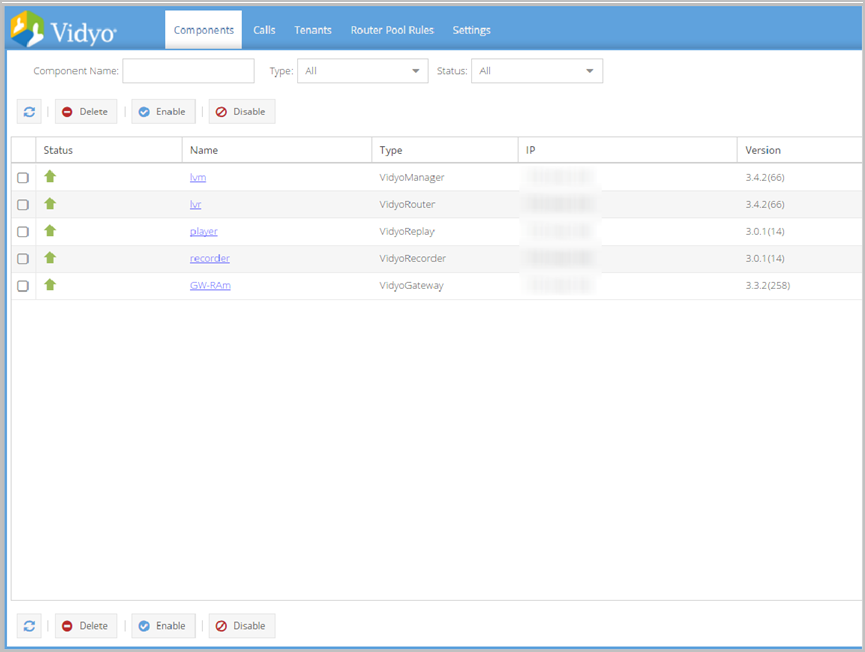
- Verify that the VidyoManager component has a Status of UP.
Request system licenses and apply system license keys
The next step in your initial system configuration is to request Vidyo licenses and then apply the license keys to your system.
Request your Vidyo licenses
After purchasing your license, if you’re running VidyoPortal Virtual Edition or the Hot Standby software option, you’ll receive Fully Qualified Domain Name (FQDN) licenses (removing license dependency to your Vidyo hardware). Otherwise, you’ll receive System ID-based licenses (licenses tied to your Vidyo hardware).
|
Note By default, you will receive System ID-based license unless you are running VidyoPortal Virtual Edition or using the Hot Standby software option. Using VidyoPortal Virtual Edition or the Hot Standby software option requires an FQDN license. Existing customers with System ID-based licenses using VidyoPortal Virtual Edition or the Hot Standby software option can be converted to an FQDN license by contacting Vidyo Support. System ID-based licenses and FQDN-based licenses were sent to the email address you provided when making your purchase. However, if you do not possess these licenses, you may request them after providing your configured system information and using the procedures in this section. |
The Vidyo licensing team usually sends out keys within one business day from the time you submit the required information from the Vidyo website form. Licenses are sent to the email address you provided.
If you have any licensing questions, please contact Vidyo's license team with your MAC address, System ID, and Public FQDN at licenses@vidyo.com.
Request Vidyo system ID-based licenses
System ID-based licenses and FQDN-based licenses were sent to the email address you provided when making your purchase. However, if you do not possess these licenses, you may request them after providing your configured system information and using the procedures in this section.
To request Vidyo System ID-based licenses:
- If you did not receive an email containing your System ID-based licenses after order processing, request them from the Vidyo license team with your MAC address, System ID, and Public FQDN at licenses@vidyo.com.
Otherwise, if you did receive an email containing your System ID-based licenses after order processing, proceed by applying the license keys to your system. See Apply the system license keys to your system. - Submit your system information using the form on the Vidyo website.
Request Vidyo FQDN-based licenses
If you’re running the VidyoPortal Virtual Edition or the Hot Standby software option and were able to provide your FQDN at the time of purchase, your FQDN-based licenses were sent to the email address you provided at that time. However, if you do not possess these licenses, you may request them after providing your configured system information and using the procedures in this section.
To request Vidyo FQDN-based licenses:
- If you were unable to provide an FQDN for your license at the time of purchase, contact the Vidyo license team with your MAC address, System ID, and Public FQDN at licenses@vidyo.com.
Otherwise, if you did provide an FQDN when ordering, your license keys were provided in the email sent to you after order processing. See Apply the system license keys to your system. - Submit your system information using the form on the Vidyo website.
Apply the system license keys to your system
Your VidyoPortal ships with factory default licensing. You need to apply your full Vidyo system license keys to access the license quantities and options purchased. The procedure for doing this varies depending on whether you are running the Hot Standby software option. For complete information about applying your licenses, see Apply the system license keys to your system and Apply system license keys to your system using the Hot Standby software option.
Set the language for the Super Admin interface
The VidyoPortal’s Super Admin interface is available in these 15 languages:
- Chinese (Simplified)
- Chinese (Traditional)
- English
- Finnish
- French
- German
- Italian
- Japanese
- Korean
- Polish
- Portuguese
- Russian
- Spanish
- Thai
- Turkish
|
Note You can also change the color scheme of your Super Admin portal using the Select a color scheme… drop-down on the upper left corner of the Super Admin Login page before logging into the system. Interfaces are immediately modified after selecting your preferred language or color scheme using the drop-downs. Preferred language changes to the Super Admin interface have no effect on the Admin and VidyoConnect interfaces. |
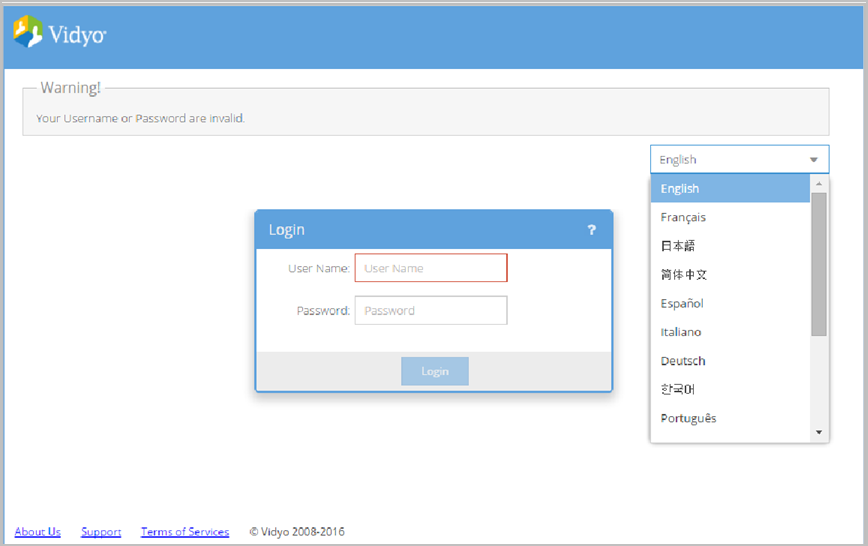
You can set the language of your Super Admin portal in either of the following ways:
- Use the language drop-down on the upper-right corner of the Super Admin Login page, before or after logging in to the system.
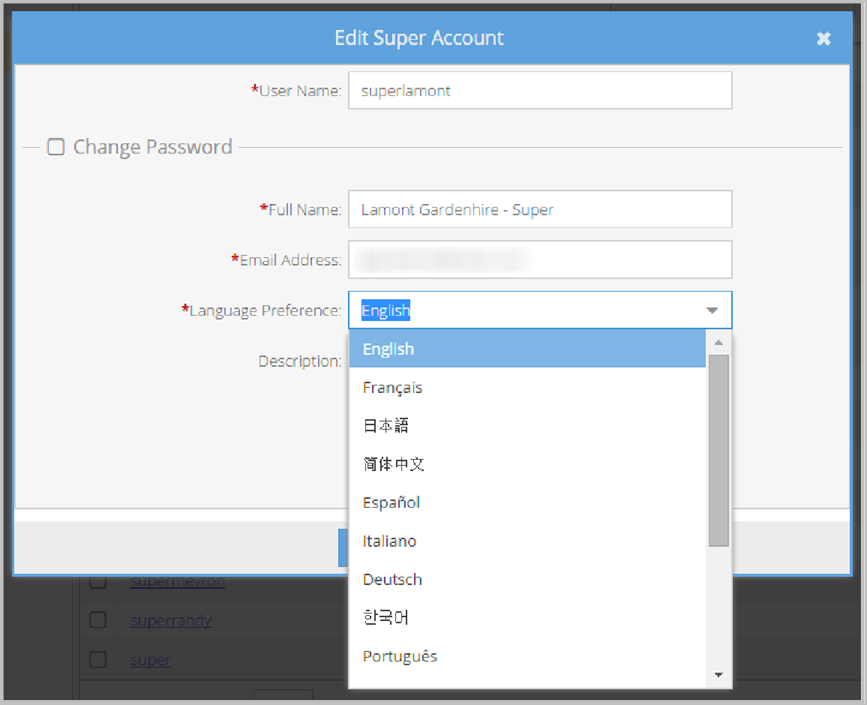
- Use the Super Account screen from inside the Super Admin portal.
To set the language of your Super Admin portal:
- Log in to the Super Admin portal using your Super Admin account. The Components page displays by default.
- Click the Settings tab.
- Click Super accounts on the left menu.
- Select the Super Admin language from the Language drop-down.
- Click Save.
Add multiple Super Admin accounts
Super Admins can create and delete multiple Super Admin accounts.
To add multiple Super Admin accounts:
- Log in to the Super Admin portal using your Super Admin account.
- Click the Settings tab. The Upload System License page displays by default.
- Click Super accounts. The Super Accounts page displays.
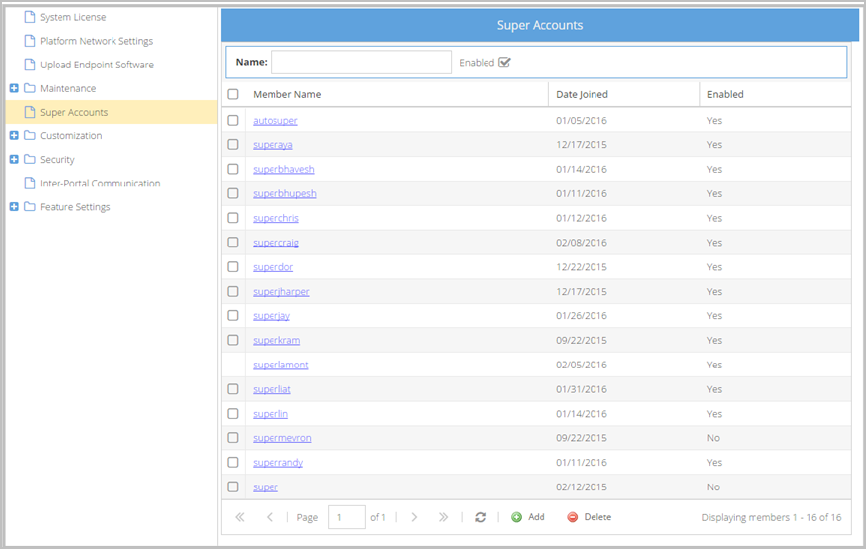
- Click Add to add a new Super Admin account.
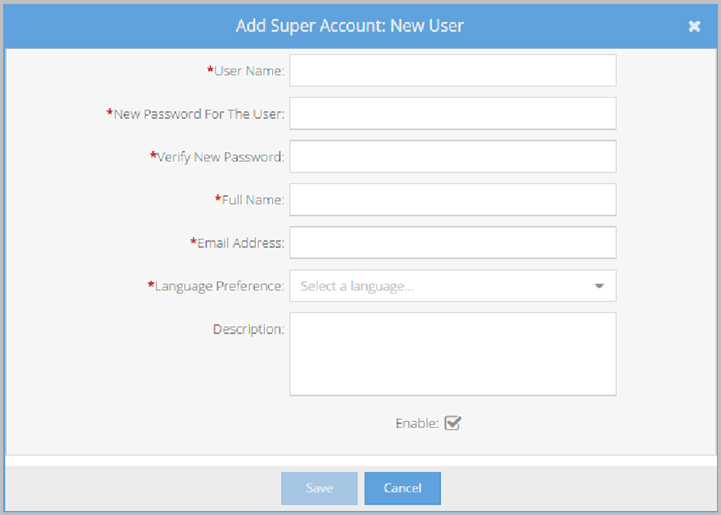
- Enter field values for your new Super Account. Fields marked with an asterisk cannot be left blank.
- Select the Enable checkbox to enable the account.
- Click Save.
|
Caution Each Super Account is required to have a valid, resolvable email address to function properly. |
