19. Appendix C. Security
Securing your Vidyo conferencing system involves securing your VidyoPortal and your various components such as VidyoRouter and VidyoGateway. This section of the guide shows you how to secure your VidyoPortal. For specific information about securing VidyoGateway and VidyoReplay, refer to the security sections in the VidyoGateway and VidyoReplay Administrator Guides.
Before we secure your Vidyo server, it’s important to understand there are two security layers available for your Vidyo conferencing system:
- HTTPS – The web standard involves setting up HTTPS and using Secure Socket Layer (SSL). This ensures secure browsing on your Vidyo server. While support for HTTPS is standardly included in Vidyo products, it does require the purchase and acquisition of SSL certificate or certificates from a valid CA (Certificate Authority). You may implement HTTPS without enabling Vidyo’s Encryption to implement secure browsing only. Enabling HTTPS secure browsing establishes secure connections between:
- The desktop user’s browser (also, the VidyoRoom System’s browser) and the Vidyo User portal.
- The browser connection to the Admin and Super Admin web pages.
- The VidyoManager, VidyoRouter, and VidyoProxy Configuration pages. HTTPS uses standard SSL certification to provide secured browsing to these web pages, protecting usernames and passwords, and actions performed on the pages. Confidential information shared during a VidyoConference browsing session is protected from phishing and hacking attempts.
- Encryption – This is an additionally purchased Vidyo licensed feature (referred to as the secured Vidyo conferencing option) which provides encrypted endpoint management, signaling, and media for end-to-end security for your entire Vidyo conferencing system. Encryption is meant to be implemented in addition to (and not in place of) HTTPS. This software option still requires the implementation of HTTPS including the purchase and acquisition of an SSL certificate or certificates from a valid CA (Certificate Authority). Once Encryption is enabled, all calls are secured and encrypted for all users and components. Mixing secured and non-secured calls is not currently supported. Encrypted end-to-end security uses AES-128 encryption to secure the connection between:
- The VidyoConnect and VidyoConnect Room clients and the VidyoManager (for licensing and management) and VidyoRouters (for signaling and media).
- Connections between all VidyoPortal components: VidyoPortal, VidyoManager, VidyoRouters, VidyoProxy, VidyoGateways, and VidyoReplays.
Confidential information shared during a Vidyo conference is protected from hijacking and eavesdropping attempts.
|
Note To configure the secured Vidyo conferencing option in your Vidyo conferencing system, you must have a valid System Console account to access the VidyoManager, VidyoRouter, VidyoProxy, and VidyoGateway Configuration pages. For VidyoReplay, you must access the VidyoReplay Super Admin portal using your VidyoReplay Super Admin Account. For more information, refer to the VidyoReplay Administrator Guide. |
The overall procedure involves performing the following sections in order:
- Secure your Vidyo conferencing system with SSL and HTTPS
- Configure your components to work with HTTPS
- Configure each VidyoPortal component to use your FQDN
- Apply VidyoPortal SSL certificates to VidyoRooms
- Implement encryption using the secured Vidyo conferencing option
Secure your Vidyo conferencing system with SSL and HTTPS
To secure your Vidyo conferencing system by Enabling SSL and HTTPS Only, you must complete specific configurations done on six sequential tabs from left to right in the Security section of the Super Admin Portal.
The tabs include:
- SSL Private Key page – This page is used for generating or importing an SSL Private Key.
- SSL CSR page – This page is used for generating an SSL Certificate Signing Request (CSR).
- Server Certificate page – This page is for deploying your server certificate.
- Server CA Certificates page – This page is for deploying your server Certification Authority (CA) certificates.
- Applications page – Regarding Security, this page is used to correctly configure HTTPS Port settings to 443.
- Advanced page – This page is for deploying your Client Root CA certificates.
- Passwords page – This page is used for setting password complexity rules and parameters.
- The URL of your VidyoRouter is typically a domain name: http://[IP or FQDN address]/vr2conf.
- You can also click the VidyoRouter IP address on the Components tab in your VidyoPortal. See Log in to the System Console of your server and change the default password.
- Although the default username for this page is admin, only the Super Admin accesses these pages.
|
Note This page is also used for Management Interface configurations. See 5. Configure RADIUS. |
|
Note The Advanced page is also used to upload, import and reset security settings. See Recover from an HTTPS failure and Reset your security configuration to factory defaults. |
The following ordered sections explain these steps in detail.
|
Note When configuring a VidyoRouter for security, access your VidyoRouter at http://[IP or FQDN address]/vr2conf and use the exact same procedures for VidyoPortal SSL and HTTPS configuration described in Configure your components to work with HTTPS and Configure each VidyoPortal component to use your FQDN. |
Import, export, and regenerate an SSL private key
The following procedures show you how to import, export, and regenerate an SSL Private Key.
An initial key with a 2048 key size is automatically generated when you first set up your system. When regenerating, examine your own security requirements and applicable policies carefully before deciding on a suitable key size.
Import an SSL private key
Private keys can be imported into your server. Vidyo recommends carefully backing up your existing SSL Private Key in its entirety before starting SSL Private Key procedures.
|
Note To import an SSL Private Key, you must first clear the HTTPS Only checkbox. You can only import encrypted and password-protected private keys that were exported from servers that also encrypted and password protected the private keys. Changes made to an SSL Private Key require a new CSR and SSL Server Certificate. This includes importing existing keys, exporting existing keys, and regenerating new keys. Private Keys are replaced if you choose to import from .p7b, .pfx, or .vidyo bundle formats. See Import certificates from a certificate bundle. |
To import a private key:
- Log in to the Super Admin portal using your Super Admin account. The Components page displays by default.
- Click the Settings tab. The Upload System License page displays by default.
- Click the plus sign to the left of Security on the left menu.
- Click SSL Private Key from the submenu. The SSL Private Key page displays.
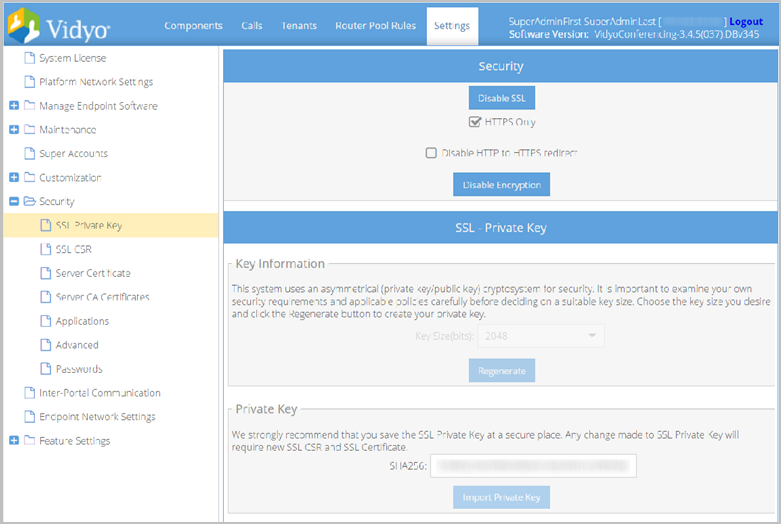
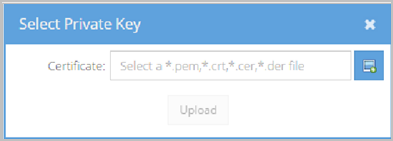
- Click Import Private Key. The Select Private Key pop-up displays.
- Click the Select File icon.
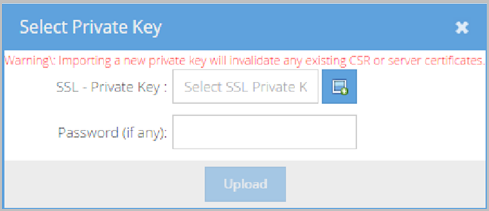
- Locate and select your private key file.
- Click Open.
- Enter a password in the Password (if any) field if necessary.
- Click Upload. If the upload is successful, the File Upload Success pop-up displays. A hash of the private key you imported displays in the SHA256 field.
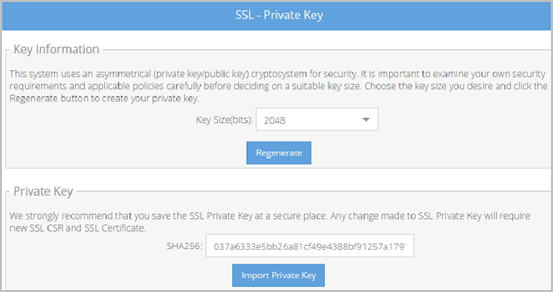
Regenerate an SSL private key
This system uses an asymmetrical (private key and public key) cryptosystem for security. Choose the key size you desire and click the Regenerate button to create your private key.
|
Note To regenerate an SSL Private Key, you must first clear the HTTPS Only checkbox. Changes made to an SSL Private Key require a new CSR and SSL Server Certificate. This includes importing existing keys and regenerating new keys. |
To regenerate an SSL Private Key:
- Log in to the Super Admin portal using your Super Admin account. The Components page displays by default.
- Click the Settings tab. The Upload System License page displays by default.
- Click the plus sign to the left of Security on the left menu.
- Click SSL Private Key from the submenu. The SSL Private Key page displays.
- Specify a 1024, 2048, or 4096 key size from the Key Size (bits) drop-down.
- Click Regenerate. The key is then shown on the Private Key area of the screen.
|
Note Some countries or CAs limit the key size. Observe the limitations in effect in your country. Check with your CA for Key Size requirements. |
Regenerate and view an SSL CSR
A Certificate Signing Request (CSR) is a message sent to a certification authority (CA) to request a public key certificate for a person or web server. Most public key certificates issued are SSL certificates, which are used to secure communications with web sites. The CA examines the CSR, which it considers to be a wish list from the requesting entity. If the request is in line with the CA's policy or it can be modified to bring it in line, the CA issues a certificate for the requesting entity.
Regenerate an SSL CSR
To regenerate an SSL CSR:
- Log in to the Super Admin portal using your Super Admin account. The Components page displays by default.
- Click the Settings tab. The Upload System License page displays by default.
- Click the plus sign to the left of Security on the left menu.
- Click SSL CSR from the submenu. The SSL CSR page displays.
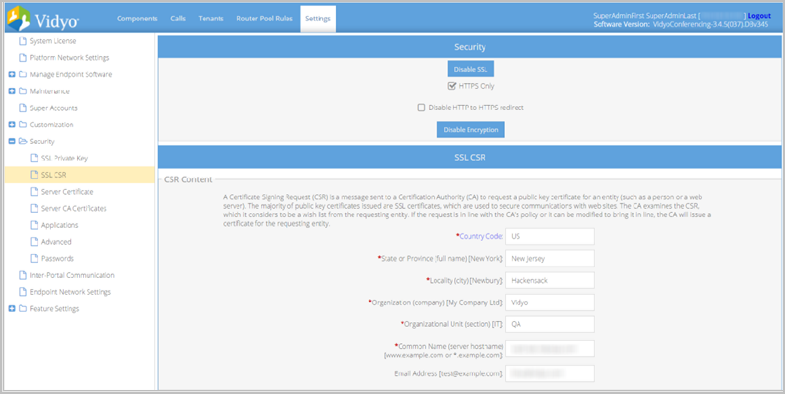
- Check with your CA and carefully enter correct values for the following:
- Country Code (the 2 character ISO 3166 country code)
- State or Province Name
- Locality
- Organization Name
- Organization Unit
- Common Name (the FQDN of the server)
- Email Address
- Provide all field information exactly as you registered it with your domain registration provider.
- You should consider all information on this screen mandatory before you click Regenerate.
|
Note If using a Subject Alternate Name (SAN) certificate, the alternate names are added by the Certificate Authority when a certificate is ordered and the Common Name you’re providing here in the Certificate Details portion of the screen is used to provide your base Common Name (CN) for your SAN certificate. See Use a wildcard certificate in a multi-tenant system. |
|
Note Click Reset to reload any previously saved field information. Your SSL CSR is generated based on the SSL Private Key you entered during Import an SSL private key or Regenerate an SSL private key. |
View an SSL CSR
To view an SSL CSR:
- Log in to the Super Admin portal using your Super Admin account. The Components page displays by default.
- Click the Settings tab. The Upload System License page displays by default.
- Click the plus sign to the left of Security on the left menu.
- Click SSL CSR from the submenu. The SSL CSR page displays.
- View the lower portion of the screen labeled CSR as desired.
Use a wildcard certificate in a multi-tenant system
If you are running a multi-tenant system, all Tenant URLs must be in the same domain, and each use a unique sub-domain. You then also use a wildcard or SAN SSL certificate. For a wildcard certificate, you must substitute an asterisk (*) wildcard character for the tenant sub-domain name (or sub-sub-domain name) in the Common Name, so the name of each tenant automatically matches the fully qualified domain name (FQDN) for the certificate.
For example: *.example.com or *.portal.example.com.
|
Note If using a Subject Alternate Name (SAN) certificate, the alternate names are added by the Certificate Authority when a certificate is ordered and the Common Name you’re providing here in the Certificate Details portion of the screen is used to provide your base Common Name (CN) for your SAN certificate. Microsoft refers to their own version of SAN certificates as Unified Communications (UC) certificates. |
Vidyo recommends that you use sub-sub-domain names so that you can also use a wildcard DNS entry in your domain name server to resolve tenant URL addresses without requiring a separate entry for each tenant, and also avoid having to create a new DNS entry each time a new tenant is added.
The following screenshot shows some wildcard certificate entry examples: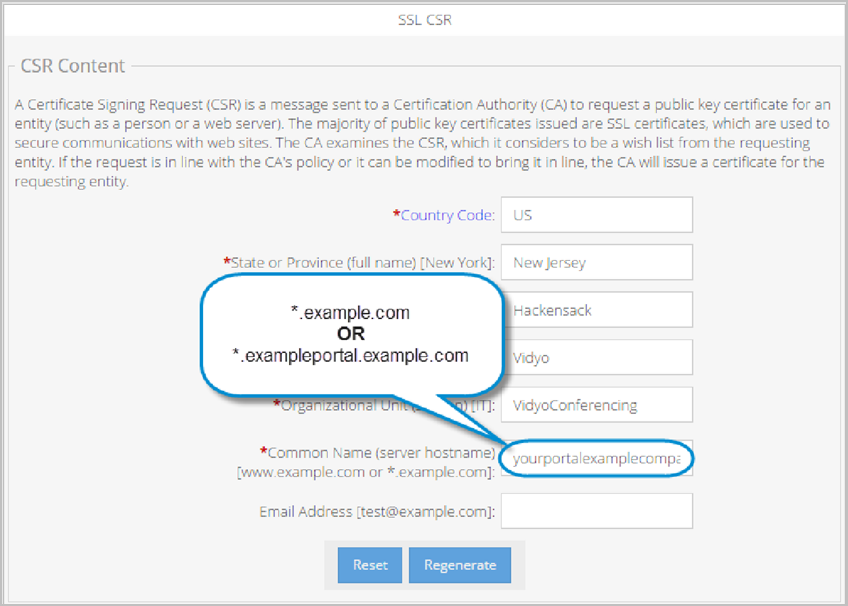
Certificates received from your Certificate Authority
Most CAs instantly send certificates and returns at least a domain (server) certificate and may return a root and one or more intermediate certificates in separate files. However, some authorities may provide the certificate data in a single email. You must copy the certificate data from the email into separate, respective files.
|
Note When selecting the certificate type from your CA, be sure to select Apache2 or Tomcat. |
Your certificate authority may provide three types of files:
- The domain certificate file. This is often named or titled server certificate.
- One or more intermediate certificate files. This is optional.
- The root certificate file.
Again, the certificate authority may send you these files, or require you to download them from their website. Often, the certificates are not clearly identified, requiring you to identify each file type.
As mentioned, if your certificate authority provides certificate files in an email message, you must copy and paste the appropriate text for each certificate type into a separate file and save it with the correct extension, as described in the next section. Be sure to use a text editor that doesn’t append carriage returns at the end of each line.
Vidyo recommends the following guidelines to identify certificate files from your CA:
- The domain file normally contains your server’s common name or FQDN.
- Intermediate files often contain the character string “inter” somewhere in the file name. Once you identify which ones are the intermediates, you can then identify the root certificate file by process of elimination.
- The remaining file is the CA’s root certificate file.
The CA may also only return the domain (server) certificate, and if needed or required, the root and intermediate certificates need to be located, and manually downloaded from the CA’s website.
If the root and intermediate certificates were not provided to you, your Vidyo server includes a default bundle of common CA root and intermediate certificates. If you are using a mainstream CA, the root and intermediate certificates may not be needed.
|
Note Some CAs have several root and intermediate certificates available depending on the type of certificate you have ordered. Be sure to locate the appropriate matching root and intermediate certificates for your domain certificate. Contact your CA for assistance if you’re not sure. |
CAs provide different kinds of certificate files to customers. Regardless, the following certificates should be a part of what your CA provides to you:
- Domain Certificate (may have a .domain, .crt, or .cer extension).
- Intermediate Certificate(s) (optional, may be one or more, and may have an .inter, .crt, or .cer extension).
- A Root Certificate (may have a .root, .crt, or .cer extension).
Certificate files versus bundles
Your CA may instead provide you with a .p7b file, which may contain Root and Intermediate or Root, Intermediate, and Server Certificate content. Check with your CA to find out exactly where each certificate is located. Your Vidyo server accepts the .pem, .crt, .cer, .der, .p7b, and .pfx formats. The .pfx format additionally includes the private key which may be password protected.
- Certificate Files (.pem, .crt, .cer, and .der) are imported using the Server Certificate, Server CA Certificates, and Advanced pages. See Deploy your server certificate, Deploy your server CA certificates (intermediates), and Import security settings from the Advanced tab.
- Bundles (.p7b, .pfx, and .vidyo) are imported and exported (only .vidyo files can be exported) from the Advanced Tab. See Import security settings from the Advanced tab.
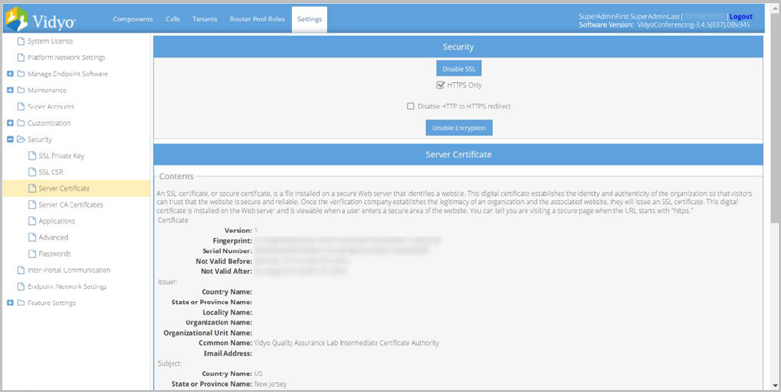
Deploy your server certificate
Perform the steps in this procedure after you receive certificate files back from your certification authority. An unsigned (self-issued) certificate does not provide a guarantee of security to your users. Your Vidyo server checks certificates for validity based on the certificates issued date range. Therefore, make sure that the time zone of your server is configured correctly prior to applying your certificate.
For more information about setting the time zone of your server, see Configure the network settings at the System Console.
If you plan on using self-signed certificates, you can click Generate Self-Signed to have the server sign its own certificate (self-signed). Clicking Generate Self-Signed and confirming removes your currently implemented server certificate.
To upload your server certificate file:
- Log in to the Super Admin portal using your Super Admin account. The Components page displays by default.
- Click the Settings tab. The Upload System License page displays by default.
- Click the plus sign to the left of Security on the left menu.
- Click Server Certificate from the submenu. The Server Certificate page displays.
- Click Upload.
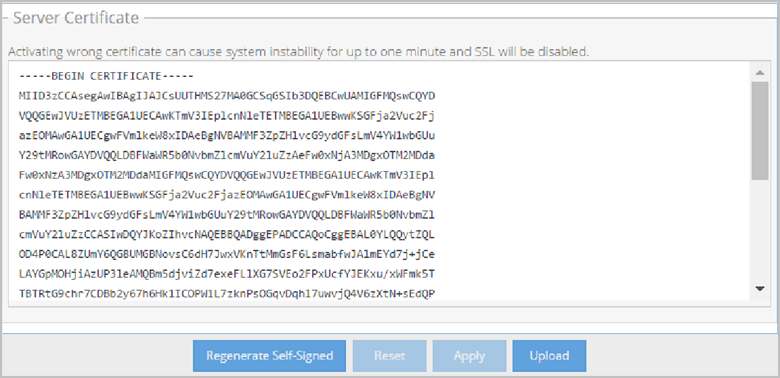
- Click the select file icon.
- Select your server certificate file on your computer (may also be referred to as the Domain Certificate by your Certificate Authority) or local network and click Upload. If the upload is successful, the File Upload Success pop-up displays. The page then loads the Certificate Information, Issuer, Subject, and the Certificate itself in the screen.
The Select Server Certificate pop-up displays.
Receive certificate expiration notifications
The system watches your certificate’s “Not Valid After” value and can warn you when it’s about to expire via System Admin email.
- Advance warnings are provided in the following daily increment order: 60, 45, 30, 15, 7, 6, 5, 4, 3, 2, 1. Verify that the email addresses on your System Admin accounts are configured correctly.
- Contact your Certificate Authority to renew your certificate.
Deploy your server CA certificates (intermediates)
In addition to issuing SSL Certificates, a Trusted Root CA certificate can also be used to create another certificate, which in turn can be used to issue SSL Certificates. The majority of SSL certificates in use around the world are chained certificates of this type. As the Intermediate Certificate is issued by the Trusted Root CA, any SSL Certificates issued by the Intermediate Certificate inherits the trust of the Trusted Root – effectively creating a certification chain of trust. In many cases the chaining is not limited to a single intermediate. More than one intermediate certificate may be part of a Certificates Bundle.
To upload your server CA certificates (intermediates) files:
- Log in to the Super Admin portal using your Super Admin account. The Components page displays by default.
- Click the Settings tab. The Upload System License page displays by default.
- Click the plus sign to the left of Security on the left menu.
- Click Server Certificate from the submenu. The Server Certificate page displays.

- Click Upload. The Select Server CA Certificate pop-up displays.
- Click the select file icon.
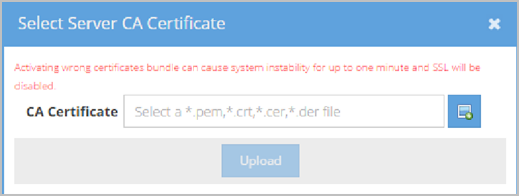
- Select your server CA certificate file on your computer (may also be referred to as the Intermediate Certificate by your Certificate Authority) or local network and click Upload.
|
Note A single file may contain multiple intermediate certificates. You can additionally upload the Root CA in this location to present the certificate to your clients along with the certificate chain. However, this is not recommended as standard security practice. |
If the upload is successful, the File Upload Success pop-up displays.
The page then loads the Certificate Information, Issuer, Subject, and the Certificates in the screen.
Configure HTTPS port settings on your applications
|
Note The Applications page is also used for Management Interface settings. See 5. Configure RADIUS. |
The HTTPS port should remain 443 (the default) on a VidyoPortal. If you set the HTTPS port to anything other than 443, users must manually add the port to their URL requests in their browsers.
To configure HTTPS port settings on your applications:
|
Note If you’re using a VidyoRouter, the default HTTPS port is 8443. VidyoProxy runs on port 443. |
- Log in to the Super Admin portal using your Super Admin account. The Components page displays by default.
- Click the Settings tab. The Upload System License page displays by default.
- Click the plus sign to the left of Security on the left menu.
- Click Applications from the submenu. The Applications page displays.
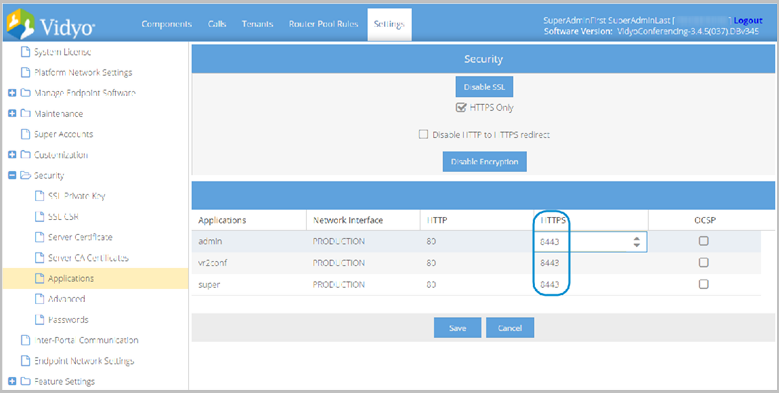
- Click HTTPS values under the HTTPS column to make them writeable and modify if desired.
- Click Save.
|
Note HTTPS will not enable if you have any other applications running on your configured port. This includes VidyoProxy. |
Import security settings from the Advanced tab
The Advanced page is used to upload trusted Client Root CA Certificates. This includes all Intermediate and Root Certificates.
You can import from .p7b and .pfx standard formats. In addition, the .vidyo bundle format is available for importing certificates from other Vidyo servers.
|
Note If your system requires trusting other secure systems such as LDAPS, Secure SMTP Server, and an OCSP Responder, their certificates must also be uploaded in this page. |
To upload security settings from the Advanced tab:
- Log in to the Super Admin portal using your Super Admin account. The Components page displays by default.
- Click the Settings tab. The Upload System License page displays by default.
- Click the plus sign to the left of Security on the left menu.
- Click Advanced from the submenu. The Advanced page displays.
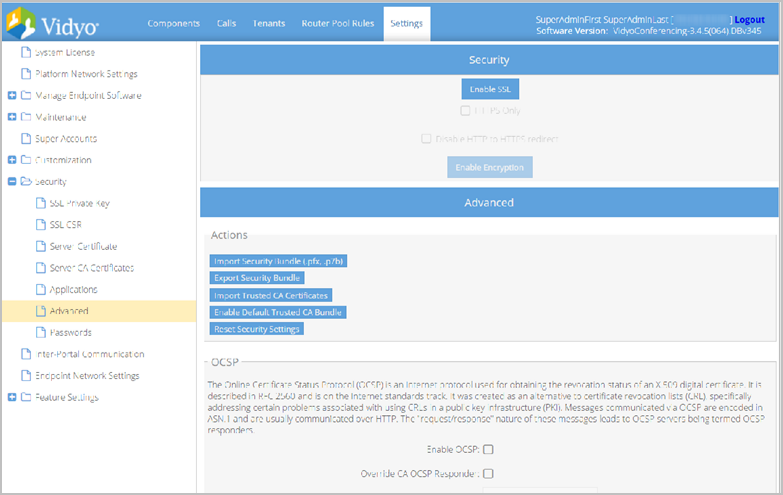
- Click Import Security Bundle (.pfx, .p7b). The Select bundle (PKCS 7, PKCS 12) pop-up displays.

- Click the select file icon to locate the bundle file.
- Enter the password if using the .pfx format.
- Click Upload to upload the bundle file. If the upload is successful, the File Upload Success pop-up displays.
|
Note Depending on which bundle format you used, the appropriate Private Key, Server Certificate, Server CA Certificates, and Client Root CA Certificates data is loaded in to your Vidyo Server. |
Enable SSL and HTTPS only
Before Enabling SSL and HTTPS Only, ensure that your VidyoProxy is not running on the same port on which your applications are running. See Configure HTTPS port settings on your applications.
Do not use the Enable SSL button and HTTPS Only checkbox until you’ve completed the steps for securing your Vidyo conferencing system. Do not Enable HTTPS Only mode until you are certain HTTPS is working properly. See Secure your Vidyo conferencing system with SSL and HTTPS.
Enable SSL only
To enable SSL:
- Log in to the Super Admin portal using your Super Admin account. The Components page displays by default.
- Click the Settings tab. The Upload System License page displays by default.
- Click the plus sign to the left of Security on the left menu.
- Click Advanced from the submenu. The Advanced page displays.
- Click Enable SSL at the top of the page. A Confirmation pop-up displays.
- Click Yes to confirm that you want to enable SSL. A Success pop-up displays.
- Click OK. You can now browse your Vidyo conferencing system over HTTPS.
- Browse to any of your Admin portals to confirm that HTTPS is working properly and that the browser does not post any security errors. Be sure to include the HTTPS header in the URL (for example, https://[FQDN]). Verify that HTTPS displays on the left side of the address bar and that a lock icon displays (typically in the lower right corner). Some browsers emphasize an HTTPS session with a color like green or blue.
- Continue with the next procedure if you are successful browsing to your Admin pages using HTTPS and you do not receive any browser errors.
|
Note You can also verify your signed certificate by displaying information for it in your web browser. See the documentation that came with your web browser for additional information. If your browser generates a root certificate error, first check that your operating system has the latest root certificates update applied. |
|
Note If you are unable to connect to your Admin pages over HTTPS, see Enable HTTPS only. |
Enable HTTPS only
Before you Enable HTTPS Only, you must configure your components to work with HTTPS. See Configure your components to work with HTTPS.
If you don’t configure your components to work with HTTPS first, you can still enable HTTPS Only. However, this may result in “DOWN” component statuses.
To enable HTTPS only:
- Log in to the Super Admin portal using your Super Admin account. The Components page displays by default.
- Click the Settings tab. The Upload System License page displays by default.
- Click the plus sign to the left of Security on the left menu.
- Click Advanced from the submenu. The Advanced page displays.
- Click HTTPS only at the top of the page. A Confirmation pop-up displays.
- Click Yes to confirm that you want to enable HTTPS only. A Success pop-up displays.
- Click OK. A Confirmation pop-up displays indicating that your “SSL settings have been reset. Do you want to reboot the server now?”
- Click Yes. Your sever reboots and the next time you access the system and return to the Security page, Enable SSL now shows as Disable SSL, the HTTPS Only checkbox is selected, which confirms that your SSL and HTTPS implementation is successful.
|
Note When the Disable http to https redirect checkbox is checked, redirecting from http to https is disabled. |
Recover from an HTTPS failure
If HTTP is disabled, and you can no longer browse to the Vidyo server using HTTPS, you can disable HTTPS and re-enable HTTP browsing using the System Console menu and selecting Option 16. See System Console menu options.
Import and export certificates from the Advanced tab
You can also import or export certificate bundles using the Advanced tab.
Import certificates from a certificate bundle
To upload security settings from a certificate bundle:
- Log in to the Super Admin portal using your Super Admin account. The Components page displays by default.
- Click the Settings tab. The Upload System License page displays by default.
- Click the plus sign to the left of Security on the left menu.
- Click Advanced from the submenu. The Advanced page displays.
- Click Import Trusted CA Certificates at the top of the page. A Select file pop-up displays.
- Choose Replace existing or Append to existing.
- Replace existing – Replaces any previously uploaded Client Root CA Certificates.
- Append to existing – Any uploaded Client Root CA Certificates are added to your existing ones.
- Click the select file icon to locate the server certificate file on your computer (may also be referred to as the Domain Certificate by your Certificate Authority) or local network.
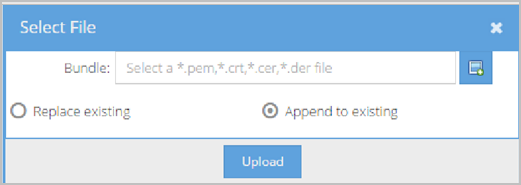
- Click Upload to upload the client root CA certificate file. An Uploading file progress bar is shown while the system applies your certificates. If the upload is successful, a Confirmation pop-up displays indicating “Upload successful. Do you want to reboot the server now?”
- Click Yes.
|
Note A single file may contain multiple Client Root CA Certificates. |
Export a security bundle containing your certificate configuration
To export a security bundle containing your certificate configuration:
- Log in to the Super Admin portal using your Super Admin account. The Components page displays by default.
- Click the Settings tab. The Upload System License page displays by default.
- Click the plus sign to the left of Security on the left menu.
- Click Advanced from the submenu. The Advanced page displays.
- Click Export Security Bundle at the top of the page. A Export Bundle pop-up displays.
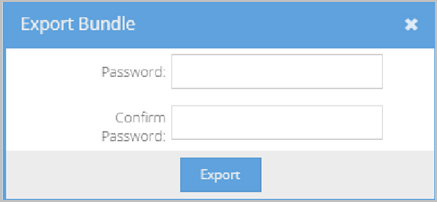
- Enter a password in the Password field to encrypt the security bundle.
- Re-enter the password in the Confirm Password field to confirm.
- Click Export. Your browser then downloads the security_bundle.vidyo file to your computer, which contains your security configuration for transfer or backup purposes.
Reset your security configuration to factory defaults
To reset your security configuration to the factory defaults:
- Log in to the Super Admin portal using your Super Admin account. The Components page displays by default.
- Click the Settings tab. The Upload System License page displays by default.
- Click the plus sign to the left of Security on the left menu.
- Click Advanced from the submenu. The Advanced page displays.
- Click Reset Security at the top of the page. A Confirmation pop-up displays.
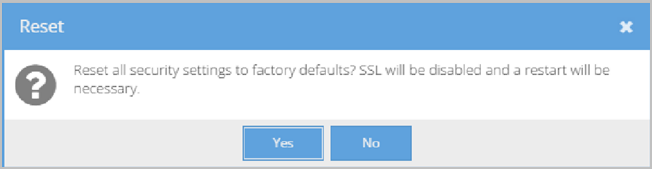
- Click Yes. Your security configuration is then restored to the factory default settings.
Configure client CA certificates
Vidyo Servers ship with a default trusted CA list and is enabled by default. This Advanced tab allows you to enable or disable the use of this list.
To configure client CA certificates:
- Log in to the Super Admin portal using your Super Admin account. The Components page displays by default.
- Click the Settings tab. The Upload System License page displays by default.
- Click the plus sign to the left of Security on the left menu.
- Click Advanced from the submenu. The Advanced page displays.
- Click Enable Default Trusted CA Bundle at the top of the page. The Enable Default Trusted CA Bundle pop-up displays.
- Click Save. After rebooting your system, your CA root certificates are applied. See Log in to the System Console of your server and change the default password.
Configure your components to work with HTTPS
After implementing SSL and enabling HTTPS on your Vidyo server, each component must be set up to listen on and address each other using a valid FQDN (URL or Common Name) as defined in the certificate applied.
After setting the FQDN address on your VidyoPortal and VidyoRouter(s) as described in the first section, be sure to continue and set the FQDN on all your system components as explained in the following cumulative sections:
- Set the hostname and domain on your Vidyo server
- Set the FQDN on your VidyoRouter configuration pages
- Set the FQDN on your tenants
Set the hostname and domain on your Vidyo server
Your VidyoPortal and VidyoRouter must be configured to be aware of their DNS hostnames. This is done when configuring your network settings at the System Console. See Configure the network settings at the System Console.
Set the FQDN on your VidyoRouter configuration pages
The FQDN on your VidyoRouter is set up using the following procedure.
To set the FQDN on your VidyoRouter configuration pages:
- Log in to your VidyoRouter using your System Console account.
- Set the Configuration Server to a valid FQDN of the VidyoPortal on the Basic tab as defined by the applied certificate.
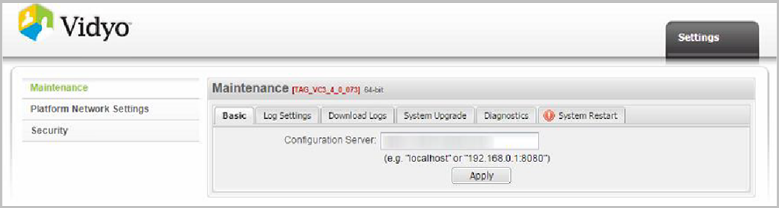
- Click Apply.
- Click OK to restart the VidyoRouter.
- Proceed and set the FQDN on your tenants.
|
Note The URL of your VidyoRouter is typically a domain name: http://[IP or FQDN address]/vr2conf. You can also click the VidyoRouter IP address on the Components tab in your VidyoPortal. See Log in to the System Console of your server and change the default password. Although the default username for this page is admin, only the Super Admin accesses these pages. |
The VidyoRouter Configuration Pages display.
|
Note The best practice is to provide a full URL for your Config Server value beginning with https://, using your IP or FQDN address, and even a port reference if desired. |
Set the FQDN on your tenants
To configure your tenants to use FQDNs:
- Log in to the Super Admin portal using your Super Admin account. The Components page displays by default.
- Click the Tenants tab. The Tenants page displays.

- Ensure that each Tenant (including the Default Tenant) is using a valid FQDN for the Tenant URL as defined by the certificate applied. See Add a default tenant or adding a new tenant.
Configure each VidyoPortal component to use your FQDN
You must now use the VidyoPortal Super Admin portal to configure each component to use the FQDN as defined in the certificate applied. This is done from the Component Configuration of your VidyoManager and VidyoRouter.
Set the FQDN in your VidyoRouter component configuration
This procedure must be completed for each VidyoRouter in your Vidyo conferencing system.
To set the FQDN in your VidyoRouter component configuration:
- Log in to the Super Admin portal using your Super Admin account. The Components page displays by default.
- Double-click the Name link on the VidyoRouter row. The VidyoRouter pop-up displays.
- Do the following in the SCIP section:
- Edit the FDQN field (VidyoRouter signaling address) by clicking the text.
- Edit the Port field by clicking the text.
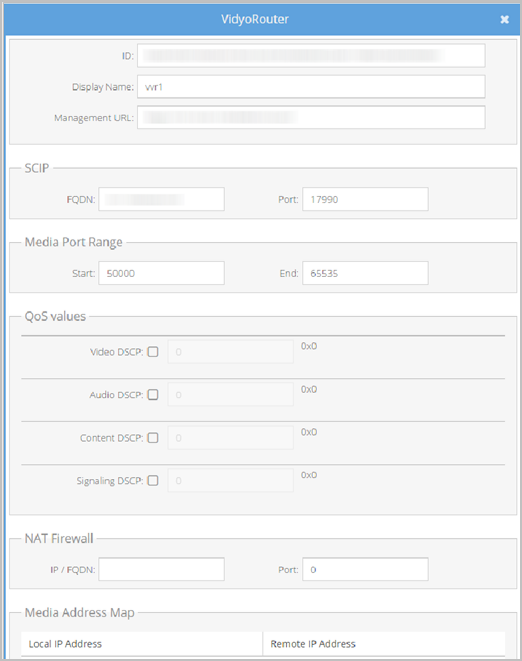
- Click Save.
- Click OK to confirm your changes.
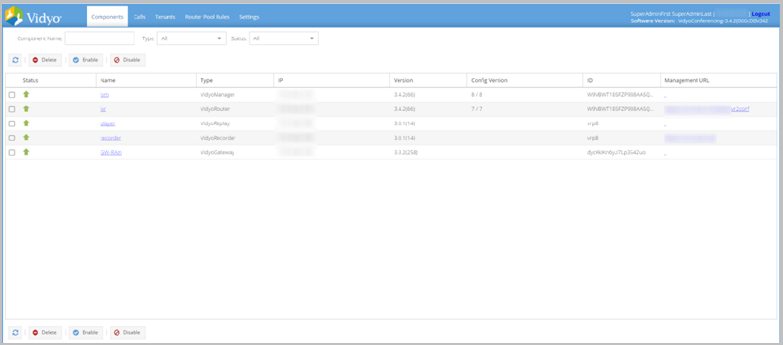
Verify your VidyoPortal components are online (Status: UP)
To verify your VidyoPortal components are Online (Status: UP):
- Log in to the Super Admin portal using your Super Admin account. The Components tab is selected by default.
- Verify that all components are Online (Status UP) and have no alarms.
- Login to a User portal and place test calls to verify that the VidyoPortal and components are functional.
|
Note If your system includes VidyoRouters, see Access your VidyoRouter configuration page. |
Apply VidyoPortal SSL certificates to VidyoRooms
You may need to apply the VidyoPortal’s SSL root or full chain certificate to any VidyoRoom connected to the VidyoPortal.
Your VidyoRoom contains a default bundle of common CA root and intermediate certificates. If you’re using a mainstream CA, the root and intermediate certificates may not be required to be uploaded to your VidyoRoom systems. Test each first to see if they connect successfully to the HTTPS only enabled VidyoPortal using the default bundled certificates.
If they do not connect, follow the steps in the next section to build the VidyoPortal full chain SSL certificate and apply it to your VidyoRoom.
|
Note For VidyoGateways and VidyoReplays, to connect using HTTPS, they each must also be configured to connect to the VidyoPortal via HTTPS. For more information, refer to the security section in the VidyoGateway Administrator Guide and VidyoReplay Administrator Guide. |
Build the VidyoPortal full chain SSL certificate
If your VidyoPortal SSL chain includes intermediates, you may need to create and upload the full chain certificate to the VidyoRoom and VidyoReplay.
An easy method to create the VidyoPortal full chain certificate is to use the certificate Export feature built into the Firefox browser.
To use the Firefox browser certificate Export, do the following:
- Browse to the VidyoPortal using the Firefox browser using an HTTPS request: https://[IP or FQDN address]
- Go to the Tools menu in Firefox once the page loads and select Page Info, and then click on the Security icon (padlock) at the top of the window; or simply click on the padlock security icon to the left of the URL or the lower right corner of the Firefox window.
- Click View Certificate.
- Click the Details tab.
- Click Export.
- Browse to the location you wish to save the exported certificate.
- Select X.509 Certificate with chain (PEM) from the Save as Type drop-down.
- Enter a name for the file in the File Name field and click Save.
- Rename the file as desired, save it with a .crt extension, and upload as necessary to your VidyoRoom accordingly.
Implement encryption using the secured Vidyo conferencing option
Before configuring encryption using the secured Vidyo conferencing option, you must first secure your VidyoPortal browsing by implementing SSL and enabling HTTPS. See Secure your Vidyo conferencing system with SSL and HTTPS.
You also must secure the connections between the VidyoConnect, VidyoConnect Room, VidyoManager, and VidyoRouters as explained in the component configuration procedures Configure your components to work with HTTPS and Configure each VidyoPortal component to use your FQDN to fully encrypt and secure your Vidyo conferencing system.
With all of these items completed, this section shows you how to verify your VidyoPortal is licensed for Encryption (as having the secured Vidyo conferencing option), how to enable it on your Vidyo conferencing system, and how to test it.
|
Note Video, audio, and application traffic to the VidyoManager is encrypted with TLS (Transport Layer Security). To the VidyoRouter, it is encrypted with SRTP (Secure Real-time Transport Protocol). |
Verify your VidyoPortal is licensed for encryption
Encryption is an optional feature that you can license for your initial installation or add on at some later time. Your VidyoPortal license must include the encryption option to be implemented.
To verify that the VidyoPortal is licensed for encryption:
- Log in to the Super Admin portal using your Super Admin account. The Components page displays by default.
- Click the Settings tab. The Upload System License page displays by default.
- Scroll down to the Encryption line in the System License information section.
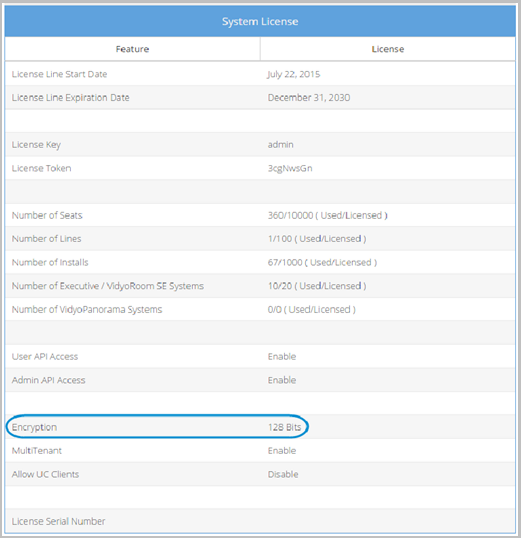
If Encryption is enabled in the VidyoPortal License, the setting reads 128 Bits, otherwise it shows Disable.
Enable encryption on the Vidyo conferencing system
Before enabling the encryption option, you must first secure your VidyoPortal browsing by implementing SSL and enabling HTTPS in addition to other prerequisites mentioned at the beginning of this section. The system components rely on the SSL certificates applied to authenticate each other for the encryption security. If you have not implemented and enabled HTTPS on the VidyoPortal, please do so before enabling Encryption by clicking the Enable Encryption button.
- For more information, see Implement encryption using the secured Vidyo conferencing option.
- Enabling encryption enables it for full signaling and media security on the VidyoRouter, VidyoManager, and VidyoPortal.
