11. Manage meeting rooms as the Tenant Admin
Every user has a personal room that is automatically assigned. The admin or operator can also add public rooms that are not associated with a particular user, like an actual conference room.
Manage Meeting Rooms table
You use the Manage Meeting Rooms table to view, delete, and manage the meeting rooms in your tenant.
To use the Manage Meeting Rooms table:
- Log in to the Admin portal using your Admin account. See Log in as a Tenant Admin. The Users page displays by default.
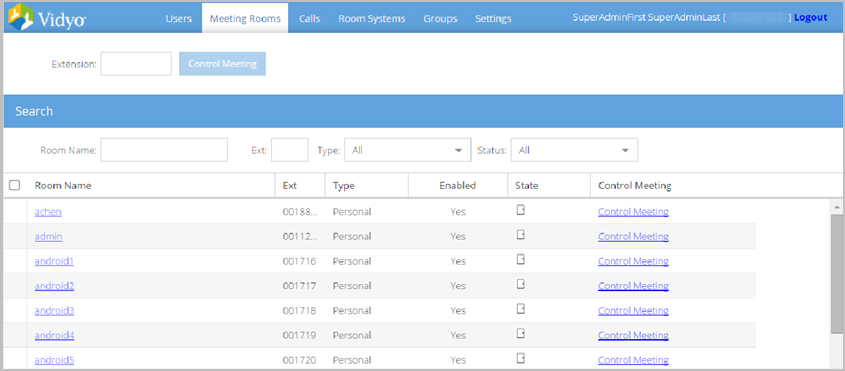
- Click the Meeting Rooms tab. The Meeting Rooms page displays. Calls taking place in your VidyoPortal display on the table and include Room Name, Ext, Type, Enabled, State, and Control Meeting fields as columns. You can drag and drop the column headings to arrange them in the order you prefer.
- Status icons indicate the state of the corresponding room as empty, full, locked, or PIN protected.
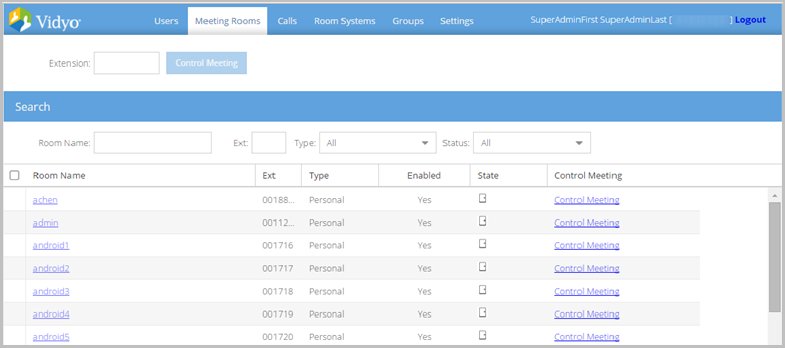
- The first icon shows whether the room is empty or full. This room is empty. The icon would be dark if the room were full. The second icon displays only if the room is locked. The third icon displays only if the room is PIN protected. Both the user and the Admin can control locking and PIN protecting the room. Only public rooms can be deleted from the Manage Meeting Rooms table. See Delete a public meeting room. Personal rooms are deleted by deleting the user associated with the personal room. See Delete a user.
- Search fields at the top of the table allow quick and easy searching by room name, extension, type, and whether the room is enabled or disabled.
- Use the following buttons at the bottom of the page to change your view of the table.
- Click Refresh to refresh the table.
- Click the First Page, Previous Page, Next Page, and Last Page direction arrows to scroll through multiple pages of results in the table.
- Enter a page number to access a specific page of results in the table.
Add a meeting room
|
Note Only public rooms can be added here. Personal rooms are automatically generated when you add a new user. |
To add a meeting room:
- Log in to the Admin portal using your Admin account. The Users page displays by default.
- Click the Meeting Rooms tab. The Meeting Rooms page displays.
- Click Add Meeting Room at the bottom of the page. The Add Room: New Room pop-up displays.
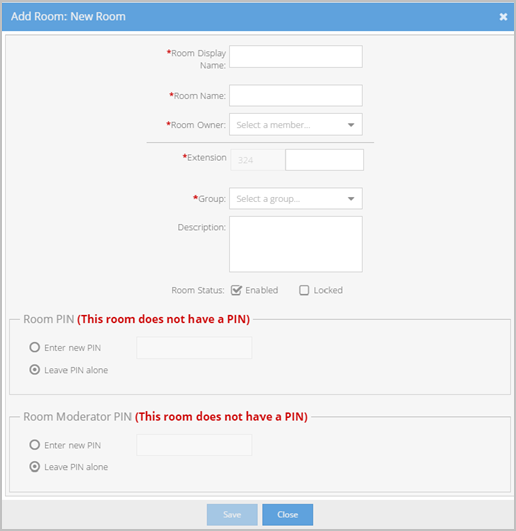
- Enter a display name for your room in the Room Display Name field. The Room Display Name may contain special characters and spaces. The system alerts you when entering an existing name.
- Enter a name for your room in the Room Name field. The Room Name is used for URI dialing and must be unique, begin with an alphanumeric character and can’t contain spaces. The only other valid characters are periods, underscores, and dashes. The system alerts you when providing an existing name. The Room Name will be auto-generated when a user creates a public room.
- Select the person to manage and control meetings in the public room from the Room Owner drop-down. A list of users is provided on the drop-down for selection. You can also type in the text area of the drop-down to narrow the list.
- Enter the number used for the user’s direct calls and speed dial in the Extension text field. The extension value provided must be numeric and unique.
- Select the group you want to associate with your new meeting room in the Group drop-down. The default group is selected automatically. Remember that groups have special designations of maximum participants and maximum bandwidth privileges. For more information on groups, see 13. Manage Tenant Admin groups as the Tenant Admin.
- Enter any information that would be useful for the users, such as “This room is used for the weekly sales meeting” in the Description field.
- Select the Enabled checkbox to enable your room. Deselecting this checkbox allows a room to be put on hold with all its information intact. The room also doesn’t show up in searches on the User portal.
- Select the Locked checkbox to prevent additional users from accessing your room.
- Select the Enter new PIN radio button on the Room PIN section of the screen and enter a four-character PIN in the text box to PIN protect your room. Participants of this meeting are prompted to enter this PIN before entering meetings in your room. Provide your meeting participants with this PIN prior to meetings you hold in your room.
- Select the Leave PIN Alone radio button on the Room PIN section of the screen to not use a PIN or retain the current one (if one is in use) for your room.
- Select the Enter new PIN radio button on the Room Moderator PIN section of the screen and enter a four-character PIN in the text box to add a moderator PIN for your room. The room moderator PIN can be set from this screen, the Edit Room screen, and the Meeting Details screen. You can also set the room moderator PIN from the Room Links screen in the User portal.
- Select the Leave PIN Alone radio button on the Room Moderator PIN section of the screen to not use a room moderator PIN or retain the current one (if one is in use) for your room. Room owners can lock the room and configure room and moderator PINs from the User portal.
- Click Save to keep the Meeting Room settings.
- If some information is missing, incorrect, or already in the system, an error message is shown at the top of the screen indicating which fields must be addressed.
- When all required fields are complete and valid, the data is saved to the database and the main table is shown.
Edit a meeting room
You can edit the settings for any meeting room as needed, including changing or removing the room URL. The room URL is the link necessary for a user to join the meeting room.
For information about the other meeting room settings, see Add a meeting room.
To edit a meeting room:
- Log in to the Admin portal using your Admin account. The Users page displays by default.
- Click the Meeting Rooms tab. The Meeting Rooms page displays.
- Find the room that needs to be edited by using the search filters, sorting on the headers, or by pagination.
- Click the name of the room that needs to be edited. The Edit Room pop-up displays.
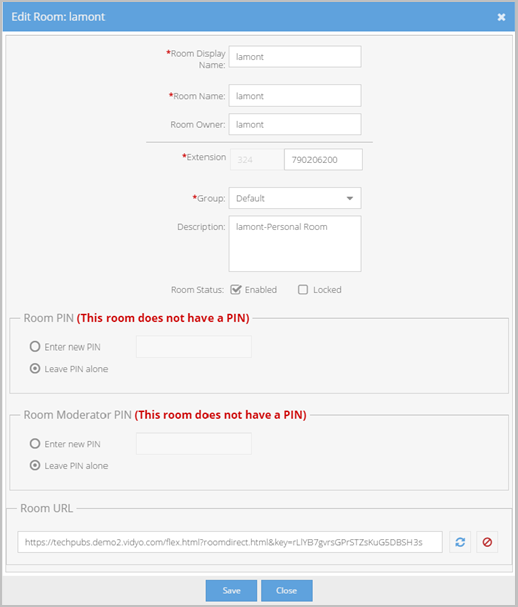
- Edit the room information as necessary. See Add a meeting room.
- Edit or delete the room URL, which is the link participants and guests use to join your room.
- The system automatically generates a new URL.
- Click the red circle with white line to the right of the Room URL field to delete the current room URL.
- Click Save.
- If some information is missing, incorrect, or already in the system, an error message is shown at the top of the screen indicating which fields must be addressed.
- When all required fields are complete and valid, the data is saved to the database, the main table is shown, and a Success message is displayed at the top of the screen.
Delete a public meeting room
If a public room is no longer needed, there are two ways to remove it. You may delete a public room completely from the system, or you may disable the room. If you permanently delete a public room from your system, it cannot be undone. Disabling a room puts it on hold with all its information intact. The room also doesn’t show up in searches on the User portal. For more information about disabling rooms, see Add a meeting room.
To delete a personal room associated with a user, you must first delete the user. Deleting the user automatically deletes his or her room. 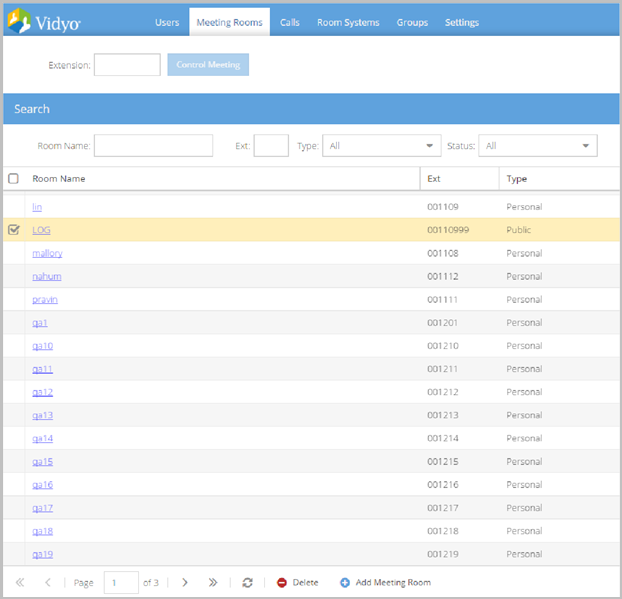
|
Note The checkbox only displays on the public room on the Meeting Room table. |
To delete a public meeting room:
- Log in to the Admin portal using your Admin account. The Users page displays by default.
- Click the Meeting Rooms tab. The Meeting Rooms page displays.
- Find the public room that needs to be deleted by using the search filters, sorting on the headers, or by pagination.
- Select one or more checkboxes for the room(s) that need to be deleted.
- Click Delete at the bottom of the page and answer Yes to all prompts.
View current calls
You can view the calls taking place on your VidyoPortal using the Calls screen.
To view current calls on your VidyoPortal:
- Log in to the Admin portal using your Admin account. The Users page displays by default.
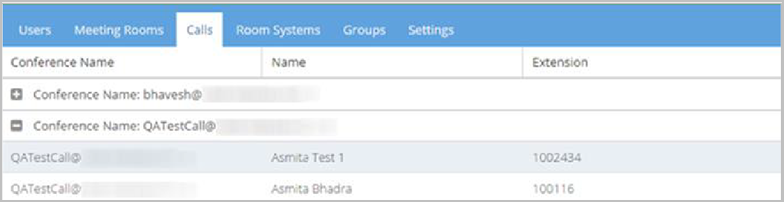
- Click the Calls tab. The Calls page displays. Calls taking place on your VidyoPortal display and include the following fields:
- Conference Name
- Name
- Extension
- Click the drop-down on the right of each column heading for the following features:
- Select Sort Ascending to arrange the current calls displaying on the table in ascending order from top to bottom based on your selected column.
- Select Sort Descending to arrange the current calls displaying on the table in descending order from top to bottom based on your selected column.
- Select or clear Conference, Name, and Extension to control the columns displaying in the table.
- Select Group By This Field.
- Select Show in Groups.
- Use the following buttons at the bottom of the page to change your view of the table.
- Click Refresh to refresh the table.
- Click the First Page, Previous Page, Next Page, and Last Page direction arrows to scroll through multiple pages of results in the table.
- Enter a page number to access a specific page of results in the table.
Control meetings
Admins and Operator user types have access to the following meeting functions and controls:
- Locking or unlocking the meeting
- Disconnecting any user
- Muting any user or disconnecting the video from any user
- Defining or removing a room PIN
- Defining or removing a Moderator PIN
- Creating and deleting a room URL
- Inviting users to attend the meeting
- The screenshot shown previously shows personal rooms which have no corresponding checkbox and therefore cannot be deleted.
- When you delete a user, their room is deleted with the account.
- You must click a meeting’s corresponding Control Meeting link to control the meeting from the Meeting Details screen.
- Admin and Operator user types can control meeting rooms while a meeting is in session.
|
Note |
Control meetings from the VidyoPortal
As an Administrator or Operator user type, you can control the meetings that are taking place on your VidyoPortal. Some of the meeting functions that you can control include locking and unlocking meetings, disconnecting participants, muting participants, and adding and removing PINs.
You can access the Control Meeting page from your VidyoPortal, but it can also be accessed from your VidyoConnect application on your desktop or mobile device.
|
Note
|
To control a meeting room:
- Log in to the Admin portal using your Admin account. The Users page displays by default.
- Click the Meeting Rooms tab. The Manage Meeting Rooms page displays.
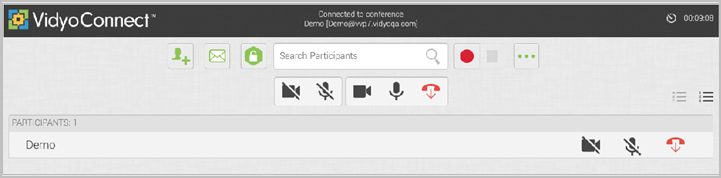
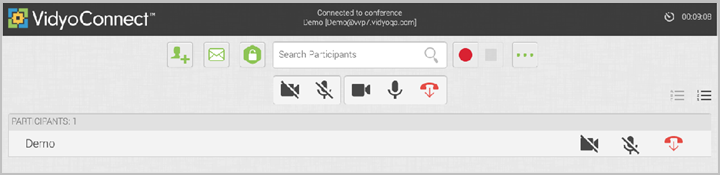
- Click the Control Meeting link in the Control Meeting column of the corresponding meeting you want to control. The HTML-based Control Meeting screen displays.
- Perform any of the following tasks.
|
Note As you make configurations on the HTML-based Control Meeting screen, notifications display on the lower part of the screen. |

|
Icon |
Description |
|
|
Add a participant to your room. |
|
|
Invite a participant to your room via email. |
|
|
Toggle between locking and unlocking your room. Locking prevents additional users from accessing your room. |
|
|
Record or record and webcast a meeting using a selected VidyoReplay Record profile. This option only displays if your system includes VidyoReplay. At least one participant must be in a conference for the recording to take place. |
|
|
Pause a recording or webcast. This option only displays if your system includes VidyoReplay. |
|
|
Stop a recording or webcast. This option only displays if your system includes VidyoReplay. |
|
|
Set a moderator PIN, create or remove a room link, and set a room PIN. See Configure settings. |
|
|
Disable video on all participants’ cameras without allowing them to re-enable. Or, disable video on a selected participant’s camera without allowing that participant to re-enable it. When selected, this button turns red and remains red. |
|
|
Disable video on all participants’ cameras and allow them to re-enable. When selected, this button briefly turns red and then returns to gray. |
|
|
Mute audio on all participants’ microphones without allowing them to re-enable. Or, mute audio on a single participant’s microphone without allowing that participant to re- enable it. When selected, this button turns red and remains red. |
|
|
Mute audio on all participants’ microphones and allow them to re-enable. When selected, this button briefly turns red and then returns to gray. |
|
|
Disconnect all participants from your meeting room. Or, disconnect a single participant from your meeting room. |
|
|
Alphabetically sort the list of your participants. |
|
|
Sort the list of your participants in attendance order. |
|
|
Toggle between viewing the current conference duration and viewing the current time of day. The conference timer is the default view. |
Configure settings via the Control Meeting page
The Control Meeting page provides access to the Settings dialog box. This dialog box enables you to access the VidyoReplay Library, configure or change a Moderator PIN, Room Link, Room PIN, Webcast Link, and Webcast PIN. You can also use this dialog box to enable and disable Presenter Mode.
|
Note VidyoReplay is an optional server appliance that enables users to stream live or pre-record video. For more information about VidyoReplay, contact your Vidyo sales representative. |
To configure your conference settings via the Control Meeting page:
- Log in to the Admin portal using your Admin account. The Users page displays by default.
- Click the Meeting Rooms tab. The Manage Meeting Rooms page displays.
- Click the Control Meeting link in the Control Meeting column of the meeting that needs to be controlled. The HTML-based Control Meeting page displays.
- Click the three-dots icon. The Settings dialog box displays.
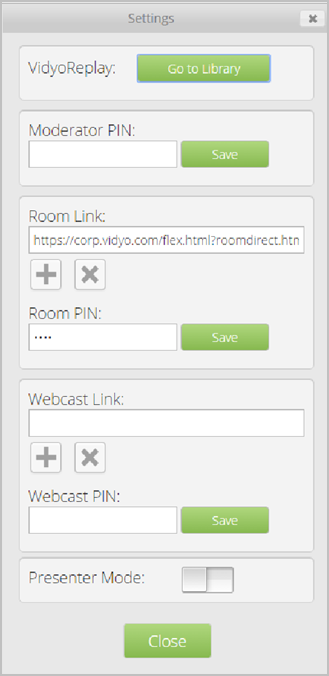
- Perform any of the following tasks:
- Click Go to Library if your system includes VidyoReplay and you want to access your VidyoReplay library. For more information, refer to the VidyoReplay Administrator Guide.
- To set a Moderator PIN:
- Enter four characters in the Moderator PIN text box.
- Click Save.
- To change or delete the room link URL (which is the link used by participants and guests to join the room):
- Click the plus sign to create a new room link URL. The system automatically generates a new link URL and displays it in the Room Link field.
- Click the X icon to remove the room link URL that currently displays in the Room Link field.
- To set a Room PIN:
- Enter four characters in the Room PIN textbox.
- Click Save.
- Participants will be prompted to enter this PIN before they can join the room. Therefore, the meeting organizer should provide the participants with this PIN prior to holding meetings in the room.
- To change or delete the Webcast Link URL, which is the link used by participants and guests to access a webcast:
- Click to create a new Webcast Link URL. The system automatically generates a new webcast link URL and displays it in the Webcast Link field.
- Click to remove the webcast link URL that currently displays in the Webcast Link field.
- When generating webcast links, the system resolves the VidyoReplay URL using DNS settings and establishes a connection on port 80 or 443 (depending on whether you have VidyoReplay security enabled). Therefore, port 80 or 443 must be opened on your network so your webcast links will work properly. See Appendix A. Firewall and Network Address Translations (NAT) deployments, and refer to the VidyoReplay Administrator Guide.
- To set a Webcast PIN:
- Enter four characters in the Webcast PIN textbox.
- Click Save.
- Viewers will be prompted to enter this PIN before they can view the webcast. Therefore, the webcast owner should provide viewers with this PIN when notifying them about the webcast.
- Click the Presenter Mode switch to enable or disable Presenter mode.
- When Presenter Mode is enabled and a user joins a Vidyo meeting, instead of seeing all the meeting participants, the user sees the presenter only, or if the presenter has not yet joined the meeting, the user sees a message telling them to please wait for the meeting to begin. In addition, the user’s microphone is muted.
- When enabling Presenter mode, a system notification displays at the top of the HTML-based Control Meeting screen asking you to “Please assign a presenter or click ‘Group’ to exit this mode” and you must select a participant as the presenter.
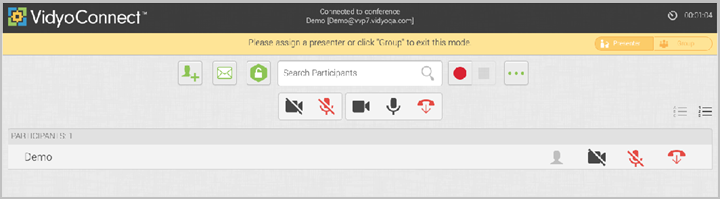
- Click Close to close the Settings dialog box. If you clicked the Presenter Mode switch, the Settings dialog box closes automatically.
A system notification then displays asking you to “Please wait for Presenter mode to begin.” When disabling Presenter Mode, a notification displays asking “Are you sure you want to exit Presenter mode?” and you must click OK.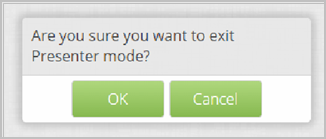
A system notification then displays asking you to “Please wait for Presenter mode to end.”
|
Note Alternatively, you can access Presenter Mode by clicking the Presenter button on the Control Meeting page, and you can exit Presenter Mode by clicking the Group button. Waiting Room mode and some Presenter Mode configurations are controlled by the Tenant Admin. See Configure custom parameters. |
Control a meeting from VidyoConnect
Users who do not have administrator rights can access the Control Meeting page from VidyoConnect only if they are the room owner or if they have been provided with the Moderator PIN. For more information, refer to the VidyoConnect section of the Vidyo Help.
Control a meeting from a tablet
If a user receives an invitation to a Vidyo meeting, and they click the guest link from their tablet, they are provided with an option to moderate the meeting. The user can moderate a meeting in their own room or in another person’s room by entering the Moderator PIN.
To control a meeting from a tablet:
- Launch your email application on your tablet.
- Open your Vidyo conference meeting invitation.
- Tap the room link in your meeting invitation. The Vidyo page displays.
- Tap Manage Conference. The Control Meeting Login dialog box displays.
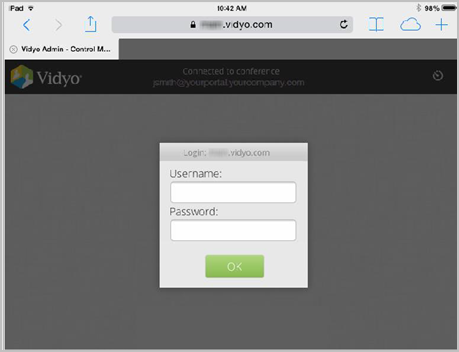
- Enter your Username and Password.
- Tap OK.
- If the conference is being held in your own room, the Control Meeting screen displays.
- If the conference is being held in another user’s room, you must first provide the Moderator PIN.
- Enter the Moderator PIN provided by the room owner in the Moderator PIN dialog box.
- Tap OK.
- For more information about the tasks that you can perform from the Control Meeting screen, see Control meetings.
Manage participants
To manage participants:
- Log in to the Admin portal using your Admin account. The Users page displays by default.
- Click the Meeting Rooms tab. The Meeting Rooms page displays.
- Click Control Meeting for the meeting room containing participants you want to manage. The HTML-based Control Meeting screen displays. See Control meetings.
