14. Configure settings as the Tenant Admin
Check your license terms
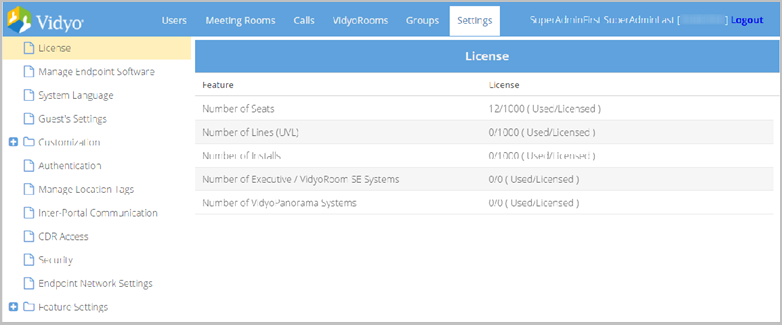
The License page under the Settings tab provides you with a report of:
- How many lines are licensed and how many have been allocated (used).
- How many installs are licensed and how many have been allocated (used).
- How many Executive Desktops (here called Executive Systems) are licensed and how many have been allocated (used).
To check your license terms:
- Log in to the Admin portal using your Admin account. See Log in as a Tenant Admin. The Users page displays by default.
- Click the Settings tab. The License page displays by default.
- Review your license terms shown on the License page.
Manage endpoint software
Super Admins can select one of the following file server modes for you to deliver endpoint software updates to your users:
- External file server or CDN (Content Delivery Network) so that endpoints can automatically download them from there. Since CDNs can be geo-located, downloads are typically faster. Additionally, for large-scale client distributions, impact on the VidyoPortal performance is significantly reduced.
- VidyoPortal. Most administrators prefer having users install their VidyoConnect software by accessing VidyoPortal when provided a user name and password you assign them. When your users access the VidyoPortal, the VidyoConnect software is installed even if users do not have administrator privileges. You provide this software to your users when new versions of the VidyoConnect and VidyoRoom client software become available from Vidyo by uploading the new software to your servers using the Manage Endpoint Software page.
- VidyoConnect for Desktop
- VidyoConnect Room
Your users are automatically prompted to download the new version the next time they log in. Users can choose to update their software or skip the update if desired.
Installation files for various client types include the following:
The Super Admin user uploads the latest version of Vidyo client software and makes it available to all users of the Vidyo conferencing System. A Tenant Admin user can also upload Vidyo client software for users on their own tenant. This helps the Tenant Admin decide when they want to make endpoint software available for their own users.
On the Manage Endpoint Software page, you can upload up to four different versions of each type of endpoint software, but for each type you must make just one active. (Linux is the exception. Up to four Linux versions can be active.) It is the active version that downloads automatically for VidyoPortal users when they first use the system or upgrade to a new version.
|
Note Since Super Admin endpoint software uploads overwrite Tenant Admin uploads, Tenant Admins should always upload files on their tenants after Super Admin uploads are completed. Download the latest version of the software to your computer. The link is provided to you by your reseller or by Vidyo Customer Support. |
Upload endpoint software installation files
The layout of the Endpoint Software Versions page is based on the file server mode that the Super Admin chooses from the Super Admin portal.
Upload endpoint software installation files to an external server or CDN
To upload endpoint software installation files to an external server or CDN:
- Log in to the Admin portal using your Admin account. The Users page displays by default.
- Click the Settings tab. The License page displays by default.
- Click Manage Endpoint Software on the left menu. The Manage Endpoint Software page displays.
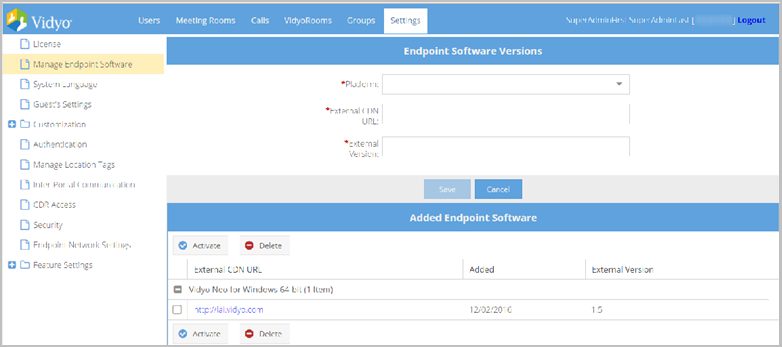
- Select the appropriate software version from the Platform drop-down.
- Enter the appropriate URL in the External CDN URL field.
- Enter the associated version in the External Version field.
- Click Save. From the Added Endpoint Software list, you can activate or delete external CDN URLs for your users from the list.
Upload endpoint software installation files to VidyoPortal
To upload endpoint software installation files to VidyoPortal:
- Log in to the Admin portal using your Admin account. The Users page displays by default.
- Click the Settings tab. The License page displays by default.
- Click Manage Endpoint Software on the left menu. The Manage Endpoint Software page displays.

- Click Browse.
- Click Upload to import the installation file after selecting it.
|
Note To avoid failure messages, make sure you are uploading Vidyo software only. The software file name ends with an .exe extension for Windows and VidyoRoom and .dmg for Macintosh. We recommend uploading the latest version of the software when it becomes available to help make sure all system users are utilizing the most up-to-date Vidyo software. |
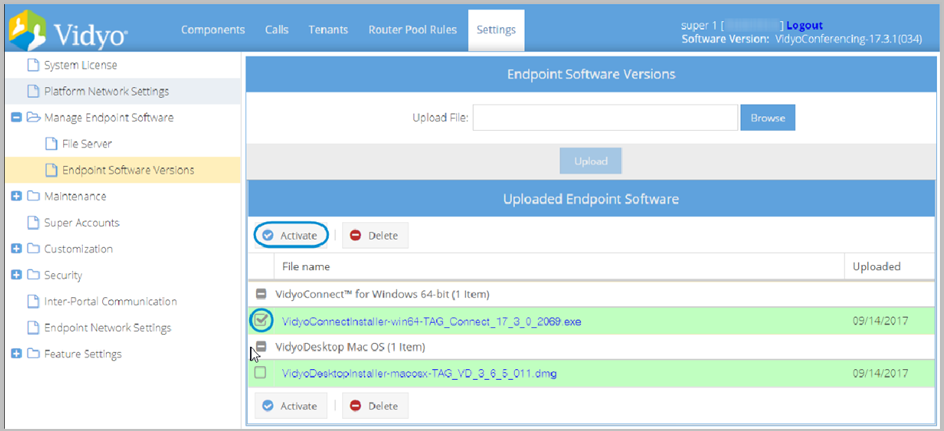
When the endpoint installation file is uploaded, it displays in the Uploaded Endpoint Software list under its corresponding heading. Scroll through this list to view all available installation files. From the Uploaded Endpoint Software list, you can activate or delete installers for your users from the list.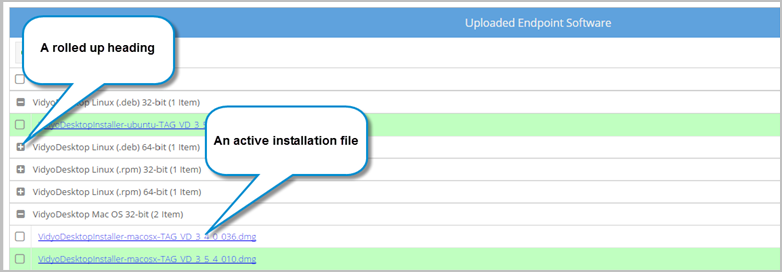
Activate an endpoint installation file
To activate an endpoint installation file:
- Log in to the Admin portal using your Admin account. The Users page displays by default.
- Click the Settings tab. The License page displays by default.
- Click Manage Endpoint Software on the left menu. The Manage Endpoint Software page displays.
- Select the checkboxes for the files you wish to activate.
- Click Activate at the top or bottom of the list. The file name displays highlighted in green.
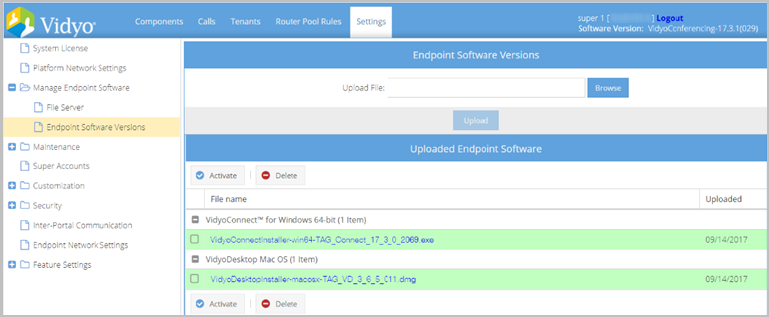
You can upload up to four different versions of each type of endpoint software, but for each type you must make just one active. (Again, Linux is the exception. Up to four Linux versions can be active.) It is the active version that downloads automatically for VidyoPortal users when they first use the system or upgrade to a new version.
Delete an endpoint installation file
To delete an endpoint installation file:
- Log in to the Super Admin portal using your Super Admin account. The Users page displays by default.
- Click the Settings tab. The License page displays by default.
- Click Upload Endpoint Software on the left menu. The Upload Endpoint Software page displays.
- Select the checkboxes for the files you wish to delete.
- Click Delete.
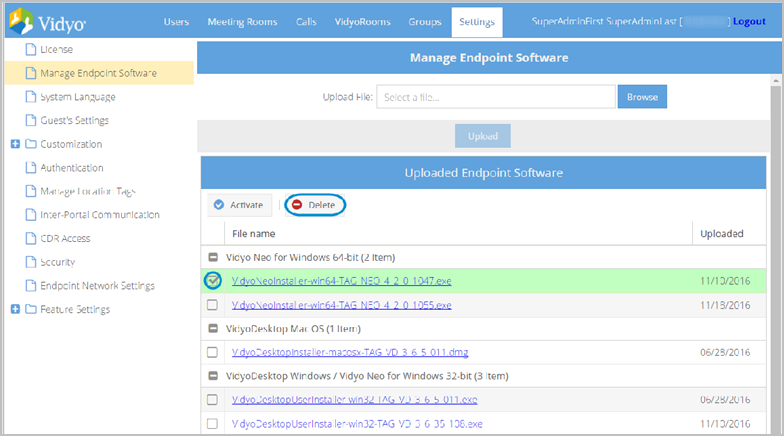
- Click Yes in the Confirmation pop-up that opens. If you delete a file by mistake, you must always upload it again provided you have not deleted it from your computer. If the file you mistakenly deleted is the current version of the client you also have the option of downloading it again from your reseller or Vidyo Customer Support.
Set the tenant language
- Chinese (Simplified)
- Chinese (Traditional)
- English
- Finnish
- French
- German
- Italian
- Japanese
- Korean
- Polish
- Portuguese
- Russian
- Spanish
- Thai
- Turkish
To set the system language of your tenants to one of the 15 available languages:
- Log in to the Admin portal using your Admin account. The Users page displays by default.
- Click the Settings tab. The License page displays by default.
- Click System Language on the left menu. The System Language page displays.
- Select the System Language from the Default System Language drop-down.
- Click Save.
|
Note This overrides the language set by the Super Admin. Once selected, the page immediately shows your chosen language. It also then becomes the system or tenants’ default language. |
Configure guest settings
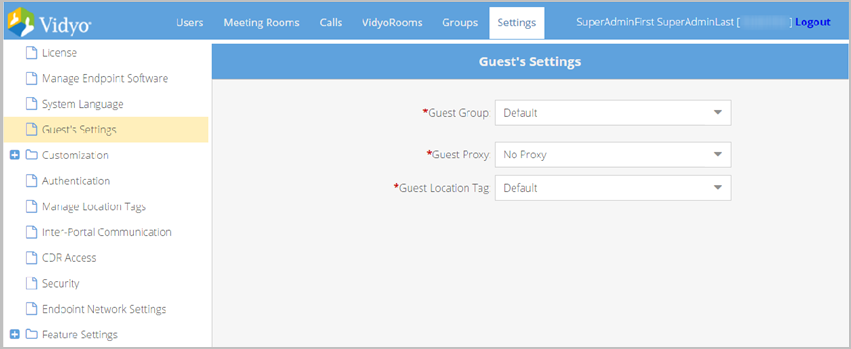
The Guest’s Settings page enables you to assign guest users to a group and specify a Location Tag for all guest users. A guest user is an unregistered user of the Vidyo conferencing system, but can join meetings to which they are invited by a registered user. In the Settings tab, select Guest’s Settings and perform the following:
To provide guest users with group assignments and location tags:
- Log in to the Admin portal using your Admin account. The Users page displays by default.
- Click the Settings tab. The License page displays by default.
- Click Guest’s Settings on the left menu. The Guest’s Settings page displays.
- Assign guest users to a group by selecting one from the Guest Group list.
- Assign guest users to a proxy by selecting one from the Guest Proxy list.
- Assign guest users a location tag by selecting one from the Location Tag list.
- Click Save.
Configure customization on your tenant
The Customization left menu item provides additional tabs for making a variety of settings on your tenant.
Customize the About Us info
The About Info page enables you to create and format an About Us page that displays when users click About Us at the bottom of the VidyoPortal home page and the VidyoPortal Admin and Super Admin Portal.
|
Note Configurations made in the Tenant Admin portal override settings made in the Super Admin portal. Because of the limitations of Adobe Flash, URLs and other markup information can be inserted into the text but must conform to HTML 1.1 specifications. |
To customize the About Us information:
- Log in to the Admin portal using your Admin account. The Users page displays by default.
- Click the Settings tab. The License page displays by default.
- Click the plus sign to the left of Customization on the left menu.
- Click the About Info from the submenu. The About Info page displays.
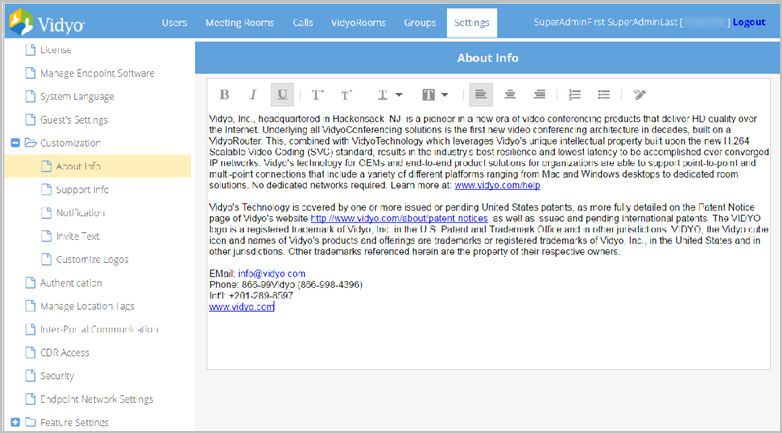
- Enter text or paste text you have copied from another application.
- Apply any formatting desired.
- Click Save.
Revert to default system text on the About Info screen
|
Note Configurations made in the Tenant Admin portal override settings made in the Super Admin portal. |
To revert to default system text on the About Info screen:
- Log in to the Admin portal using your Admin account. The Users page displays by default.
- Click the Settings tab. The License page displays by default.
- Click the plus sign to the left of Customization on the left menu.
- Click the About Info from the submenu. The About Info page displays.
- Click Default to remove any previously saved customized text and revert to the default system text provided by Vidyo. A Confirmation pop-up displays.
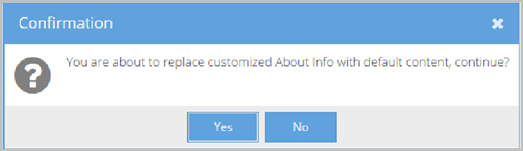
- Click Yes.
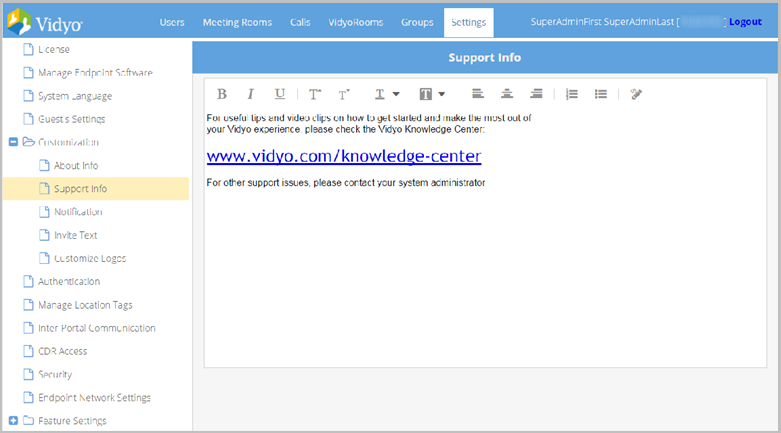
Customize support information
The Support Info page enables you to create and format a contact page that displays when users click Support at the bottom of the VidyoPortal home page, as well as the Login page. This is information your users need to use to contact you. This page is inherited from the Super Admin, but you can customize it here per Tenant.
|
Note Configurations made in the Tenant Admin portal override settings made in the Super Admin portal. |
To customize the Support information:
- Log in to the Admin portal using your Admin account. The Users page displays by default.
- Click the Settings tab. The License page displays by default.
- Click the plus sign to the left of Customization on the left menu.
- Click Support Info from the submenu. The Support Info page displays.
- Enter text or paste text you have copied from another application.
- Apply any formatting desired.
- Click Save.
|
Note Because of the limitations of Adobe Flash, URLs can be inserted into the text but they must conform to HTML 1.1 specifications. |
Revert to default system text on the support info screen
|
Note Configurations made in the Tenant Admin portal override settings made in the Super Admin portal. |
To revert to default system text on the Support Info screen:
- Log in to the Admin portal using your Admin account. The Users page displays by default.
- Click the Settings tab. The License page displays by default.
- Click the plus sign to the left of Customization on the left menu.
- Click Support Info from the submenu. The Support Info page displays.
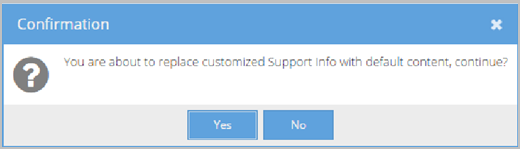
- Click Default to remove any previously saved customized text and revert to the default system text provided by Vidyo. A Confirmation pop-up displays.
- Click Yes.
Customize notification information
The Notification page enables you to enter From and To email information that’s used by the VidyoPortal for automated emails. The From address you enter is used for automated emails sent out by the VidyoPortal, such as confirmations to new users that their accounts are activated, and other correspondence.
You can elect to have status updates about the Vidyo system sent to an IT staff person in your organization. The To address should be the email address of the person who should receive alerts for action required by the VidyoPortal. Configure SMTP and Security information as desired.
|
Note If a "From" email address is not provided, SMTP servers may block emails or change email headers. Configurations made in the Tenant Admin portal override settings made in the Super Admin portal. |
To customize Notification information:
- Log in to the Admin portal using your Admin account. The Users page displays by default.
- Click the Settings tab. The License page displays by default.
- Click the plus sign to the left of Customization on the left menu.
- Click Notification from the submenu. The Notification page displays.
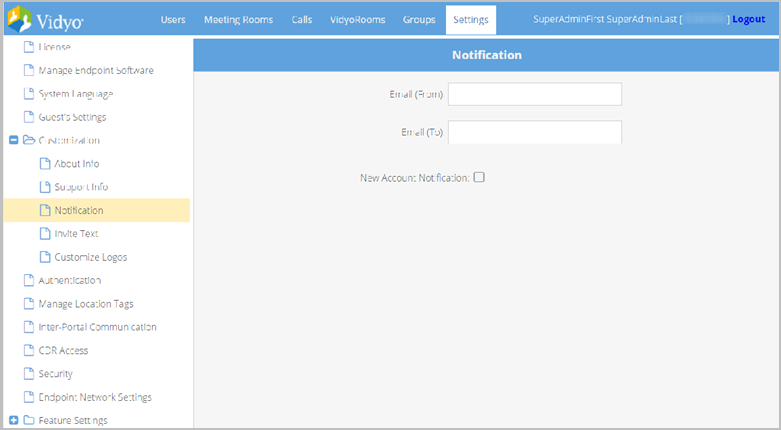
- Enter the Email (From) and Email (To) email addresses.
- Select the New Account Notification checkbox to have the system send a welcome email to each new account created.
- Click Save.
Customize the invite text
The Invite Text page enables you to customize the boilerplate messages sent by users to invite others to attend meetings in their rooms.
There are three kinds of invitations.
- Email Content text is sent for VidyoConferences.
- Voice Only text is sent to those participating in voice-only mode via telephone.
- Webcast text is sent to participants accessing your webcast.
As with the other informational text boxes on the Customization pages, you can use the text as is or modify it as you wish. If you decide to delete the default text and replace it with new text, it’s important for you to understand how to use the green buttons in the upper right hand corner of the page.
|
Note Configurations made in the Tenant Admin portal override settings made in the Super Admin portal. |
For more information, see Customize the invite text.
To customize Invite Text:
- Log in to the Admin portal using your Admin account. The Users page displays by default.
- Click the Settings tab. The License page displays by default.
- Click the plus sign to the left of Customization on the left menu.
- Click Invite Text from the submenu. The Invite Text page displays.
- Change the text from the Email Content (Text), Voice Only, Webcast, and Email Subject sections as desired.
- Change the HTML variables from the Email Content (HTML) section as desired. The following system variables (uppercase text inside of brackets) display and can be inserted in sections of your invite text using the following buttons:
- The [DISPLAYNAME] variable inserts the specific user’s display name as it was entered into the system in the Email Content (Text) section.
- The [EXTENSION] variable inserts the room extension (if one is configured) along with the room PIN (if one is configured) in the Email Content (Text) section.
- The [PIN] variable inserts the room PIN (if one is configured) in the Email Content (Text) section.
- The [ROOMNAME] variable inserts name of the room for which the invite was issued in the Email Content (Text) section.
- The [TENANTURL] variable inserts the name of the tenant in the Email Content (Text) section.
- Add a new dial-in number by navigating to the Dial In Numbers section and performing the following steps if necessary:
- Click Add.
- Enter the number in the Dial-in Number field.
- Enter a label for the number in the Dial-in Number Label field if necessary.
- Click Update. The Country Code field auto-populates upon clicking Update. Click Remove to delete the dial-in number if necessary.
- Click Save to save the invitations.
|
Icon |
Description |
|
|
Available in the Email Content (Text), Email Content (HTML), and Voice Only sections, the [DIALIN_NUMBER] variable inserts the dial-in number of your room into your invite text and HTML. |
|
|
Available in the Email Content (Text), Email Content (HTML), and Voice Only sections, the [PIN_ONLY] variable inserts the PIN (if one is configured) of your room into your invite text and HTML. |
|
|
Available in the Email Content (Text), Email Content (HTML), and Voice Only sections, the [EXTENSION_ONLY] variable inserts the room extension (if one is configured) into your invite text and HTML. |
|
|
Required in the Email Content (Text) and Email Content (HTML) sections, the [ROOMLINK] variable inserts a hyperlink to your room into your invite text and HTML. When accessed from a tablet, room links may be used to join a conference, annotate, or manage a meeting. |
|
|
Available in the Email Content (Text) and Email Content (HTML) sections, the [LEGACY_URI] variable inserts the URI that participants will use to access your room from Legacy endpoints. |
|
|
Available in the Email Content (HTML) section, the [AVATAR] variable inserts the avatar link, which points to the specific user’s profile thumbnail, into your invite HTML. |
|
|
Available in the Email Content (HTML) section, the [USER_TITLE) variable inserts the specific user’s title into your invite HTML. |
|
|
Available in the Email Content (HTML) section, the [USER_DISPLAYNAME] variable inserts the specific user’s display name as it was entered in to the system into your invite HTML. |
|
|
Available in the Email Content (HTML) section, the [ROOMNAME] variable inserts name of the room for which the invite was issued into your invite HTML. |
|
|
Available in the Email Content (HTML) section, the [TENANT_LOGO] variable inserts the tenant’s logo into your invite HTML. |
|
|
Available in the Email Content (HTML) section, the [INTERNATIONAL_DIALIN] variable inserts the specific dial-in number that is defined in the Dial In Numbers section below. |
|
|
Available in the Voice Only section, the [DIALSTRING] variable inserts the phone number participants will use to access your room voice-only telephones. |
|
|
Required in the Webcast section, the [WEBCASTURL] variable inserts the URL that participants can use to access your webcast. |


Some additional variables (ones that do not have buttons or icons) and display in sections of your invite text include:
|
Note If applicable, modify the default text in the Email Content (Text) section with your VidyoGateway IP address for your participants accessing your conference from Legacy endpoints. |
Make common invite text changes
You can make the following common changes to invite text:
- If your organization uses mobile devices that support a tap-to-connect functionality, you can add the following template to your invite: Voice only users can tap-to-connect: “[DIALIN_NUMBER], [EXTENSION]#”.
- If your organization has disabled guest access, delete the line about joining as a first-time user from your desktop or mobile device, or to annotate with VidyoSlate on your iPad: Click [ROOMLINK] from the Email Content section.
- If your system includes a VidyoGateway, add the following sentence as part of your email content:
- To join from a non-Vidyo conferencing endpoint: Connect through a VidyoGateway [enter your VidyoGateway IP here] using H.323 or SIP and enter meeting ID [EXTENSION].
- If your organization doesn’t use IPC, delete the line about joining from another VidyoPortal using IPC: Enter [ROOMNAME]@[TENANTURL] from the Email Content section.
- If your organization doesn’t use VidyoVoice, delete the line about using VidyoVoice in the Voice Only section.
- If your organization uses more than one VidyoVoice number, add the additional number or numbers in the Voice Only section.
|
Note When accessed from a tablet, room links may be used to join a conference, annotate, or manage a meeting. |
|
Note Modify the [enter your VidyoGateway IP here] portion with your VidyoGateway IP address. |
|
Note Some browsers may not support email invitation generation due to a limitation on the number of characters in the invite text. Vidyo recommends that you generate the email invitation prior to making that text the default, and reduce the number of characters if needed. |
Revert to default system text on the Invite Text screen
|
Note Configurations made in the Tenant Admin portal override settings made in the Super Admin portal. |
To revert to the default system text on the Invite Text screen:
- Log in to the Admin portal using your Admin account. The Users page displays by default.
- Click the Settings tab. The License page displays by default.
- Click the plus sign to the left of Customization on the left menu.
- Click Invite Text from the submenu. The Invite Text page displays.
- Click Default to remove any previously saved customized text and revert to the default system text provided by Vidyo. A Confirmation pop-up displays.
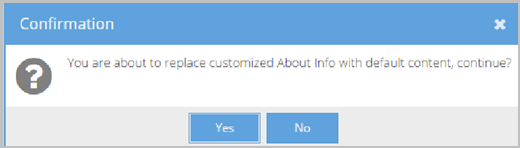
- Click Yes.
Upload custom logos on your tenant
You can customize the logo that appears on the VidyoConnect Download page, which is the page shown to users when a software update is performed, and on the Control Meeting page, which is the page shown to meeting moderators.
|
Note Logo customizations completed at the Super Admin level can be overridden at the Tenant level by Tenant Admins. See Upload custom logos. The customized logos per tenant display on the HTML-based Control Meeting screen. See Control meetings. |
To upload your custom logos:
- Log in to the Admin portal using your Admin account. The Users page displays by default.
- Click the Settings tab. The License page displays by default.
- Click the plus sign to the left of Customization on the left menu.
- Click Customize Logos from the submenu. The Customize Logos page displays.
- Click Browse… to locate the logo that needs to be uploaded.
- Select your logo file and click Upload. For best appearance, use a logo saved with a transparent background.
- Click View to see the logo file currently in use. The logo file displays in a new browser tab.
- Click Remove to delete the logo file currently in use. If you remove a customized logo file, it is replaced with the system default Vidyo logo.
|
Note The VidyoConnect Download Page logo must be 145 x 50 pixels and can be in the .gif, .jpg, or .png formats. See Control meetings. |
Configure authentication
If you do not want to use the local VidyoPortal database to authenticate your users, you can configure your tenant to use LDAP, Web Services, or SAML authentication. See Configure authentication using REST Web Services or Configure authentication using SAML.
For REST Web Services, LDAP, and Web Service authentication, you can then apply settings to specific user types.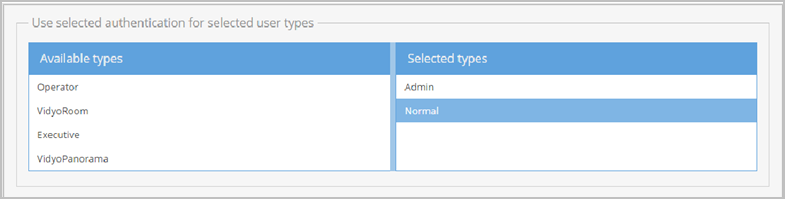
Configure authentication using REST Web Services
Using REST Web Service Authentication requires an enabled Vidyo API license. The Authentication page only allows you to configure REST Web Service Authentication if you have the API license enabled.
To configure REST Web Service authentication:
- Log in to the Admin portal using your Admin account. The Users page displays by default.
- Click the Settings tab. The License page displays by default.
- Click Authentication on the left menu. The Authentication page displays.
- Select REST WS from the Authentication Type drop-down.
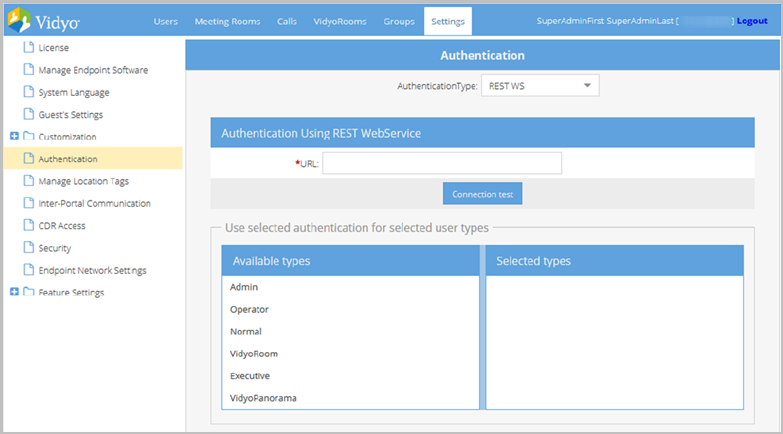
- Enter the URL of your authentication server in the URL field.
- Click Connection test. If your connection test fails:
- Verify that the user name and password are correct.
- Verify the connection to your REST Web Service.
- Apply authentication to specific user types using the following section.
- Click Save.
Users cannot log in to the VidyoPortal until the REST Web Service connectivity is restored. For security reasons, there is no fallback to the VidyoPortal database.
|
Note A successful connection test is required to enable the Save button on the lower part of the screen. |
Configure authentication using LDAP
LDAP Authentication can be used two ways: LDAP Authentication with Manual User Creation and LDAP Authentication with Auto-Provisioning.
Regardless of which LDAP Authentication method you use, your LDAP server must first be set up.
Configure your VidyoPortal tenant to use your LDAP server
When you configure your VidyoPortal to use your LDAP Server, you can set it to use a directory system, such as Microsoft Active Directory or Oracle Directory Server, to authenticate your users. When LDAP authentication is enabled on your tenant, your VidyoPortal uses the LDAP protocol to pass your user logins to your directory system for authentication.
Any Vidyo user type (except for the Super Admin and System Console accounts) can be authenticated by LDAP (Normal, Operator, Admin, VidyoRoom, etc.).
|
Note To use secured LDAP, upload your LDAP certificate chain (intermediates and root) from your certification authority using the Security page before enabling LDAP. See Secure your Vidyo conferencing system with SSL and HTTPS. When LDAP authentication is enabled, the User and Admin Portals do not show Change or Forgot Password options. |
To configure your VidyoPortal to use your LDAP server:
- Log in to the Admin portal using your Admin account. The Users page displays by default.
- Click the Settings tab. The License page displays by default.
- Click Authentication on the left menu. The Authentication page displays.
- Select LDAP from the Authentication Type drop-down. The Authentication page expands and shows additional fields as follows:

- Enter the following information:
- Enter the LDAP server URL in the URL field.
- The format is ldap://[IP or FQDN address]/:389.
- Overwrite the auto-populated credentials in the Bind DN or username field to log in to the LDAP server if necessary. For example: uid=user, ou=employees, dc=vidyo, dc=com.
- Overwrite the auto-populated password in the Bind password field needed to bind with the LDAP server if necessary.
- Enter the base object (baseObject) used for searching in the optional Search base field. For example: ou=employees, dc=vidyo, dc=com.
- Enter the configuration string to return the LDAP Distinguished Name (DN) in the Filter template field. For example: uid=<> where <> is replaced by the VidyoPortal user name during authentication.
- Select the base object (baseObject) from the Scope options to search:
- Select Object to search the named entry; typically used to read just one entry.
- Select One level to search the entries immediately below the base DN.
- Select Subtree to search the entire subtree starting at the base DN.
- Click the Connection Test button. The Connection Test pop-up displays.
- Enter your LDAP user name and password.
- If validation is successful and the LDAP settings are working, click Save to save your LDAP settings.
- If validation fails, use a third-party LDAP tool such as LDAP Browser and try the same connection string you are using with the VidyoPortal.
- Configure authentication on your tenants using your desired method: LDAP Authentication with Manual User Creation or LDAP Authentication with Auto-Provisioning. See Configure LDAP authentication with manual user creation or Configure LDAP authentication with auto-provisioning.
- Apply authentication to specific user types. See Apply authentication (LDAP or Web Service) to specific user types.
- Click Save.
|
Note Field entries on the screenshot show a typical LDAP configuration. |
|
Note To use secure LDAP (LDAPS), use an “ldaps” prefix: ldaps://[IP or FQDN address]/:636 |
|
Note The user must be able to search the LDAP tree. |
|
Note A successful connection test is required to enable the Save button on the lower part of the screen. |
This determines whether your LDAP settings are correct.
Configure LDAP authentication with manual user creation
This LDAP Authentication method requires you to manually create user accounts on your tenant. The user attributes can be manually changed and configured; however, only the password is verified against your LDAP server configured in the previous section.
To configure LDAP authentication with manual user creation:
- Log in to the Admin portal using your Admin account. The Users page displays by default.
- Click the Settings tab. The License page displays by default.
- Click Authentication on the left menu. The Authentication page displays.
- Configure your VidyoPortal to use your LDAP server. See Configure your VidyoPortal tenant to use your LDAP server.
- Create user accounts manually on your tenant. User accounts can be added at any time. See Add a new user or Import users.
- Apply authentication to specific user types. See Apply authentication (LDAP or Web Service) to specific user types.
- Click Save.
|
Note When you create a new user with LDAP authentication enabled, the user name must match the user name configured on your LDAP server. See the Filter template field explained in the previous section. When creating new users, passwords are mandatory; however, when you enable LDAP, the password in the local database is not used to authenticate the user. When LDAP authentication is enabled, the User and Admin portals do not provide Change or Forgot Password options. |
LDAP authentication with auto-provisioning
This LDAP Authentication method automatically creates user accounts on your tenant based on mapping configurations. When your users log in to the User or Admin portals, the following takes place:
- The username and password is validated against the LDAP server. See Configure your VidyoPortal tenant to use your LDAP server.
- If authentication succeeds, the LDAP server returns the user’s attributes as you have specified using the LDAP Attributes Mapping pop-up.
- The VidyoPortal then uses the set of attributes returned from the LDAP server to create a new user account in the system.
|
Note Before enabling LDAP Authentication with auto-provisioning, it is highly recommended that you first decide which LDAP attributes you want to map to your VidyoPortal user account attributes. These mapping decisions become your LDAP auto-provisioning scheme during the Edit Attributes Mapping step in the following procedure. |
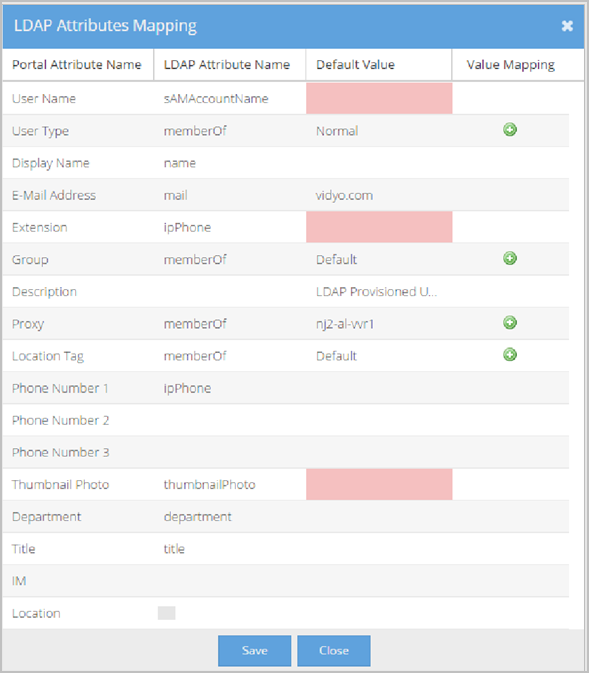
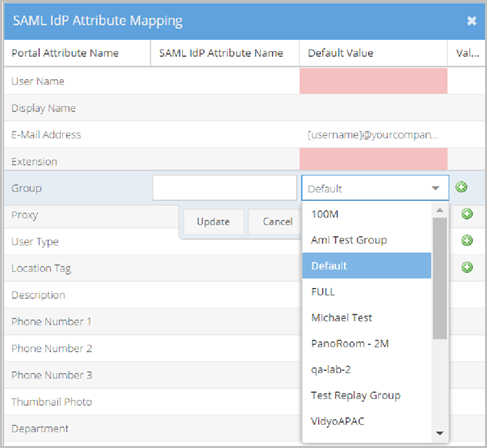
The LDAP Attributes Mapping pop-up looks like this.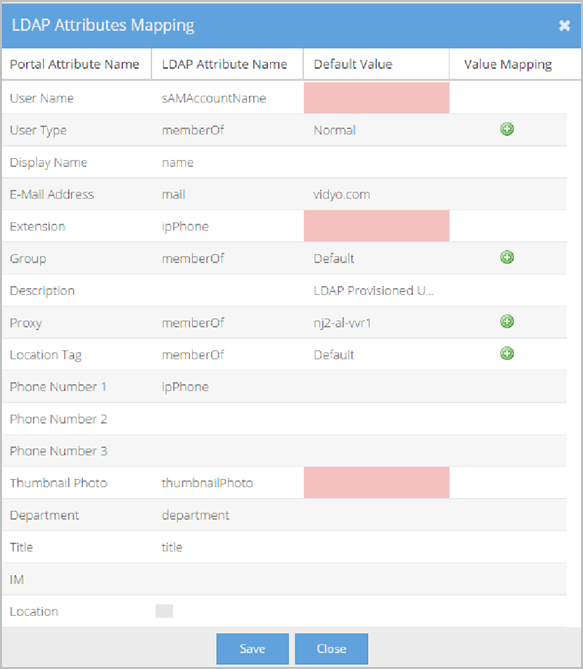
Each row on the LDAP Attributes Mapping pop-up represents an attribute. For each attribute, there is an associated Portal Attribute Name, LDAP Attribute Name, Value mapping (where applicable), and Default Value. These configurations become the rules telling the system what values to populate in specific user account fields when the new account is created.
VidyoPortal user account attributes
When a user is created manually in the VidyoPortal, there is a specific set of attributes required to create an account. The following list of
|
Note When you provision users with LDAP, user data is read-only in the Edit User pop-up after clicking a member name from Users > Manage Users in the Admin portal. |
The following list explains VidyoPortal attributes (Portal Attribute Names) that can be mapped to LDAP Attribute Names. Default Values for the attributes and Value Mapping selection criteria (where applicable) are also explained here.
- User Name is the name of this specific LDAP attribute in the VidyoPortal.
- LDAP Attribute Name: This value maps to the VidyoPortal User Name in your LDAP schema. Many users choose to enter userPrinicpalName as the LDAP Attribute Name when using a Microsoft Active Directory LDAP server. This is a required attribute.
- Default Value - N/A.
- Value Mapping - N/A.
- User Type is the name of this specific LDAP attribute in the VidyoPortal.
- LDAP Attribute Name: This value maps to the User Type in your LDAP schema. Many users choose to enter memberOf as the LDAP Attribute Name. The memberOf value returns a list of groups of which this user is a member. This list is then used for Value mapping selection criteria.
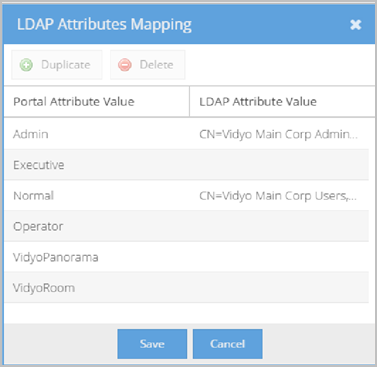
- Default Value: This value is used as the default User Type when the LDAP Attribute Name does not exist or returns an invalid attribute value or no Value mapping criteria is met. You can select from Admin, Operator, Normal, VidyoRoom, and Executive options. See Users.
- Value Mapping - makes specific associations between exact Portal Attribute Values and LDAP Attribute Values based on the LDAP Attribute Name selected for your User Type. Different users return different LDAP Attribute Values. The Attribute Values Mapping pop- up allows you to map specific associations for all possible values returned.
- If desired, select the Duplicate or Remove buttons to create or delete rows in the Attribute Values Mapping pop-up.
- The following screenshot provides an example of a Value mapping configuration where the memberOf LDAP Attribute Name is used.
- Display Name is the name of this specific LDAP attribute in the VidyoPortal.
- LDAP Attribute Name: This value maps to the Display Name in your LDAP schema. Many users choose to enter DisplayName as the LDAP Attribute Name.
- Default Value: This value is used as the Display Name when a value is somehow missing for any reason.
- Value Mapping - N/A.
- E-Mail Address is the name of this specific LDAP attribute in the VidyoPortal.
- LDAP Attribute Name: This value maps to the Email Address in your LDAP schema. Many users choose to enter mail as the LDAP Attribute Name. When a user logs in to the User or Admin portal, the system validates that the LDAP Attribute Name value is actually an email address. Otherwise, the system uses the Default Value.
- Default Value: This value is the domain portion of the automatically created email address for the account. When a user logs in to the User or Admin portal and an invalid email address is provided as the LDAP Attribute Name, the system constructs an email address for the account by taking the User Name provided, combining it with what you type as the Default Value, and inserts an @ symbol in between them.
- For example, if you log in as jsmith and your Default Value is Vidyo.com, the system will automatically construct an email address of jsmith@vidyo.com.
- Value Mapping - N/A.
- Extension is the name of this specific LDAP attribute in the VidyoPortal.
- LDAP Attribute Name: This value maps the Extension in your LDAP schema. You may choose to enter telephoneNumber as the LDAP Attribute Name when using a Microsoft Active Directory LDAP server.
- Default Value - N/A. When a user logs in to the User or Admin portal and an empty or invalid LDAP Attribute Name is retrieved from your LDAP server, the system randomly auto-generates an extension value for the new account.
- Value Mapping - N/A.
- Group is the name of this specific LDAP attribute in the VidyoPortal.
- LDAP Attribute Name: This value maps the Group in your LDAP schema. Many users choose to enter memberOf as the LDAP Attribute Name. The memberOf value returns a list of groups of which this user is a member. This list is then used for Value mapping selection criteria.
- Default Value: This value is used as the default Group Type when the LDAP Attribute Name does not exist or returns an invalid attribute value or no Value mapping criteria is met. The VidyoPortal tenant used in this example has group configured as Default, VidyoUS_East, VidyoUS_West, etc. values from which you can select. Map these groups using the Attribute Value Mapping pop-up.
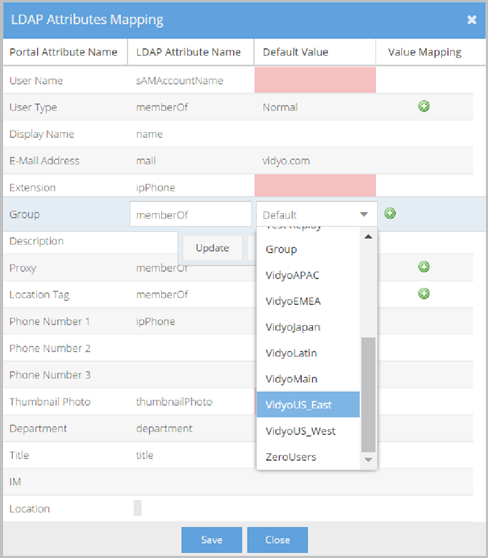
- Value Mapping - makes specific associations between exact Portal Attribute Values and LDAP Attribute Values based on the LDAP Attribute Name selected for your User Type.
- Description is the name of this specific LDAP attribute in the VidyoPortal.
- LDAP Attribute Name: This value maps to the Description in your LDAP schema. You may choose to enter title as the LDAP Attribute Name.
- Default Value: This value is used as the default Description when the LDAP Attribute Name does not exist or returns an invalid attribute value or no Value mapping criteria is met.
- Value Mapping - N/A.
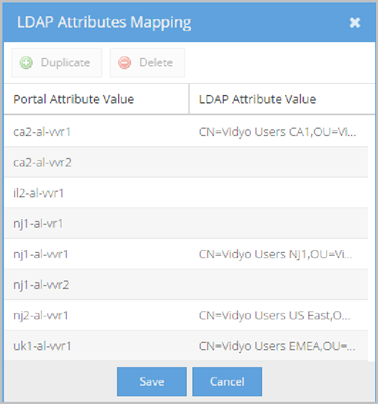
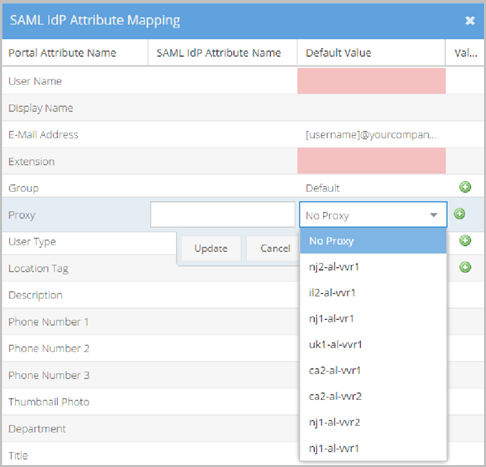
- Proxy is the name of this specific LDAP attribute in the VidyoPortal.
- LDAP Attribute Name: This value maps to the Proxy in your LDAP schema.
- Default Value: This value is used as the default Proxy when the LDAP Attribute Name does not exist or returns an invalid attribute value or no Value mapping criteria is met.
- Value Mapping - makes specific associations between exact Portal Attribute Values and LDAP Attribute Values based on the LDAP Attribute Name selected for your Proxy. Different users return different LDAP Attribute Values. The Attribute Values Mapping pop- up allows you to map specific associations for all possible values returned. Click the Duplicate and Remove buttons to create or delete rows in the Attribute Values Mapping pop-up if desired. The following screenshot provides an example of a Value mapping configuration where the memberOf LDAP Attribute Name is used.
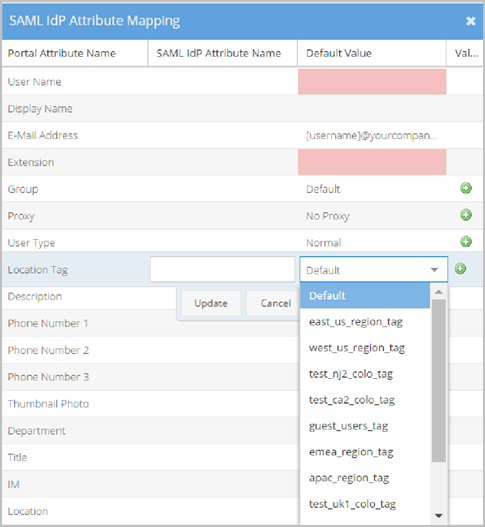
- Location Tag is the name of this specific LDAP attribute in the VidyoPortal.
- LDAP Attribute Name: This value maps to the Location Tag in your LDAP schema. Many users choose to enter physicalDeliveryOfficeName as the LDAP Attribute Name. The physicalDeliveryOfficeName attribute returns the user’s office location. This value is then used for Value mapping selection criteria.
- Default Value: This value is used as the default Location Tag when the LDAP Attribute Name does not exist or returns an invalid attribute value or no Value mapping criteria is met.
- The VidyoPortal tenant used in this example has Location Tags configured as Default, east_us_region_tag, west_us_region_tag, etc. values from which you can select.
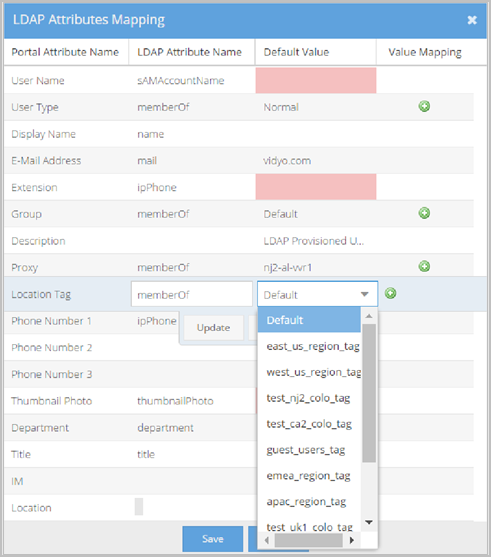
- Value Mapping - makes specific associations between exact Portal Attribute Values and LDAP Attribute Values based on the LDAP Attribute Name selected for your location tag.
- The following attributes are optional biographical information about the user. Therefore, default values are not set for these attributes:
- Phone Number 1
- Phone Number 2
- Phone Number 3
- Department
- Title
- IM
- Location
- Thumbnail Photo is the name of this specific LDAP attribute in the VidyoPortal.
- The Thumbnail Photo must be a .png, .jpg, or jpeg and smaller than the maximum size that the Super Admin configures in Settings > Feature Settings > User Attributes within the Super Admin Portal. See Configure user attributes.
- Default Value - N/A.
- Value Mapping - N/A.
|
Note The LDAP Attribute you associate with the User Name must be specified as part of your Filter template. See Configure your VidyoPortal tenant to use your LDAP server. |
|
Note Default Value may not be configured because this is a mandatory, unique attribute. |
For example, using the screenshot shown here, you can see that when a user is a member of the VidyoAdministratorUser group and logs in to the User or Admin portal, the account is created with the Admin User Type.
|
Note To create these Portal User Type mapping associations, Vidyo recommends your LDAP administrator creates specific security groups on your LDAP server in advance. |
|
Note If you do not type a Default Value for the Display Name in this cell, the system uses the User Name as the default. |
|
Note If you do not wish to map extensions for new accounts, leave the LDAP Attribute Name blank and the system will use the Default Value to randomly auto-generate extension values for new accounts. The number of digits in the auto generated extension values is not fixed and may vary. |
Different users return different LDAP Attribute Values. The Attribute Values Mapping pop- up allows you to map specific associations for all possible values returned.
If desired, select the Duplicate or Remove buttons to create or delete rows in the Attribute Values Mapping pop-up.
The following screenshot provides an example of a Value mapping configuration where the memberOf LDAP Attribute Name is used.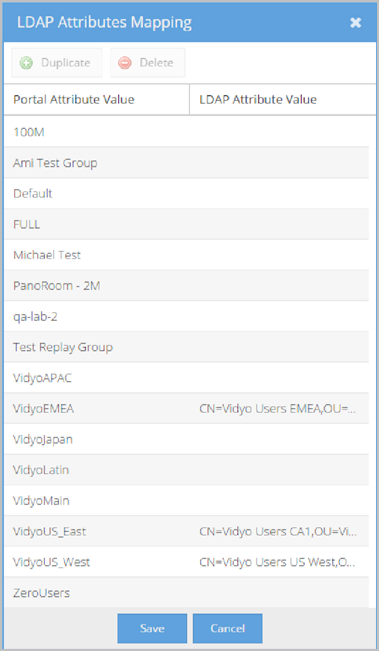
For example, using the screenshot shown here, you can see that when a user is a member of the Default group and logs in to the User or Admin portal, the account is created with the Default Group.
Many users choose to enter memberOf as the LDAP Attribute Name. The memberOf value returns a list of groups of which the particular user is a member. This list is then used for Value mapping selection criteria.
The VidyoPortal tenant used in this example has Proxies configured as nj2-al-vvr1, il2-al- vvr1, nj1-al-vr1, etc. from which you can select. Map these groups using the Attribute Value Mapping pop-up.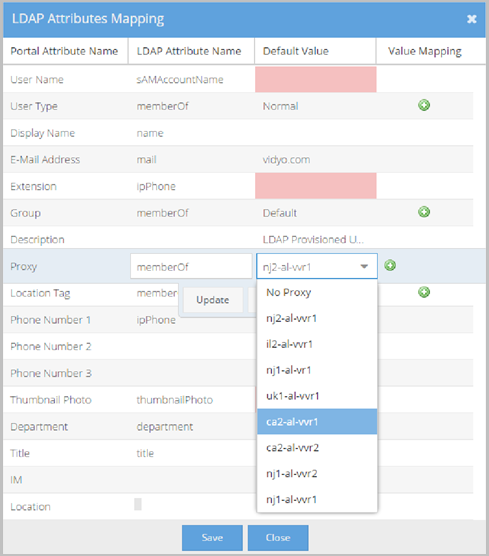
For example, using the screenshot shown here, you can see that when a user is a member of the nj2-al-vvr1 VidyoProxy and logs in to the User or Admin portal, the account is created with the nj2-al-vvr1 VidyoProxy.
Different users return different LDAP Attribute Values. The Attribute Values Mapping pop- up allows you to map specific associations for all possible values returned.
Click the Duplicate and Remove buttons to create or delete rows in the Attribute Values Mapping pop-up if desired.
The following screenshot provides an example of a Value mapping configuration where the physicalDeliveryOfficeName LDAP Attribute Name is used.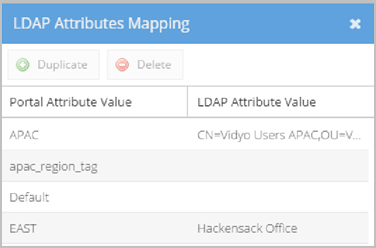
For example, using the screenshot shown here, you can see that when a user is a member of the Hackensack Office group and logs in to the User or Admin portal, the account is created with the EAST Location Tag.
Configure LDAP authentication with auto-provisioning
Before configuring LDAP Authentication with auto-provisioning, it is highly recommended that you first decide which LDAP attributes you want to map to your VidyoPortal user account attributes. These mapping decisions become your LDAP auto-provisioning scheme during the Edit Attributes Mapping step in the following procedure. See LDAP authentication with auto-provisioning and VidyoPortal user account attributes.
To configure LDAP authentication with auto-provisioning:
- Log in to the Admin portal using your Admin account. The Users page displays by default.
- Click the Settings tab. The License page displays by default.
- Click Authentication on the left menu. The Authentication page displays.
- Configure your VidyoPortal to user your LDAP server. See Configure your VidyoPortal tenant to use your LDAP server.
- Select the LDAP Attributes Mapping checkbox. The Edit Attributes Mapping and Test Attributes Mapping buttons display.
- Click Edit Attributes Mapping. The LDAP Attributes Mapping pop-up displays. The LDAP Attributes Mapping pop-up with data looks like this:
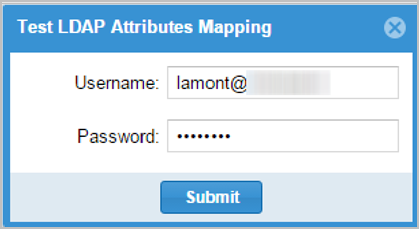
- Click Test Attributes Mapping and provide the user account credentials for the account you wish to test as follows only after configuring your LDAP Attributes Mapping:
- Type the User Name for the account you wish to test.
- Type the Password for the account you wish to test.
- Click Submit.
- Apply authentication to specific user types. See Apply authentication (LDAP or Web Service) to specific user types.
|
Note You should spend some time analyzing your VidyoPortal user account attributes to decide which LDAP attributes you want to associate with them before actually making the configurations in the LDAP Attributes Mapping pop-up. See LDAP authentication with auto-provisioning and VidyoPortal user account attributes. |
Each row on the LDAP Attributes Mapping pop-up represents an attribute. For each attribute, there is an associated Portal Attribute Name, LDAP Attribute Name, Value mapping (where applicable), and Default Value. These configurations become the rules telling the system what values to populate in specific user account fields when the new account is created.
If successful, the LDAP Attributes Mapping results pop-up displays for the account you wish to test.
Configure authentication using Web Services
Using Web Service Authentication requires an enabled Vidyo API license. The Authentication page only allows you to configure Web Service Authentication if you have the API license enabled.
To configure Web Service Authentication:
- Log in to the Admin portal using your Admin account. The Users page displays by default.
- Click the Settings tab. The License page displays by default.
- Click Authentication on the left menu. The Authentication page displays.
- Configure your VidyoPortal to use your LDAP server. See Configure your VidyoPortal tenant to use your LDAP server.
- Select Web Service from the Authentication Type drop-down.
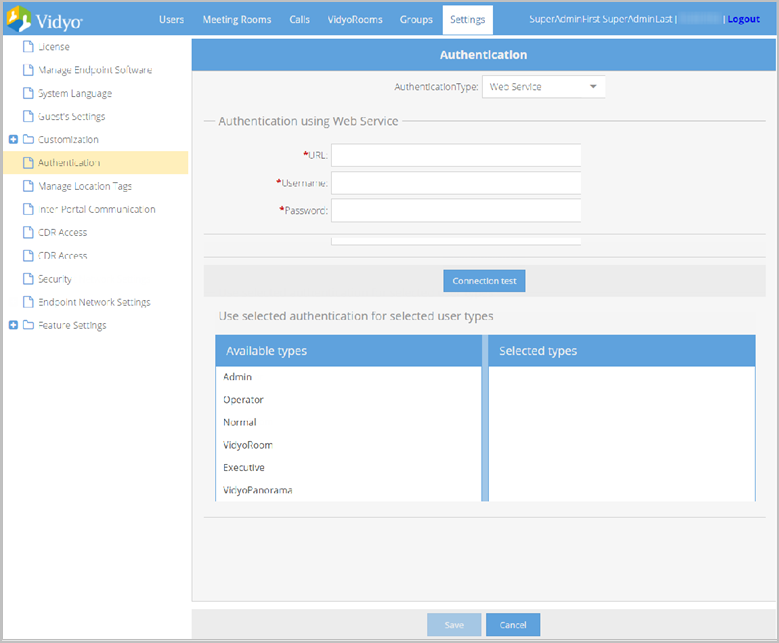
- Enter the URL of your authentication server in the URL field.
- Enter the username and password for your web service.
- Click Connection test.
- Verify that the username and password are correct.
- Verify the connection to your Web Service.
- Apply authentication to specific user types using the following section.
- Click Save.
If your connection test fails:
Normal users cannot log in to the VidyoPortal until Web Service connectivity is restored. For security reasons, there is no fallback to the VidyoPortal database.
|
Note A successful connection test is required to enable the Save button on the lower part of the screen. |
Apply authentication (LDAP or Web Service) to specific user types
The lower portion of the Authentication screen allows you to apply the authentication you configured (LDAP or Web Service) to specific user types.
To apply the configured authentication (LDAP or Web Service) to specific user types:
- Log in to the Admin portal using your Admin account. The Users page displays by default.
- Click the Settings tab. The License page displays by default.
- Click Authentication on the left menu. The Authentication page displays.
- Configure your VidyoPortal to use your LDAP server. See Configure your VidyoPortal tenant to use your LDAP server.
- Configure authentication on your tenants using your desired method: LDAP Authentication with Manual User Creation, LDAP Authentication with Auto-Provisioning, or Web Services. See Configure LDAP authentication with manual user creation, Configure LDAP authentication with auto-provisioning, or Configure authentication using Web Services.
- Select one or more user types to validate by LDAP from the Available types list.
- Click the Right Arrow button to transfer your selection or selections to the Selected types list.
- Click Save.
- Verify that the selected user types are configured with the authentication you selected (LDAP or Web Service) by logging in to your User portal.
Configure authentication using SAML
You can configure authentication using SAML to provide Single Sign-On (SSO) and auto-provisioning capabilities for Normal and Executive user types on your system. Other account types such as VidyoRoom, Admin, and Operator must be manually provisioned. See System accounts.
Once configured, SAML authentication will let your users log in and create Vidyo accounts on-the-fly based on authorized credentials from a SAML Identity Provider (IdP).
|
Note SAML 2.0 functionality operates in browser-based application environments and is not currently supported on VidyoRoom. You cannot use more than one IdP for a given tenant. However, multiple tenants can use the same IdP. Where Are You From (WAYF) services are not supported at this time. |
Configure your VidyoPortal tenant to use your SAML server
When you configure your VidyoPortal tenant for SAML authentication, your VidyoPortal uses the SAML 2.0 protocol to externally authenticate your Vidyo users against your SAML server.
Normal or Executive user types can be authenticated by SAML. See System accounts.
|
Note When SAML authentication is enabled, the User and Admin Portals do not show Change or Forgot Password options. |
You must first choose and configure your user provisioning model before deploying your tenants SP metadata to your IdP. The following topics explain how you can configure your VidyoPortal tenant to manually or automatically provision your users.
Configure SAML authentication with manual user creation
This SAML Authentication method requires you to manually create user accounts on your tenant. The user attributes are manually maintained directly on the VidyoPortal by the Tenant Admin. Only the username and password are externally verified from your SAML server before your VidyoConnect user is logged in to the system.
To configure SAML authentication with manual user creation:
- Log in to the Admin portal using your Admin account. The Users page displays by default.
- Click the Settings tab. The License page displays by default.
- Click Authentication on the left menu. The Authentication page displays.
- Select SAML from the Authentication Type drop-down.
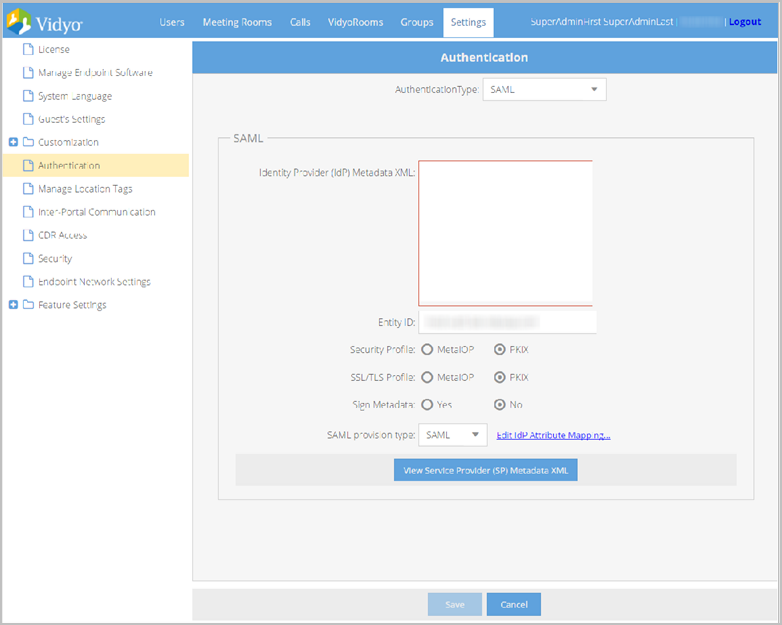
- Enter the following information:
- Enter your IdP Metadata XML in the Identity Provider (IdP) Metadata XML field. Your SAML administrator should be able to provide you with the IdP Metadata.
- The Entity ID field includes your tenants FQDN address by default. However, you may overwrite this default value if necessary.
- Select MetaIOP or PKIX validation from the Security Profile options. PKIX is the most common profile used.
- Select MetaIOP or PKIX validation from the SSL/TLS Profile options.
- Select PKIX if you’re not certain of which profile to choose.
- Select Yes or No from the Sign Metadata options.
- Select Local from the SAML provisioning type drop-down.
- Enter your IdP attribute in the IdP Attribute For User Name field, which will be used when mapping your user names.
- Click View Service Provider (SP) Metadata XML to view your service provider metadata XML for your SAML-enabled tenant.
- Create user accounts manually on your tenant. User accounts can be added at any time. See Add a new user or Import users.
- Click Save.
|
Note If your system includes multiple tenants configured to use SAML authentication, this field must contain a unique entity ID for each tenant. |
|
Note This should be provided to you from your IdP administrator. The value of this attribute must exactly match the user name ID used by your VidyoPortal. |
You can also view the service provider metadata XML for your SAML-enabled tenant by clicking the following URL: https://[tenant.fqdn]/saml/metadata.
|
Note You must provide this metadata XML to your IdP administrator to complete the SAML configuration on your tenant. |
|
Note When you create a new user with SAML authentication enabled, the user name must match the IdP attribute value for user name on your SAML server. When creating new users, passwords are mandatory; however, when you enable SAML, the password in the local database is not used to authenticate the user. When SAML authentication is enabled, the User Portal does not provide Change or Forgot Password options. Only Normal or Executive user types are authenticated by SAML. See System accounts. |
SAML authentication with auto-provisioning
This SAML Authentication method automatically creates user accounts on your tenant based on mapping configurations. When your users log in to the User portal, the following takes place:
- The VidyoPortal redirects the user to your IdP authentication page.
- Your username and password is validated against the SAML IdP server.
- If authentication succeeds, the SAML server returns the user’s attributes as you have specified using the SAML Attributes Mapping pop-up. See VidyoPortal User Account Attributes.
- The VidyoPortal then uses the set of attributes returned from the SAML server to create a new user account in the system.
VidyoPortal user account attributes
When a user is created manually in the VidyoPortal, there is a specific set of attributes required to create an account. The following list of Portal Attributes can be mapped based on SAML IdP Attributes to create accounts automatically.
|
Note When you provision users with SAML, user data is read-only in the system from the Admin Portal > Users > Manage Users > Edit User pop-up. |
The following list explains VidyoPortal attributes (Portal Attribute Names) that can be mapped to SAML Attribute Names. Default Values for the attributes and Value mapping selection criteria (where applicable) are also explained here.
- User Name is the name of this specific SAML attribute in the VidyoPortal.
- SAML IdP Attribute Name - This value maps to the User Name within your existing SAML schema.
- Default Value - N/A.
- Value Mapping - N/A.
- User Type is the name of this specific SAML attribute in the VidyoPortal.
- SAML IdP Attribute Name - This value maps to the User Type.
- Default Value - This value is used as the default User Type when the SAML IdP Attribute Name does not exist or returns an invalid attribute value or no Value mapping criteria is met.
- Value Mapping - Makes specific associations between exact Portal Attribute Values and IdP Attribute Values based on the IdP Attribute Name selected for your User Type.
- Display Name is the name of this specific SAML attribute in the VidyoPortal.
- SAML IdP Attribute Name - This value maps to the Display Name within your existing SAML schema.
- Default Value - This value is used as the Display Name when a value is somehow missing for any reason.
- Value Mapping - N/A.
- E-Mail Address is the name of this specific SAML attribute in the VidyoPortal.
- SAML IdP Attribute Name - This value maps to the E-Mail Address within your existing SAML schema.
- Default Value - This value is the domain portion of the automatically created email address for the account.
- Value Mapping - N/A.
- Extension is the name of this specific SAML attribute in the VidyoPortal.
- SAML IdP Attribute Name - This value maps to the Extension within your existing SAML schema.
- Default Value - N/A.
- Value Mapping - N/A.
- Group is the name of this specific attribute in the VidyoPortal.
- SAML IdP Attribute Name - This value maps to the Group within your existing SAML schema.
- Default Value - This value is used as the default Group Type when the LDAP Attribute Name does not exist or returns an invalid attribute value or no Value mapping criteria is met. The VidyoPortal tenant used in this example has Groups configured as Default from which you can select. Map these groups using the Attribute Value Mapping pop-up.
- Value Mapping - Makes specific associations between exact Portal Attribute Values and SAML IdP Attribute Values based on the SAML IdP Attribute Name selected for your User Type.
- Proxy is the name of this specific IdP attribute in the VidyoPortal.
- SAML IdP Attribute Name - This value maps to the Proxy in your IdP schema. Many users choose to enter memberOf as the IdP Attribute Name. The memberOf value returns a list of groups of which the particular user is a member. This list is then used for Value mapping selection criteria.
- Default Value - This value is used as the default Proxy when the IdP Attribute Name does not exist or returns an invalid attribute value or no Value mapping criteria is met. The VidyoPortal tenant used in this example has Proxies configured as nj2-al-vvr1, il2-al-vvr1, etc. from which you can select. Map these groups using the Attribute Value Mapping pop-up.
- Value Mapping - Makes specific associations between exact Portal Attribute Values and IdP Attribute Values based on the IdP Attribute Name selected for your proxy. Different users return different IdP Attribute Values. The Attribute Values Mapping pop-up allows you to map specific associations for all possible values returned. Click the Duplicate and Remove buttons to create or delete rows in the Attribute Values Mapping pop-up if desired.
- Location Tag is the name of this specific IdP attribute in the VidyoPortal.
- SAML IdP Attribute Name - This value maps to the Location Tag in your IdP schema.
- Default Value - This value is used as the default Location Tag when the IdP Attribute Name does not exist or returns an invalid attribute value or no Value mapping criteria is met. The VidyoPortal tenant used in this example has Location Tags configured as Default from which you can select.
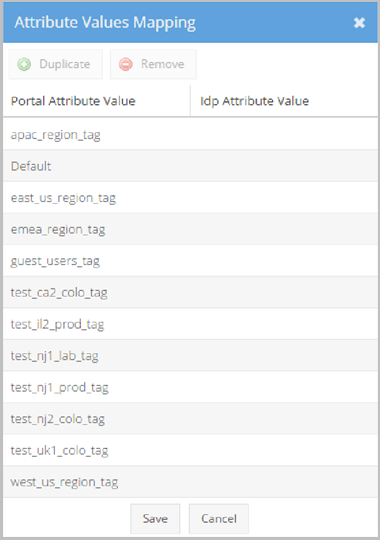
- Value Mapping - Makes specific associations between exact Portal Attribute Values and IdP Attribute Values based on the IdP Attribute Name selected for your location tag. Different users return different IdP Attribute Values. The Attribute Values Mapping pop-up allows you to map specific associations for all possible values returned. Click the Duplicate and Remove buttons to create or delete rows in the Attribute Values Mapping pop-up if desired. The following screenshot shows the Attribute Values Mapping pop-up.
- Description is the name of this specific IdP attribute in the VidyoPortal.
- SAML IdP Attribute Name - This value maps to the Description in your IdP schema.
- Default Value - This value is used as the default Description when the IdP Attribute Name does not exist or returns an invalid attribute value or no Value Mapping criteria is met.
- Value Mapping - N/A.
- The following attributes are optional biographical information about the user. Therefore, default values are not set for these attributes:
- Phone Number 1
- Phone Number 2
- Phone Number 3
- Department
- Title
- IM
- Location
- Thumbnail Photo is the name of this specific SAML attribute in the VidyoPortal.
- The Thumbnail Photo must be a .png, .jpg, or jpeg and smaller than the maximum size that the Super Admin configures in Settings > Feature Settings > User Attributes within the Super Admin Portal. See Configure user attributes.
- Default Value - N/A.
- Value Mapping - N/A.
|
Note Default Value may not be configured because this is a mandatory, unique attribute. |
You can select from Normal or Executive options.
Different users return different IdP Attribute Values. The Attribute Values Mapping pop-up allows you to map specific associations for all possible values returned.
If desired, select the Duplicate or Remove buttons to create or delete rows in the Attribute Values Mapping pop-up.
The following screenshot shows the Attribute Value Mapping pop-up.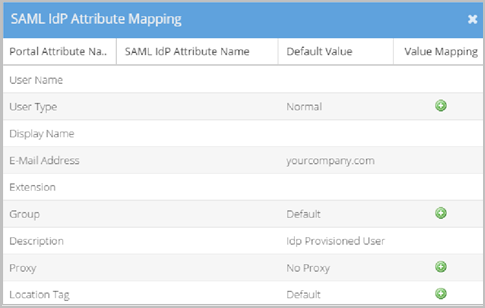
|
Note To create these Portal User Type mapping associations, Vidyo recommends your IdP administrator creates specific security groups on your SAML server in advance. |
|
Note If you do not type a Default Value for the Display Name in this cell, the system uses the User Name as the default. |
When a user logs in to the User portal, the system validates whether the SAML IdP Attribute Name value is actually an email address. If it’s not an email address, the system uses the Default Value.
When a user logs in to the User or Admin portal and an invalid email address is provided as the SAML IdP Attribute Name, the system constructs an email address for the account by taking the User Name provided, combining it with what you type as the Default Value, and inserts an @ symbol in between them.
For example, if you log in as jsmith and your Default Value is Vidyo.com, the system will automatically construct an email address of jsmith@vidyo.com.
When a user logs in to the User or Admin portal and an empty or invalid SAML IdP Attribute Name is retrieved from your SAML server, the system randomly auto- generates an extension value for the new account.
|
Note If you do not wish to map extensions for new accounts, leave the SAML IdP Attribute Name blank and the system will randomly auto-generate extension values for new accounts. |
Different users return different SAML IdP Attribute Values. The Attribute Values Mapping pop-up allows you to map specific associations for all possible values returned.
Click the Duplicate and Remove buttons to create or delete rows in the Attribute Values Mapping pop-up if desired.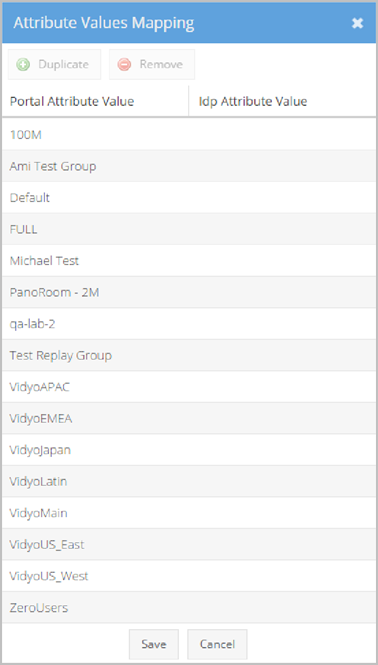
For example, using the screenshot shown here, you can see that when a user is a member of the Default group and logs in to the User or Admin portal, the account is created with the Default Group.
The following screenshot shows the Attribute Values Mapping pop-up.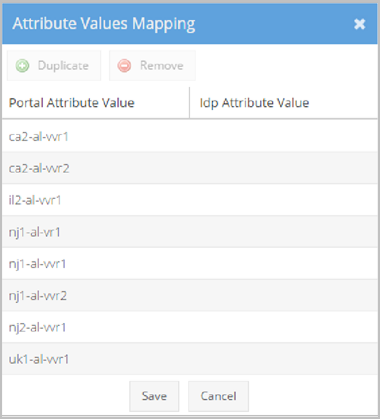
Configure SAML authentication with auto-provisioning
Before configuring SAML Authentication with auto-provisioning, it is highly recommended that you first decide which SAML attributes you want to map to your VidyoPortal user account attributes. These mapping decisions become your SAML auto-provisioning scheme during the Edit Attributes Mapping step in the following procedure. See SAML authentication with auto-provisioning and VidyoPortal user account attributes.
|
Note You can still manually create users even if you configure SAML authentication with auto- provisioning. However, these manual users do not automatically update attributes from your IdP server. |
To configure SAML authentication with auto-provisioning:
- Log in to the Admin portal using your Admin account. The Users page displays by default.
- Click the Settings tab. The License page displays by default.
- Click Authentication on the left menu. The Authentication page displays.
- Select SAML from the Authentication Type drop-down.
- Enter the following information:
- Enter your IdP Metadata XML in the Identity Provider (IdP) Metadata XML field. Your SAML administrator should be able to provide you with the IdP Metadata.
- Select MetaIOP or PKIX validation from the Security Profile options. PKIX is the most common profile used.
- Select MetaIOP or PKIX validation from the SSL/TLS Profile options. Select PKIX if you’re not certain of which profile to choose.
- Select Yes or No from the Sign Metadata options.
- Select SAML from the SAML provisioning type drop-down.
- Click Edit IdP Attributes Mapping and configure your IdP attribute to be used for mapping your user accounts.
- Click View Service Provider (SP) Metadata XML to view your service provider metadata XML for your SAML-enabled tenant.
- Click Save.
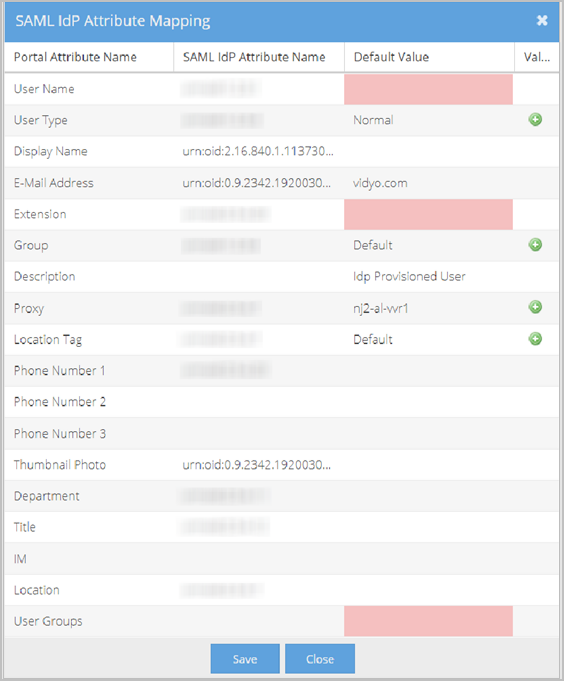
Each row on the SAML IdP Attributes Mapping pop-up represents an attribute. For each attribute, there is an associated Portal Attribute Name, SAML IdP Attribute Name, Default Value, and Value Mapping (where applicable). These configurations become the rules telling the system what values to populate in specific user account fields when the new account is created.
|
Note Changes made to Attribute Mapping information also affect the View Service Provider (SP) Metadata XML information. You should spend some time analyzing your VidyoPortal user account attributes to decide which SAML IdP attributes you want to associate with them before making the configurations on the SAML IdP Attributes Mapping pop-up. See VidyoPortal user account attributes. |
|
Note You must provide this metadata XML to your IdP administrator to complete the SAML configuration on your tenant. |
Manage location tags
A location tag is a geographically based name that can be assigned to a set of users, groups, or guests. Each user is assigned a location tag when their account is created. Location tags are a feature of the Router Pools architecture.
To manage location tags:
- Log in to the Admin portal using your Admin account. The Users page displays by default.
- Click the Settings tab. The License page displays by default.
- Click Manage Location Tags on the left menu. The Location Tags page displays.
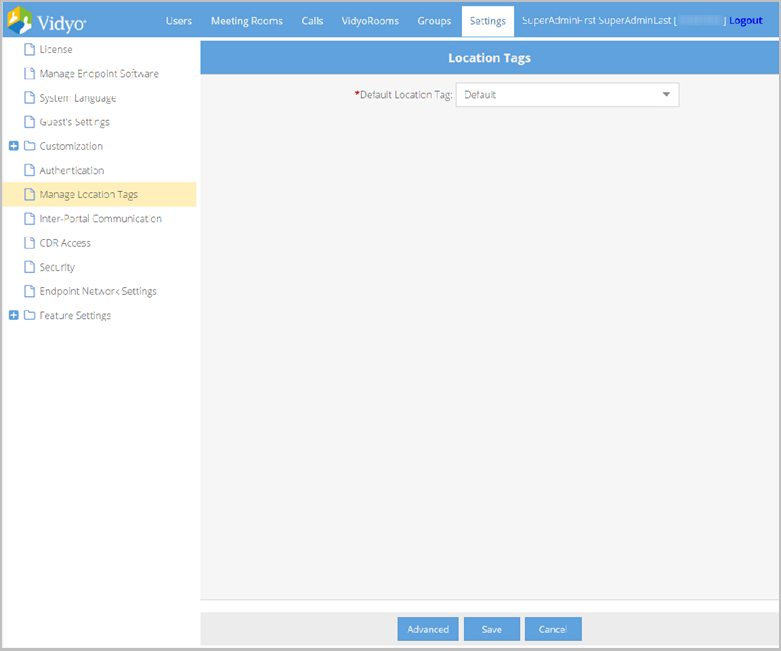
- Select the location tag from the Default Location Tag drop-down that will be used by default on the Add User page.
- Click Advanced. The Assign Location Tags to Groups table opens, which allows you to assign a location tag to existing users of selected groups.
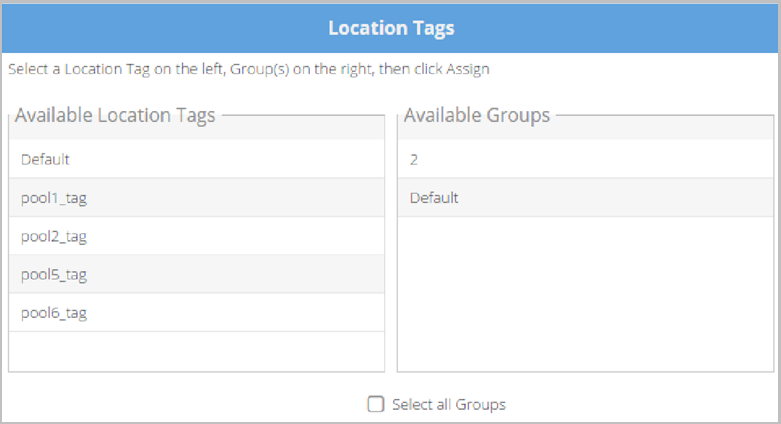
- Select a location tag from the Available Location Tags list and then select the group you want to assign it to from the Available Groups list (or select all the Groups by selecting the Select all Groups checkbox).
- Click Assign. All existing users within the selected Group or Groups will now have this location tag assigned to them.
Export CDR files from the Admin portal
You can export specific CDR records from your VidyoPortal as necessary.
To export CDR records from the Admin portal:
- Log in to the Admin portal using your Admin account. The Users page displays by default.
- Click the Settings tab. The License page displays by default.
- Click CDR Access on the left menu. The CDR Access page displays.
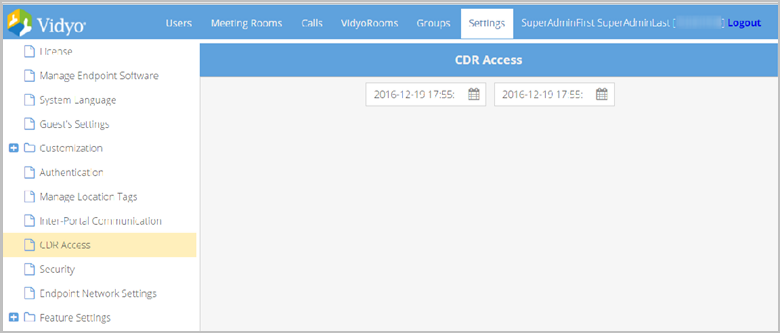
- Specify a date range.
- Click Export.
|
Note The export record limit is 65,000 records. If the export contains more than 65,000 records, a message displays warning you to restrict the range before proceeding with the download. The export data provided match the fields and descriptions explained in the ConferenceCall2 table. |
Configure endpoint network settings on your tenant
This page allows you to set differentiated services code point (DSCP) values for audio, video, content, and signaling coming from your VidyoConnect and VidyoConnect Room endpoints to your VidyoRouter. Audio, video, content data, and signaling coming from your VidyoConnect and VidyoConnect Room endpoints are assigned corresponding values that you set on this screen.
With these specified values assigned to media types coming from your VidyoConnect and VidyoConnect Room endpoints, you can then configure your network router or switch to prioritize the packets as desired.
You can also configure the media port range and enable use of the VidyProxy on the Endpoint Network Settings page.
To configure quality of service values for endpoints on your tenant:
- Log in to the Admin portal using your Admin account. The Users page displays by default.
- Click the Settings tab. The License page displays by default.
- Click Endpoint Network Settings on the left menu. The Endpoint Network Settings page displays.

- Enter DSCP values for Video, Audio, Content, and Signaling. Values provided must be decimals from 0 to 63. The values default to 0.
- Enter the appropriate values in the fields in the Media Port Range section.
- Click Save. A Confirmation pop-up displays.
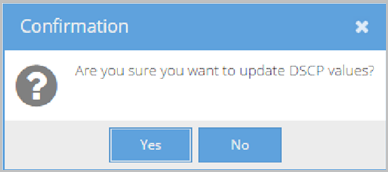
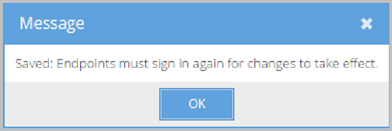
- Click Yes. A message displays stating that all endpoints using your tenant must sign in to the system again before values are tagged to corresponding media packets based on your saved changes.
Configure feature settings on your tenant
You can configure Room Attribute feature settings on your tenants for your users. However, your Super Admin can decide whether the Chat, and User Attributes features may be configured on tenants.
Configure public and private chat on your tenant
You can configure public or private chat on your tenant.
To configure public and private chat on your tenant:
- Log in to the Admin portal using your Admin account. The Users page displays by default.
- Click the Settings tab. The License page displays by default.
- Click the plus sign to the left of Feature Settings on the left menu.
- Click Chat from the submenu. The Chat page displays.
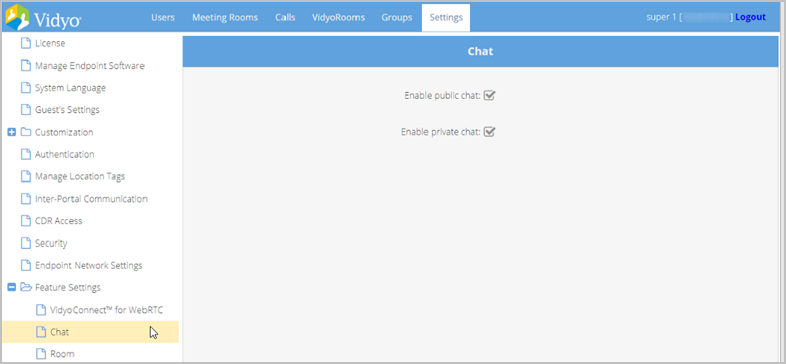
- Deselect the Enable public chat checkbox if you want to deny public chat for your tenant.
- Deselect the Enable private chat checkbox if you want to deny private chat for your tenant.
- Click Save.
Configure custom parameters
Tenant Admins can configure various custom parameters for their users, such as:
- Configure a post-call URL
- Playing audio or video content to Epic CAL participants in a waiting room
- Configure a warning pop-up for VidyoConnect for WebRTC users on iOS 15
- Disable the screen capture feature
- Configure the inactivity timer
- Upload virtual backgrounds and default backgrounds
- Add contact information to the hardware test
- Disable the post-call survey
- Disable background blur
Configure a post-call URL
Tenant Admins can configure a post-call URL to redirect registered or guest participants to a webpage at the end of a VidyoConnect call for purposes such as completing surveys, purchasing, or downloading products. The configured URL opens in the participant’s default browser.
|
Note Only HTTP and HTTPS are supported. The minimum VidyoPortal version required is 20.2.0. |
To configure a post-call URL:
- Log in to the Admin portal using your Admin account. The Users page displays by default.
- Click the Settings tab. The License page displays by default.
- Click the plus sign to the left of Feature Settings on the left menu.
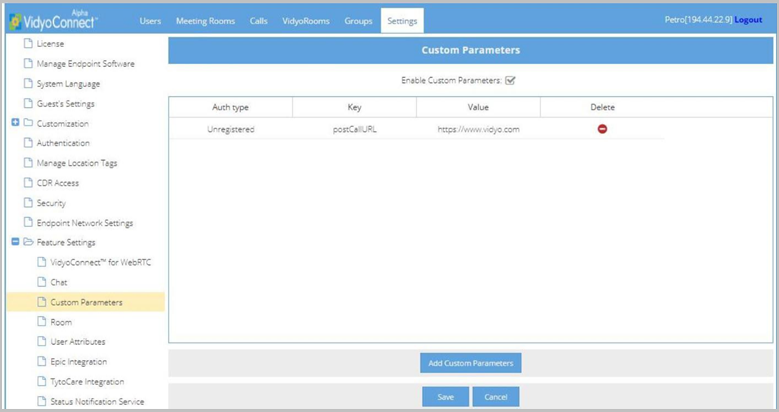
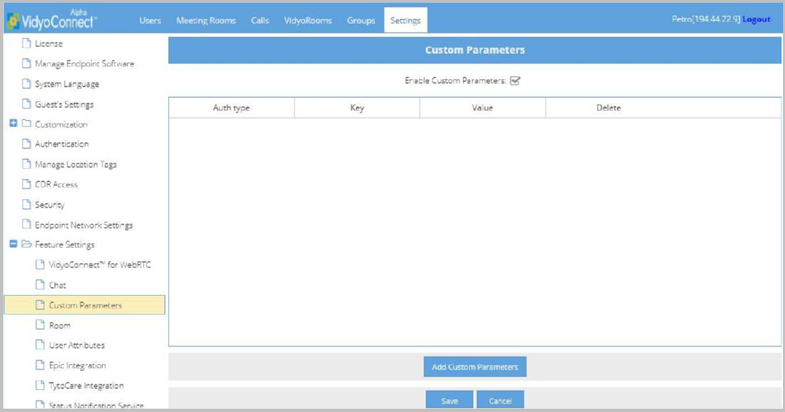
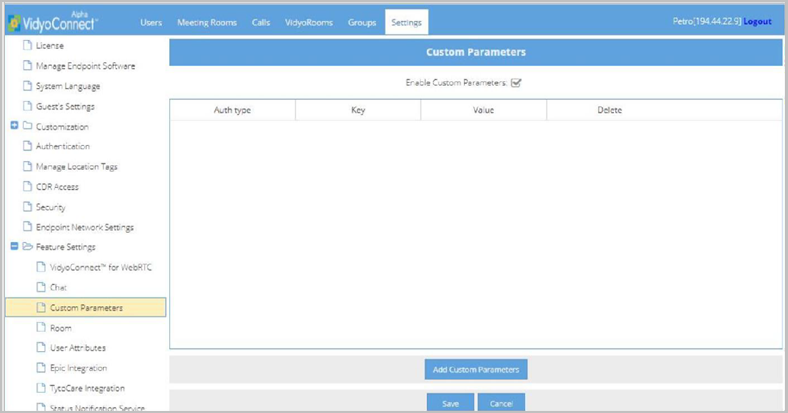
- Click Custom Parameters from the submenu. The Custom Parameters page displays.

- Select the Enable Custom Parameters checkbox and click Save. Click Add Custom Parameters at the bottom of the page. The Add Custom Parameters pop- up appears.
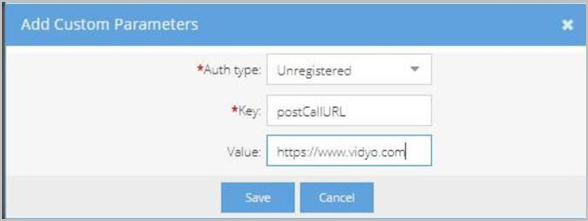
- In the Add Custom Parameters pop-up, do the following:
- Auth Type - Select the type of user, Registered and/or Unregistered (Guest), who will be affected by this parameter. Registered users are logged in and Unregistered users are not.
- Key - Enter postCallURL.
- Value - Enter the URL that will open in the user’s default browser when the call ends.
- Click Save. The URL you configured appears on the Custom Parameters list.
Playing audio or video content to Epic CAL participants in a waiting room
This information is now in the VidyoHealth section of the Vidyo Help, under Epic integration.
Configure a warning pop-up for VidyoConnect for WebRTC users on iOS 15
With the release of iOS 15, Apple introduced some critical issues for WebRTC users on Safari. The issues are Apple limitations and are not a result of using VidyoConnect. Because of these issues, we've added the ability for you to configure a Warning pop-up that displays as the first screen for VidyoConnect WebRTC users joining a call with iOS 15 or later.
To configure a warning pop-up for VidyoConnect for WebRTC users on iOS 15:
- Log in to the Admin portal using your Admin account. The Users page displays by default.
- Click the Settings tab. The License page displays by default.
- Click the plus sign to the left of Feature Settings on the left menu.
- Click Custom Parameters from the submenu. The Custom Parameters page displays.

- Select the Enable Custom Parameters checkbox and click Save.
- Click Add Custom Parameters at the bottom of the page. The Add Custom Parameters pop-up appears.
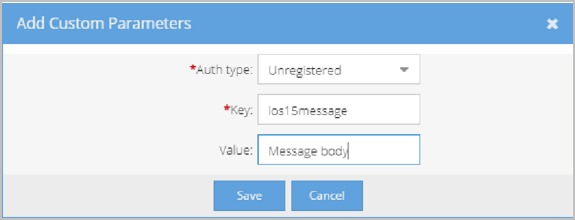
- In the Add Custom Parameters pop-up, do the following:
- Auth Type - Select Unregistered. Since this message is displayed as the first screen for VidyoConnect WebRTC users joining a call with iOS 15 or later (before a user would get a chance to log in), the message displays for both registered and unregistered users.
- Key - Enter ios15message to indicate that you want to display the Warning pop-up.
- Value - Enter the contents of the message you want to display in the Warning pop-up. For example, you may want to briefly explain the issue or tell users what alternate methods they can use to connect to the call.
- Click Save. The Auth Type, Key, and Value you configured appear on the Custom Parameters page. When you no longer want the pop-up to display, click the red Delete icon on the Custom Parameters page.
Disable the screen capture feature
For added privacy and security, Tenant Admins can disable the screen capture feature within the VidyoConnect mobile app. Screen capture (also known as snapshot) is enabled by default but you can disable it via the snapshotCaptureMobileDisabled parameter.
|
Note To use this feature, end users must be running VidyoConnect for Mobile version 22.3.0 or later. |
To disable the screen capture feature:
- Log in to the Admin portal using your Admin account. The Users page displays by default.
- Click the Settings tab. The License page displays by default.
- Click the plus sign to the left of Feature Settings on the left menu.
- Click Custom Parameters from the submenu. The Custom Parameters page displays.
- Select the Enable Custom Parameters checkbox and click Save.
- Click Add Custom Parameters at the bottom of the page. The Add Custom Parameters pop-up appears.
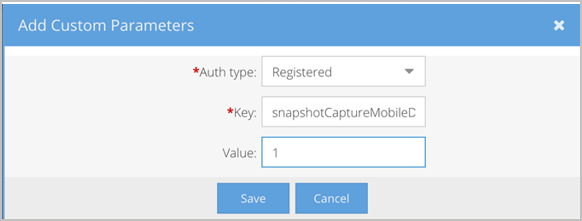
- In the Add Custom Parameters pop-up, do the following:
- Auth Type - Select the type of user, Registered and/or Unregistered (Guest), who will be affected by this parameter. Registered users are logged in and Unregistered users are not. If you want to affect both types of users, you can configure each type separately.
- Key - Enter snapshotCaptureMobileDisabled.
- Value - Enter 1 to disable screen capture or enter 0 to enable screen capture.
- Click Save.
Configure the inactivity timer
The "InactivityTimer" custom parameter enables Tenant Admins to set a timeout value for guest and/or registered users. After the specified amount of time during which a participant is alone in a call, the VidyoConnect app disconnects the guest or registered user.
- The default timeout value for VidyoConnect for Desktop is 6 hours (21600 seconds). The default timeout value for VidyoConnect for WebRTC is 15 minutes (900 seconds).
- The Tenant Admin can set up this parameter for guest and registered users separately.
|
Note To use this feature, end users must be running VidyoConnect for Desktop or VidyoConnect for WebRTC version 22.3.0 or later. For the desktop app, this feature applies only to Epic users; for WebRTC, this feature applies to all users. |
To configure the inactivity timer:
- Log in to the Admin portal using your Admin account. The Users page displays by default.
- Click the Settings tab. The License page displays by default.
- Click the plus sign to the left of Feature Settings on the left menu.
- Click Custom Parameters from the submenu. The Custom Parameters page displays.
- Select the Enable Custom Parameters checkbox and click Save.
- Click Add Custom Parameters at the bottom of the page. The Add Custom Parameters pop-up appears.
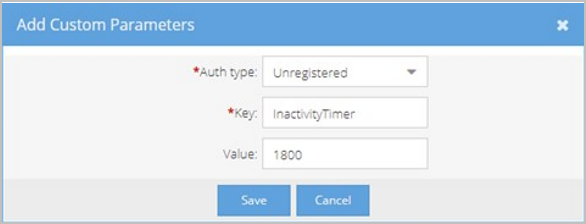
- In the Add Custom Parameters pop-up, do the following:
- Auth Type - Select the type of user, Registered and/or Unregistered (Guest), who will be affected by this parameter. Registered users are logged in and Unregistered users are not. If you want to affect both types of users, you can configure each type separately.
- Key - Enter InactivityTimer.
- Value - Enter the amount of time in seconds after which the user will be logged out.
- For VidyoConnect for Desktop, the default is 21600 seconds (6 hours).
- For VidyoConnect for WebRTC, the default is 900 seconds (15 minutes).
- Click Save.
Upload virtual backgrounds and default backgrounds
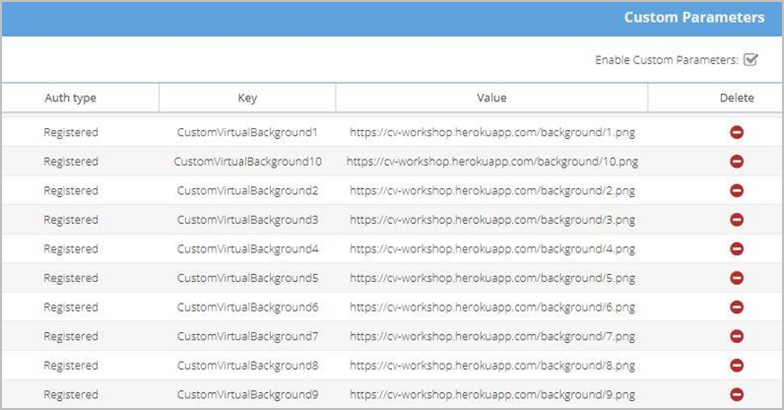
In addition to the virtual backgrounds that already come with the VidyoConnect desktop app, you (as a Tenant Admin) can upload up to ten more images. You can also configure a default virtual background for users who haven’t selected any virtual background before.
- Supported image formats are PNG and JPG, and the image size cannot exceed 2MB.
- For privacy reasons, only logged-in (registered) users can see the admin-uploaded images.
|
Note When uploading virtual backgrounds, the custom image that you see in your self-view appears as you see yourself in a mirror: that is, the image appears flipped for you, but it is fine for the other call participants. |
To upload a virtual background or to configure a default background:
- Log in to the Admin portal using your Admin account. The Users page displays by default.
- Click the Settings tab. The License page displays by default.
- Click the plus sign to the left of Feature Settings on the left menu.
- Click Custom Parameters from the submenu. The Custom Parameters page displays.

- Select the Enable Custom Parameters checkbox and click Save.
- Click Add Custom Parameters at the bottom of the page. The Add Custom Parameters pop-up appears.
- In the Add Custom Parameters pop-up, do the following:
- Auth Type - Select the type of user, Registered and/or Unregistered (Guest), who will be affected by this parameter. Registered users are logged in and unregistered users are not. For privacy reasons, only registered users can see the admin-uploaded images. However, if you want to affect both types of users for the default background, you can configure each type separately.
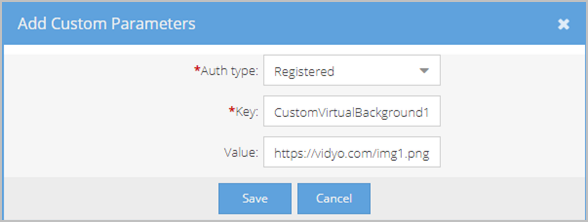
- Key:
- If you want to add a virtual background image, enter CustomVirtualBackground1 through CustomVirtualBackground10.
- If you want to add a default virtual background, enter DefaultCameraEffect.
- Value:
- If you want to add a virtual background image, enter the URL of the image.
- If you want to add a default virtual background, enter BLUR or IMAGE_1 through IMAGE_7 for guests; for registered users, enter BLUR, IMAGE_1 through IMAGE_7, or CUSTOM_1 through CUSTOM_10.
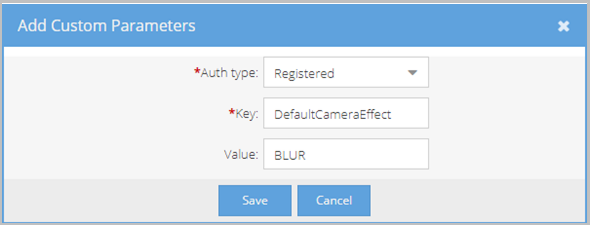
- Click Save. The Auth Type, Key, and Value you configured appear on the Custom Parameters page.
Add contact information to the hardware test
Starting with version 22.4.0, the VidyoConnect desktop and WebRTC apps offer a voluntary pre-call hardware test which enables users to check their hardware before joining a call. Users can access the test before they are logged in by clicking Test Conference Hardware on the VidyoConnect beauty screen.
- The voluntary test is enabled by default.
- A mandatory hardware test, which requires users to perform the test before joining the call, is also available and can be initiated by admins using custom invocation via Epic CAL.
If you want to add your contact information to the hardware test, you can do that using the custom parameter described in this section.
To add contact information to the hardware test:
- Log in to the Admin portal using your Admin account. The Users page displays by default.
- Click the Settings tab. The License page displays by default.
- Click the plus sign to the left of Feature Settings on the left menu.
- Click Custom Parameters from the submenu. The Custom Parameters page displays.

- Select the Enable Custom Parameters checkbox and click Save. Click Add Custom Parameters at the bottom of the page. The Add Custom Parameters pop-up appears.
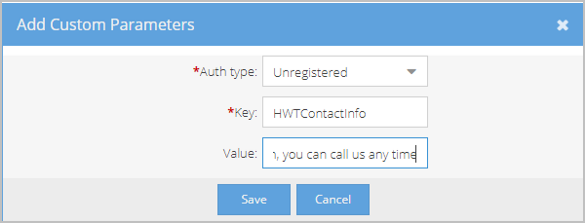
- In the Add Custom Parameters pop-up, do the following:
- Auth Type - Select the type of user, Registered and/or Unregistered (Guest), who will be affected by this parameter. Registered users are logged in and Unregistered users are not. If you want to affect both types of users, you can configure each type separately.
- Key:
- If you want to add general contact information, enter HWTContactInfo.
- If you want to add a contact email, enter HWTContactEmail.
- If you want to add a contact phone number, enter HWTContactPhone.
- Value:
- If you want to add general contact information, enter a maximum of 4096 characters of information. If you enter a URL, it will be clickable on the VidyoConnect Need help? pop-up.
- If you want to add a contact email, enter the email address. The email will be clickable on the VidyoConnect Need help? pop-up.
- If you want to add a contact phone number, enter the phone number. The phone number will be clickable on the VidyoConnect Need help? pop-up.
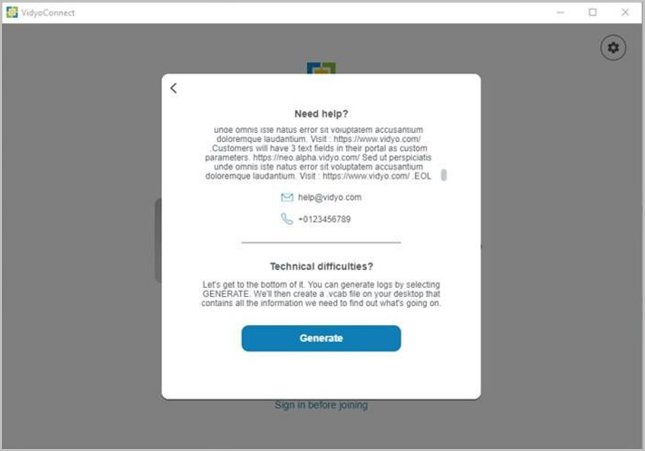
- Click Save.
Disable the post-call survey
Starting with version 22.4.0, all the VidyoConnect apps (desktop, mobile, and WebRTC) now offer a post-call survey. This feature, which is enabled by default, presents users with a five-star survey at the end of each call. The result of the survey is reported to Google Analytics. If you want to disable this survey, you can use the custom parameters described in this section.
To disable the post-call survey:
- Log in to the Admin portal using your Admin account. The Users page displays by default.
- Click the Settings tab. The License page displays by default.
- Click the plus sign to the left of Feature Settings on the left menu.
- Click Custom Parameters from the submenu. The Custom Parameters page displays.

- Select the Enable Custom Parameters checkbox and click Save.
- In the Add Custom Parameters pop-up, do the following:
- Auth Type - Select the type of user, Registered and/or Unregistered (Guest), who will be affected by this parameter. Registered users are logged in and Unregistered users are not. If you want to affect both types of users, you can configure each type separately.
- Key:
- If you want to disable the post-call survey for the VidyoConnect desktop app, enter postCallSurveyDisabledDesktop.
- If you want to disable the post-call survey for the VidyoConnect mobile app, enter postCallSurveyDisabledMobile.
- If you want to disable the post-call survey for the VidyoConnect WebRTC app, enter postCallSurveyDisabledWeb.
- Value:
- To disable the post-call survey, enter 1 in the Value field.
- If you have disabled the post-call survey and later want to enable it, you can delete postCallSurveyDisabledDesktop, postcallSurveyDisabledMobile, or postCallSurveyDisabledWeb from the Key field or you can enter 0 in the Value field.
- Click Save.
Click Add Custom Parameters at the bottom of the page. The Add Custom Parameters pop-up appears.
Disable background blur
To disable background blur:
- Log in to the Admin portal using your Admin account. The Users page displays by default.
- Click the Settings tab. The License page displays by default.
- Click the plus sign to the left of Feature Settings on the left menu.
- Click Custom Parameters from the submenu. The Custom Parameters page displays.
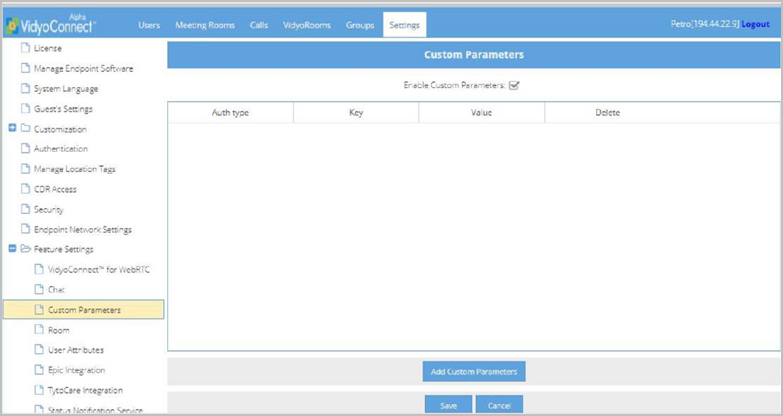
- Select the Enable Custom Parameters checkbox and click Save.
- Click Add Custom Parameters at the bottom of the page. The Add Custom Parameters pop-up appears.
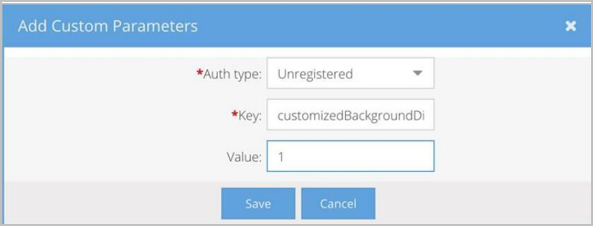
- In the Add Custom Parameters pop-up, do the following:
- Auth Type - Select the type of user, Registered and/or Unregistered (Guest), who will be affected by this parameter. Registered users are logged in and Unregistered users are not. If you want to affect both types of users, you can configure each type separately.
- Key - Enter customizedBackgroundDisabled into this field.
- Value - Enter 1 to disable background blur or enter 0 to enable background blur.
- Click Save.
Configure room attributes on your tenant
On the Room Attributes page, you can configure room attributes on your tenant and control Waiting Room, Group Mode, and Presenter Mode feature settings.
|
Note The Presenter mode feature is supported on the VidyoConnect desktop app but not yet on the VidyoConnect mobile app. The Waiting Room feature is supported on the VidyoConnect desktop app starting with version 18.1.0; on the VidyoConnect mobile app, it is supported starting with version 21.1.0. |
You can also make scheduled rooms available to your tenants. Scheduled rooms allow your users to create ad-hoc rooms from specific endpoints on your system. Scheduled rooms are enabled on your tenant by default and can be disabled if necessary.
Allowing your tenants to create public rooms is configured here as well.
To configure room attributes on your tenant:
- Log in to the Admin portal using your Admin account. The Users page displays by default.
- Click the Settings tab. The License page displays by default.
- Click the plus sign to the left of Feature Settings on the left menu.
- Click the Room Attributes from the submenu. The Room Attributes page displays.
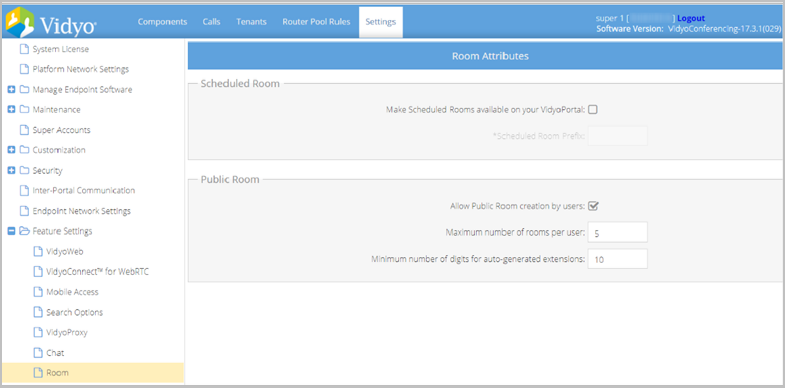
- Deselect the Enable Waiting Room and Presenter mode checkbox if you want to disable the Waiting Room and Presenter mode features for your users.
- Select the Automatically start all meetings in Waiting Room mode checkbox if you want all meetings to start in Waiting Room mode for your tenants. The Automatically switch to Group mode when the owner joins and Stay in Waiting Room mode until a presenter is selected (Presenter mode) radio buttons become active upon selecting the Automatically start all meetings in Waiting Room mode checkbox.
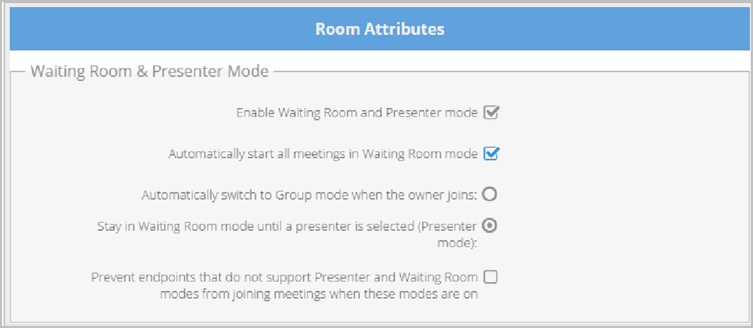
- Select either the Automatically switch to Group mode when the owner joins radio button to have conference participants interact with one another until the room owner joins the conference or the Stay in Waiting Room mode until a presenter is selected (Presenter mode) radio button if you don’t want the participants interacting with one another until a presenter is selected by a conference moderator.
- Select the Prevent endpoints that do not support Presenter and Waiting Room modes from joining meetings when these modes are on checkbox to prevent users from entering meetings that use Presenter or Waiting Room modes if they are accessing the conference from endpoints that do not support those features.
- Deselect the Make Scheduled Rooms available on your tenant checkbox if you want to restrict scheduled rooms from being available for your tenant.
- Select the Allow Public Room creation by users checkbox if you want to allow your users to create public rooms. Upon selecting the Allow Public Room creation by users checkbox, the Maximum number of rooms per User field becomes active.
- Enter the maximum number of public rooms that the user can create in the Maximum number of rooms per User field.

- Click Save.
|
Note If you deselect the Enable Waiting Room and Presenter mode checkbox, the Select the Automatically start all meetings in Waiting Room mode and Prevent endpoints that do not support Presenter and Waiting Room modes from joining meetings when these modes are on checkboxes become inactive. |
Configure user attributes
You can allow or restrict users from uploading their own thumbnail photos.
|
Note To use this feature, the Vidyo endpoint must also support it. |
If the user uploads a thumbnail photo, it will override LDAP and SAML provided images. When the user authenticates, the LDAP or SAML thumbnail photo is retrieved only if they have not uploaded a photo.
To configure user attributes:
- Log in to the Admin portal using your Admin account. The Users page displays by default.
- Click the Settings tab. The License page displays by default.
- Click the plus sign to the left of Feature Settings on the left menu.
- Click the User Attributes from the submenu. The User Attributes page displays.
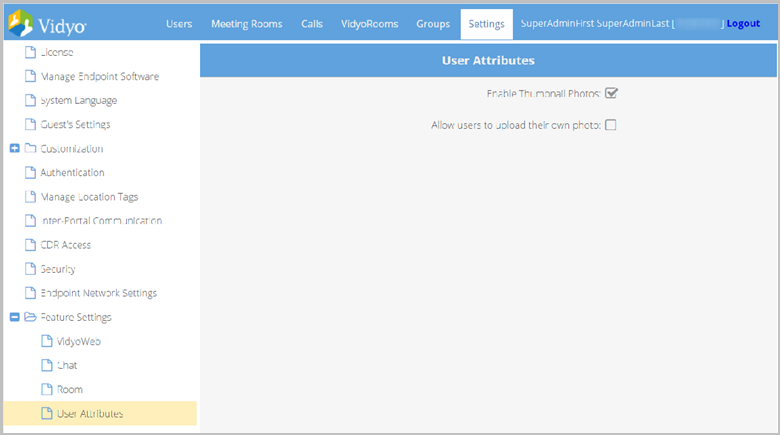
- Select the Enable Thumbnail Photos checkbox to allow tenants to upload thumbnail photos. The Allow users to upload their own image checkbox displays.
- Select the Allow users to upload their own image checkbox to allow users to upload their own images on the Users page.
- Click Save.
Configure Epic version February 2019 integration with VidyoConnect Context-Aware Linking (CAL)
This information is now in the VidyoHealth section of the Vidyo Help, under Epic integration.
Configure Epic version August 2018 integration with VidyoConnect Context-Aware Linking (CAL)
This information is now in the VidyoHealth section of the Vidyo Help, under Epic integration.
Configure the Status Notification Service
Follow the steps below to configure the Status Notification Service.
To configure the Status Notification Service:
- Log in to the Admin portal using your Admin account. The Users page displays by default.
- Click the Settings tab. The License page displays by default.
- Click the plus sign to the left of Feature Settings on the left menu.
- Click the Status Notification Service from the submenu. The Status Notification Service page displays.
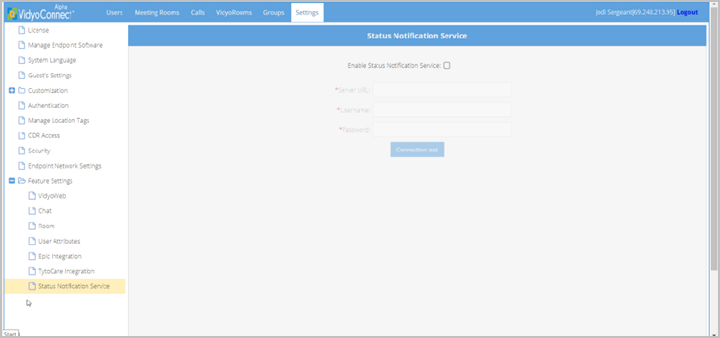
- Select the Enable Status Notification Service checkbox.
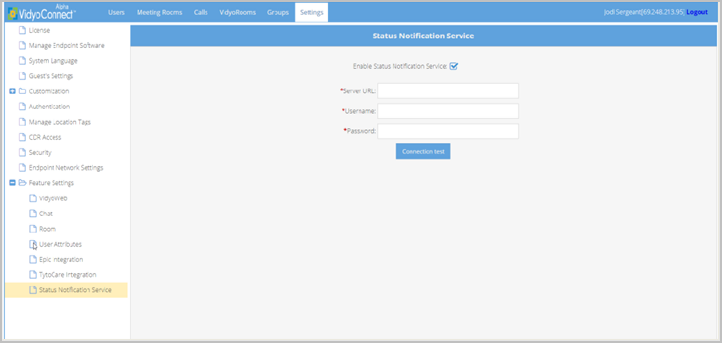
- Enter the URL of the notification server in the Server URL field. This should be a web reachable address. If your notification service is HTTPS-enabled, remember to use the https:// prefix and also verify that your VidyoPortal has the appropriate Certificate Authorities uploaded.
- Enter the username in the Username field.
- Enter the password in the Password field
- Click Connection test to send a test notification to the notification server. If the test is successful, this pop-up displays:
- Click OK.
