21. Appendix E. Hot standby
The Hot Standby feature is a Vidyo software option that must be purchased separately. To purchase the Hot Standby option, talk to your Vidyo sales representative.
The way you apply Vidyo FQDN-based licenses vary based on whether they are being applied when you are initially configuring both your system and the Hot Standby software option or you are applying add-on licenses to a system already synchronizing via the Hot Standby software option. See Apply add-on licenses to a system already synchronizing via the Hot Standby software option.
The Hot Standby option allows you to have a second VidyoPortal configured to take over in case your primary VidyoPortal is unreachable. The primary VidyoPortal is referred to as the Active VidyoPortal, and the other VidyoPortal is referred to as the Standby VidyoPortal.
Users who already have a VidyoPortal purchase an additional VidyoPortal and add it to their setup to leverage the Hot Standby option. Those who do not have an existing VidyoPortal install a brand new setup consisting of two new VidyoPortals.
The two VidyoPortals should be physically close to each other. If not in the same server room, they should certainly be on the same subnet in the same hosting facility.
|
Note Your Hot Standby software option may be used on a Virtual Vidyo Portal. For more information, refer to Install VidyoPortal VE and VidyoRouter VE in the Vidyo Help. |
Automatically and manually trigger Hot Standby
When the Hot Standby feature is implemented correctly, the Standby VidyoPortal (VidyoPortal 1) becomes Active and the Active VidyoPortal (VidyoPortal 2) becomes the Standby when Hot Standby is triggered.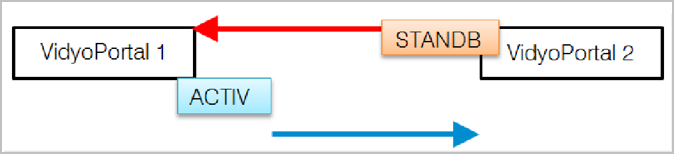
Hot Standby is triggered for the following reasons:
- Manual Hot Standby – You can force a Hot Standby from the Hot Standby > Operation screen in the Super Admin Portal.
- Automatic Hot Standby – A Hot Standby automatically takes place when the Active VidyoPortal is unreachable for 20 seconds.
- Some additional reasons Hot Standby is automatically triggered include:
- An IP network failure of 30 seconds or more.
- A restart or shutdown of the Active VidyoPortal.
- A VidyoManager failure.
- A Web services failure.
- Some reasons Hot Standby is not automatically triggered include:
- If a previously unreachable Standby VidyoPortal suddenly becomes reachable and operational, Hot Standby is not triggered and the currently Active VidyoPortal remains in service.
- Restarting Web services from the Super Admin Portal.
Synchronize the VidyoPortal database for Hot Standby
Since the Hot Standby option has your two VidyoPortals alternating between which one is Active and which one becomes the Standby, database information on each VidyoPortal must be kept synchronized.
|
Note Whenever Hot Standby changes which VidyoPortal is Active and which one becomes the Standby, all database and Call Detail Records (CDR) changes since the last successful synchronization are lost. Therefore, Vidyo highly recommends setting automatic synchronizations and regular manual synchronizations prior to Hot Standby triggers. If you are using the CDR database, do not let CDR entries accumulate. Instead, periodically access the CDR, collect the records, and then purge the database to optimize synchronizations. For more information about CDRs, see Appendix D. CDR. |
Configure your settings in preparation for Hot Standby
To prepare for Hot Standby, you must configure (or reconfigure) your VidyoPortal IP addresses and perhaps make some DNS settings as described in this section. When this is complete, you can then move on to setting the specific Hot Standby configuration values as explained in Configure Hot Standby.
Set IP and DNS settings on VP1 and VP2
You must configure your IP Addresses and DNS settings for VP1 and VP2 (new or existing) using the System Console as described in Configure the network settings at the System Console.
|
Note Remember that if you are adding a VidyoPortal to your existing setup to leverage the Hot Standby option, Vidyo strongly recommends that you change your VidyoPortal’s existing, Native IP address and FQDN to new ones so that the existing ones can be used as the Cluster IP address and FQDN. Always reboot machines after making any IP address and DNS changes. As you proceed, print the page containing the title Prepare specific IP and FQDN values for your VP1, VP2, and cluster and write down specific IP address and FQDN values that you designated for your VP1, VP2, and Cluster. Having this information handy makes the entire process easier. |
Verify correct installation of VidyoPortal licenses with the Hot Standby option
To use the Hot Standby feature, your organization must have a Hot Standby license. No third-party software is required.
Your Hot Standby option comes with a license for each of your VidyoPortals. These two licenses are tied to specific system IDs and must be installed on the correct VidyoPortal based on the license file name (system ID).
Use the following procedure to make sure you have correctly applied the VidyoPortal licenses with the Hot Standby option.
|
Note You should plan to perform the licensing and configuring of your VidyoPortals at the same time because uploading Hot Standby licenses on your VidyoPortals reduces the number of system licenses by 50% until the configuration is complete. |
To verify correct installation of VidyoPortal licenses with the Hot Standby option:
- Open a new System Console for VP1 using the Native IP or FQDN address.
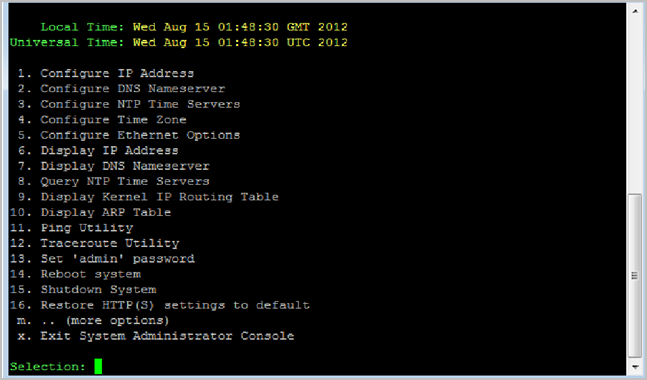
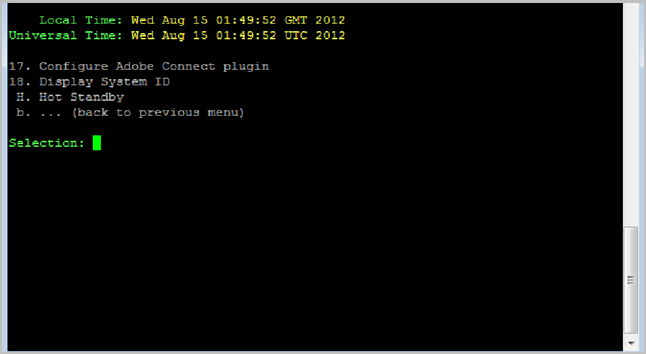
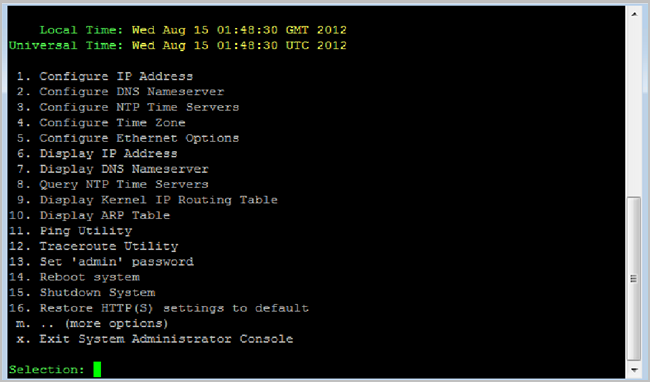
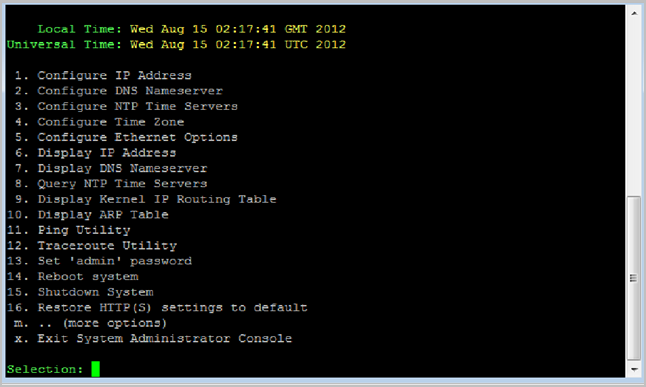
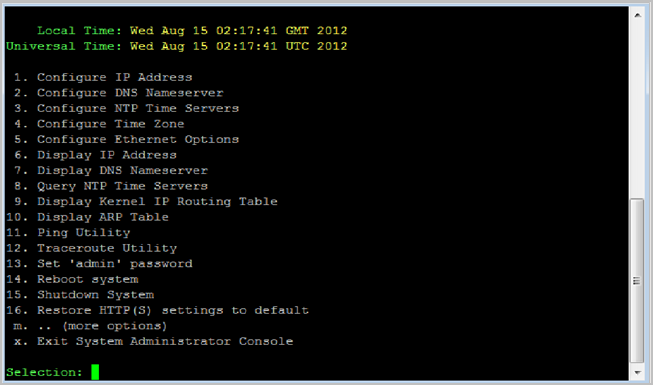
- Enter m for more options.
- Press the Enter key.
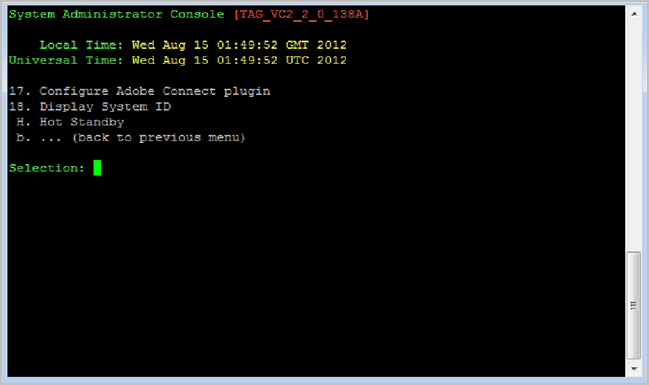
- Verify that the H. Hot Standby option displays in the menu. If it does, the license for your Hot Standby option is applied correctly on VP1. If desired, you may leave the VP1 System Console open.
|
Note System Console menu options are not case sensitive. |
|
Note If you do not see the H. Hot Standby option, review the steps for applying system license keys. See Request your Vidyo licenses and Apply the system license keys to your system. |
Prepare the system software and database
After verifying your licenses, you must do the following to prepare for Hot Standby:
- Verify that the VidyoPortal software on VP1 and VP2 has the latest version and the same security patches applied.
- Open a new (or return to an already open) System Console for VP1 using the Native IP or FQDN address you designated for VP.
- Enter m for more options.
- Press the Enter key. The software version is shown in red at the top of the System Console.
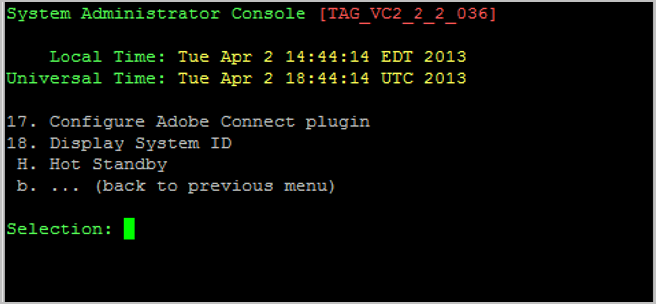
- Confirm that both of your machines are running the same software version. If desired, you may leave the VP1 System Console open. Back up and download the database on the machine you’re using as VP1. See Perform system maintenance.
Prepare specific IP and FQDN values for your VP1, VP2, and cluster
To implement Hot Standby, you need an IP address and FQDN for each of your VidyoPortals. You also need an IP address and FQDN for the Cluster.
When the Hot Standby option is used correctly, the Cluster IP and FQDN always direct traffic to the Active VidyoPortal. The Active VidyoPortal takes the Cluster IP and FQDN during Hot Standby activation.
The following diagrams show Hot Standby system configurations, both without and with the Management Interface enabled on your system: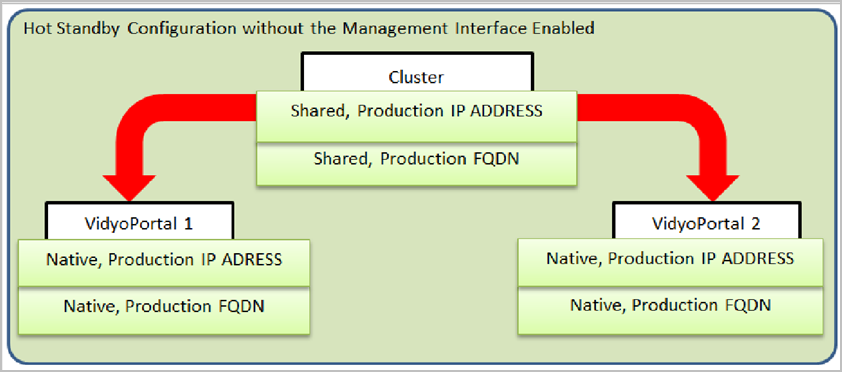
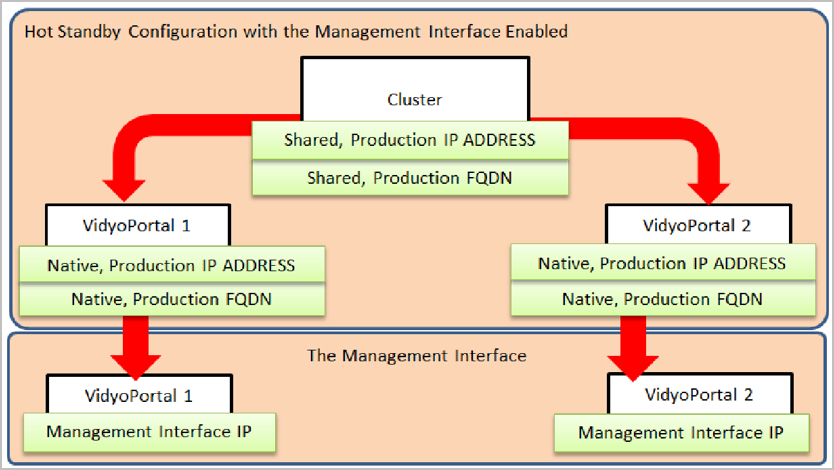
|
Note The Management Interface IPs remain static and always accessible. There is no virtualization applied to them, as done with the Cluster IP. The Management Interface is not virtualized; meaning, when using the Management Interface and Hot Standby changes which VidyoPortal is Active and which one becomes the Standby, no IP address virtualization takes place and respective Management Interface IPs remain unchanged. |
The following diagram illustrates how your Hot Standby Cluster relates to the Active VidyoPortal: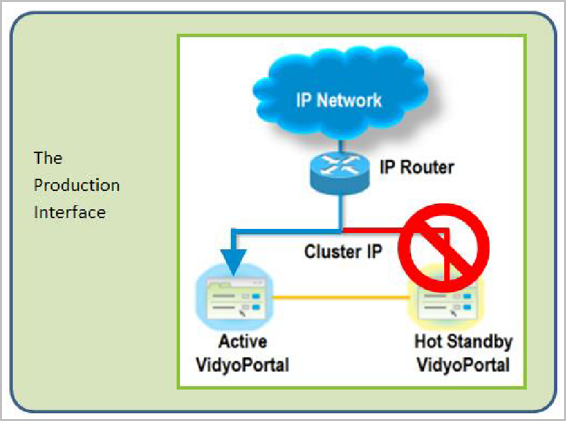
|
Note Prepare for configuring your Hot Standby setup by printing this page and writing down the specific IP and FQDN values that you want for your VP1, VP2, and Cluster. You will need this information during various Hot Standby configuration procedures. |
|
Note If you are upgrading from VidyoPortal 2.x to 3.x and are now using FQDN licensing, your Public FQDNs and Cluster FQDNs on both of your VidyoPortals must be identical before upgrading. |
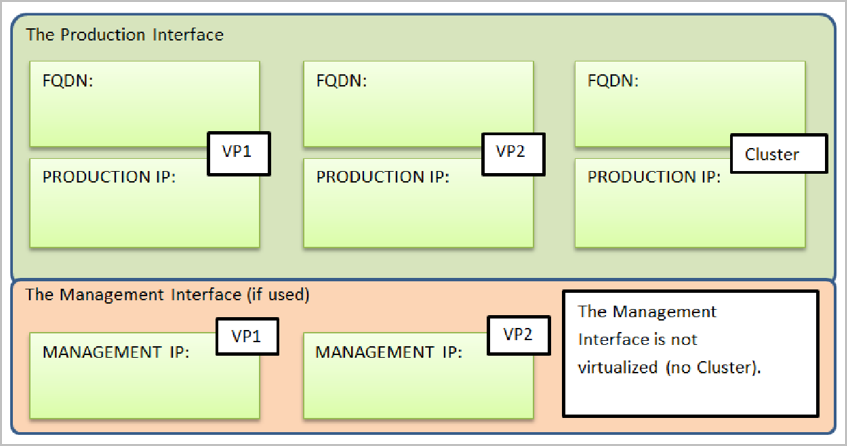
The Hot Standby option creates the mechanism that allows for storing both a Native IP address and FQDN and a Cluster IP address and FQDN on each of your VidyoPortals in the following manner: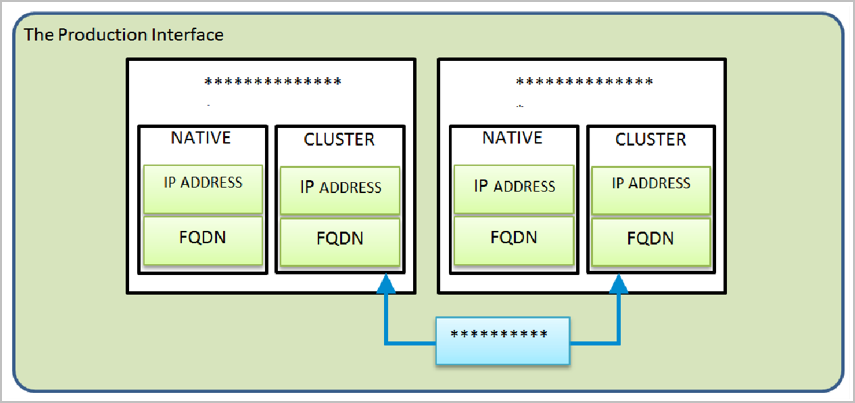
|
Note The Cluster IP address and FQDN are stored on both machines and are ready for use when the VidyoPortal is designated as the Active VidyoPortal. Remember if you are adding a VidyoPortal to your existing setup to leverage the Hot Standby option, Vidyo strongly recommends that you change your VidyoPortal’s existing Native IP address and FQDN to new ones so that the existing ones can be used as the Cluster IP address and FQDN. Always reboot machines after making any IP address and DNS changes. |
Ensure that the network IP address can be pinged
The network gateway or router IP address is also used during Hot Standby. Therefore, you must be able to ping this address from both the VP1 and VP2 VidyoPortals. See Configure the network settings at the System Console.
If you don’t have a pool of existing IP addresses, you can purchase more from your ISP if you are using public IPs. In a NAT environment, you need one public IP address and three private IP addresses.
Configure Hot Standby
This section explains how to completely configure Hot Standby after you already read and completed the steps in all the subsection of the Configure your settings in preparation for Hot Standby. Ensure that you have configured your IP addresses and possibly DNS settings for VP1 and VP2 (new or existing) using the System Console as described in Set IP and DNS settings on VP1 and VP2.
In addition, you should be familiar with this terminology:
- VP1 – Generically refers to the VidyoPortal machine you are designating as VP1 and configuring for Hot Standby use. This is regardless as to whether you’re using an existing VidyoPortal as VP1 for your Hot Standby configuration and you purchased a second VidyoPortal to use as VP2, or if you purchased two new VidyoPortals to use for Hot Standby.
- VP2 – Generically refers to the VidyoPortal machine you are designating as VP2 and configuring for Hot Standby use.
- Cluster – Refers to the Cluster IP and FQDN, which always will direct traffic to the Active VidyoPortal.
- Active VidyoPortal or Standby VidyoPortal – For procedures where the status of the VidyoPortal with respect to Hot Standby is the main focus, references may simply indicate the Active VidyoPortal or the Standby VidyoPortal where necessary.
Set Hot Standby configuration values on VP1
To set the Hot Standby configuration values on VP1:
- Open a new System Console for VP1 using the Native IP or FQDN address. See Prepare specific IP and FQDN values for your VP1, VP2, and cluster.
- Enter m for more options.
- Enter H to select the Hot Standby option.
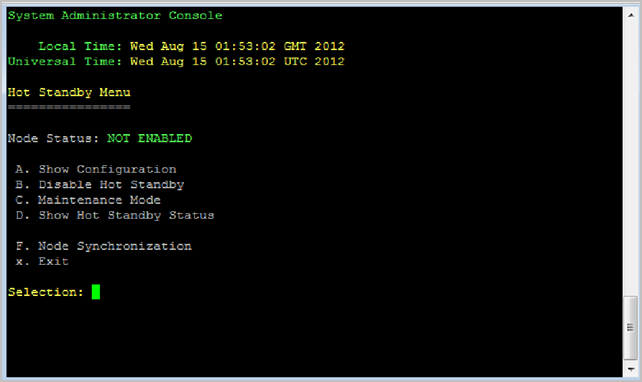
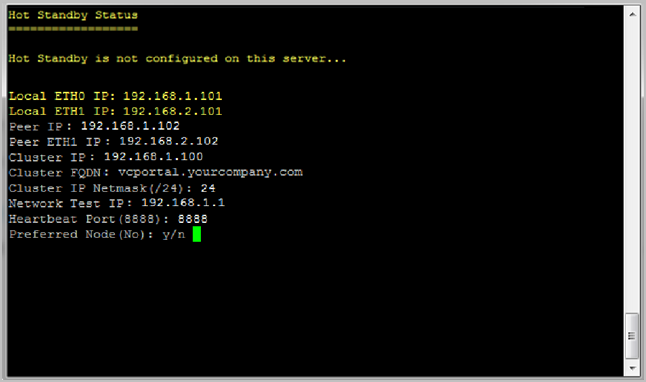
- Enter A to select the Show Configuration option. The Hot Standby Status screen displays.

- Enter y to confirm changes to current settings. The New Configuration screen displays.
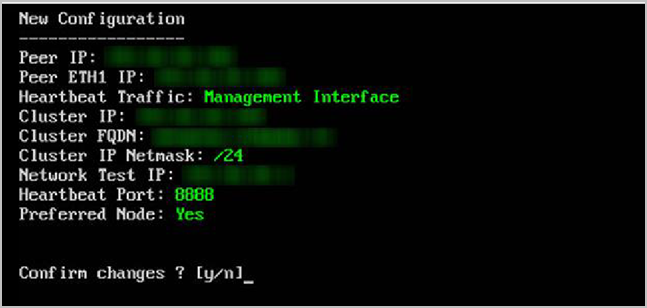
- Peer IP – The IP address of the other VidyoPortal (sometimes referred to as the “peer” or “partner” VidyoPortal). Enter VP2’s IP address.
- Peer ETH1 IP – If your Management Interface is configured, you are prompted for your Peer ETH1 IP. This is the IP of the VP2 Management Interface.
- Heartbeat Traffic – The periodic health check that takes place via the UDP, which is between the active node and the standby node, allowing that health check communication to happen either over the management interface or production interface.
- Cluster IP – This is a shared IP address used for the VidyoPortal (VP1 or VP2) activated by Hot Standby. Configure your Cluster IP value for VP1 based on the following:
- If you are adding a VidyoPortal to your existing setup to leverage the Hot Standby option, you are strongly urged to change your VidyoPortal’s existing, Native IP address to a new one so the existing one can be used as the Cluster IP. Having the Cluster IP address match the one on your current VidyoPortal keeps you from having to change your DNS and other network configuration settings. Vidyo specifically recommends this method if you are adding a VidyoPortal to your existing setup to leverage the Hot Standby option.
- When configuring both VidyoPortals, one must be selected as the preferred server. This preferred machine initially assumes the Cluster IP address.
- Cluster FQDN – The shared FQDN used for the VidyoPortal (VP1 or VP2) activated by Hot Standby.
- If you are adding a VidyoPortal to your existing setup to leverage the Hot Standby option, you are strongly urged to change your VidyoPortal’s existing Native FQDN to a new one so the existing one can be used as the Cluster FQDN. Having the Cluster FQDN match the one on your current VidyoPortal keeps you from having to change your DNS and other network configuration settings. Vidyo specifically recommends this method if you are adding a VidyoPortal to your existing setup to leverage the Hot Standby option.
- When configuring both VidyoPortals, one must be selected as the preferred server. This preferred machine initially assumes the Cluster FQDN address.
- Cluster IP Netmask – The netmask for the subnet. You must enter this in the slash format; however, you don’t have to enter the slash. For example, if the cluster IP netmask is 255.255.255.0, you should enter 24, but onscreen you’ll see /24.
- Network Test IP – The external IP address for validating IP connectivity. You should be able to ping this IP address. Vidyo recommends using the VidyoPortal’s network gateway IP address. See the Configure the network settings at the System Console.
- Heartbeat Port – This is a port used by both of your VidyoPortal machines (VP1 and VP2) to check each other’s availability and check if services are running to know when it’s necessary to assume the role of the Active VidyoPortal. Any available port may be used, but Vidyo recommends using port 8888.
- Preferred Node – This configuration determines which VidyoPortal (VP1 or VP2) becomes the Active one when both machines are initialized. The setting on one machine should be Yes and the other should be No.
- If you already had one VidyoPortal and you purchased a second one to use for Hot Standby, you should answer Yes for the VidyoPortal you already have and are upgrading, and No for the new one. If, on the other hand, you purchased two new VidyoPortals, you can answer Yes or No for either VidyoPortal if you have one of each.
- Select y to confirm the changes. If desired, you may leave the VP1 System Console open as you continue to the next procedure.
|
Note Press the Enter key after each prompt. |
|
Note System Console menu options are not case sensitive. |
Using the IP and FQDN values you designated for your VP1, VP2, and Cluster in the Prepare specific IP and FQDN values for your VP1, VP2, and cluster, enter the following information on the System Console New Configuration screen:
|
Note The Peer IP, Cluster IP, and IP address of VP1 must be unique. |
|
Note When one of your VidyoPortals (VP1 or VP2) becomes the Active VidyoPortal, Hot Standby automatically has that machine use the Cluster IP address and makes the Native IP address unreachable. |
|
Note This is the same value as your Public FQDN as set when you select 1. Configure IP Address. |
Configure your Cluster IP value for VP1 based on the following:
|
Note You must make sure port 8888 (or whichever port decided to use) is open between your VidyoPortal machines (VP1 and VP2). |
|
Note Upon subsequent rebooting of VidyoPortal machines, the status is based on this Preferred Node setting and assumes the Active for Yes and Standby for No. |
Reboot to apply the new Hot Standby configuration values on VP1
To apply the new Hot Standby configuration values on VP1, reboot the machine using the following steps:
- Open a new (or return to an already open) System Console for VP1 using the Native IP or FQDN address you designated for VP.
- Enter 14 to reboot the system.
|
Note Wait until the machine has completely rebooted before proceeding. |
If desired, you may leave the VP1 System Console open as you continue to the next procedure.
Verify VP1 functionality
To verify VP1 functionality:
- Access the Super Admin portal of your Active VidyoPortal using the Cluster IP or FQDN address. See Prepare specific IP and FQDN values for your VP1, VP2, and cluster.
- Verify that the appropriate Vidyo components and licenses display.
- Place a test call. If desired, you may leave the Super Admin portal for your Active VidyoPortal open.
|
Note You must use the Cluster IP or FQDN address to access VP1 because its Active status deactivates the native IP address. Refer to the specific IP address and FQDN values you designated for your VP1, VP2, and Cluster in the Prepare specific IP and FQDN values for your VP1, VP2, and cluster. |
Set Hot Standby configuration values on VP2
Perform the steps from the following sections to set Hot Standby configuration values on VP2.
To set the Hot Standby configuration values on VP2:
- Set Hot Standby configuration values on VP1
- Reboot to apply the new Hot Standby configuration values on VP1. After rebooting VP2, the machine will be in Standby mode.
- Do the following:
- Generate and import the security keys on VP1 and VP2. See Generate and import the security keys.
- Perform a database synchronization on VP1. See Trigger the first database synchronization from VP1.
- Force VP2 in to Active mode by accessing VP1 and forcing it in to Standby mode. See Force the Active VidyoPortal into Standby mode from the Super Admin portal or Force a Hot Standby from the System Console on your Active VidyoPortal.
- Verify VP1 functionality
|
Note If you put your Standby VidyoPortal in to Maintenance mode, the Settings > Hot Standby screens do not display when accessed via the Internet Explorer Web browser. |
|
Note Verify your VP2 functionality by performing a controlled test where you force a Hot Standby, make your VP2 the Active VidyoPortal, and place a test call. You can force a Hot Standby from the Super Admin portal using Force the Active VidyoPortal into Standby mode from the Super Admin portal or from the System Console using Force a Hot Standby from the System Console on your Active VidyoPortal. See Prepare specific IP and FQDN values for your VP1, VP2, and cluster. Proceed only after you’ve configured both VP1 and VP2 and rebooted both machines. One machine has an Active status while the other has a Standby status. |
Generate and import the security keys
Each VidyoPortal generates its own unique security key (unrelated to CA certificates) for sharing with the other VidyoPortal in your Hot Standby setup. This section shows you how use the System Console to generate this key for copying and pasting to your other VidyoPortal.
Alternatively, you can generate the key using the System Console.
To generate and import the security keys:
- Open a new (or return to an already open) System Console and access VP1 using the Cluster IP or FQDN address you designated for VP1. See Prepare specific IP and FQDN values for your VP1, VP2, and cluster.
- Enter m for more options.
- Enter H to select the Hot Standby option.
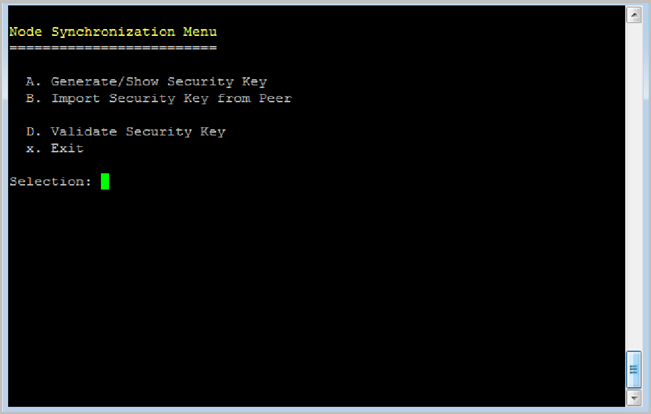
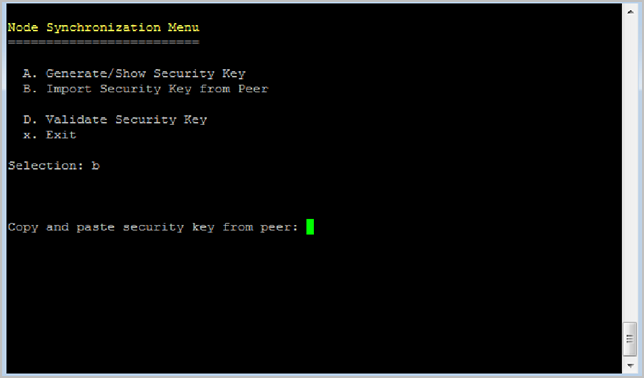
- Enter F to select the Node Synchronization option. The Node Synchronization Menu displays.
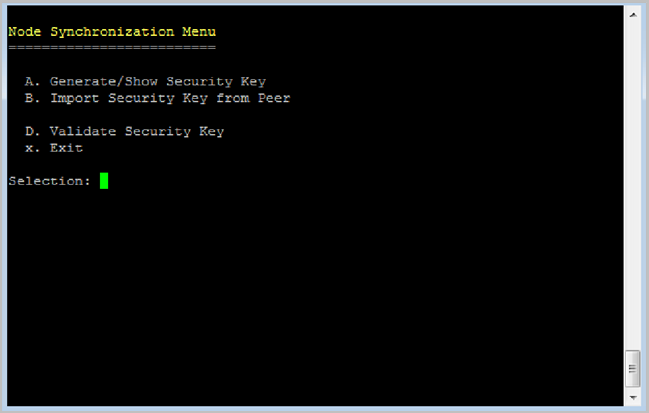
- Enter A to select the Generate/Show Security Key option.
- Enter y to confirm the key generation. The system generates a security key for VP2.
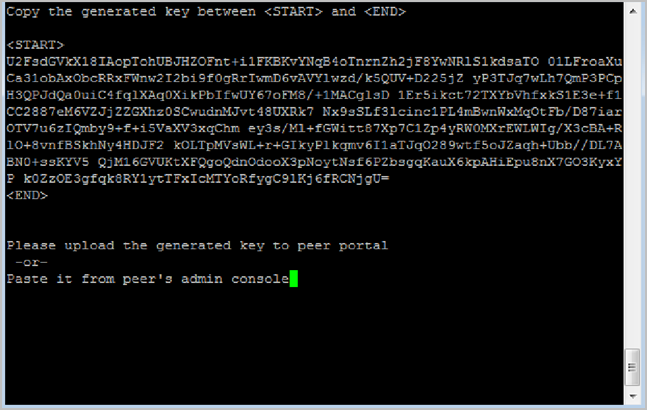
- Copy the key.
- Press the Enter key to stop viewing the key.
- Enter x to exit the VP1 System Console.
- Open a new (or return to an already open) System Console for VP2 using the native IP or FQDN address you designated for VP2. See Prepare specific IP and FQDN values for your VP1, VP2, and cluster.
- Enter m for more options.
- Enter H to select the Hot Standby option.
- Enter F to select the Node Synchronization option.
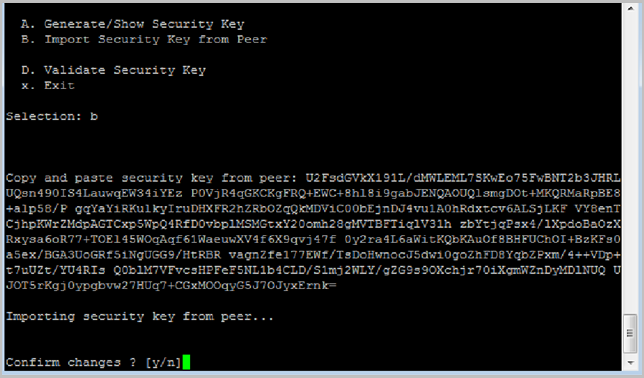
- Enter B to import security key from peer.
- Paste the key (generated from VP1) here on VP2.
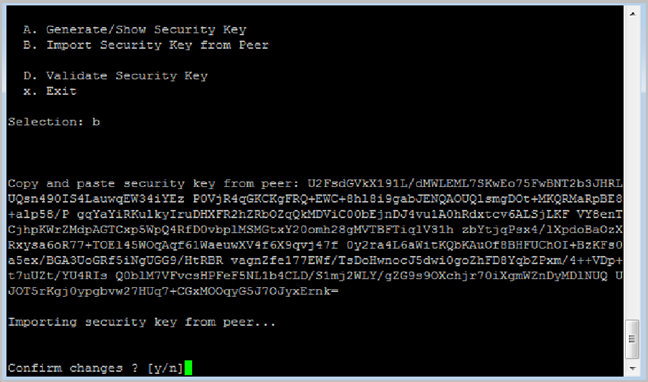
- Enter y to confirm your changes.
- Enter A to select the Generate/Show Security Key option.
- Copy the key.
- Open a new (or return to an already open) System Console for VP1 using the native IP or FQDN address you designated for VP1. See Prepare specific IP and FQDN values for your VP1, VP2, and cluster.
- Enter menu choices m > H > F to access VP1’s Node Synchronization Menu.
- Enter B to import security key from peer.
- Paste the key (generated from VP2) here on VP1.
- Enter y to confirm your changes.
- Press any key. If desired, you may leave the VP1 System Console open as you continue to the next procedure.
|
Note Press the Enter key after each prompt. You must use the Cluster IP or FQDN address to access the Active Vidyo Portal. Its Active status disables the native IP address. Refer to the specific IP address and FQDN values that you designated for your VP1, VP2, and Cluster in the Prepare specific IP and FQDN values for your VP1, VP2, and cluster section. |
|
Note Even though the H. Hot Standby option may not display on the main menu, you can still select it. |
|
Note Use your mouse to highlight the key text shown in the System Console. This automatically copies the selection to your clipboard. Exclude the words <START> and <END> when copying the key. |
|
Note So far you’ve copied VP1’s key to VP2. While you’re here in VP2, generate a key for copying to VP1 before validating both keys. |
|
Note Use your mouse to highlight the key text shown in the System Console. This automatically copies the selection to your clipboard. Exclude the words <START> and <END> when copying the key. |
If desired, you may leave the VP2 System Console open as you continue to the next procedure.
|
Note Use your mouse to right-click and paste the key text in to the VP1 System Console. |
Validate the security keys
Continue your Hot Standby configuration by validating the security keys on VP1 and VP2.
To validate the security keys:
- Open a new (or return to an already open) System Console for VP1 using the Cluster IP or FQDN address. See Prepare specific IP and FQDN values for your VP1, VP2, and cluster.
- Enter D from the System Console Node Synchronization menu on VP1 to validate the security key.
- Press any key. If desired, you may leave the VP1 System Console open as you continue to the next step.
- Open a new (or return to an already open) System Console for VP2 using the Native IP or FQDN address. See Prepare specific IP and FQDN values for your VP1, VP2, and cluster.
- Enter m > H > F from the main menu to access VP2’s Node Synchronization Menu.
- Enter D to validate the security key. The message Validating security... [Success] displays indicating that VP2 has validated the security key from VP1. If desired, you may leave the VP2 System Console open as you continue to the next procedure.
|
Note Press the Enter key after each prompt. |
The message Validating security...[Success] displays indicating that VP1 has validated the security key from VP2.
Trigger the first database synchronization from VP1
Continue your Hot Standby configuration by triggering the first database synchronization from VP1.
To trigger the first database synchronization from VP1:
- Open a new (or return to an already open) System Console for VP1 using the Cluster IP or FQDN address. See Prepare specific IP and FQDN values for your VP1, VP2, and cluster.
- Enter m > H > F from the main menu to access VP1’s Node Synchronization Menu.
- Enter C from the Node Synchronization Menu to create DB snapshot. This triggers the initial database synchronization from VP1.
|
Note Press the Enter key after each prompt. |
If desired, you may leave the VP1 System Console open as you continue to the next procedure.
Verify the node status on VP1 and VP2
Continue your Hot Standby configuration by verifying the status of each node on VP1 and VP2.
To verify the node status on VP1 and VP2:
- Open a new (or return to an already open) System Console for VP1 using the Cluster IP or FQDN address. See Prepare specific IP and FQDN values for your VP1, VP2, and cluster.
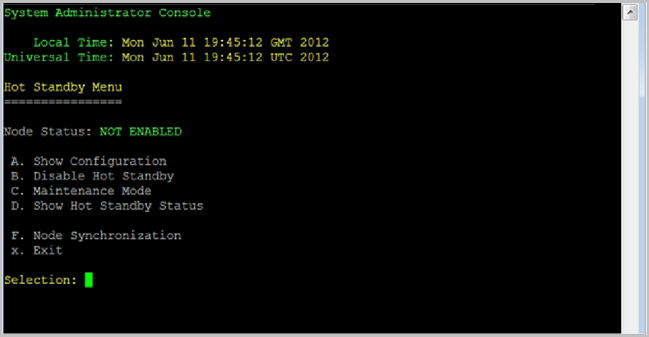
- Enter m > H from the main menu to access VP1’s Hot Standby Menu. Enter D to show hot standby status.
- Enter D to show hot standby status.
- Other statuses include NOT ENABLED and MAINTENANCE.
- Enter x to exit the VP1 System Console.
- Open a new (or return to an already open) System Console for VP2 using the Native IP or FQDN address. See Prepare specific IP and FQDN values for your VP1, VP2, and cluster.
- Enter m > H from the main menu to access VP2’s Hot Standby Menu.
- Enter D to show hot standby status.
- Enter x to exit the VP2 System Console.
|
Note Press the Enter key after each prompt. |
|
Note One server must show as ACTIVE and the other as STANDBY in your Hot Standby configuration. |
|
Note One server must show as ACTIVE and the other as STANDBY in your Hot Standby configuration. Other statuses include NOT ENABLED and MAINTENANCE. |
Check the status of the Hot Standby configuration
|
Note The database status is not shown until you perform the initial Hot Standby database synchronization using Trigger the first database synchronization from VP1. |
To check the status of the Hot Standby configuration:
- Access the Super Admin portal of the Active VidyoPortal using the Cluster IP or FQDN address. See Prepare specific IP and FQDN values for your VP1, VP2, and cluster. The Components page displays by default.
- Click the Settings tab. The Upload System License page displays by default.
- Click the plus sign to the left of Hot Standby on the left menu.
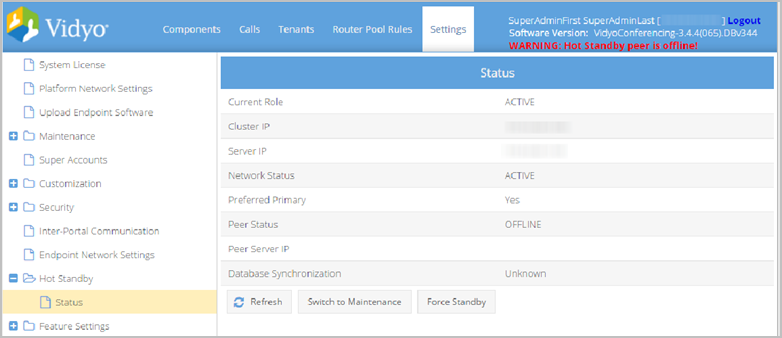
- Click Status from the submenu. The Status page displays.
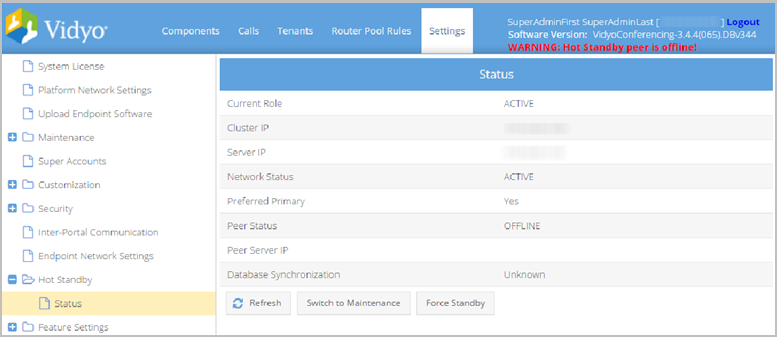
- The Status table displays. This is a read-only table that contains the following Hot Standby information:
- Current Role – UNKNOWN displays if the VidyoPortal is in Maintenance mode; otherwise, ACTIVE displays.
- Cluster IP – The IP address of the VidyoPortal.
- Server IP – The native IP address of the VidyoPortal. This IP address is used during Maintenance mode or when Hot Standby is disabled.
- Network Status – ACTIVE displays if the VidyoPortal is reachable; UNKNOWN displays if the VidyoPortal is in Maintenance mode.
- Preferred Primary – When both VidyoPortals initialize at the same moment, the Preferred Primary becomes the Active VidyoPortal. (You select the Preferred Primary in the Preferred Node field when you configure VP1 and VP2 using the System Console.)
- Peer Status – The status (either ONLINE or OFFLINE) of the partner VidyoPortal.
- Peer Server IP – The configured IP address of the peer VidyoPortal.
- Database Synchronization – The state of the database synchronization. If the standby server database is not in-sync, the number of minutes behind will be displayed. If the database is unable to be synchronized, the Super Admin will be prompted to click a button to replicate the database. If there is a connectivity issue, a descriptive message displays.
|
Note The following screenshot does not actually show the database synchronization taking place. |
|
Note If the Super Admin initiates a database replication, the database may be offline for a few seconds. Statuses generally correspond to the ones shown when using the System Console during Verify the node status on VP1 and VP2. |
If desired, you may leave the Super Admin portal for your Active VidyoPortal open.
Force the Active VidyoPortal into Standby mode from the Super Admin portal
When a VidyoPortal is in Standby mode, you cannot access corresponding Super Admin or Admin portals; however, the machine is still accessible from the System Console. See Force a Hot Standby from the System Console on your Active VidyoPortal.
If you put your Standby VidyoPortal in to Maintenance mode, the Settings > Hot Standby screens do not display when accessed via the Internet Explorer Web browser.
To force the Active VidyoPortal into Standby mode from the Super Admin portal:
- Access the Super Admin portal of your Active VidyoPortal using the Cluster IP or FQDN address. See Prepare specific IP and FQDN values for your VP1, VP2, and cluster. The Components page displays by default.
- Click the Settings tab. The Upload System License page displays by default.
- Click the plus sign to the left of Hot Standby on the left menu.
- Click Status from the submenu.
- Click Force Standby. A Confirmation pop-up displays.
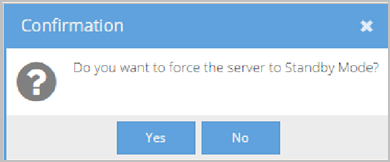
- Click Yes to force the Active VidyoPortal into Standby mode.
|
Note At this point, the peer VidyoPortal becomes the Active VidyoPortal and assumes the Cluster IP address and FQDN. This means that the Standby VidyoPortal no longer receives traffic from the Cluster IP address, and instead assumes its Native IP address and FQDN. Once a VidyoPortal becomes the Active VidyoPortal, its Native IP address and FQDN are temporarily disabled. As a safety measure, you cannot bring down the currently Active VidyoPortal unless its peer VidyoPortal is online and ready to take over. If the peer is offline, the message “Warning!!! Standby Node (xxx.xxx.x.xxx) is OFFLINE” displays, and you are unable to force the currently Active VidyoPortal into Standby mode. |
Email notifications
When you change the status of the VidyoPortals in the Hot Standby configuration, you receive email notifications of the changes. The following table lists some of these emails.
| Cause | Email or emails sent |
| Active VidyoPortal switches over to Standby VidyoPortal |
Two emails:
|
| Active VidyoPortal switches over to Maintenance mode and Standby VidyoPortal takes over |
Two emails:
|
| VidyoPortal switches from Maintenance mode to Standby |
Standby Node is ONLINE. |
| VidyoPortal switches from Maintenance mode to Active without Standby |
Two emails:
|
| Standby VidyoPortal reboots |
Two emails:
|
| Standby VidyoPortal IP connectivity was lost and restored |
Two emails:
|
Upgrade Hot Standby VidyoPortals
You have two main options for upgrading your Hot Standby VidyoPortals:
- Upgrade Hot Standby VidyoPortals while Keeping One Server Online
- Upgrade Hot Standby VidyoPortals while Both Servers are Offline
Upgrade your Hot Standby VidyoPortals while keeping one server online
This section describes how to upgrade both the Active and the Standby VidyoPortals by forcing your Standby VidyoPortal into Maintenance mode, performing the upgrade, forcing a Hot Standby, and then repeating the process on the previously Active VidyoPortal.
When performing this procedure, refer to the specific IP and FQDN values that you designated for your VP1, VP2, and Cluster in the Prepare specific IP and FQDN values for your VP1, VP2, and cluster section.
Switch to Maintenance mode and upgrade your standby VidyoPortal
If you put your Standby VidyoPortal into Maintenance mode, the Settings > Hot Standby screens do not display when accessed via the Internet Explorer Web browser.
To switch to Maintenance mode and upgrade your Standby VidyoPortal:
- Open a new System Console and access the Standby VidyoPortal using the Native IP or FQDN address. See Prepare specific IP and FQDN values for your VP1, VP2, and cluster.
- Put the Standby VidyoPortal into Maintenance mode using the following steps:
- Enter m > H from the main menu to access the Standby VidyoPortal’s Hot Standby Menu.
- Enter C to select the Maintenance Mode option.
- Enter y to confirm putting your Standby VidyoPortal into Maintenance mode.
- Upgrade the Standby VidyoPortal as described in the Upgrade your VidyoPortal system software. The VidyoPortal automatically reboots.
- Open a new System Console and return to the Standby VidyoPortal using the Native IP or FQDN address. See Prepare specific IP and FQDN values for your VP1, VP2, and cluster.
- Take the Standby VidyoPortal out of Maintenance mode using the following steps:
- Enter m > H from the main menu to access the Standby VidyoPortal’s Hot Standby Menu.
- Enter C to select the Maintenance Mode option.
- Enter y to confirm putting your Standby VidyoPortal into Maintenance mode.
|
Note Press the Enter key after each prompt. |
Alternatively, you can put the Standby VidyoPortal into Maintenance mode via the Super Admin Portal by navigating to Settings > Hot Standby > Status, clicking Switch to Maintenance, and then clicking Yes in the confirmation pop-up that displays.
|
Note Wait until the machine has completely rebooted before proceeding. |
|
Note Press the Enter key after each prompt. |
If desired, you may leave the System Console for your Standby VidyoPortal open as you continue to the next procedure.
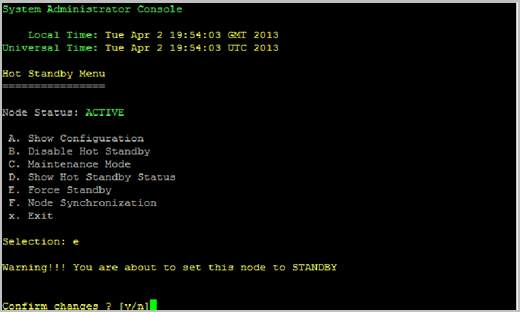
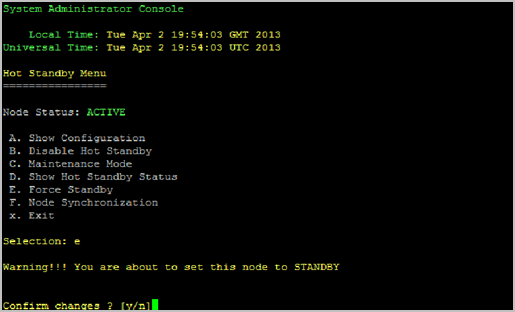
Force a Hot Standby from the System Console on your Active VidyoPortal
To force a Hot Standby on your Active VidyoPortal:
- Open a new System Console for your Active VidyoPortal using the Cluster IP or FQDN address. See Prepare specific IP and FQDN values for your VP1, VP2, and cluster.
- Force a Hot Standby using the following steps:
- Enter m > H from the main menu to access the Standby VidyoPortal’s Hot Standby Menu.
- Enter C to select the Maintenance Mode option.
- Enter y to confirm putting your Standby VidyoPortal into Maintenance mode.
- Close the System Console which is now disconnected from your VidyoPortal.
|
Note Press the Enter key after each prompt. |
Your System Console session is automatically disconnected from your VidyoPortal while it is forced into Standby mode.
|
Note Alternatively, a Force Standby can be done via the Super Admin portal using Force the Active VidyoPortal into Standby mode from the Super Admin portal. |
Repeat the previous procedures starting with Switch to Maintenance mode and upgrade your standby VidyoPortal for the Standby VidyoPortal – which was just the Active machine before you forced the Standby during the previous step – to complete upgrades on both of your VidyoPortal machines.
Upgrade your Hot Standby VidyoPortals while taking both servers offline
This method for upgrading your VidyoPortals requires more time because you must take the system completely offline for full maintenance. However, no CDR records are lost.
With this option, you place both servers into Maintenance mode, upgrade both and then return them to their original Active and Standby modes.
To upgrade Hot Standby VidyoPortals while taking both servers offline:
- Open a new System Console and access the Standby VidyoPortal using the Native IP or FQDN address to put your Standby VidyoPortal into Maintenance mode. See Prepare specific IP and FQDN values for your VP1, VP2, and cluster.
- Select m > H from the main menu to access the Standby VidyoPortal’s Hot Standby Menu.
- Enter C to select the Maintenance Mode option.
- Enter y to confirm putting your Standby VidyoPortal into Maintenance mode.
- Open a new System Console and access the Active VidyoPortal using the Native IP or FQDN address to put your Active VidyoPortal into Maintenance mode. See Prepare specific IP and FQDN values for your VP1, VP2, and cluster.
- From the main menu, select m > H to access the Active VidyoPortal’s Hot Standby Menu.
- Enter C to select the Maintenance Mode option.
- Enter y to confirm putting your Standby VidyoPortal into Maintenance mode.
- Both of your VidyoPortals should now be offline and in Maintenance Mode.
- Upgrade both VidyoPortals as described in the Perform system maintenance. After the upgrades are complete and the servers are restarted, return the VidyoPortal that was originally your Active VidyoPortal using the Native IP or FQDN address.
- Put this machine in to Active mode first using the following steps:
- Select m > H from the main menu to access the Standby VidyoPortal’s Hot Standby Menu.
- Enter C to select the Maintenance Mode option.
- Enter y to confirm putting your VidyoPortal back into Active mode.
- Return the VidyoPortal that was originally your Standby VidyoPortal using the Native IP or FQDN address.
- Put this machine in to Standby mode using the following steps:
- Enter m > H from the main menu to access the Standby VidyoPortal’s Hot Standby Menu.
- Enter C to select the Maintenance Mode option.
- Enter y to confirm putting your VidyoPortal back into Standby mode.
|
Note Press the Enter key after each prompt. |
|
Note The first VidyoPortal server you take out of Maintenance Mode is made the Active VidyoPortal just by removing it from Maintenance Mode. |
|
Note The second VidyoPortal server that you take out of Maintenance Mode becomes the Standby VidyoPortal just by removing it from Maintenance Mode. |
