8. Configure your components as the super admin
Components are the software and/or hardware devices that enable your Vidyo system to operate. You can add components to your system to give it added capabilities or capacities, such as connecting to a legacy conferencing system. You must register these components with your VidyoPortal for them to work with your Vidyo conferencing system. The Components tab enables you to add the following components:
- VidyoManager – The software component necessary for the functioning of the VidyoPortal.
- VidyoRouter – Routes video and audio streams between endpoints and intelligently identifies and adjusts to bandwidth and network constraints. You can purchase VidyoRouters to increase your call capacity.
- VidyoProxy – A software component built into the VidyoRouter that enables authorized endpoints to connect while denying unauthorized connections. It also enables NAT and firewall traversal.
- VidyoGateway – An optional component that connects the VidyoPortal to legacy conferencing systems, landlines, and cell phones (for voice-only participation).
- VidyoReplay – VidyoReplay enables you to record, webcast, store, catalog, and playback video conferences.
|
Note Do not perform any tasks on the VidyoManager other than those described below. Many VidyoManager tasks including ones indicated in the following section should only be completed under specific instruction from Vidyo Customer Support. |
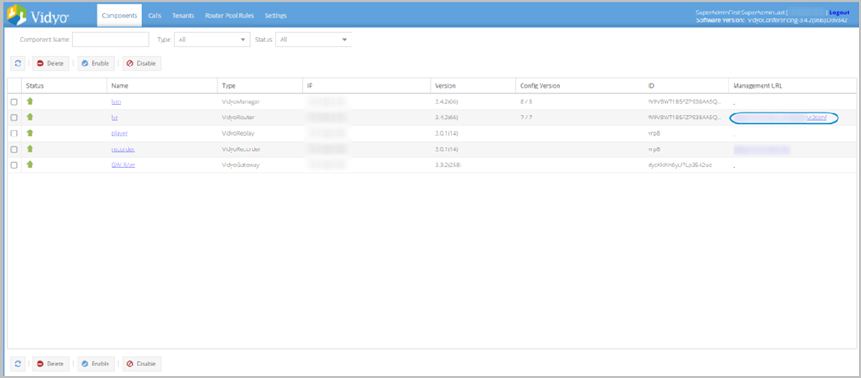
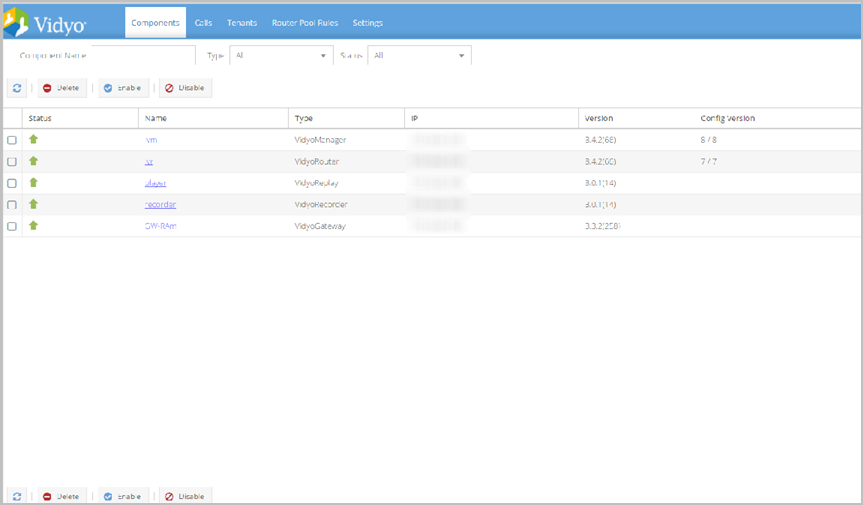
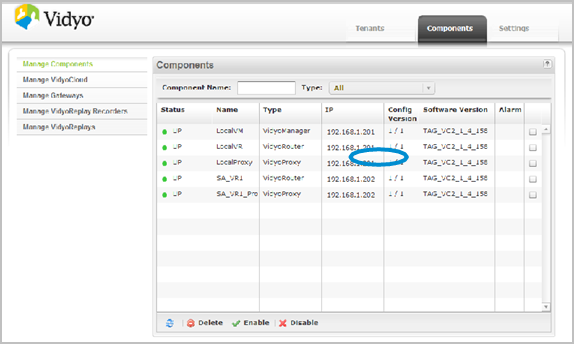
Components table
You use the Manage Components table to view, delete, and manage the components in your system.
To use the Manage Components table:
- Log in to the Super Admin portal using your Super Admin account. See Log in to the Super Admin portal. The Components page displays by default.
- Status: The following statuses display on the Manage Components table.
- A green arrow in the status column means it’s installed and operating.
- A yellow arrow means the component is newly installed, but not configured yet.
- A red arrow means the component isn’t working. Hover your mouse pointer over the red arrow to read its alarm message.
- A gray arrow means the component is disabled, typically when you take a component offline while performing maintenance.
- The Name column displays the descriptive name you provided when installing a component.
- The Type column displays the specific type of component as VidyoManager, VidyoRouter, or VidyoGateway.
- The IP Address column displays the IP address you assigned to the component when you created it.
- The Version column displays the specific software version of the component.
- The Config Version column displays a numeric tally on the left side of the slash. The number increases each time you change a component’s configuration.
- The ID column displays the identification assigned to the component when you created it.
- The Management URL column displays the linked URL that takes you to the component’s console page.
- Search by component name or type using the Component Name field or Type drop-down above the table.
- Click Delete after selecting one or more components to be deleted from your system.
- Click Enable after selecting one or more components to be enabled on your system.
- Click Disable after selecting one or more components to be disabled on your system.
Components in your VidyoPortal display in the table and include component Status, Name, Type, IP, Version, Config Version, ID, and Management URL as columns.
|
Note Whenever you modify and save a component, the new configuration is assigned an incremental version number to distinguish it from previous component modifications saved on your VidyoPortal. Approximately every 15 seconds, your component communicates with your VidyoPortal and reports the configuration it is currently running. This is the number shown on the right side of the slash. If a new configuration version is available on your VidyoPortal, it is pushed to your component. Configuration version numbers do not display for the optional VidyoGateway component. An alarm symbol displays next to the component’s status when the component is not working properly. Hover your mouse pointer over it to read a brief description of the fault. The checkbox column allows you to select one or more components to be deleted, enabled, or disabled on your system. |
You can drag and drop the column headings to arrange them in the order you prefer.
If desired, you can also select the Delete, Enable, and Disable buttons. The table automatically refreshes.
|
Note Deleting a VidyoGateway or VidyoReplay component from the Manage Components table does not disable or delete the component itself. Disabling or deleting the VidyoGateway or VidyoReplay components, must be done from their respective Configuration pages. You can access the Configuration pages of each registered component by clicking the Name shown in the Components table. You can access the component’s own local webpage configuration screen by clicking the Management URL shown in the Components table. The first page shown is the component’s login page where you can log in using your Super Admin account. |
Configure Your VidyoManager component
This section describes how to configure the VidyoManager.
Enter general VidyoManager information
To enter general VidyoManager information:
- Log in to the Super Admin portal using your Super Admin account. The Components page displays by default.
- Double-click on the blue link in the Name column for the VidyoManager component. The VidyoManager pop-up displays.
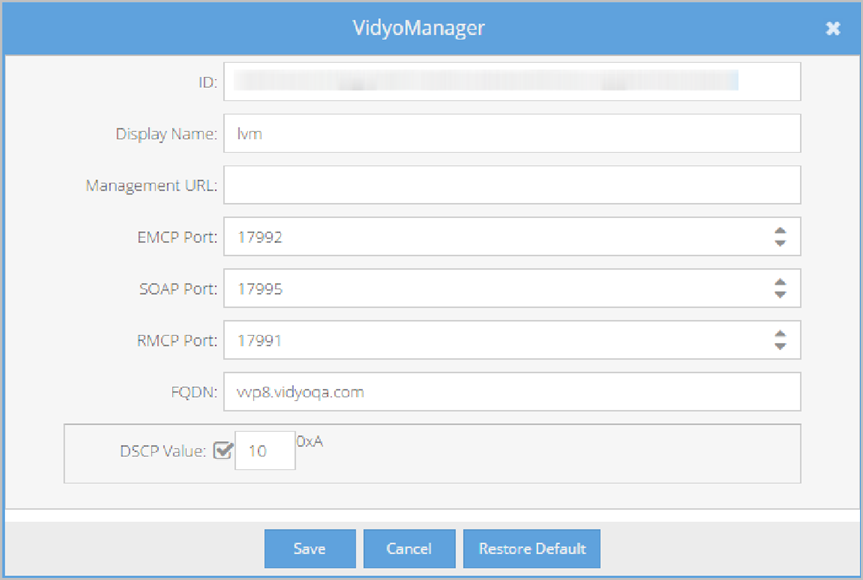
- View and enter the following information:
- The ID shows your VidyoManager ID, which is automatically created and set by the system. This value cannot be changed.
- Enter a display name or label for your VidyoManager in the Display Name field. These address and port values are then used by VidyoConnect, VidyoConnect Room, and VidyoGateway clients to communicate with your VidyoManager.
- The Management URL shows the address the VidyoManager uses to communicate with the VidyoPortal.
- Enter the appropriate port in the EMCP Port field.
- The SOAP Port field allows your VidyoPortal to communicate with your VidyoManager.
- The RMCP Port field allows your VidyoRouter to connect to the VidyoManager.
- Enter the appropriate FQDN in the FQDN field.
- The DSCP value will be used for VidyoManager connections.
- Click Save.
|
Note Do not change this address. |
|
Note Do not change the address value unless required for NAT traversal or enabling Security. Before editing the EMCP settings, see Appendix A. Firewall and Network Address Translations (NAT) deployments and Appendix C. Security. If you’re using FQDN licensing, the EMCP address is read-only. |
Configure your VidyoRouter component
Your VidyoRouter transports video and audio streams between endpoints. It also intelligently identifies and adjusts to bandwidth and network constraints.
Configure VidyoRouter general settings
To configure VidyoRouter general settings:
- Log in to the Super Admin portal using your Super Admin account. The Components page displays by default.
- Double-click on the blue link in the Name column for the VidyoRouter component. The VidyoRouter pop-up displays.
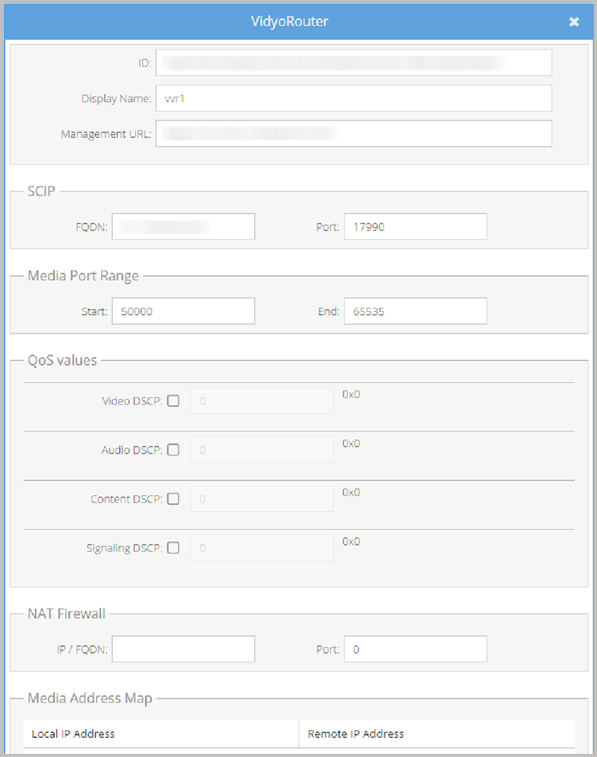
- Enter a display name or label for your VidyoRouter in the Name field. The ID shows your VidyoRouter ID, which is automatically created and set by the system. This value cannot be changed. The Management URL shows the address the VidyoManager uses to communicate with the VidyoPortal.
|
Note This is the minimum required to authorize a VidyoRouter. It’s a good idea to give your routers names that help you remember their locations, such as NYC VidyoRouter 1 and NYC VidyoRouter 2. Don’t change this address unless required for NAT traversal or enabling Security. |
Configure VidyoRouter SCIP settings
Before editing SCIP settings, see Appendix A. Firewall and Network Address Translations (NAT) deployments and Appendix C. Security.
To configure VidyoRouter SCIP settings:
- Log in to the Super Admin portal using your Super Admin account. The Components page displays by default.
- Double-click on the blue link in the Name column for the VidyoRouter component. The VidyoRouter pop-up displays.
- Enter a FQDN and Port in the SCIP section.
These FQDN and Port values are then used by VidyoConnect, VidyoConnect Room, and VidyoGateway clients to communicate with your VidyoRouter using Vidyo’s proprietary network protocol. This is the listening address of the VidyoRouter.
Configure VidyoRouter media port range settings
To configure VidyoRouter media port range settings:
- Log in to the Super Admin portal using your Super Admin account. The Components page displays by default.
- Double-click on the blue link in the Name column for the VidyoRouter component. The VidyoRouter pop-up displays.
- Enter a value in the Start and End fields in the Media Port Range section.
Configure VidyoRouter Quality of Service (QoS)
This page allows you to set differentiated services code point (DSCP) values for audio, video, and content coming from your VidyoRouter to various endpoints. Audio, video, and content data coming from your VidyoRouter is assigned corresponding values you set on this screen.
With these specified values assigned to media types coming from your VidyoRouter, you can then configure your network router or switch to prioritize the packets as desired.
To configure Quality of Service values in your VidyoRouter:
- Log in to the Super Admin portal using your Super Admin account. The Components page displays by default.
- Double-click on the blue link in the Name column for the VidyoRouter component. The VidyoRouter pop-up displays.
- Select Video, Audio, Content, and Signaling DSCP values as desired and provide corresponding decimal values. If no values are provided, they all default to zero.
|
Note We recommend setting QoS policies on the network equipment using IP policies rather than here. |
For more information about setting DSCP for endpoints on your tenants, see Configure endpoint network settings on your tenant.
Configure VidyoRouter NAT firewall settings
This page is used for traversal of a NAT when the VidyoPortal and VidyoRouter are hosted behind a NAT. See Appendix A. Firewall and Network Address Translations (NAT) deployments.
To configure VidyoRouter NAT Firewall settings:
- Log in to the Super Admin portal using your Super Admin account. The Components page displays by default.
- Double-click on the blue link in the Name column for the VidyoRouter component. The VidyoRouter pop-up displays.
- Enter the following information:
- Enter an IP and port of a STUN server in the NAT Firewall fields. A STUN server generally uses port 3478. If the system is NATed without a 1:1 port mapping, you must configure the VidyoRouter to use a STUN server residing on the WAN side for network traversal.
- Enter an IP and port in the Media Address Map fields. If the system is NATed with a 1:1 port mapping, hence no port translation, you can define local to public and public to local address mappings. The remote IP address is the IP address that the system is NATed to from the side that users connect from.
- Select the Media Port Range checkbox and provide Start and End port numbers. If only one port is available, enter the same port number in each Start and End field. This allows you to define a range of ports available in your firewall.
|
Note The Media Address Map feature is the preferred configuration option. Only enter values for NAT Firewall fields or Media Address Map fields. Enabling both options and by entering values for each causes the system to malfunction. |
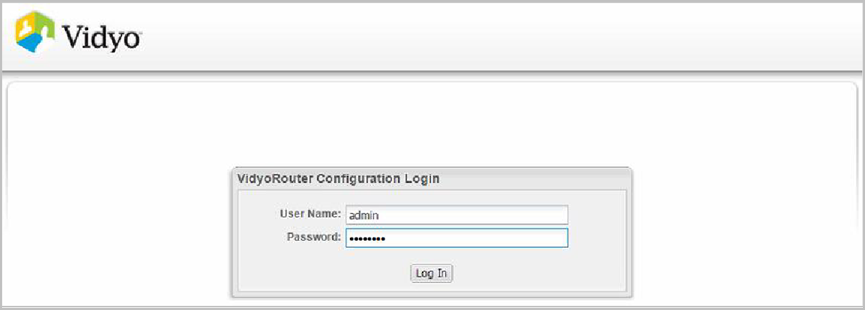
Access your VidyoRouter configuration page
The URL of your VidyoRouter is typically a domain name: http://[IP or FQDN address]/vr2conf. You can also click the Management URL link for the VidyoRouter on the Components tab in your VidyoPortal.
For more information, see Log in to the System Console of your server and change the default password.
Although the default username for this page is admin, only the Super Admin accesses these pages.
Configure basic settings on your VidyoRouter
To configure basic settings on your VidyoRouter:
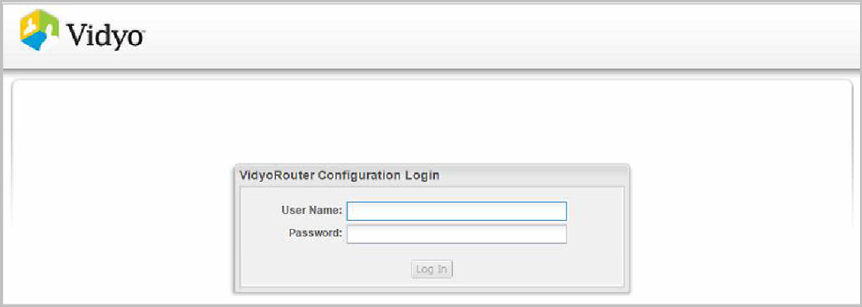
- Log in to your VidyoRouter using your System Console account.
- The Maintenance > Basic page displays by default. The only task you must do for every external VidyoRouter is to tell it where to find its Config Server. The Configuration Server field tells the VidyoRouter where to look for its configuration information. For VidyoRouters, it’s the IP or FQDN address of your VidyoPortal.
- Enter the IP or FQDN address of your VidyoPortal.
- Click Apply for the VidyoRouter to register.
Configure security on your VidyoRouter
Entering information on this tab is optional. For detailed VidyoRouter security information, see Appendix C. Security.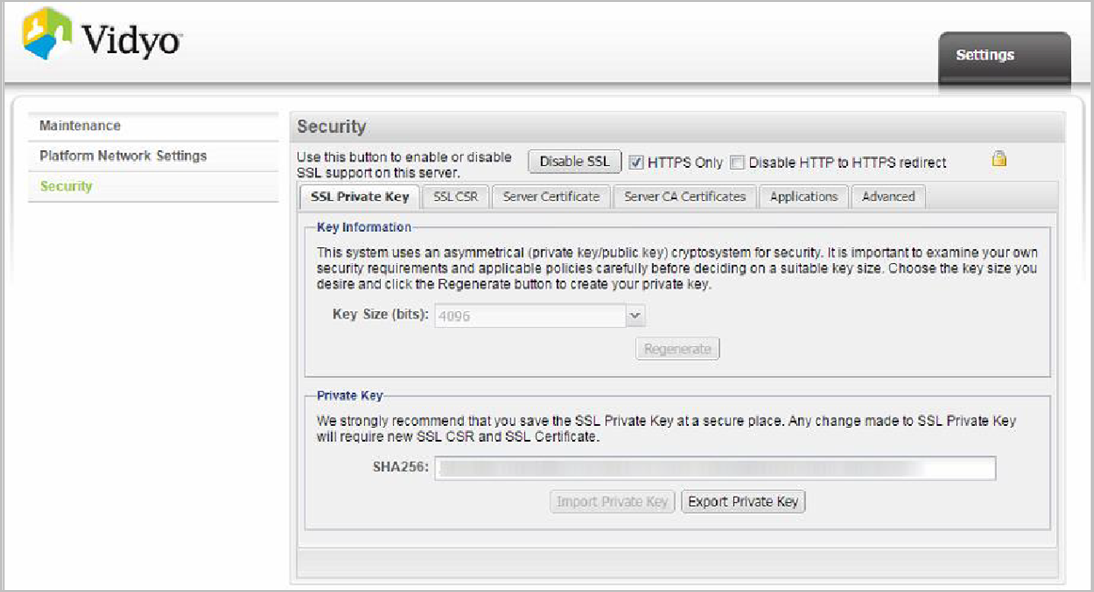
View system information on your VidyoRouter
To view system information on your VidyoRouter:
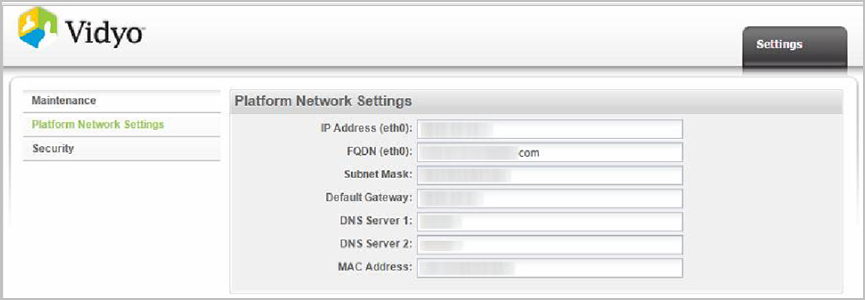
- Log in to your VidyoRouter using your System Console account. The Maintenance > Basic page displays by default.
- Click Platform Network Settings on the left menu. The text in the fields shown are read-only. This page serves as a convenient summary of basic system information.
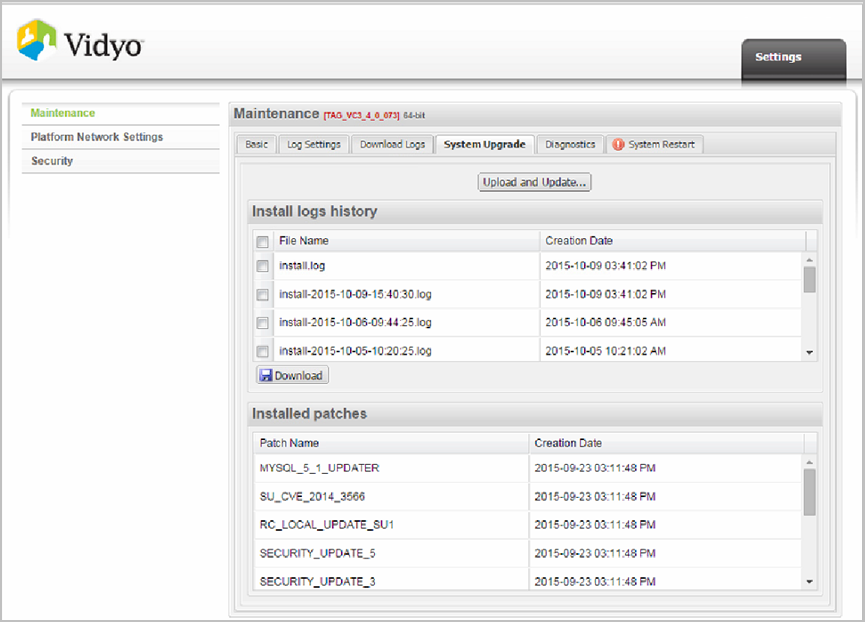
Upgrade your VidyoRouter
The System Upgrade tab is used for upgrading your VidyoRouter software version, downloading installation logs history, and viewing installed patches.
The Vidyo upgrade filenames contain the server product abbreviation, version number and/or Add-on/Patch name, and have a .vidyo extension (example: TAG_VC_3_0_0_x.vidyo).
|
Caution Once the VidyoRouter is upgraded, it cannot be reverted to the previous version or other versions. |
|
Note The system doesn’t accept a file that’s versioned earlier than the version currently being used on the VidyoRouter, preventing you from accidentally downgrading your software. The system only accepts .vidyo files signed by Vidyo, protecting you from non-genuine files. The upgrade process terminates all calls in progress. You might want to email users ahead of time and perform the upgrade when system usage is lowest. |
To upgrade any VidyoRouters:
- Log in to the Super Admin portal using your Super Admin account. The Components page displays by default.
- Click on the Management URL link for the VidyoRouter (as shown in the following illustration) or navigate to http://[VidyoRouter Server IP or FQDN address]/vr2conf to access the VidyoRouter Configuration Pages.
- Enter your VidyoRouter Administrator username and password. The default username is admin and the default password is password.
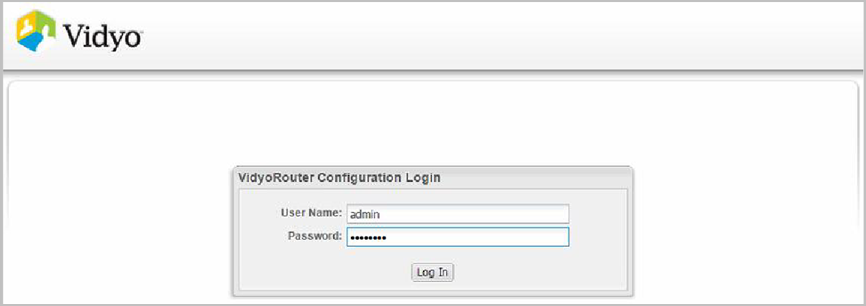
- Click Login. The Maintenance > Basic page is selected by default.
- Click the System Upgrade subtab. The Uploading new server software file pop-up displays.
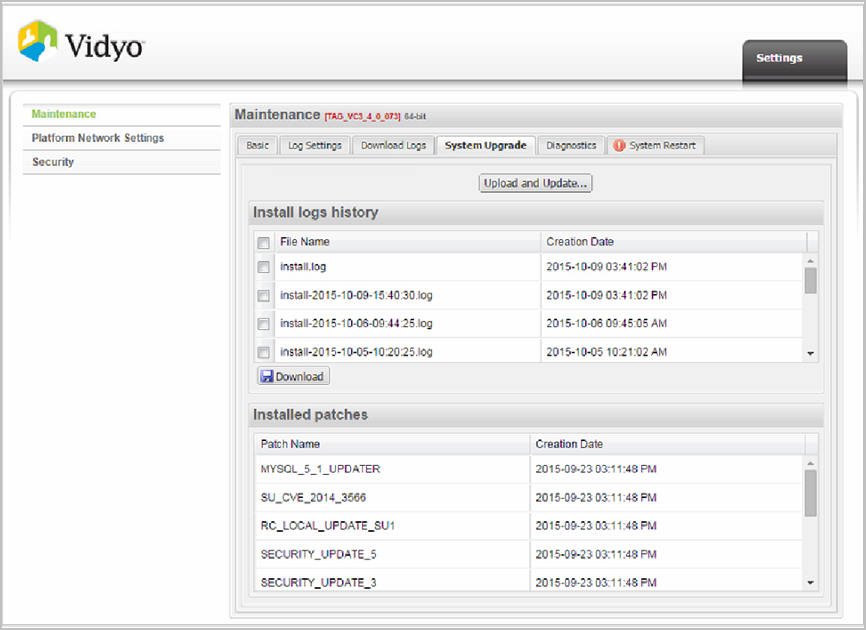
- Click the Select File icon.

- Locate and select the .vidyo file from the file selection dialog box.
- Click Open.
- Click Upload from the Uploading new server software file pop-up. The upload process may take five to fifteen minutes or more depending on the bandwidth available between the upload file location and your VidyoRouter. Once the upload completes, your VidyoRouter will reboot. Wait two to five minutes before proceeding to the next step.
- Return to the Super Admin portal and click the Components tab after the VidyoRouter reboots.
- Verify that the Software Version displayed is correct for the VidyoRouter that you upgraded.
- Repeat the steps in this section for each additional VidyoRouter in your Vidyo conferencing system.
|
Note You can determine your VidyoRouter type by viewing the version label displayed to the right of the Maintenance title. The version number also ends with either 64-bit or 32-bit. |
|
Caution Do not reboot the server manually during this process; doing so may interrupt the upgrade process and corrupt the data. Vidyo recommends running a continuous ping to the server to monitor the reboot process status. |
|
Caution The VidyoRouter (and corresponding VidyoProxy) may both have a Status of DOWN or NEW, or they may show an Alarm (as shown in the following illustration). Do not attempt to reconfigure the NEW, delete the DOWN component, or attempt to clear the Alarm at this time. Each will update or clear automatically once the VidyoPortal is upgraded. |
Download your VidyoRouter installation logs history
You can download your VidyoRouter installation logs history from the System Upgrade tab.
To download VidyoRouter installation logs history:
- Log in to the Super Admin portal using your Super Admin account. The Components page displays by default.
- Click on the Management URL link for the VidyoRouter or navigate to http://[VidyoRouter Server IP or FQDN address]/vr2conf to access the VidyoRouter Configuration Pages.
- Enter your VidyoRouter Administrator username and password. The default username is admin and the default password is password.
- Click Login. The Maintenance > Basic page displays by default.
- Click the System Upgrade subtab.
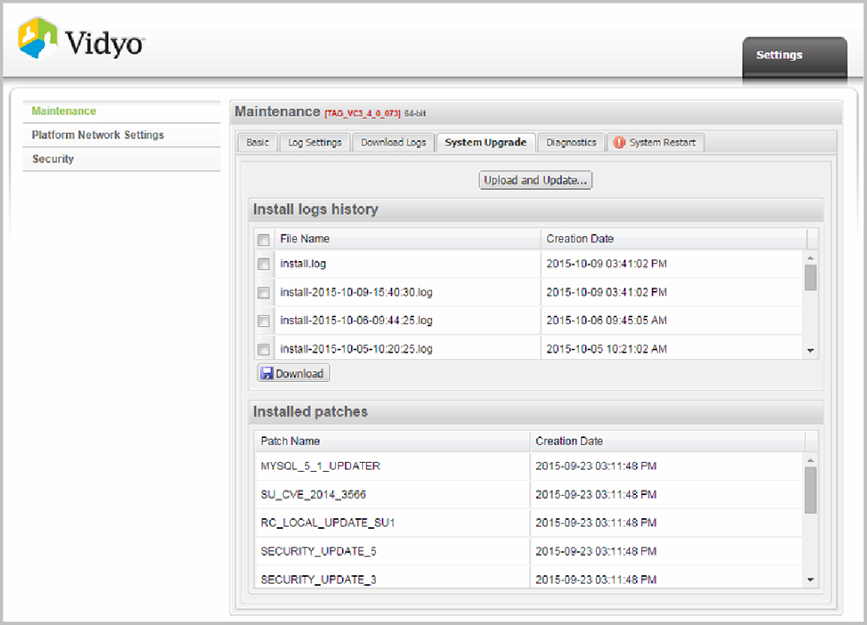
- Select the checkbox to the left of the file name you wish to download.
- Click Download. Your selected .log file or files then download through your Web browser.
View installed patches in your VidyoRouter
You can view the installed patches in your VidyoRouter from the System Upgrade tab.
To view installed patches in your VidyoRouter:
- Log in to the Super Admin portal using your Super Admin account.
- Click the Components tab. The Manage Components left menu item is selected by default.
- Click on the VidyoRouter IP address (as shown in the following illustration) or browse to http://[VidyoRouter Server IP or FQDN address]/vr2conf to access the VidyoRouter Configuration Pages.
- Enter your VidyoRouter Administrator username and password. The default username is admin and the default password is password.

- Click Login. The Maintenance > Basic page displays.
- Click the System Upgrade subtab. All the patches you have installed on your VidyoRouter display on the Installed Patches section of the screen.
Restart your VidyoRouter
This tab enables you to restart or shut down your VidyoRouter. You’re required to enter your username and password before you can do either.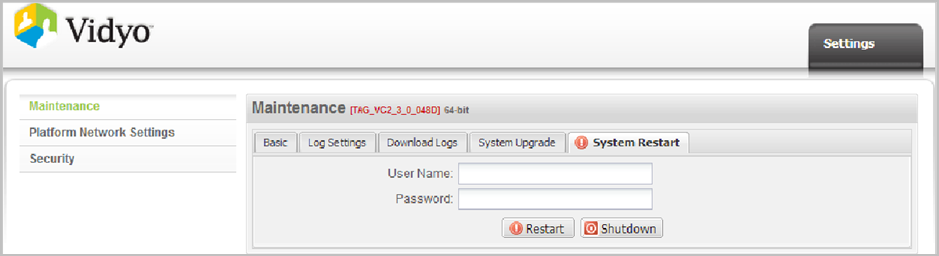
|
Caution Once the server shuts down you can power it back up only by physically pressing the power button on the front of the unit. Additionally, when the system is restarted or shut down, all calls in progress will end. |
You might want to email users ahead of time and perform the upgrade when system usage is lowest.
Log out of your VidyoRouter
Clicking the Logout tab opens a pop-up that asks you to confirm your intent to log out of the VidyoRouter.
VidyoGateway configuration
A VidyoGateway is the optional component that permits calls from legacy devices that support SIP, H.323, and video conferencing endpoints, such as landlines and cell phones, to participate in videoconferences.
VidyoGateway configuration requires cumulative steps performed on both the VidyoGateway and the VidyoPortal as described in the following procedures. Complete all of the following steps on your VidyoGateway and VidyoPortal in the order that they display.
|
Note If you are clustering VidyoGateways, the entire procedure should be done for each VidyoGateway in your cluster. Telephones can send and receive only the audio portion of the teleconference. |
Make configurations on your VidyoGateway
To make configurations on your VidyoGateway:
- Configure your network interface settings in the VidyoGateway System Console. The following criteria should be met:
- Set your production and management interfaces with IP addresses.
- Rack your machine properly.
- Successfully Ping your server before proceeding.
- For more information, refer to Configure your server via the System Console in the VidyoGateway administrator guide.
- Secure your VidyoGateway server (if applicable). For more information, refer to Secure your VidyoGateway system with SSL and HTTPS in the VidyoGateway administrator guide.
- Register your VidyoGateway to your VidyoPortal by entering your VidyoPortal address in your VidyoGateway. For more information, refer to Configure the VidyoPortal settings in the VidyoGateway administrator guide.
Make configurations on your VidyoPortal for your VidyoGateway
To make configurations on your VidyoPortal for your VidyoGateway:
- Add the VidyoGateway as a component on your VidyoPortal. See Add a VidyoGateway to your VidyoPortal.
- Assign the VidyoGateway to a tenant. If you are running a multi-tenant system, assign it to the appropriate tenant. See Make the VidyoGateway components available.
|
Note If you are performing an initial VidyoGateway setup, you must add the VidyoGateway as a component in your Vidyo conferencing system. |
|
Note Now you can configure additional VidyoGateway features as needed, such as creating VidyoGateway clusters, setting up call services to enable dialing between the VidyoGateway and your Legacy system (or use any of the predefined services), and integrating VoIP phones and IP PBXs. |
Add a VidyoGateway to your VidyoPortal
To add a VidyoGateway to your VidyoPortal:
- Log in to the Super Admin portal using your Super Admin account. The Components page displays by default.
- Log in to the VidyoGateway Console Admin page. The General > VidyoPortal subtab is selected by default.
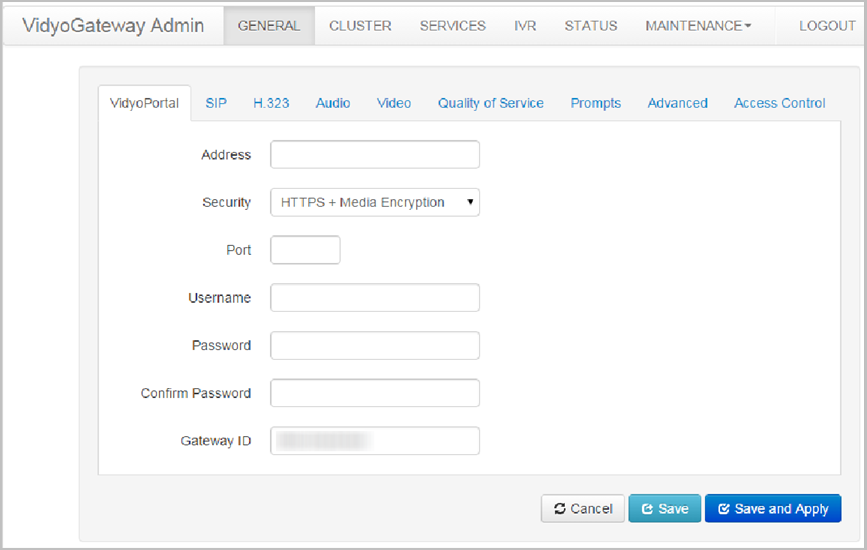
- Configure the VidyoGateway and ensure that the Address is directed to your VidyoPortal. If you need to configure a cluster node, refer to Configure your cluster node in the VidyoGateway Administrator Guide.
- Click Save to complete the configuration. The VidyoGateway appears on the Components tab within the Super Admin portal as NEW.
- Navigate back to the Component tab in the Super Admin portal.
- Click the Name link for the VidyoGateway. The VidyoGateway pop-up displays.
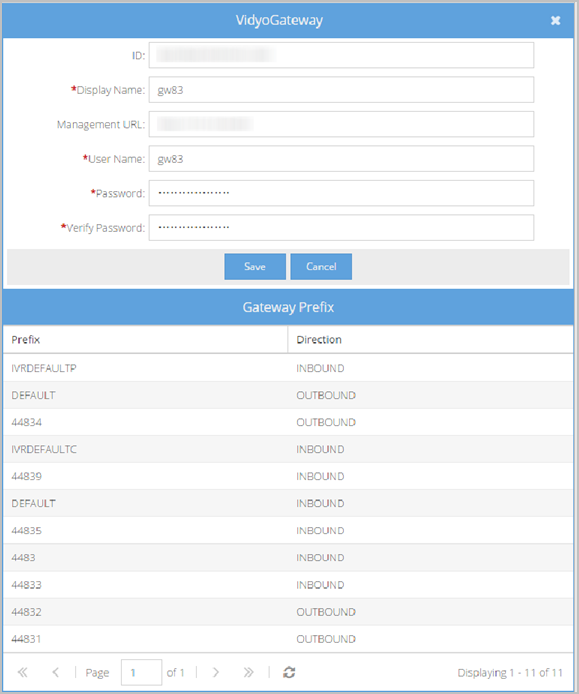
- Enter the VidyoGateway login name for VidyoPortal registration and authentication in the User Name field.
- Enter the VidyoGateway password for VidyoPortal registration and authentication in the Password field.
- Re-enter the password in the Verify Password field.
- Click Save.
|
Note The username and password configured in these steps are used when configuring your VidyoPortal settings on your VidyoGateway. For more information, refer to Configure the VidyoPortal settings in the VidyoGateway Administrator Guide. The username cannot be “admin” or “super.” When editing existing VidyoGateway components, prefixes from your VidyoGateway are listed on their tables.d |
Configure router pools
Router pools are an optional advanced topology for configuring VidyoRouters in the Vidyo conferencing system. You can configure router pools at initial installation or do so at a later date when your organization’s network grows. Some of the benefits of router pools include:
- More efficient network bandwidth utilization.
- Improved latency for conferences by localizing traffic.
- Support for large conferences spanning over multiple VidyoRouters.
- Shared capacity with floating VidyoLine licenses among regions.
- Simplified firewall configurations.
The capacity of a single VidyoRouter is up to 100 concurrent HD lines. If you need additional capacity, you can purchase additional VidyoRouters. If you do, you can group them into pools or router pools. Typically, you might do this to group VidyoRouters that are near each other geographically (for example, group your America-based VidyoRouters in one pool and your Europe-based VidyoRouters into another pool). Another reason might be to reserve one or more VidyoRouters to a certain group of users in your organization (for example, top level management).
- A VidyoRouter can be in only one pool.
- A pool contains one or more VidyoRouters.
- If you have only one VidyoRouter, it’s still in a pool.
- A location may have several pools.
- Multiple VidyoRouters in a pool provide failover across the pool.
Before setting router pools, if one VidyoRouter reached its saturation point of 100 simultaneous users for a conference, any additional connection attempts were refused even if a second VidyoRouter was hosting less than 100 users. There was no way the first VidyoRouter could utilize the second VidyoRouter’s unused capacity.
However, once your router pools are set up, when one VidyoRouter hits maximum capacity, instead of additional callers to the same conference failing to connect, they can be cascaded onto another VidyoRouter. If the second VidyoRouter maxes out, it can cascade to a third VidyoRouter in the pool and so on.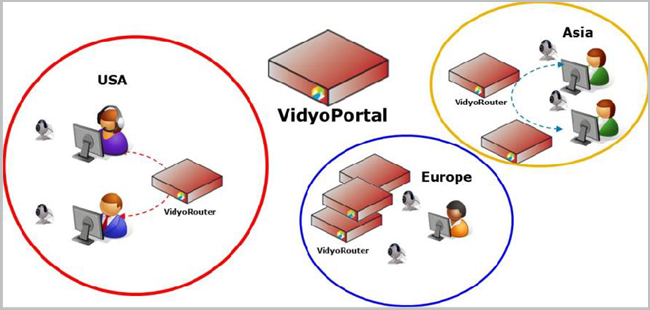
VidyoRouters within a single pool use the Full Mesh topology, whereas pools are cascaded using the DAG (Directed Acyclic Graph) topology. Directed edges of the DAG must be manually specified during system configuration. You must also assign a priority that will decide which two locations will connect when there is more than one choice.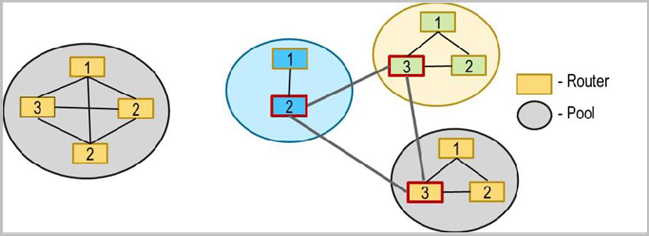
This section describes how to create a VidyoRouter pool, how to remove a VidyoRouter from a pool, and how to delete an entire VidyoRouter pool.
Create a VidyoRouter pool
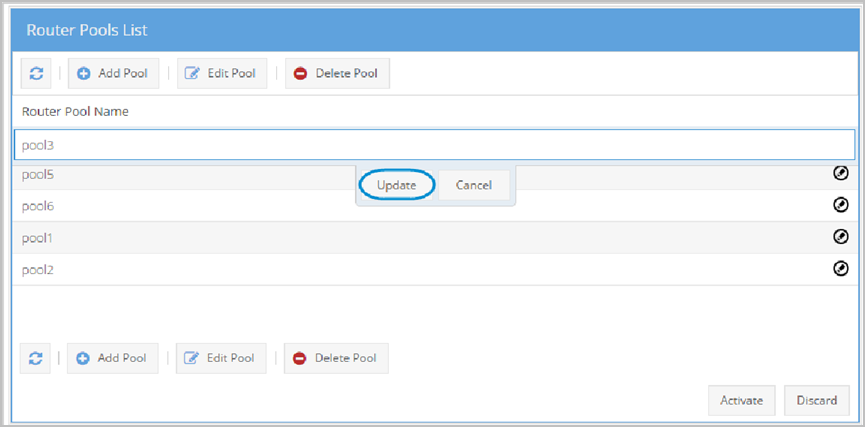
To create a VidyoRouter pool:
- Log in to the Super Admin portal using your Super Admin account. The Components page displays by default.
- Click the Router Pools tab. The Router Pools page displays.
- Click the Modified radio button in the upper right corner.
- Click Add Pool in the Pools List section.
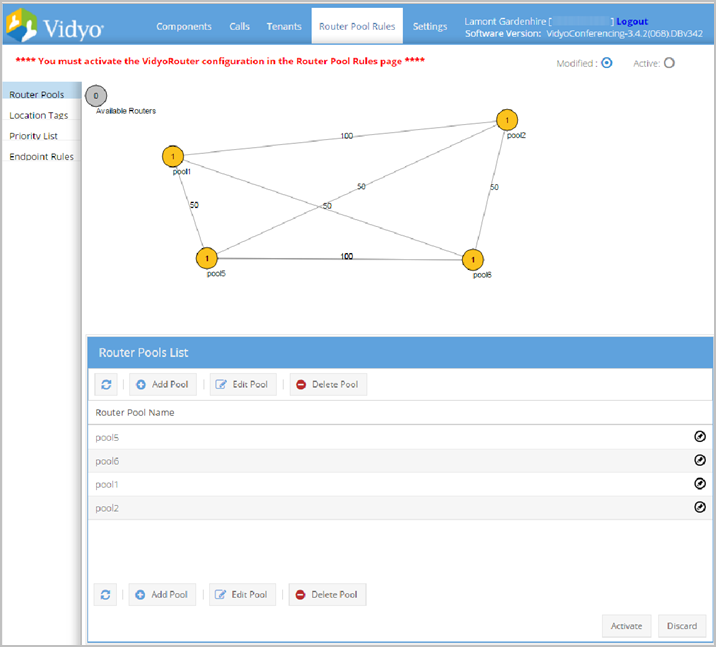
- Enter a name for the pool you’re creating in the Pool Name field.
- Click Update.
|
Note It’s a good idea to use pool names that remind you of the location or purpose, such as New York, Paris, or Board Members. |
Delete an entire VidyoRouter pool
Deleting a pool does not delete the configuration information of any routers that were in the pool.
To delete an entire VidyoRouter pool:
- Log in to the Super Admin portal using your Super Admin account. The Components page displays by default.
- Click the Router Pools tab. The Router Pools page displays.
- Click the Modified radio button in the upper right corner.
- Select the pool that needs to be deleted from the Pools List section.
- Click Delete Pool. A Confirmation pop-up displays.
- Click Yes.
Activate the router pool configuration
Router pools enable the Vidyo conferencing system to cascade conferences across multiple VidyoRouters. The router pool configuration must be activated for any changes made to the configuration of the VidyoManager or any VidyoRouters. This is due to the underlying default router pool configuration; even though you may decide not to configure a full router pool, a default router pool for any VidyoRouters still exists in the system. If you have multiple VidyoRouters, they cascade by default as needed (even without a full router pool configuration) to provide for larger conferences and router capacity overflow. Therefore, you need to activate the router pool configuration upon configuring all the components.
To activate the router pool configuration:
- Log in to the Super Admin portal using your Super Admin account. The Components page displays by default.
- Click the Router Pools tab. The Router Pools page displays.
- Click the Modified radio button in the upper right corner.
- Click Activate at the bottom of the page. A Confirmation pop-up displays.
- Click Yes.
- Unless you need to control which VidyoRouter your users’ access, you don’t need to define any Router Pools. By leaving everything under Manage Router Pools blank, you create a default Router Pool, and your VidyoRouters are automatically pooled together and allowed to cascade for larger conferences.
- If you do not activate Router Pools, a message displays on top of the Components window.

Create user location tags
A location tag is a geographically-based name that can be assigned to a set of users, groups, or guests. Each user is assigned a location tag when their account is created. It’s a mandatory field on the Add User page. However, using location tags as the basis for a rule is optional, but it’s a good idea to associate a user with their most-used location. The user’s location tag would be associated to a particular VidyoRouter Pool.
To create a user location tag:
- Log in to the Super Admin portal using your Super Admin account. The Components page displays by default.
- Click the Router Pools tab. The Router Pools page displays.
- Click the Location Tags subtab.
- Select the Modified radio button.
- Click Add.
- Enter a name for the location tag in the text field.
- Click Update. A Confirmation pop-up displays “Location Tag Saved.”
- Click OK. For information about how to assign location tags to tenants, see Assign location tags.
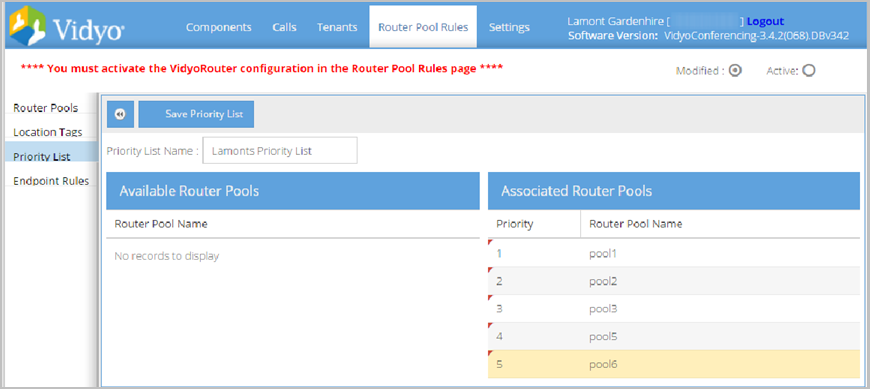
Create priority lists
Priority Lists are priority ordered lists of Router Pools that are used in the Endpoint Rules.
To create a priority list:
- Log in to the Super Admin portal using your Super Admin account. The Components page displays by default.
- Click the Router Pools tab. The Router Pools page displays.
- Click the Priority List subtab.
- Click Add Priority List. A new page displays.
- Enter a name for the priority list in the Priority List Name field.
- Drag and drop pools from the Available Pools list to the Associated Pools list in the order that they should display based on priority level.
- Click Save Priority List at the top of the page.
- A rule can be based on a single local or (NATed) external IP or a range of IP addresses.
- A rule can be based on a Location Tag.
- See below for how to create and assign Location Tags.
- A rule can be based on an Endpoint ID (for special situations).
- Each endpoint has a unique character string, known as Endpoint ID, in which it automatically sends to the VidyoManager to identify itself.
- Log in to the Super Admin portal using your Super Admin account. The Components page displays by default.
- Click the Router Pools tab. The Router Pools page displays.
- Click the Endpoint Rules subtab.
- Select the Modified radio button.
- Click Add Rule. A new page displays.
- Enter a name for your endpoint rule in the Rule Name field.
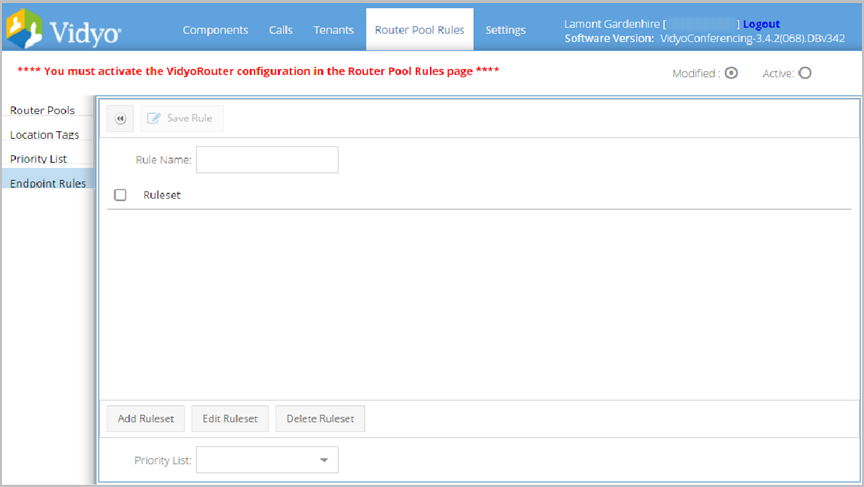
- Select from the following radio buttons:
- Select IP Rule and select the corresponding checkboxes - Specify Local IP Range (Ipv4 or Ipv6) and Specify External(NATed) IP Range (Ipv4 or Ipv6) to specify a range of local and external IP addresses.
- Select User Location Tag to select from location tags that you have already configured in the system.
- The Endpoint ID is selected to provide a unique identifier for an endpoint.
- Click Save.
- To add another rule, click Add Ruleset.
- To edit a rule, select the corresponding checkbox, and then click Edit Ruleset.
- To delete a rule, select the corresponding checkbox, and then click Delete Ruleset.
- You can apply priority lists that were previously created to all rules by selecting the Priority List drop-down.
|
Note Characters are not permitted in the Priority List Name field, for example: < > & # % ! @. |
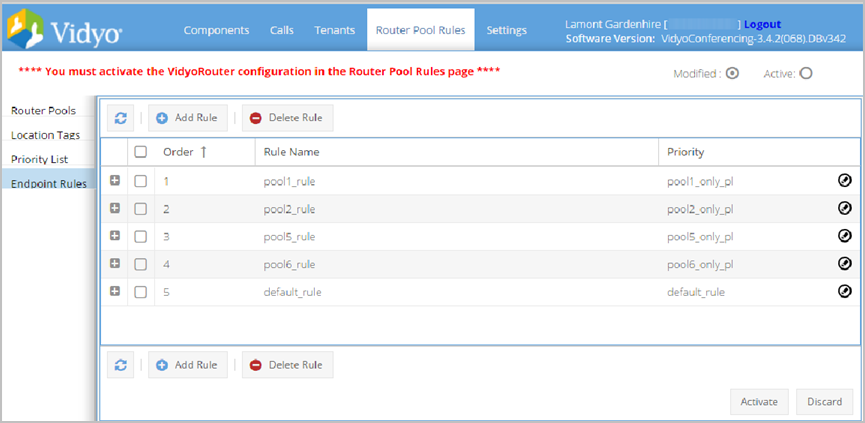
Create endpoint rules
An endpoint is any device that can be used to participate in a point-to-point call or a conference (such as VidyoConnect, VidyoConnect Room, a VidyoConnect mobile device, and VidyoGateway).
Endpoint Rules determine which VidyoRouter pool a given endpoint will use in a call. Remember that you can create Endpoint Rules only after you have set up your VidyoRouter pools and Priority Lists.
As the Super Admin, you determine the order in which Endpoints Rules are applied. The first rule that matches the endpoint’s characteristics (IP address, location tag, or Endpoint ID) is the rule that is applied.
You can have as many as 1,000 rules. There are only three kinds of rules:
As part of the process of setting up rules, we recommend that you set up a catch-all rule accepting all endpoints that do not match any of the endpoints previously created. The catch-all can be a rule that uses IP 0.0.0.0/0.
To create an endpoint rule:
The Add Ruleset pop-up displays.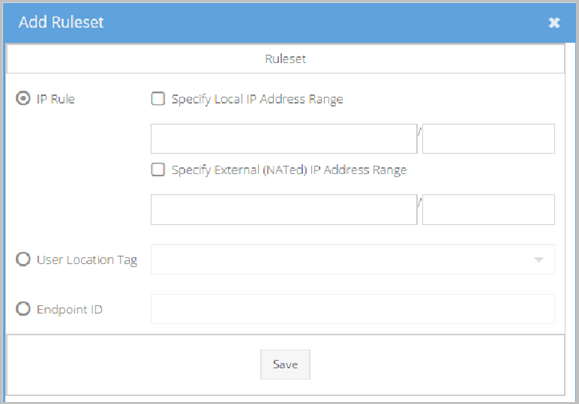
|
Note Location tags must first be created to select them for your rule. |
|
Caution This Endpoint ID field should only be set under specific instruction from Vidyo Customer Support. |
