17. Appendix A. Firewall and network address translations (NAT) deployments
NAT introduction
The Vidyo conferencing platform utilizes reflexive addressing to assist in the setup of Vidyo calls. Reflexive addressing is used when the end user is using VidyoConnect to make a call from behind a NAT. This happens automatically and is transparent to the user.
Reflexive addressing requires the VidyoRouter to have a public IP address to provide NAT traversal of the Vidyo endpoints. If the VidyoRouter itself is placed behind a NAT, reflexive addressing won’t work.
When the VidyoRouter is behind a NAT, the preferred configuration uses DNS to resolve properly to the server IP addresses. In some cases, a combination of the ICE and STUN protocols are used to determine the Public IP translated to the VidyoRouter. This appendix outlines how to configure the Vidyo conferencing system to work when placed behind a NAT and still allow users to connect from the public Internet.
There are three basic areas that need to be addressed to configure the Vidyo conferencing system to operate from behind a NAT. Each is explained in detail in the following sections.
- Firewall and NAT Configuration
- DNS configuration
- Vidyo Server configurations
There are several options to deploy the Vidyo conferencing system to provide service for your entire organization:
- Place the VidyoPortal and VidyoRouter on a public Static IP address.
- Place the VidyoPortal and VidyoRouter in a private network having a private Static IP address within the organization.
- Place the VidyoPortal and VidyoRouter within the DMZ with a private Static IP address.
When deployed with a public IP address and no server side firewall or NAT, the VidyoPortal and VidyoRouter are reachable by either IP address or DNS name. This is the simplest scenario since we’re only concerned with the NAT and firewall at the far-end (client side).
The client-side firewall most often permits any connection initiated on the Private LAN to any outside network destination. In some cases, the local firewalls must be configured to allow each application from the inside to the Public Network.
Vidyo conferencing firewall ports
The requirements for VidyoConnect, VidyoConnect Room, and VidyoRoom follow.
VidyoConnect, VidyoRoom, and VidyoConnect Room requirements
To register to the VidyoPortal and place calls, the client side connection must be open to the VidyoPortal on these TCP and UDP ports.
| VidyoConnect and VidyoConnect Room connectivity to VidyoPortal and VidyoRouter | ||
| TCP Port 80 | HTTP – Outbound to VidyoPortal | Client to VidyoPortal authentication and GUI |
| TCP Port 443 | TCP – Outbound to VidyoProxy (running on a VidyoRouter - optional) | Optional for TCP signaling and media proxy connections from endpoints |
|
TCP Port 8443 |
HTTPS – Outbound to VidyoRouter (optional) | Optional for SSL connection to VidyoRouter Configuration Pages |
| TCP Port 443 | HTTPS – Outbound to VidyoPortal (optional) | Optional for SSL connection to VidyoPortal |
| TCP Port 17992 | EMCP – Outbound to VidyoPortal | Client connection to VidyoManager |
| TCP Port 17990 |
SCIP – Outbound to VidyoPortal/ VidyoRouter
Note: If you are using a VidyoRouter, the VidyoPortal does not apply. |
Client connection to VidyoRouter |
| UDP Ports 50,000 – 65,535 | RTP, sRTP, RTCP – Bi-Directional to and from the VidyoRouter | Audio and Video Media from participants (6 ports per participant). RTP and RTCP pair for each audio, video, and data collaboration stream. |
| UDP Timeout | General Comment | Change from Default (0:02:00 – 2 minutes) to something larger (e.g., 3:00:00 – 3 hours) to avoid call timeouts |
|
Note Some firewalls have a UDP default timeout. On the Cisco PIX firewall, for example, if the UDP timeout is not changed, then the call drops in exactly two minutes and the Vidyo client or clients must reconnect. Many newer consumer home firewalls have SPI (Stateful Packet Inspection) active by default. This may need to be disabled for better performance. For Vidyo conferencing clients, who are behind restricted firewalls where the ports above cannot be opened, Vidyo provides the VidyoProxy to address these users. See Appendix B. VidyoProxy. When using VidyoReplay and generating webcast links, the system resolves the VidyoReplay URL using DNS settings and establishes a connection on port 80 or 443 (depending on whether you have VidyoReplay security enabled). Therefore, port 80 or 443 must be opened on your network so your webcast links will work properly. For more information, see Configure settings. Or refer to the VidyoReplay Administrator Guide. |
Vidyo server requirements
To enable remote management access to the Vidyo servers, the following TCP and UDP ports need to be opened through any server-side firewall or NAT.
| Management access to VidyoPortal, VidyoRouter, VidyoGateway, and VidyoReplay | ||
| TCP Port 80 | HTTP – Inbound to Server | Web Access to VidyoPortal and VidyoRouter |
| TCP Port 443 | HTTPS – Inbound to Server (optional) | Secure Web Access to VidyoPortal and VidyoRouter |
| TCP Port 22/2222 | SSH – Inbound to Server | SSH access to the VidyoPortal and VidyoRouter |
The following services outline the ports required for Router Pools cascading.
| Router Pools connectivity to VidyoPortal and VidyoRouter to VidyoRouter | ||
| TCP Port 80 | HTTP – Router to VidyoPortal | Client to VidyoPortal authentication and GUI |
| TCP Port 443 | HTTPS – Router to VidyoPortal (optional) | Optional for SSL connection to VidyoPortal |
| TCP Port 17991 | RMCP – Router to VidyoPortal | Router connection to VidyoManager |
| TCP Port 17990 | SCIP – Bi-Directional to and from VidyoRouters | Signaling connections between VidyoRouters |
| UDP Ports 50,000 – 65,535 | RTP, sRTP, RTCP – Bi-Directional to and from VidyoRouters |
|
The following services are optional on the VidyoPortal, VidyoRouter and VidyoGateway, and require the following TCP and UDP ports if they are used.
| Other services on VidyoPortal, VidyoRouter, and VidyoGateway | ||
| UDP Port 123 | NTP – Outbound from Server | Network Time Protocol |
| TCP Port 25 | SMTP – Outbound from Server | Email notifications for new user accounts, lost passwords, and licensing notifications. VidyoPortal only |
| TCP Port 3306 | MySQL – Inbound to Server | Call Detail Record (CDR) access for billing systems. VidyoPortal only |
| TCP Port 389 | LDAP – Outbound from Server | Optional authentication to LDAP and Active Directory. |
| TCP Port 636 | LDAPS – Outbound from Server | Secure LDAP. Optional authentication to LDAP and Active Directory |
| UDP Port 161 – 162 | SNMP – Inbound to Server | Basic SNMP functions |
| TCP and UDP 3478 | STUN – Bi-directional to and from Server | Optional, only if using STUN for NAT traversal |
Configure Vidyo conferencing with a firewall NAT
In this section, we’ll discuss the steps to configure the VidyoPortal and VidyoRouter in a NATed firewall or DMZ environment. For this, the Vidyo servers are installed either fully behind a firewall on the corporate LAN, or installed in the firewall DMZ with one or more NATed addresses and Static IP address. The figure below illustrates an example of firewall NAT topologies.
|
Note This appendix doesn’t apply to deployments using a VidyoProxy. Separate instructions are available for use with a VidyoProxy. The two deployment scenarios can coexist. |
For this configuration, there are three tasks to accomplish:
- Firewall NAT Configuration
- DNS configuration
- Vidyo Server configurations
|
Note Actual steps to configure the Firewall NAT and DNS environments are outside the scope of this appendix and vary based on the Firewall NAT and DNS servers used. This appendix focuses on conceptual information. |
Configure the firewall NAT
Allocate an external, public static IP address to use for the VidyoPortal and VidyoRouters and configure a one-to-one NAT statement to the desired private or DMZ static IP address. In cases where the internal network is NATed to the DMZ, a similar static NAT must be configured from the static private LAN to the Static DMZ server addresses.
With the NAT configured, you’ll need to permit access to the TCP and UDP ports needed by the Vidyo solution. In the firewall access-control list, be sure to open these ports as a minimum:
- Inbound TCP Port 80 – web access to the VidyoPortal and administrative interfaces
- Inbound TCP Port 443 – optional for SSL secured web access and calls
- Inbound TCP Port 17992 – EMCP protocol client connection to VidyoManager and VidyoPortal (configurable)
- Inbound TCP Port 17990 – SCIP protocol client connection to VidyoRouter (configurable)
- Bi-Directional UDP Port 50000 – 65535– RTP and SRTP media, one RTP and RTCP port pair for each audio, video, data sharing stream in the conference
Lastly, it’s beneficial to check the UDP timeout for the firewall. Some firewalls limit the duration of UDP port openings, and this may cause the calls to terminate prematurely.
Configure DNS and FQDN
For the firewall NAT traversal to properly communicate between servers and clients through the IP address translations, DNS must be configured properly for hosting the Vidyo servers in the DMZ or behind the NAT. In firewall deployments, Vidyo communicates based on DNS information rather than exposing IP addresses.
The DNS servers for both inside and outside networks (if different) must be configured for the Vidyo server’s fully qualified domain name (FQDN). In our example, we are assuming the server is using the FQDN of vidyoportal.example.com.
Configure both public and private DNS records for the server FQDN. Regardless of where the client resides, it needs to match the same hostname to the proper IP address, public Internet clients resolve to the outside NAT address, and internal WAN clients resolve to the inside IP address (either real IP or NAT inside address if double NAT is used) when they access the server URL. To test, from both the inside and outside subnets, ping to the server URL.
Configure the Vidyo server
With the firewall configured for the proper NAT statements, the required TCP and UDP ports opened, and the DNS entries configured, you can move on to the configuration in the Vidyo servers to enable using DNS and to route calls properly between the LAN and Public Network.
This is done by selecting System Console menu option 2. Configure DNS Nameserver.
|
Note When configuring your DNS Nameserver, set the server local hostname and domain name as well as the working DNS server address. It’s very important to note that the IP address shown in the System Console (127.0.1.1) must remain intact for proper communications. In a firewalled installation, the VidyoManager and VidyoRouters need to be configured to use the server FQDN instead of the IP addresses. |
Configure tenant URLs
To configure tenant URLs:
- Log in to the Super Admin portal using your Super Admin account. See Log in to the Super Admin portal. The Components page displays by default.
- Click the Tenants tab. The Tenants page displays.

- Ensure that each Tenant (including the Default Tenant) is using a FQDN for Tenant URL.
Configure the VidyoManager
To configure the VidyoManager to be addressed by its FQDN:
- Log in to the Super Admin portal using your Super Admin account. The Components page displays by default.
- Double-click the blue Name link for the VidyoManager entry. The VidyoManager pop-up displays.
- Enter the server FQDN (e.g., vidyoserver.example.com).
- Edit the EMCP Port according to your needs and firewall rules. The default value for V2.0 is 17992; the default in V1 was 10000.
- Click Save.

Configure each of your VidyoRouters
To configure each VidyoRouter to be addressed by its FQDN:
- Log in to the Super Admin portal using your Super Admin account. The Components page displays by default.
- Double-click the blue Name link for the VidyoManager entry. The VidyoRouter pop-up displays.
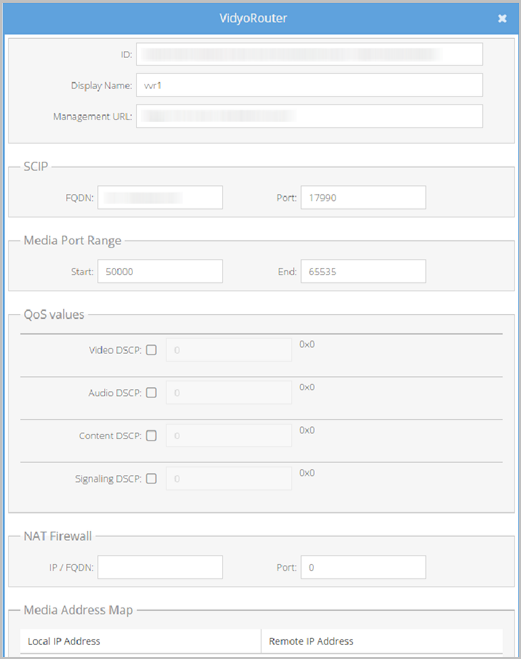
- Edit the FQDN address (for example, vidyorouter.example.com) in the SCIP section.
- Edit the Port field according to your needs and firewall rules. The SCIP Port field is where you can set the SCIP (VidyoRouter) TCP Port. The default value for v2.0 is 17990; the default in v1 was 50000. Each VidyoRouter server requires a unique and separate FQDN to your VidyoPortal server. Use each server’s unique FQDN for the SCIP address on each VidyoRouter configuration. For example: vr1.example.com, vr2.example.com, etc.
- Click Save.
- For additional information about configuring your VidyoRouter, see Configure your VidyoRouter component.
Test your configuration
From both sides of the firewall NAT, you must attempt to log in to the VidyoPortal as a Normal user. If the EMCP is traversing properly, person icons display in green. If all person icons remain grey, then either the EMCP address or port is not configured properly in the VidyoManager configuration, or the port is not configured correctly at the firewall NAT.
Once you are successfully logged in to the VidyoPortal, attempt to join the user’s own meeting room (‘My Room’). If a ‘failed to Join conference’ or ‘failed to Join router’ error message is received, then either the VidyoRouter SCIP address or port is not configured correctly in the VidyoRouter configuration, the port is not configured properly at the firewall NAT, or the VidyoPortal server or client PC is unable to resolve the Router’s FQDN.
- Ensure that media connections succeed (send and receive video).
- Test from both the Inside LAN and from the Public Network by using the same URL – for example, http://[portal.example.com].
- Test from each remote network segment if using multiple Media Address Maps.
Once you have successfully joined the meeting room, you should see loopback video if you are the only participant in the room, or the video from other participants. If you receive loopback video, then it means the media is traversing in both directions. If you receive another participant’s video, ask them if they are receiving your video. If both sides are receiving each other’s video, then that too means media traversal is working in both directions. If media traversal does not take place, then the UDP port range is not properly configured at the firewall NAT.
