10. Manage users as the Tenant Admin
What Tenant Admins do
Super Admins configure the system (and create tenants if running a multi-tenant system). Then, they create Tenant Admins who can manage their assigned tenant or tenants.
The tasks Admins and Tenant Admins perform include:
- Creating and maintaining user accounts.
- Creating user provisioning groups. (Optional, but useful.)
- Creating and maintaining public rooms.
- Deploying and managing endpoint software. Admins upload new endpoint software onto the VidyoPortal itself. Once the endpoint client programs are loaded on the VidyoPortal, users are notified when they use their VidyoConnect programs to download and install the new software themselves.
- Setting the system language and guest access.
- Setting up Quality of Service.
- Customizing a Contact Us page to enable Vidyo conferencing users to contact them for help with the system, customize an About Us page, and set up the boilerplate text for email conference invitations.
If you have a single-tenant system, then you need at least one Admin account to do the above tasks. In a multi-tenant system, each tenant has its own Tenant Admin.
|
Note If you’re running a multi‑tenant VidyoPortal system, the Super Admin can assign a different Tenant Admin user to each tenant on the system or have some or allthe tenants administered by one person. The Super Admin can always log in to any tenant using his or her Super Admin credentials. |
You use the Users tab to add, delete, and edit your Vidyo system’s users. This includes adding both personnel in your organization, as well as adding accounts for your VidyoRooms. This section of the document walks you through how to perform these actions.
Log in as a Tenant Admin
To administer your tenant, you must log in to your Tenant Admin Portal, but if you’re a Super Admin, you can use your Super Admin credentials.
To log in as a Tenant Admin:
- Enter the IP or FQDN address for the VidyoPortal in the address bar of a web browser, followed by a forward slash and the word “admin”:
- http://[IP or FQDN address]/admin
- The Login pop-up displays.
- Enter the default Admin user name and password.
- User Name: admin
- Password: password (case sensitive)
|
Note A password change is required when you first log in to a newly configured tenant. See 11. Manage meeting rooms as the Tenant Admin. |
Set the language for the Admin interface
You can select the language of the VidyoPortal Admin interface before or after you log into the system.
To set the language for the Admin interface:
- Select your desired language using the language drop-down on the upper right corner of the Admin Login page (before or after logging into the system).
- The VidyoPortal Admin interface is available in these 15 languages:
- Chinese (Simplified)
- Chinese (Traditional)
- English
- Finnish
- French
- German
- Italian
- Japanese
- Korean
- Polish
- Portugese
- Russian
- Spanish
- Thai
- Turkish
|
Note The Admin interface is immediately modified once you select your preferred language using the language drop-down. Any changes you make to the preferred language of the Admin interface have no effect on any other interfaces, such as the VidyoConnect user interface. |
Manage Users table
You use the Manage Users table to view, delete, and manage the users in your tenant.
To use the Manage Users table:
- Log in to the Admin portal using your Admin account. The Users page displays by default.
- Search by member name, extension, type, group name, and whether the user account is enabled using the various fields above the table.
- Use the following buttons at the bottom of the page to change your view of the table.
- Click Refresh to refresh the table.
- Click the First Page, Previous Page, Next Page, and Last Page direction arrows to scroll through multiple pages of results in the table.
- Enter a page number to access a specific page of results in the table.
This page lists the users in your VidyoPortal in a table format. You can drag and drop the column headings to arrange them in the order you prefer.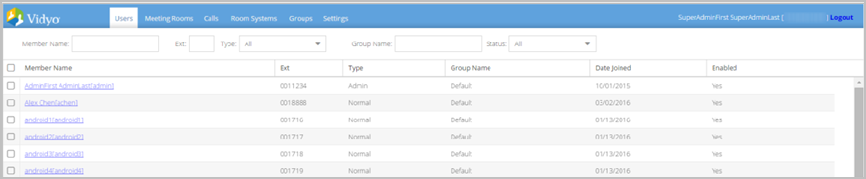
|
Note The member name search works for both the display name and username. These names are the ones showing in the VidyoPortal and may not necessarily be the user’s full name. |
Add a new user
As the administrator of your tenant, you can add yourself and others as administrative users, and you can also add normal user accounts. Alternatively, you can bulk upload users with the Import Users function. See Import users.
To add a user:
- Log in to the Admin portal using your Admin account. The Users page displays by default.
- Click the Add User at the bottom of the page. The Add User: New User pop-up displays.
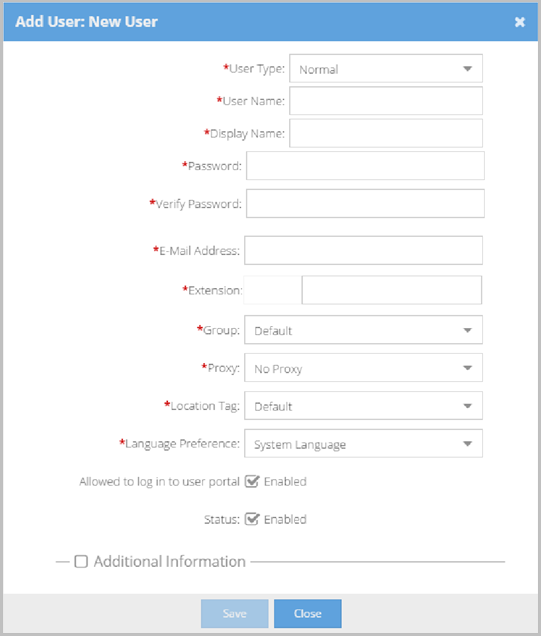
- Select one of the following options from the User Type drop-down:
- Select Admin to provide the new user with administrative privileges and capabilities.
- Select Operator to provide the user with the ability to manage users and meeting rooms. The operator has the same rights as the administrator except an operator cannot change any system settings nor manage groups.
- Select Normal to provide the user with the ability to join meetings, control their own meetings, and place direct calls. Normal users can also change their passwords, set their PIN codes, and invite guests, unless the administrator has disabled these capabilities.
- Select VidyoRoom to create an account for a physical Vidyo endpoint appliance. A VidyoRoom has the same rights as a normal user.
- Select Executive to create executive desktop users. Executive Desktop licenses are a feature of the standard VidyoLines licensing model; however, Executive Desktop licenses are purchased as separate licenses in your VidyoLines package. Each Executive Desktop has guaranteed system access. Therefore, if you purchase 100 VidyoLines and five Executive Desktops, then even when your system is at full capacity, your five users with Executive Desktop privileges can still make calls.
- Enter information into the following required fields:
- Enter a user name, which is the name the user provides when logging in to the system, in the User Name field. The user name must be alphanumeric and it cannot contain any spaces or punctuation except for the @ sign, periods, underscores, or dashes. The maximum length is 80 characters. If your intended entry has already been taken, you are prompted to select a different name.
- Enter a display name for the user you are adding in the Display Name field. For VidyoRoom systems, the display name is the system name set by the administrator and the name that displays in the top-left corner of the home page. For VidyoConnect systems, the users’ display names appear below their video images when they are in a conference using VidyoConnect.
- Enter a password in the Password and Verify Password fields.
- Enter a valid email address for the user in the E-Mail Address field. This is the address to which the new account email is sent. If notifications are enabled and a user’s email address is not set correctly, the user may not be able to use the Forgot Password function.
- Enter the numeric extension in the Extension field that you want associated with the user. This value must be unique for each user. If your intended entry has already been taken, you’ll be prompted to select a different extension.
- Select either the default group or another group you have created from the Group drop-down. Changing the group may change the maximum number of users and the bandwidth allowed for the user’s personal meeting room. You must define groups prior to assigning them. See 13. Manage Tenant Admin groups as the Tenant Admin.
- Select either the default proxy or another proxy you have created from the Proxy drop-down. You must define proxies before assigning them. See Make the VidyoProxy components available.
- Select the user’s Location Tag from the Location Tag drop-down. See Manage location tags and Configure router pools.
- Select the language preference from the Language Preference drop-down for the specific user you are adding. Select System Language to apply the currently selected system-wide language. See Set the language for the Admin interface. Otherwise, select any other language to change the language for this specific user only.
- Deselect the Allowed to log in to user portal checkbox if you want to disable the user’s ability to log in to the User portal, or leave selected. Normal users are required to log in, but Administrators and Operators may not be required to log in.
- Leave the Status checkbox selected to enable the new user’s room. Deselect the Status checkbox if you want to put a user on hold with all their information intact. When this checkbox is selected, the user does not show up in searches in the VidyoPortal and is not able to log in.
- Select the Additional Information checkbox if you want to enter additional information about the new user in the following fields:
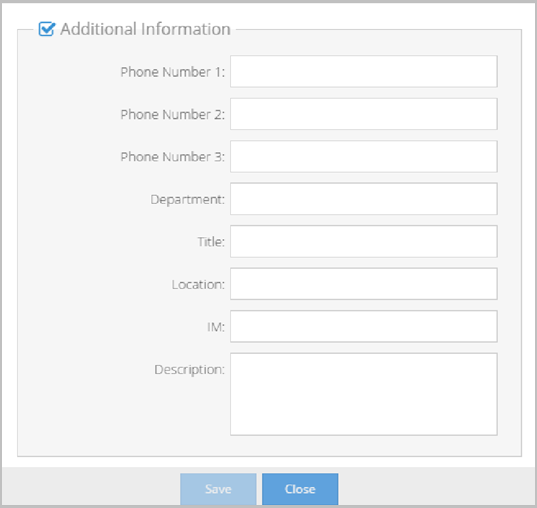
- Enter a primary phone number for the new user in the Phone Number 1 field if necessary.
- Enter a secondary phone number for the new user in the Phone Number 2 field if necessary.
- Enter a tertiary phone number for the new user in the Phone Number 3 field if necessary.
- Enter the department that the new user is associated with in the Department field if necessary.
- Enter the new user’s title in the Title field if necessary.
- Enter a primary location (e.g., New York Office) for the new user in the Location field if necessary.
- Enter an IM address for the new user in the IM field if necessary.
- Enter any details or data regarding the user you are adding in the Description field if necessary.
- Click Save.
- If some information is missing, incorrect, or already in the system, an error message displays at the top of the page indicating which fields must be addressed.
- When all required fields are complete and valid, the data is saved to the database, the main table is shown, and a success message is displayed at the top of the page.
- Repeat the steps in this procedure for every user that you want to add.
|
Note Users may change their own passwords later. There is no limitation regarding which characters you can use. |
Edit a user
To edit a user:
- Log in to the Admin portal using your Admin account. The Users page displays by default.
- Find the user to edit by using the search filters, sorting on the headers and pagination.
- Click the name of the user that needs to be edited. The Edit User pop-up displays.

- Click the camera iconto select and upload a thumbnail photo, and then click Yes in the confirmation pop-up that displays. The X icon displays.
- Click the X icon to remove the uploaded thumbnail photo, and then click Yes in the confirmation pop-up that displays.
- Edit the user’s information as needed. You can edit any of the settings. For a description of these settings, see Add a new user.
- Click Save.
If the User Attributes page is available from the Settings > Feature Settings submenu and the Enable Thumbnail Photos checkbox is selected, the Edit User pop-up will display as follows and you will have the option to upload thumbnail photos.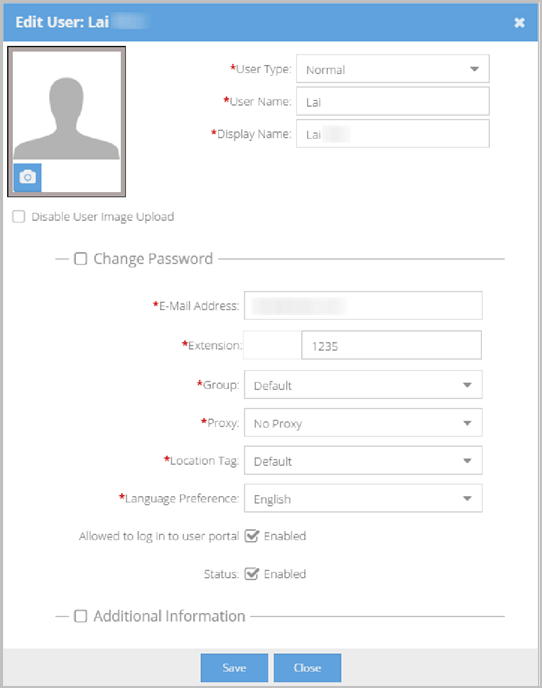
Additionally, if the User Attributes page is available from the Settings > Feature Settings submenu and the Allow users to upload their own image checkbox is selected, your tenants will also have the option to upload their own thumbnail photo from the Edit User pop-up. See Configure user attributes.
|
Note If information is missing, incorrect, or already in the system, an error message displays at the top of the page indicating which fields must be addressed. When all required fields are complete and valid, the data is saved to the database, and the main table displays. |
Delete a user
If a user leaves the organization or no longer has access to the system and needs to be removed, you can delete a user completely from the system.
To delete a user:
- Log in to the Admin portal using your Admin account. The Users page displays by default.
- Find the user to edit by using the search filters, sorting on the headers, or by pagination.
- Select the one or more checkboxes at the left of the row of the user(s) that needs to be deleted.
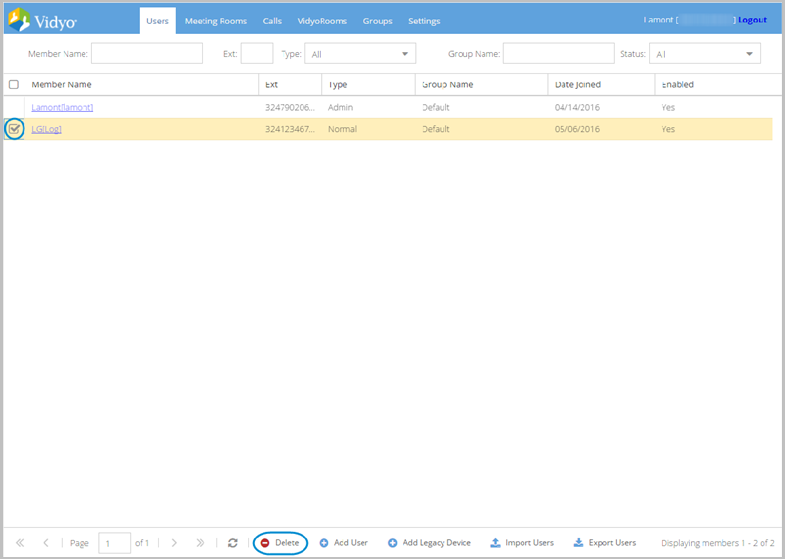
- Click Delete at the bottom of the page and answer Yes to all prompts.
|
Note Deleting a user also deletes all the personal, public, and scheduled rooms they created. Once a user is deleted from the system, it cannot be undone. |
As an alternative to deleting a user, you can clear Enabled on the User’s page to change their status to disabled. Disabling a user puts them on hold with all their information intact. That user will not show up in searches in the VidyoPortal and will not be able to log in. However, you can re-enable them at any time. See Edit a user.
Add a legacy device
You can add legacy systems as if they were users on your VidyoPortal. Use this feature in conjunction with the VidyoGateway to make dialing from the VidyoPortal to legacy (H.323 and SIP) endpoints and telephones easier. For more information, refer to the VidyoGateway Administrator Guide.
To add a legacy device:
- Log in to the Admin portal using your Admin account. The Users page displays by default.
- Click Add Legacy Device on the bottom of the page. The Add Legacy Device: New Legacy Device pop-up displays.

- Enter the Legacy Device Name.
- Enter the Extension for your Legacy device.
- Click Save.
Export users
If you need to add multiple user accounts, you can do so by first exporting a .csv or .veb file that contains the user information, and then importing that file. This section explains how to export users. For information about how to import users, see Import users.
To export users:
- Log in to the Admin portal using your Admin account. The Users page displays by default.
- Click Export Users on the bottom of the page. The Export Users pop-up displays.
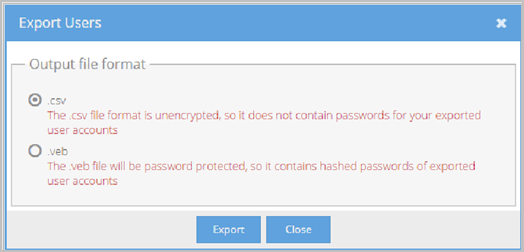
- Select the output file format from the following:
- Select .csv to export the user account data without corresponding passwords in to the standard comma-separated value format. See Export .csv files.
- Select .veb to export your user account data along with corresponding hashed passwords as a .veb file. The .veb format is an encrypted and password protected format.
- Click Export.
Export .csv files
When exporting a .csv file, the first line of the file is considered the header and is not imported as one of the added users. All .csv files must use UTF8 encoding. The following image shows the .csv data in a spreadsheet.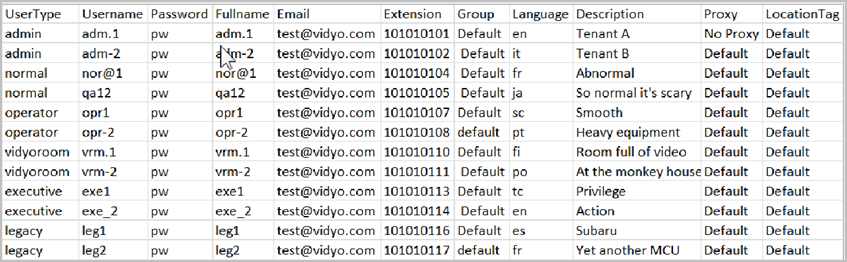
The columns in the .csv file are described below.
- The User Type column shows the various user types. You can import all types of users including admins, operators, VidyoRooms, executives and legacy devices; however, when imported, they are all created as the Normal user type.
- The Username, Password, Fullname, and Email columns provide details about the user.
- The Extension column shows the users unique extension. The extension values must be numeric values.
- The Group column shows the provisioned group to which the user belongs. You must define groups before assigning them. For more information about managing groups, see 13. Manage Tenant Admin groups as the Tenant Admin.
- The Language column shows the two-letter language code for the user. See Set the tenant language.
- The Description column shows the optional information that may have been entered when the user was added. See Add a new user.
- The Proxy column shows the optional proxy to which the user has been assigned. See Add a new user.
- The LocationTag column shows the location tag to which the user has been assigned. See Add a new user and Create user location tags.
|
Note Except for Proxy and Description, all user account fields are required when importing users. |
Import users
If you need to add multiple user accounts, you can do so by importing a .csv or .veb file that contains the user information. All imported users are created as the Normal user type.
|
Note Imported users do not trigger new user account notifications; therefore, administrators should directly email the login credentials to all imported users. |
To import users:
- Log in to the Admin portal using your Admin account. The Users page displays by default.
- Click Import Users on the bottom of the page. The Import Users pop-up displays.
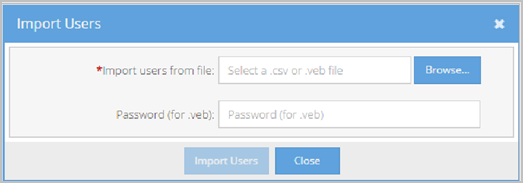
- Click Browse....
- Locate and open your .csv or .veb file.
- Enter the same password that was used to create the .veb file bundle to import a .veb file.
- Click Import Users. A message displays confirming the number of imported users.
