13. Manage Tenant Admin Groups as the Tenant Admin
Groups are special designations of users who have the common attributes such as the maximum number of users in a call and the maximum bandwidth allowed per call. Users are assigned to the default group automatically unless a new group is created by the Tenant Admin or Operator and the user is assigned to the created group.
You may choose to create groups based on specific employee needs or departmental divisions. Changing the group settings for the maximum number of users in a call and the maximum bandwidth allowed per call affects the personal meeting room for each user in the group. However, public rooms may be created and can be assigned to a different group than the public room owner.
Manage Groups table
You use the Manage Groups table to view, delete, and manage the groups in your tenant.
To use the Manage Groups table:
- Log in to the Admin portal using your Admin account. . The Users page displays by default.
- Click the Groups tab. The Groups page displays.

- Search by group name using the Group Name search box above the table.
- Use the following functions at the bottom of the table:
- Click Refresh to refresh the table.
- Click the First Page, Previous Page, Next Page, and Last Page direction arrows to scroll through multiple pages of results in the table.
- Enter a page number to access a specific page of results in the table.
Groups on VidyoPortal display on the table and include Group Name, Max Participants, Max Bandwidth Out, and Max Bandwidth In as columns.
|
Tip You can drag and drop the column headings to arrange them in the order you prefer. |
Add a new group
To add a new group:
- Log in to the Admin portal using your Admin account. The Users page displays by default.
- Click the Groups tab. The Groups page displays.
- Click Add Group at the bottom of the Groups screen. The Add Group: New Group pop-up displays.
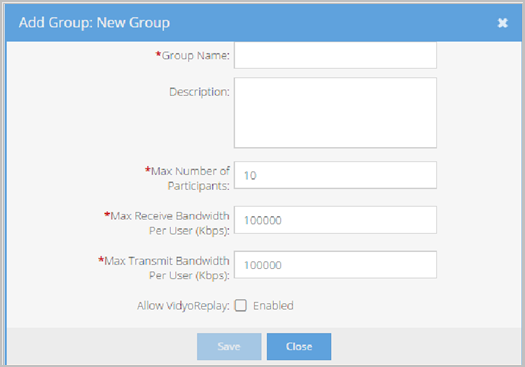
- Enter values in the following required fields:
- Enter the name of the group in the Group Name field. The system checks to ensure it is unique.
- Add an optional description for the group in the Description field.
- Enter values in the Max Number of Participants, Max Receive Bandwidth Per User (Kbps), and Max Transmit Bandwidth Per User (Kbps) fields if necessary.
- Select the Allow VidyoReplay checkbox if you want to enable members of this group to start recording meetings.
- Click Save to keep the group settings.
- If some information is missing, incorrect, or already in the system, an error message is shown at the top of the screen indicating which fields must be addressed.
- When all required fields are complete and valid, the data is saved to the database, the main table is shown, and a Success message is displayed at the top of the screen.
|
Note The Max Number of Participants, Max Receive Bandwidth Per User (Kbps), and Max Transmit Bandwidth Per User (Kbps) fields are populated by default. |
Edit a group
You can edit the settings for any group.
To edit the settings for a group:
- Log in to the Admin portal using your Admin account. The Users page displays by default.
- Click the Groups tab. The Groups page displays.
- Click the Group Name link for the group you want to edit.
- Edit the settings as needed. For information about settings, see Add a new group.
- Click Save to keep the group settings.
Delete a group
If you permanently delete a group from your system, it cannot be undone.
To delete a group:
- Log in to the Admin portal using your Admin account. The Users page displays by default.
- Click the Groups tab. The Groups page displays.
- Find the group you wish to delete by using the search filters, sorting on the headers, and pagination. Once the group has been found, select the checkbox in the Delete column for the group.
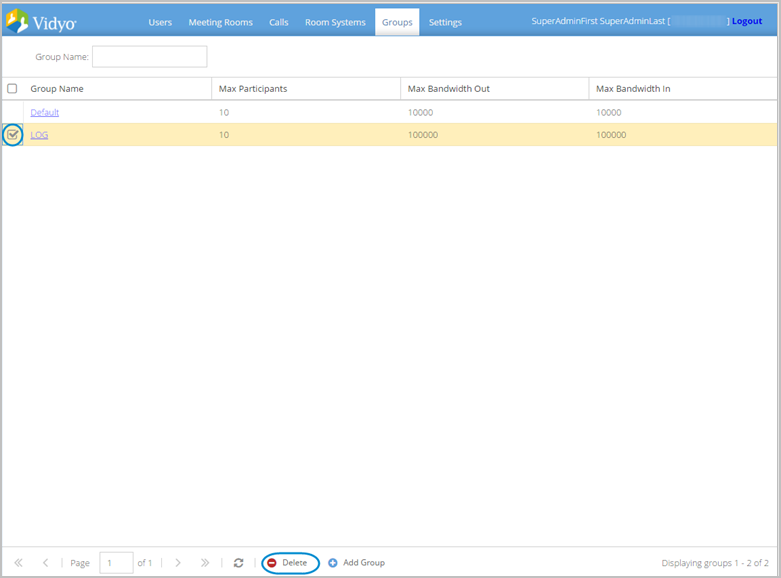
- Click Delete at the bottom of the page.
- Click Yes in the Confirmation dialog box that opens.
- Repeat for all groups that you wish to delete.
