5. Configure RADIUS
The Remote Authentication Dial-In User Service (RADIUS) can be enabled for VidyoPortal, VidyoRouter, and VidyoGateway servers. This configuration is optional and you do not have to install it unless you plan on using RADIUS.
Disable FIPS mode
RADIUS configuration is allowed only when the Vidyo server has FIPS disabled. If FIPS is enabled, follow the procedures in this section to disable it. If FIPS is already disabled, then proceed to the Enable RADIUS section.
To disable FIPS mode:
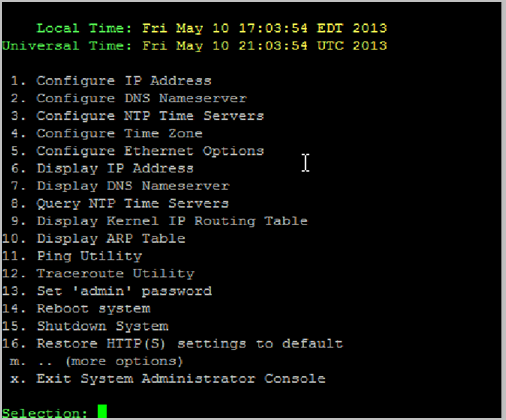
- Log in to the System Console.
- Enter m for more options.
- Enter A for Advanced Options.
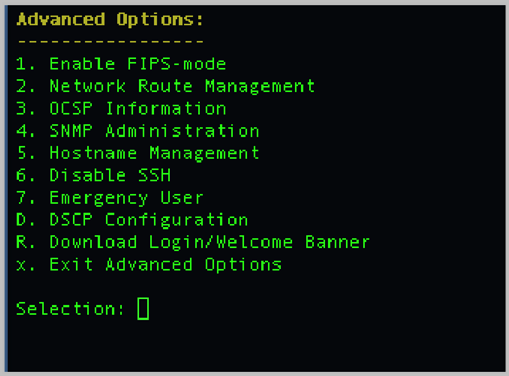
- Enter 1 to disable FIPS mode.
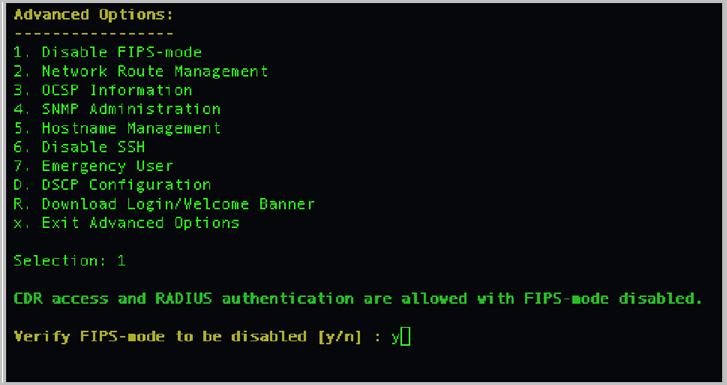
- Enter y to verify disabling FIPS mode.
- Press the Enter key on your keyboard to return to the Advanced Options menu.
|
Note Press the Enter key after each prompt. |
|
Note This setting toggles between disable and enable states. |
A message displays stating the following: "CDR access and RADIUS authentication are allowed with FIPS-mode disabled."
Enable RADIUS
To enable RADIUS:
- Log in to the System Console.
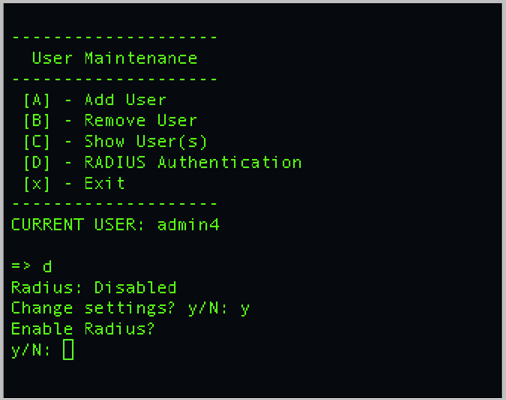
- Enter 19 for more options.
- Enter D for Advanced Options.
- Enter y for the change settings prompt.
- Enter y for the confirm enable radius prompt.
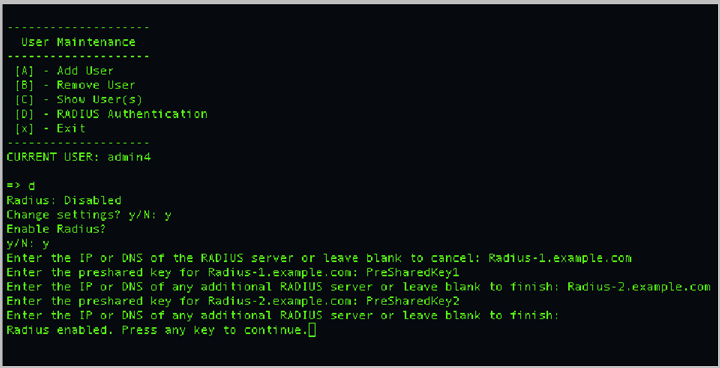
- Enter the IP or FQDN of the RADIUS server or leave blank to cancel.
- Enter the preshared key for the RADIUS server.
- Enter the IP or FQDN for additional RADIUS servers or leave blank to finish.
- Enter the preshared key for the additional RADIUS server.
- Enter the IP or FQDN for additional RADIUS server or leave blank to finish.
- Press any key on your keyboard to return to the User Maintenance menu.
|
Note Press the Enter key after each prompt. |
|
Note A maximum of 10 RADIUS servers are supported. |
|
Note In the following screenshot, two RADIUS servers were configured causing this prompt to display. This prompt will only display if two or more RADIUS servers are being configured. If you do not have additional RADIUS servers to configure, leave blank to finish. |
View the current RADIUS configuration
You should always review your RADIUS server configurations for accuracy.
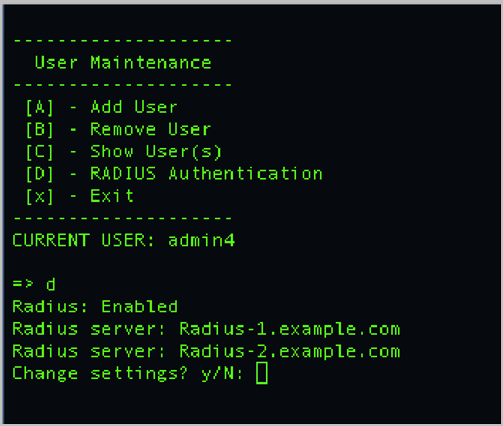
To view the current RADIUS configuration:
- Log in to the System Console.
- Enter D to select the RADIUS Authentication option. The RADIUS server configurations display.
- Enter n for the change settings prompt if the configuration does not need to be modified.
|
Note Press the Enter key after each prompt. |
|
Note Enter y for the change settings prompt if the configuration needs to be modified, and proceed to step 4 in the Modify the RADIUS configuration section. |
Modify the RADIUS configuration
To modify the RADIUS configuration:
- Log in to the System Console.
- Enter D to select the RADIUS Authentication option. The RADIUS server configurations display.
- Enter y for the change settings prompt if the configuration needs to be modified.
- Re-enter the IP or FQDN of the RADIUS server or leave blank to cancel.
- Re-enter the preshared key for the RADIUS server.
- Re-enter the IP or FQDN for additional RADIUS servers or leave blank to finish.
- Re-enter the preshared key for the additional RADIUS server.
- Re-enter the IP or FQDN for any additional RADIUS server or leave blank to finish.
- Press any key on your keyboard to return to the User Maintenance menu.

|
Note Press the Enter key after each prompt. |
|
Note If you enter y for the change settings prompt, then all RADIUS server configurations will need to be re-entered. |
|
Note A maximum of 10 RADIUS servers are supported. |
|
Note In the following screenshot, two RADIUS servers were configured causing this prompt to display. This prompt will only display if two or more RADIUS servers are being configured. If you do not have additional RADIUS servers to configure, leave blank to finish. |
RADIUS is enabled.
Create a RADIUS-enabled account
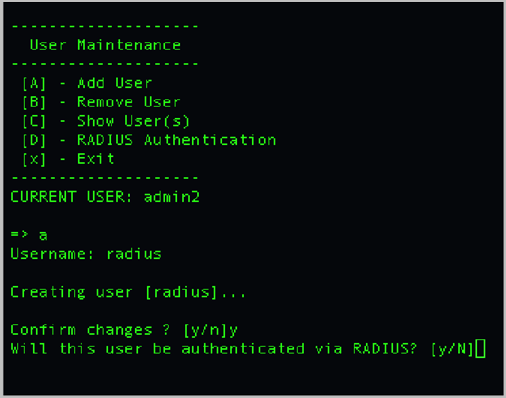
To create a RADIUS-enabled account:
- Log in to the System Console.
- Enter A for Advanced Options.
- Enter a unique username. The username must match your RADIUS User ID.
- Enter y for the confirm changes prompt.
- Enter y for the user to be authenticated via RADIUS prompt.
|
Note Press the Enter key after each prompt. |
|
Note Enter n if you do not want the user to be authenticated via RADIUS, and proceed to the Create a local System Console account section. |
View a RADIUS-enabled account
You should always review the new RADIUS-enabled account for accuracy.
To view a RADIUS-enabled account:
- Log in to the System Console.
- Enter 19 to access the User Maintenance menu.
- Enter C to select the Show User(s) option.
A list of current users in the system displays. If the new user is set up incorrectly, then proceed to the Remove a RADIUS-enabled account section.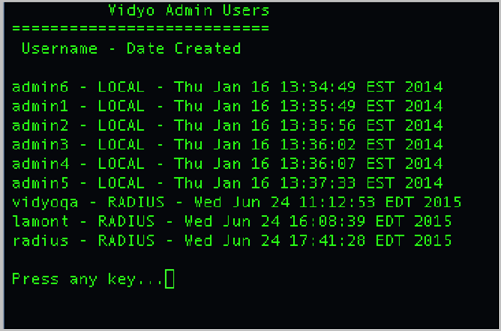
- Press any key on your keyboard to return to the User Maintenance menu.
|
Note Press the Enter key after each prompt. |
Remove a RADIUS-enabled account
To remove a RADIUS-enabled account:
- Log in to the System Console.
- Enter B to select the Remove User option.
- Enter the username to be removed.
- Enter y for the confirm changes prompt.

|
Note Press the Enter key after each prompt. |
Disable RADIUS authentication
To disable RADIUS authentication:
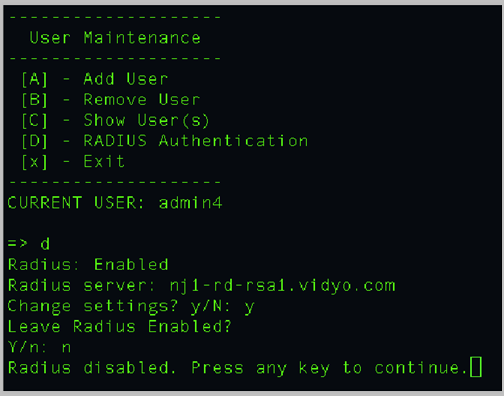
- Log in to the System Console.
- Enter 19 to access the User Maintenance menu.
- Enter D to select the RADIUS Authentication option. Details about the RADIUS server display.
- Enter y for the change settings prompt.
- Enter n for the leave RADIUS enabled prompt. RADIUS is disabled.
- Press any key on your keyboard to return to the User Maintenance menu.
|
Note Press the Enter key after each prompt. |
Create a local System Console account
To create a local System Console account:
- Log in to the System Console.
- Enter A for Advanced Options.
- Enter a unique username.
- Enter y for the confirm changes prompt.
- Enter n for the user to be authenticated via RADIUS prompt.
- Enter password for the current UNIX password.
Enter a unique password that follows these password complexity requirements: - The password should not be based on the dictionary.
- The password should not be similar to the old password.
- The password should not be overly simple or short.
- The password should not be a case change of the old password or should not be the reverse of the old password.
- Re-enter your new password for the retype new UNIX password prompt.
If the passwords don’t match, you’ll be prompted to try again. If the passwords match, the System Console menu opens immediately.
|
Note Press the Enter key after each prompt. |
The default setting is at least three characters should be different from the old password.
The algorithm here is a point system to satisfy the minimum password length (the default length is eight characters). The password gets extra points if it contains a number, upper case, lower case, or special character. Each point is equivalent to one character.
|
Note When you need to reset the password, use 13. Set 'admin' password. However, if you are logged in with a RADIUS-enabled account and need to use this option, then your account will be converted back to a local System Console account with the standard default password at the next login. |
In addition, when using the emergency user functionality with a RADIUS-enabled account, the account will be converted back to a local System Console account as well.
