5. Configure system settings as the Super Admin
This section describes how to configure the VidyoReplay system settings. The first procedure shows you how to access these settings.
When you make changes to the system settings as described in this chapter and then click Save or Save & Apply, the VidyoReplay server reboots.
|
Note After you have configured your system, you should provide users with a link to the VidyoReplay along with their username, and password. You can also provide them with information about creating, viewing, and managing recordings and webcasts. See 8. View and manage recordings and webcasts. |
Access system settings
To access VidyoReplay settings:
- Log in to the VidyoReplay using the default Super account.
- Click the Settings link. The VidyoReplay system settings window displays.
Tabs are shown along the top, which include the following: General, Cluster, Recorder, Security, Customization, Cleanup, Maintenance, and Users. Settings are made on these tabs to configure different areas of your system. The following sections cover these tabs in more detail.
|
Note The tabs display or are hidden based on the server (Standalone versus Active Controller, Standby Controller, or Recorder or in a VidyoReplay cluster) from which you are accessing settings. Notes are included on these topics if the settings vary. |
Configure the general settings
In the VidyoReplay version 19.1.0 or later, you can migrate your local recordings from this General Settings tab.
To configure the general settings:
- Log in to the VidyoReplay using the default Super account.
- Click the Settings link.
- Click the General tab.
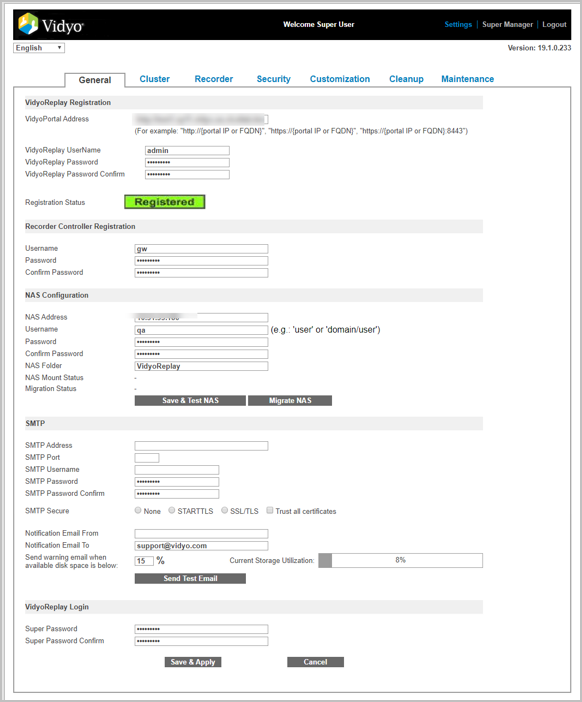
- In the VidyoPortal Address field, enter the IP or FQDN address (fully qualified domain name) of your VidyoPortal. The library needs this address so it can connect to its associated VidyoPortal.
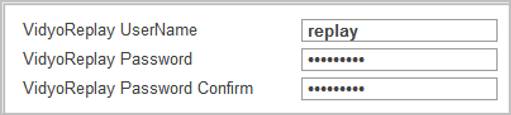
- Change the VidyoReplay UserName and VidyoReplay Password in their respective fields to match the account you set up for the VidyoReplay on the VidyoPortal, and then verify the password.
- In the Recorder Controller Registration section, enter the username, password, and confirm the password of your VidyoReplay Controller.
- In the NAS Configuration section, enter the following:
- In the NAS Address, enter the IP address of your NAS.
- Enter the username, password, and confirm the password of your NAS.
- Enter the NAS folder name to use on your NAS.
- View the NAS Mount Status indicators to see the current state of your VidyoReplay server’s NAS configuration.
- View the Migration Status in the Migration Status field.
- Click the Save & Test NAS button to migrate your local recordings.
- Click the Migrate NAS button to migrate your local recordings. You no longer need to use the Vidyo Console to migrate local recordings. After you click this button, check that the statuses update correctly in the NAS Mount Status and Migrations Status fields. NAS Mount Status indicators include the following:
- No error (green indicator)
- No route to host: Network issue or NAS device might be down (red indicator)
- Connection refused: NAS service might not be running (red indicator)
- Permission denied: NAS username/password might be incorrect (red indicator)
- No such device or address: NAS folder might not be available (red indicator)
- Permission denied: NAS read error (red indicator)
- Permission denied: NAS write error (red indicator)
- Unknown error
- Mount in progress
- The Alarm column of the Components Table in your VidyoPortal alerts you if your VidyoReplay is in Maintenance mode, shows any NAS error statuses (if NAS is used), and indicates if your database replication is OFF.
- The SMB and CIFS protocols are supported for mounting your NAS.
- Your NAS username must have both read and write access to the NAS folder.
- A standalone VidyoReplay handles all recordings and playbacks/webcasts internally; however, you can connect it to NAS, if desired.
- To use a cluster configuration, your VidyoReplays must be connected to a NAS. See NAS guidelines for your VidyoReplay.
- In the SMTP section, enter the following:
- In the SMTP Address field, enter the IP address of your SMTP server.
- In the SMTP Port field, enter your SMTP port.
- Enter the username, password, and confirm the password of your SMTP server.
- In the SMTP Secure options, select from None, STARTTLS, and SSL/TLS.
- Select the Trust all certificates checkbox, if desired.
- In the Notification Email From and Notification Email To fields, enter email addresses.
- In the Send warning email when available disk space is below field, enter a percentage.
- The Current Storage Utilization percentage bar shows how much space is being utilized on your VidyoReplay.
- Click Send Test Email if you want to make sure the email is configured correctly.
- If you want to change the VidyoReplay Super Admin’s password, you can change it in the Super Password field and confirm it in the Super Password Confirm field.

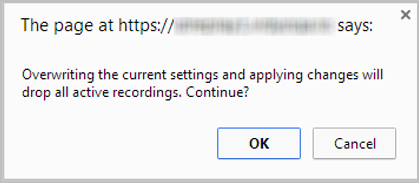
- Click Save & Apply. When you click Save & Apply, a dialog box informs you that overwriting the settings and applying changes drops all active recordings on your server. When you click OK, the VidyoReplay server reboots.
|
Note You must add your VidyoReplay and VidyoReplay recorder as components on your VidyoPortal. See 3. Configuration procedure. When clustering VidyoReplay servers, your username and password must be the same on each VidyoReplay Recorder and VidyoReplay in your system. |
The Registration Status Display field shows “Registered” if your VidyoReplay is able to communicate with your VidyoPortal.
|
Note |
The email address you provide here is notified in the event of a failover.
VidyoReplay also sends notifications to this email address if your NAS unmounts. This allows you to get alerted quickly, thereby preventing issues that could occur if your NAS unmounts without your knowledge.
|
Note The notification email address is only configurable on Controller 1 and Controller 2 nodes and not from the VidyoReplay Recorder. The system needs a “From” address because many email systems block or send to the spam folder all emails that don’t have “From” addresses. The “To” address is the email address of the Admin or other IT person who receives notifications from the library. (The two addresses may be identical.) |
NAS guidelines for your VidyoReplay
This section provides some guidelines for your NAS to work with your clustered VidyoReplay configuration.
|
Note The SMB and CIFS protocols are supported for mounting your NAS. A standalone VidyoReplay handles all recordings and playbacks/webcasts internally; however, you can connect it to NAS, if desired. Your NAS username must have both read and write access to the NAS folder. To use the cluster configuration, your VidyoReplays must be connected to NAS. See VidyoReplay clusters. You can always confirm the status of your NAS by viewing the NAS Status indicators on the General tab. |
Configure VidyoReplay to use your NAS
After properly setting up your NAS, the VidyoReplays in your cluster must now be configured to use it.
Always confirm your VidyoReplay as being correctly configured to use your NAS by viewing the NAS Status on the General tab. See Configure the general settings.
To configure VidyoReplay to use your NAS:
- Configure your secondary network interface (ETH1) for your NAS.
- Configure your address, username, password, NAS folder in the General tab. See Configure the general settings.
- Configure your VidyoReplay servers in to a cluster configuration. See VidyoReplay clusters.
- View the NAS Status in the General tab. See Configure the general settings.
- You may now move any of your local .mp4 or .flv files to your NAS, if desired.
VidyoReplay clusters
A VidyoReplay can be configured as a single Standalone VidyoReplay (a single component acting as both Controller and VidyoReplay Recorder) or as a cluster setup with an Active Controller, Standby Controller, and VidyoReplay Recorder.
This section explains various VidyoReplay cluster configurations used to support as many recordings required prior to going through the Cluster tab in the VidyoReplay Admin Pages. Think of a VidyoReplay cluster as a large, single VidyoReplay system.
For information about configuring clusters, see Configure clusters.
|
Note With Clustering enabled on your VidyoReplay, some security scanners may indicate the presence of Telnet as running on your server. This detection is a false positive and Telnet is not actually running on your VidyoReplay. |
Clustering benefits
VidyoReplay clustering enables you to scale your VidyoReplay capacity to a higher volume of simultaneous recordings by deploying multiple VidyoReplays per VidyoPortal and per tenant. By clustering, you are enabling the multiple VidyoReplays to balance the recording load, thereby increasing your scalability. Clustering also provides the same benefit when playing back recordings from your NAS via the shared controller IP address on your active controller.
For more information about the Shared Controller IP Address, see Configure clusters.
For more information about configuring your NAS, see NAS guidelines for your VidyoReplay.
When creating clusters, you need to assign a Controller 1 role to one of your VidyoReplays and designate the other VidyoReplays as a Controller 2 and/or Recorder. Any VidyoReplay can be a Controller 1, Controller 2, or VidyoReplay Recorder in your VidyoReplay cluster.
When your VidyoReplay cluster is properly implemented, Controller 1, Controller 2, and the VidyoReplay Node assume statues of Active, Standby, and additional Recorder to balance the recording and playback load.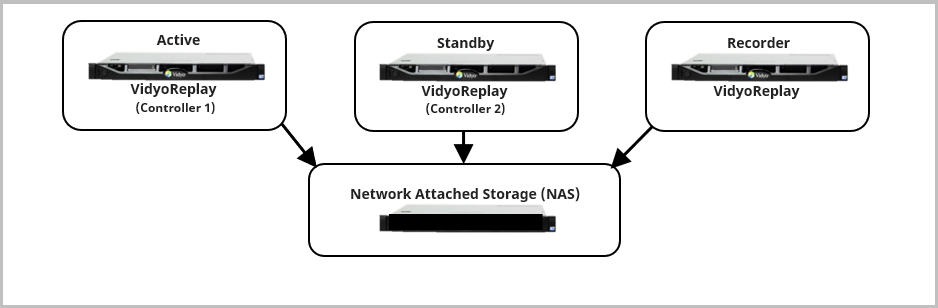
|
Note The VidyoReplay Recorder is not required in the diagram. A NAS must be used as your storage when clustering VidyoReplays. For more information about NAS, see NAS guidelines for your VidyoReplay. Also when clustering VidyoReplay servers, your username and password must be the same on each VidyoReplay Recorder and VidyoReplay in your system. See Configure the general settings. |
Configure clusters
The Cluster tab provides options to configure your VidyoReplay server as a Standalone, Controller 1, Controller 2, or Recorder Node. The following sections cover these configurations in more detail.
Each VidyoReplay server in your cluster must align to the following requirements:
- A public IP addresses must be used. This means none of the VidyoReplay servers in your cluster can be NATed.
- If they are behind a Firewall, it must permit Legacy ports for each VidyoReplay server in your Cluster. This is usually configured as a set range of IP addresses in your Firewall.
- Each VidyoReplay server in your cluster must all be physically located in the same data center. The Clustering functionality does not support VidyoReplays located in separate data centers.
- Each VidyoReplay server in your cluster must have a properly configured hostname, IP address, and shared IP address. The information for each of these fields is required for the Cluster to work. The shared IP address is the one that will be dialed by incoming calls. See Configure Controller 1, Configure Controller 2, and Configure your Recorder.
|
Note Cluster configurations are only supported using IPv4. IPv6 clustering is not currently supported. VidyoReplay high availability relies on the address resolution protocol (ARP) request to determine whether the floating IP address is up. If it is not up, the VidyoReplay Controller (Controller 1 or Controller 2) takes possession of the shared IP address. |
The Cluster Configuration screen allows you to specifically designate your VidyoReplays as a Standalone, Controller 1, Controller 2, or Recorder Node. You can also provide additional data for each component depending on the VidyoReplay role.
As a reminder, when your VidyoReplay cluster is properly implemented, Controller 1, Controller 2, and VidyoReplay Node assume statuses of Active, Standby, and additional Recorder(s) to balance the recording and playback load.
When the Active Controller is configured properly, the following takes place in the event of a failover:
- Recordings being recorded or played are stopped as the Standby Controller takes the IP address of the Active Controller.
- The new Active Controller sends out the email notification alert to the Notification Email From and To address provided in the General tab. See Configure the general settings.
- The course of action varies at this point based on whether the original Active Controller that failed is repairable and can be returned to your system setup.
Clustering procedure
In a VidyoReplay cluster, the volume of incoming recordings is load balanced among each of your servers in a logical manner. When you change the status of a VidyoReplay in your cluster, the system automatically adjusts the statues of the other VidyoReplays to keep your system intact.
|
Note You can perform upgrades, cleanups, and configuration changes to your specific nodes in your VidyoReplay cluster by setting the server status to Maintenance and administering your machine. The Alarm column of the Components Table in your VidyoPortal alerts you if your VidyoReplay is in Maintenance mode, shows any NAS error statuses (if NAS is used), and indicates if your database replication is OFF. |
|
Note In the VidyoReplay 19.1.0 or later release, the High Availability subtab is no longer available; however, you can invoke the “force standby mode” by rebooting the server. Then, the standby controller will take over the virtual IP. |
Perform the steps from the following sections to create your VidyoReplay Cluster.
To create a VidyoReplay cluster:
- Make sure you’ve assigned a hostname to Controller 1. Reboot your machine after assigning the hostname. See Set the hostname and the domain.
- Configure Controller 1 to use your NAS. See Configure VidyoReplay to use your NAS.
- Access Controller 2 and assign a different hostname to it. Reboot your machine after assigning the hostname.
- Configure Controller 2 to use your NAS. See Configure VidyoReplay to use your NAS.
- Access your Recorder and assign a different hostname to it. Reboot your machine after assigning the hostname.
- Configure your Recorder to use your NAS. See Configure VidyoReplay to use your NAS.
- Perform the cluster configuration settings on Controller 1 and then reboot. See Configure Controller 1.
- Perform the cluster configuration settings on Controller 2. Reboot your machine after the configuration. See Configure Controller 2.
- Perform the cluster configuration settings on your Recorder. Reboot your machine after the configuration. See Configure your Recorder.
|
Note You must add your VidyoReplay and VidyoReplay recorder as components on your VidyoPortal. See 3. Configuration procedure. When clustering VidyoReplay servers, your username and password must be the same on each VidyoReplay Recorder and VidyoReplay in your system. See Configure the general settings. |
Return a repaired controller to your system setup
The original Active Controller returns to the system setup and is acting as the Standby Controller.
Replace an irreparable controller 1 to your system setup
Vidyo recommends you replace the original Controller 1 role with a Recorder Node role (if you have one in your system setup). The Recorder node is then recognized as a Standby Controller, but is mislabeled as a Recorder.
|
Note If desired, you can easily reconfigure your controllers to bear the correct Controller 1, Controller 2 labeling. However, this is not required and the system is fully functional in this state. |
Some people setup VidyoReplay systems with a single Standalone VidyoReplay (a single component acting as both Controller and Recorder). Other clients designate a Controller 1, Controller 2, and Recorder Nodes. You can think of the latter as a large, single VidyoReplay system.
The following sections show you how to configure each VidyoReplay component type using the Cluster tab.
Configure your standalone VidyoReplay
Your server is set as a Standalone VidyoReplay by default. Unless it’s changed, you don’t need to modify the configuration.
To configure your Standalone VidyoReplay:
- Log in to the VidyoReplay using the default Super account.
- Click the Settings link.
- Click the Cluster tab.
- Click the Configuration link.
- Select Standalone from the Mode drop-down.
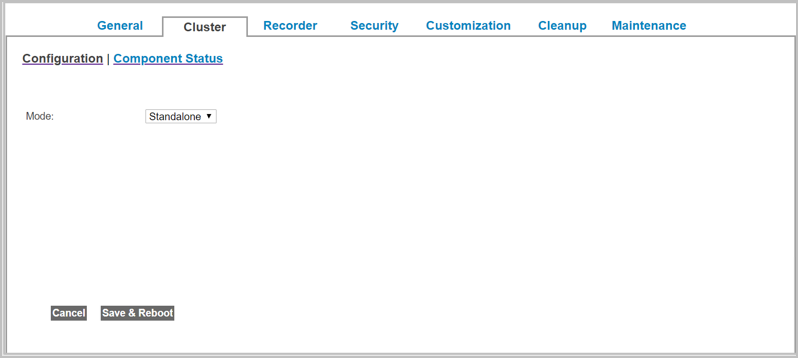
- Click Save & Reboot. When you click Save & Reboot, a dialog box informs you that overwriting the settings and applying changes drops all active recordings on your server.
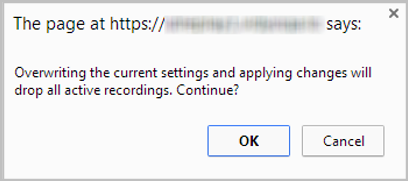
When you click OK, the VidyoReplay server reboots.
Configure Controller 1
Before configuring clusters, be sure to review the Clustering procedure.
To configure Controller 1:
- Log in to the VidyoReplay using the default Super account.
- Click the Settings link.
- Click the Cluster tab.
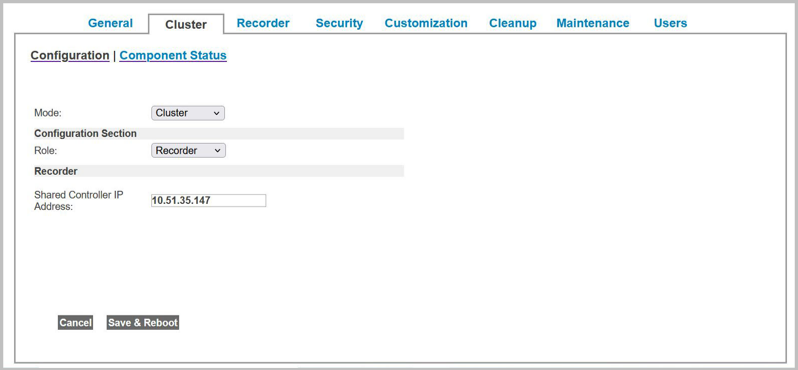
- Click the Configuration link.
- In the Mode drop-down, select Cluster.
- In the Role drop-down, select Controller 1.
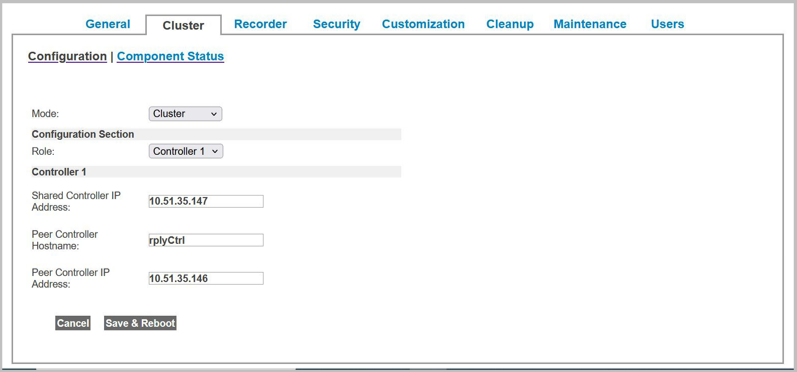
- In the additional fields, configure Controller 1 as follows:
- Enter a Shared Controller IP Address.
- Enter a Peer Controller Hostname.
- Enter a Peer Controller IP Address.
- Click Save & Reboot. When you click Save & Reboot, a dialog box informs you that overwriting the settings and applying changes drops all active recordings on your server.
|
Note Provide the IP address exactly as it’s shown in the System Console and do not provide an FQDN in this field. |
When you click OK, the VidyoReplay server reboots.
Configure Controller 2
Before configuring clusters, be sure to review the Clustering procedure.
To configure Controller 2:
- Log in to the VidyoReplay using the default Super account.
- Click the Settings link.
- Click the Cluster tab.
- Click the Configuration link.
- In the Mode drop-down, select Cluster.
- In the Role drop-down, select Controller 2.
- In the additional fields, configure Controller 2 as follows:
- Enter a Shared Controller IP Address.
- Enter a Peer Controller Hostname.
- Enter a Peer Controller IP Address.
- Click Save & Reboot. When you click Save & Reboot, a dialog box informs you that overwriting the settings and applying changes drops all active recordings on your server.
|
Note Provide the IP address exactly as it’s shown in the System Console and do not provide an FQDN in this field. |
When you click OK, the VidyoReplay server reboots.
Configure your Recorder
Before configuring clusters, be sure to review the Clustering procedure.
To configure your Recorder:
- Log in to the VidyoReplay using the default Super account.
- Click the Settings link.
- Click the Cluster tab.
- Click the Configuration link.
- In the Mode drop-down, select Cluster.
- In the Role drop-down, select Recorder.
- Enter a Shared Controller IP Address. Provide the IP address exactly as it’s shown in the System Console and do not provide an FQDN in this field.
- Click Save & Reboot. When you click Save & Reboot, a dialog box informs you that overwriting the settings and applying changes drops all active recordings on your server.
When you click OK, the VidyoReplay server reboots.
View VidyoReplay component statuses
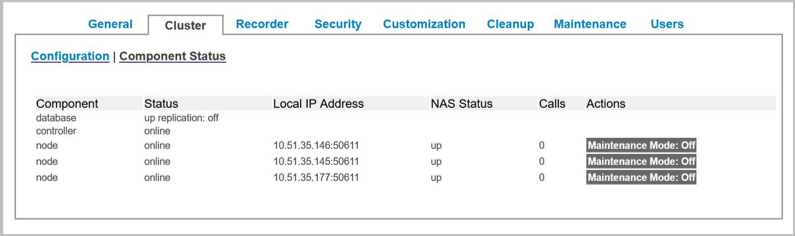
You can view the component statuses and other details of the VidyoReplay servers in your system using the Component Status link.
Additionally, in VidyoReplay version 19.1.0 or later, you can turn Maintenance mode on or off per node in this window as well as view details about each component including Status (up, online, or maintenance), Local IP Address, NAS Status (up or down), number of Calls, and Actions (Maintenance mode on or off).
To view VidyoReplay component statuses:
- Log in to the VidyoReplay using the default Super account.
- Click the Settings link.
- Click the Cluster tab.
- Click the Component Status link. A tabular display appears and lists your servers along with corresponding components, statuses, local IP addresses, shared IP addresses, and database statuses.
|
Note To stop incoming recordings or prior to upgrading, turn a node to Maintenance Mode: Off (from within the Maintenance tab). |
Configure the VidyoReplay Recorder
Your VidyoReplay Recorder is configured using the Configuration, Profiles, and Call Status links.
Set VidyoReplay Recorder main configurations
To set your VidyoReplay Recorder main configurations:
- Log in to the VidyoReplay using the default Super account.
- Click the Settings link.
- Click the Recorder tab.
- Click the Configuration link.
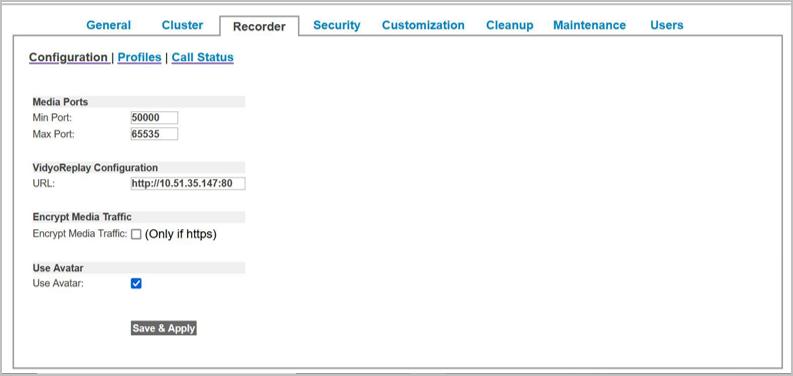
- In the Media Min Port and Max Port fields, enter the UDP ports used for media transport between the VidyoReplay and the VidyoRouter. You must specify a minimum range of 1000.
- In the Media Min Port field, enter the lower limit of the port range. The default (and recommended) value is 1024.
- In the Media Max Port field, enter the upper limit of the port range. The default (recommended and maximum) value is 65535.
- In the URL field, enter the IP address of your VidyoReplay Recorder. Provide the FQDN of your VidyoReplay Recorder exactly as it’s shown in the System Console. When clustering VidyoReplay servers, the URL field must be the Shared Controller FQDN.
- Select the Encrypt Media Traffic checkbox to only allow calls in which the media is encrypted and secured via the secure real-time transport protocol (SRTP).
- When you leave this checkbox unselected, recordings without SRTP media encryption are permitted on the VidyoReplay.
- Select the Use Avatar checkbox if you want an avatar with the first three letters of a participant’s name to appear on their tile when their video source is muted (that is, when that participant is in audio-only mode).
- Leave the checkbox unselected if you do not want a participant’s video tile to display at all when their video source is muted. Click Save & Apply. When you click Save & Apply, a dialog box informs you that overwriting the settings and applying changes drops all active recordings on your server.
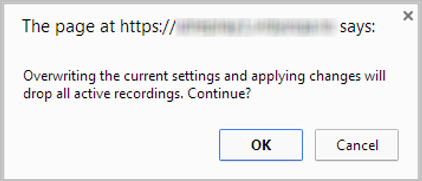
When you click OK, the VidyoReplay server reboots.
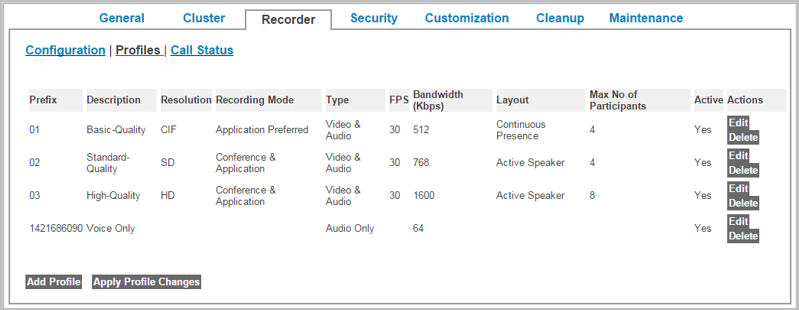
Manage VidyoReplay Recorder profiles
The Profiles link allows you to manage and configure profiles for various recording types on your VidyoReplay.
VidyoReplay profiles specify details such as descriptive text, the profile type, resolution, recording mode, FPS, bandwidth, the maximum number of participants, layout, and whether the profile is active. Profiles are used when initiating a recording or webcast.
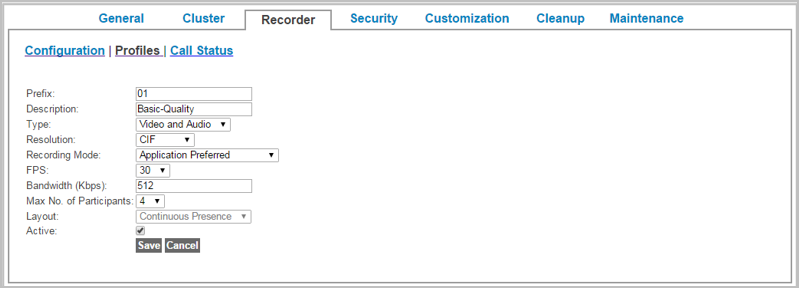
The VidyoReplay comes with preconfigured profiles for a variety of resolutions. These defaults allow you to record without the need to create your own profiles. You can modify these profiles or add new ones.
|
Note When a VidyoReplay server is made part of a cluster, all the profiles must be identical between the cluster nodes. Therefore, any manually entered profiles should be created on each node. For more information about clustering, see VidyoReplay clusters. Four default profiles are provided for Basic-Quality CIF, Standard-Quality SD, High-Quality HD, and Audio. |
View and manage VidyoReplay Recorder profiles
To view and manage VidyoReplay Recorder profiles:
- Log in to the VidyoReplay using the default Super account.
- Click the Settings link.
- Click the Recorder tab.
- Click the Profiles link.
Add a VidyoReplay Recorder profile
To add a VidyoReplay Recorder profile:
- Log in to the VidyoReplay using the default Super account.
- Click the Settings link.
- Click the Recorder tab.
- Click the Profiles link.
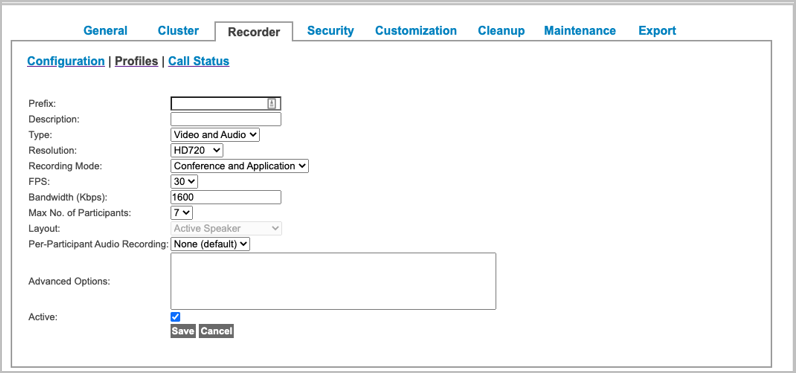
- Click Add Profile. The Add Profile screen displays.
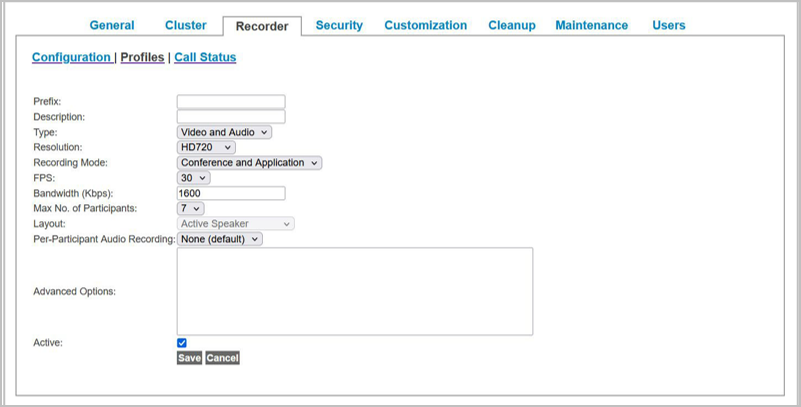
- In the Description field, enter a descriptive recorder profile name for your new profile. For example, if you are planning to use the Per-Participant Audio Recording feature, you could enter “PPA-aac_SD” to indicate per-participant audio of type AAC is enabled for a standard definition recording.
- In the Type drop-down, select Video and Audio or Audio Only.
- In the Resolution drop-down, select HD1080, HD720, SD, or CIF as your resolution. The setting determines the maximum resolution used for your profile.
- In the Recording Mode drop-down, select Conference and Application, Conference Only, or Application Preferred.
- In the FPS drop-down, select 5, 10, 15, 20, 25, or 30 as your frames per second.
- In the Bandwidth (kbps) field, enter a numeric value (in kbps) for the maximum bandwidth available for your profile.
- In the Max No. of Participants drop-down, select 1, 2, 3, 4, 5, 6, 7, or 8 as your specified maximum number of participants to be shown.
- In the Layout drop-down, select Continuous Presence or Active Speaker as your mode.
- Select Continuous Presence to display all participants in equal-sized windows.
- Select Active Speaker to display the most recent speaker in a larger window than other users.
- In the Per-Participant Audio Recording drop-down, select None (default), AAC, or WAV. This feature enables each participant in a conference to have separate conference recordings as well as separate audio-only files. When enabled, an additional directory is created in the file system that contains the recordings. The directory contains the audio-only recordings as well as a meta.dat file. This metadata file includes events within the conference recording, such as “user joined”, “user left”, “user silence”, and “user speaking”. If a participant leaves and re-joins a conference, two audio-only files are created. In order to match the audio-only files with the actual participants, you must consult the meta.dat file.
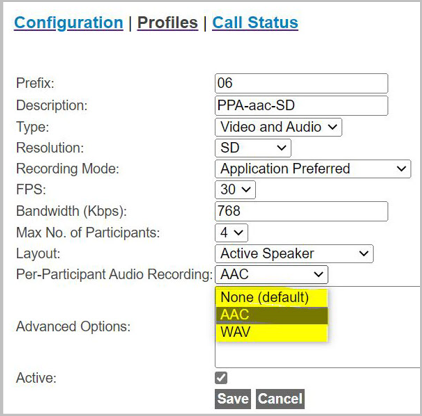
- Select None (default) if you do not want to allow any extra audio-only files to be created.
- Select AAC to allow additional MPEG audio-only files (.M4A) to be created. This option uses the AAC codec. AAC codecs require more CPU, but the resulting audio-only files are small.
- Select WAV to allow additional WAV audio-only files (.WAV) to be created. This option uses the PCM codec. WAV format results in about 10.5 MB of storage for each minute.
- In the Advanced Options field:
- Enter chatRecording:on if you want to record and save chat messages from your VidyoConnect calls. See Record and save in-call chats.
- Enter deleteWebcast:on if you want to delete the webcast recording at the end of the VidyoConnect call. See Auto-delete webcasts.
- Select the Active checkbox to make your profile and all its settings available for use on your system. Deselect the checkbox to make it unavailable for use on your system.
- Click Save. The VidyoReplay server reboots.
|
Note If you select Audio Only, the Resolution, Recording Mode, FPS, Max No. of Participants, and Layout fields disappear, and the Bandwidth field is read-only and is fixed at 64 kbps. |
|
Note If you select HD1080, HD720, or SD as your profile resolution, the Recording Mode is set to Conference and Application and the Layout is fixed as Active Speaker. If you select CIF as your profile resolution, the Recording Mode is set to Application Preferred and the Layout is set to Continuous Presence. |
|
Note The recording mode is initially selected in this drop-down based on the Resolution selected in the following manner: Conference and Application = HD1080 or HD720, Conference and Application = SD, Application Preferred = CIF. |
|
Note The number that displays in this field is based on the Resolution selected in the following manner: 3072kbps = HD1080, 1600 kbps = HD720, 768 kbps = SD, 512 kbps = CIF. If you select the Audio Only option from the Type drop-down, the Bandwidth field is read-only and is fixed at 64 kbps. |
|
Note The maximum number of participants is initially selected in this drop-down based on the Resolution selected in the following manner: 8 = HD1080 or HD720, 4 = SD, 4 = CIF. |
|
Note If you select the Conference and Application option from the Recording Mode drop-down, the Layout field is read-only and is fixed as Active Speaker. If you select HD1080, HD720, or SD in the Resolution drop-down, the Layout field is read-only and is fixed as Active Speaker. If you select CIF in the Resolution drop-down, the Layout field is read-only and is fixed as Continuous Presence. |
Record and save in-call chats
You can record and save the chat messages from your VidyoConnect calls by creating a profile with chatRecording:on enabled. When this profile is selected, an additional file is created during the recording. That file is a CSV file which contains the chat messages as well as other information, such as the timestamp, username, and internal ID.
When a user goes to the VidyoReplay Library and downloads a recording that had the in-call chat recorded, they receive a ZIP file that contains the recorded call in MP4 format, a thumbnail image, and the CSV file containing the chat. Note that the VidyoReplay Library does not provide any visual indication of which recordings include the chat message and which don’t.
To record and save in-call chats:
- Log in to the VidyoReplay using the default Super account.
- Click the Settings link.
- Click the Recorder tab.
- Click the Profiles link. Click Add Profile. The Add Profile screen displays.
- In the Description field, enter a descriptive profile name which identifies that the in-call chat will be recorded. For example, if you are adding chat recording to your Standard-Quality profile, you could enter “Standard-Quality-chat”.
- Complete the Type, Resolution, Recording Mode, FPS, Bandwidth, Max No. of Participants, Layout, and Per-Participant Audio Recording fields as described in the previous section, Add a VidyoReplay Recorder profile.
- In the Advanced Options field, enter chatRecording:on.
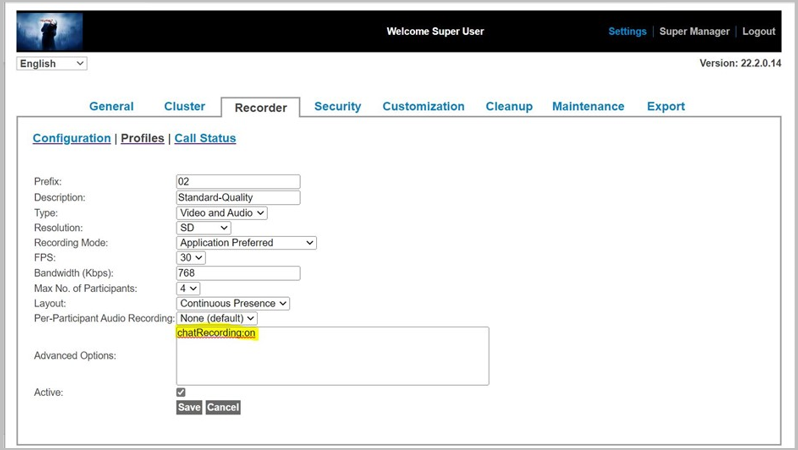
- Click Save. The VidyoReplay server reboots.
Auto-delete webcasts
You can delete your webcast recordings by creating a profile with deleteWebcast:on enabled. When this profile is selected, the webcast recording is not available in the VidyoReplay Library once the webcast finishes. Therefore, it cannot be viewed, played, searched, or downloaded.
|
Note To enable users who have slow connections to view the entire webcast, the recording does remain available for about 30 seconds after the webcast ends. |
To auto-delete webcasts:
- Log in to the VidyoReplay using the default Super account.
- Click the Settings link.
- Click the Recorder tab.
- Click the Profiles link. Click Add Profile. The Add Profile screen displays.
- In the Description field, enter a descriptive profile name which identifies that the in-call chat will be recorded. For example, if you are adding chat recording to your Standard-Quality profile, you could enter “Standard-Quality-chat”.
- Complete the Type, Resolution, Recording Mode, FPS, Bandwidth, Max No. of Participants, Layout, and Per-Participant Audio Recording fields as described in the previous section, Add a VidyoReplay Recorder profile.
- In the Advanced Options field, enter deleteWebcast:on.
- Select the Active checkbox to make your profile and all of its settings available for use on your system.
- Click Save. The VidyoReplay server reboots.
Edit a VidyoReplay Recorder profile
To edit a VidyoReplay Recorder profile:
- Log in to the VidyoReplay using the default Super account.
- Click the Settings link.
- Click the Recorder tab.
- Click the Profiles link.
- Click the corresponding Edit button to the right of the list of profiles. The Edit Profile screen displays.
- Edit configuration settings for your profile. The settings are the same as the ones used when adding a VidyoReplay recorder profile. See Add a VidyoReplay Recorder profile.
- Click Save. The VidyoReplay server reboots.
View VidyoReplay Recorder statuses
The Status link allows you to view the recordings and playbacks occurring on your VidyoReplay.
To view VidyoReplay Recorder statuses and to download logs:
- Log in to the VidyoReplay using the default Super account.
- Click the Settings link.
- Click the Recorder tab.
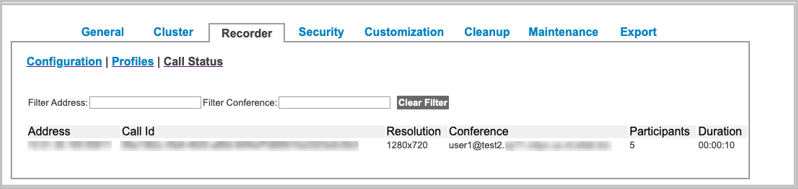
- Click the Call Status link. If the VidyoReplay is processing recordings, the main area of the screen is populated with call information such as Address, Status, Call ID, Resolution, Conference, Participants, and Duration.
- Click Clear to instantly remove any parameters you provided.
- Click Download Logs. A dialog box asks you to confirm that you want to download the logs as it may take some time.
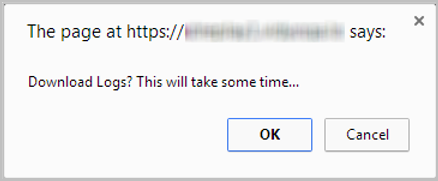
- Click OK. Your browser downloads a .tar.gz file containing your log file for debugging analysis.
Secure your VidyoReplay system with SSL and HTTPS
To secure your VidyoReplay system by Enabling SSL and HTTPS Only, you must complete specific configurations done on six sequential tabs from left to right in the Security section of the Super Admin Portal. The tabs include:
- SSL Private Key Tab – This tab is for Generating or Uploading an SSL Private Key.
- SSL CSR Tab – This tab is for Generating an SSL Certificate Signing Request (CSR).
- Server Certificate Tab – This tab is for Deploying Your Server Certificate.
- Server CA Certificates Tab – This tab is for Deploying Your Server Certification Authority (CA) Certificates.
- Advanced Tab – This tab is for deploying your Client Root CA Certificates.
- Enable an SSL Type from the drop down in the top left of the window. (The HTTPS+HTTP option is the default).
|
Note The Advanced tab is also used to Upload and Import Security Settings, and Reset Security Settings. See Import or export certificates from the Advanced tab and Reset your security configuration to factory defaults. |
|
Note Do not use the Enable SSL Type drop down until you’ve completed the steps for securing your videoconferencing system. |
The following ordered sections explain these steps in detail.
Upload and regenerate an SSL private key
The following procedures show you how to upload and regenerate an SSL Private Key.
An initial key with a 2048 key size is automatically generated when you first set up your system. When regenerating, examine your own security requirements and applicable policies carefully before deciding on a suitable key size.
Upload an SSL private key
Private keys can be imported into your server. Vidyo recommends carefully backing up your existing SSL Private Key in its entirety before starting SSL Private Key procedures.
|
Note In order to import an SSL Private Key, you must first disable HTTPS. You can only import encrypted and password protected private keys that were exported from servers that also encrypted and password protected the private keys. Changes made to an SSL Private Key require a CSR and SSL Server Certificate. This includes importing existing keys, editing existing keys, exporting existing keys, and regenerating new keys. Private Keys are replaced if you choose to import from .pfx bundle format. See Import certificates from a certificate bundle. |
To import an SSL private key:
- Log in to the VidyoReplay using the default Super account.
- Click the Settings link.
- Click the Security tab.
- Click the SSL Private Key subtab.
- Click Upload.
- In the Select Private Key dialog box, click the Select File icon.
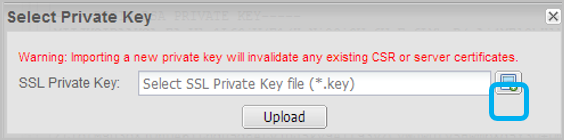
- Select your private key file and click Upload.
- If the upload is successful, the File Upload Success dialog box displays. The tab then loads the Private Key information in the lower part of the screen.
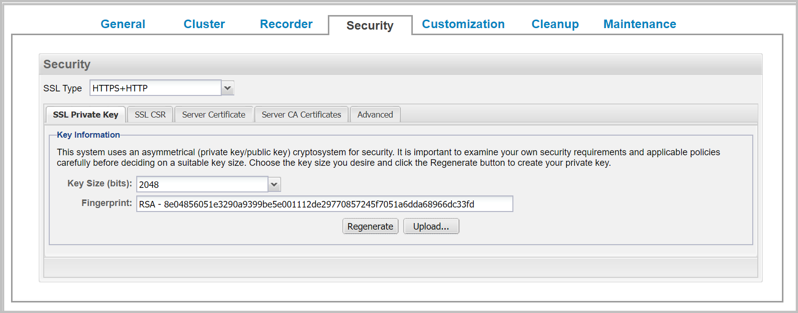
Generate an SSL private key
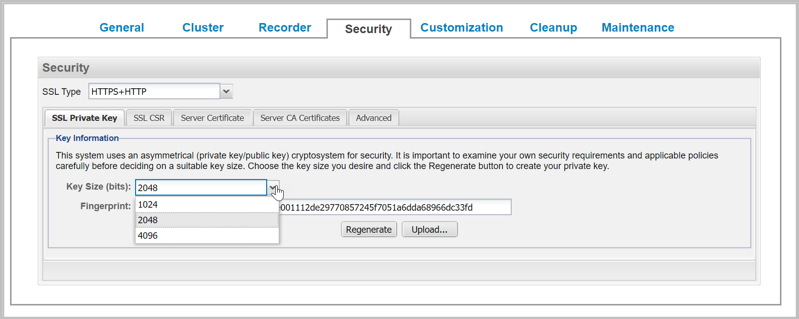
This system uses an asymmetrical (private key and public key) cryptosystem for security. Choose the desired key size and click the Regenerate button to create your private key.
|
Note Changes made to an SSL Private Key require a CSR and SSL Server Certificate. This includes importing existing keys, exporting existing keys, and regenerating new keys. |
|
Note Changes made to an SSL Private Key require a CSR and SSL Server Certificate. This includes importing existing keys, exporting existing keys, and regenerating new keys. |
To regenerate an SSL Private Key:
- Log in to the VidyoReplay using the default Super account.
- Click the Settings link.
- Click the Security tab.
- Click the SSL Private Key subtab.
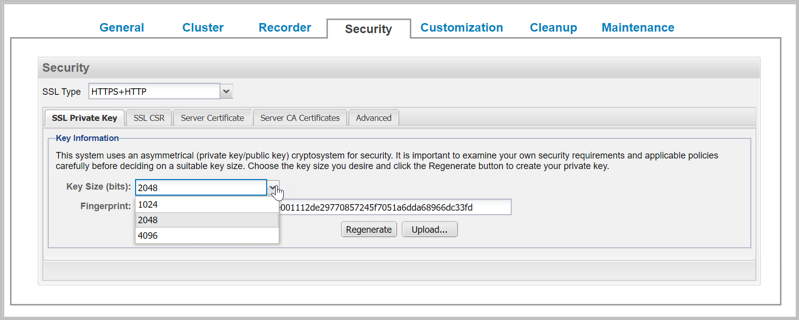
- In the Key Size field, specify a 1024, 2048, or 4096 key size.
- Click Regenerate. A confirmation window displays this message, “Are you sure you want to generate a new private key?" This will require new SSL CSR and server certificates.”

- Click Yes.
Generate and view an SSL CSR
A Certificate Signing Request (CSR) is a message sent to a certification authority (CA) to request a public key certificate for a person or web server. The majority of public key certificates issued are SSL certificates, which are used to secure communications with web sites. The CA examines the CSR, which it considers to be a wish list from the requesting entity. If the request is in line with the CA's policy or it can be modified to bring it in line, the CA issues a certificate for the requesting entity.
Generate an SSL CSR
To generate an SSL CSR:
- Log in to the VidyoReplay using the default Super account.
- Click the Settings link.
- Click the Security tab.
- Click the SSL CSR subtab.
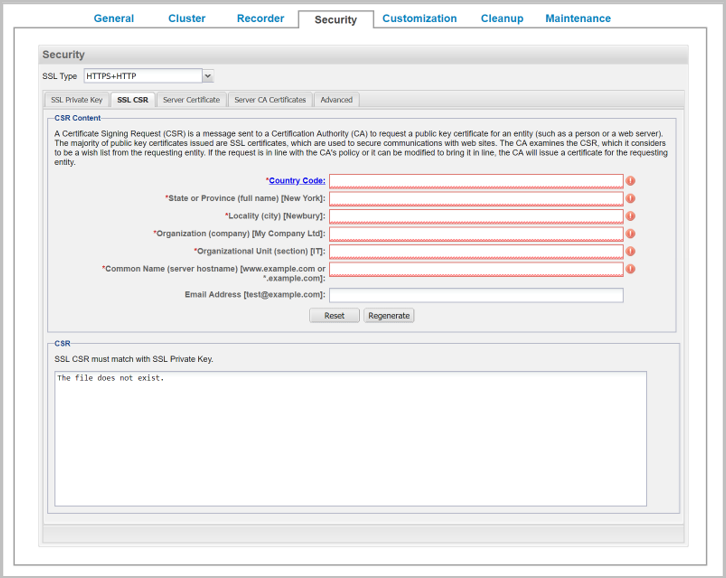
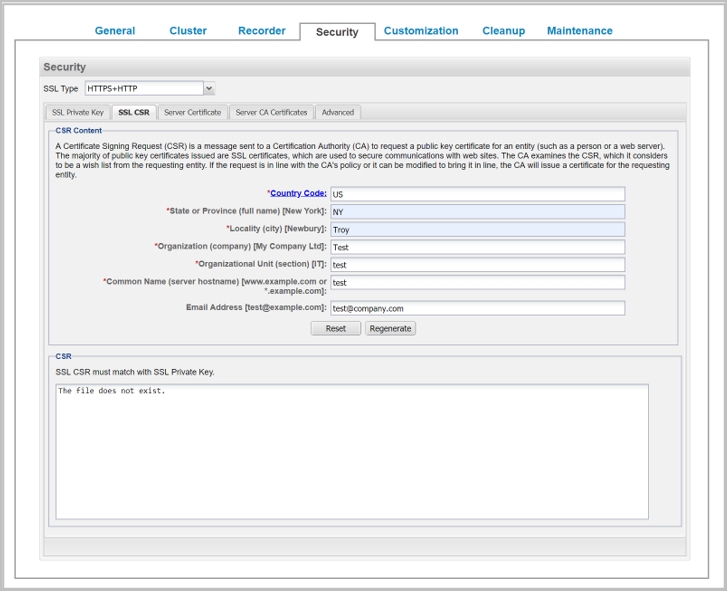
- Check with your CA and carefully enter correct values for the following:
- Country Code (the 2 character ISO 3166 country code)
- State or Province Name
- Locality
- Organization Name
- Organization Unit
- Common Name (the FQDN of the server)
- Email Address
- Provide all field information exactly as you registered it with your domain registration provider. You should consider all information on this screen mandatory before you click Generate or Regenerate CSR.
|
Note If using a Subject Alternate Name (SAN) certificate, the alternate names are added by the Certificate Authority when a certificate is ordered and the Common Name you’re providing here in the Certificate Details portion of the screen is used to provide your base Common Name (CN) for your SAN certificate. See Use a wildcard certificate in a multi-tenant system. |
|
Note Click Reset to reload any previously saved field information. Your SSL CSR is generated based on the SSL Private Key you entered during Upload an SSL private key or Generate an SSL private key. |
View an SSL CSR
To view an SSL CSR:
- Log in to the VidyoReplay using the default Super account.
- Click the Settings link.
- Click the Security tab.
- Click the SSL CSR subtab.
- View the lower portion of the screen labeled CSR, as desired.
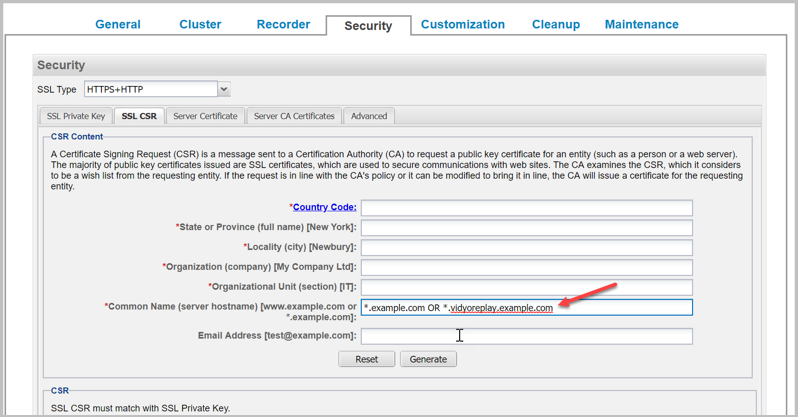
Use a wildcard certificate in a multi-tenant system
If you are running a multi-tenant system, all Tenant URLs must be in the same domain, and each use a unique sub-domain. You then also use a wildcard or SAN SSL certificate. For a wildcard certificate, you must substitute an asterisk (*) wildcard character for the tenant sub-domain name (or sub-sub-domain name) in the Common Name, so the name of each tenant automatically matches the fully qualified domain name (FQDN) for the certificate.
For example: *.example.com or *.vidyoreplay.example.com
|
Note If using a Subject Alternate Name (SAN) certificate, the alternate names are added by the Certificate Authority when a certificate is ordered and the Common Name you’re providing here in the Certificate Details portion of the screen is used to provide your base Common Name (CN) for your SAN certificate. Microsoft refers to their own version of SAN certificates as Unified Communications (UC) certificates. |
Vidyo recommends that you use sub-sub-domain names so that you can also use a wildcard DNS entry in your domain name server to resolve tenant URL addresses without requiring a separate entry for each tenant, and also avoid having to create a new DNS entry each time a new tenant is added.
Wildcard certificate entry examples include: *.example.com or *.vidyoreplay.example.com
Certificates received from your certificate authority
Most CAs instantly send certificates and returns to at least a domain (server) certificate and may return a root and one or more intermediate certificates in separate files. However, some authorities may provide the certificate data in a single email. You must copy the certificate data from the email into separate, respective files.
|
Note When selecting the certificate type from your CA, be sure to select Apache2 or Tomcat. |
Your certificate authority may provide three types of files:
- The domain certificate file. This is often named or titled server certificate.
- One or more intermediate certificate files. This is optional.
- The root certificate file.
Again, the certificate authority may send you these files, or require you to download them from their website. The certificates are not clearly identified most times, requiring you to identify each file type.
As mentioned, if your certificate authority provides certificate files in an email message, you must copy and paste the appropriate text for each certificate type into a separate file and save it with the correct extension, as described in the next section. Be sure to use a text editor that doesn’t append carriage returns at the end of each line.
Vidyo recommends the following guidelines to identify certificate files from your CA:
- The domain file normally contains your server’s common name or FQDN.
- Intermediate files often contain the character string “inter” somewhere in the file name. Once you identify which ones are the intermediates, you can then identify the root certificate file by process of elimination.
- The remaining file is the CA’s root certificate file.
The CA may also only return the domain (server) certificate, and if needed or required, the root and intermediate certificates need to be located, and manually downloaded from the CA’s website.
If the root and intermediate certificates were not provided to you, your Vidyo server includes a default bundle of common CA root and intermediate certificates. If you are using a mainstream CA, the root and intermediate certificates may not be needed.
|
Note Some CAs have several root and intermediate certificates available depending on the type of certificate you have ordered. Be sure to locate the appropriate matching root and intermediate certificates for your domain certificate. Contact your CA for assistance if you’re not sure. |
CAs provide different kinds of certificate files to customers. Regardless, the following certificates should be a part of what your CA provides to you:
Domain Certificate (may have a .domain, .crt, or .cer extension).
Intermediate Certificate(s) (optional, may be one or more, and may have an .inter, .crt, or .cer extension).
A Root Certificate (may have a .root, .crt, or .cer extension).
Certificate files versus bundles
Your CA may instead provide you with a .p7b file, which may contain Root and Intermediate or Root, Intermediate, and Server Certificate content. Check with your CA to find out exactly where each certificate is located. Your Vidyo server accepts the .pem, .crt, .cer, .der, .p7b, and .pfx formats. The .pfx format additionally includes the private key which may be password protected.
- Certificate Files (.pem, .crt, .cer, and .der) are imported using the Server Certificate, Server CA Certificates, and Advanced tabs. See Deploy your server certificate, Deploy your server CA certificates (intermediates), and Import Client Root CA Certificates from the Advanced tab.
- Bundles (.p7b, .pfx,) are imported and exported (only .pfx files can be exported) from the Advanced tab. See Import Client Root CA Certificates from the Advanced tab.
Deploy your server certificate
- Perform the steps in this procedure after you receive certificate files back from your certification authority.
- An unsigned (self-issued) certificate does not provide a guarantee of security to your users.
- Your Vidyo server checks certificates for validity based on the certificates issued date range. Therefore, make sure that the time zone of your server is configured correctly prior to applying your certificate.
- If you instead plan on using self-signed certificates, you can click Generate Self-Signed to have the server sign its own certificate (self-signed). Clicking Generate Self-Signed and confirming removes your currently implemented server certificate.
To upload your server certificate file:
- Log in to the VidyoReplay using the default Super account.
- Click the Settings link.
- Click the Security tab.
- Click the Server Certificate subtab.
- Click Upload.
- In the Select Server Certificate dialog box, click the Select File icon.
- Select your server certificate file on your computer (may also be referred to as the Domain Certificate by your Certificate Authority) or local network and click Upload. If the upload is successful, the File Upload Success dialog box displays. The tab then loads the Certificate Information, Issuer, Subject, and the Certificate itself in the screen.
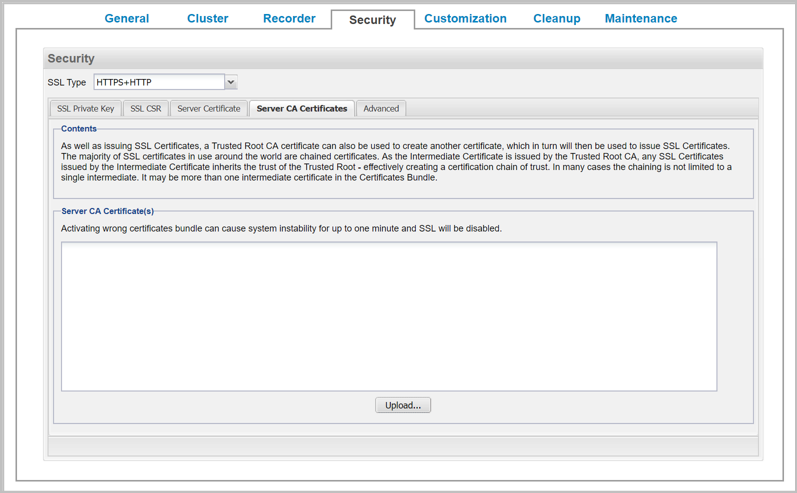
Deploy your server CA certificates (intermediates)
In addition to issuing SSL Certificates, a Trusted Root CA certificate can also be used to create another certificate, which in turn can be used to issue SSL Certificates. The majority of SSL certificates in use around the world are chained certificates of this type. As the Intermediate Certificate is issued by the Trusted Root CA, any SSL Certificates issued by the Intermediate Certificate inherits the trust of the Trusted Root – effectively creating a certification chain of trust. In many cases the chaining is not limited to a single intermediate. More than one intermediate certificate may be part of a Certificates Bundle.
To upload your server CA certificates (intermediates) files:
- Log in to the VidyoReplay using the default Super account.
- Click the Settings link.
- Click the Security tab.
- Click the Server Certificate subtab.
- Click Upload.
- In the Select Server CA Certificate dialog box, click the Select File icon.

- Select your server CA certificate file on your computer (may also be referred to as the Intermediate Certificate by your Certificate Authority) or local network and click Upload.
|
Note A single file may contain multiple intermediate certificates. You can additionally upload the Root CA in this location in order to present the certificate to your clients along with the certificate chain. However, this is not recommended as standard security practice. |
If the upload is successful, the File Upload Success dialog box displays.
The tab then loads the Certificate Information, Issuer, Subject, and the Certificates in the screen.
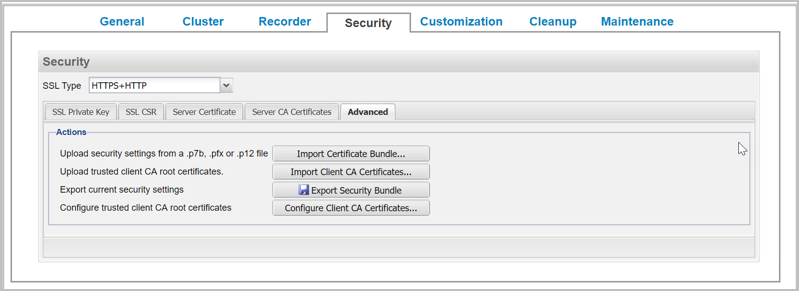
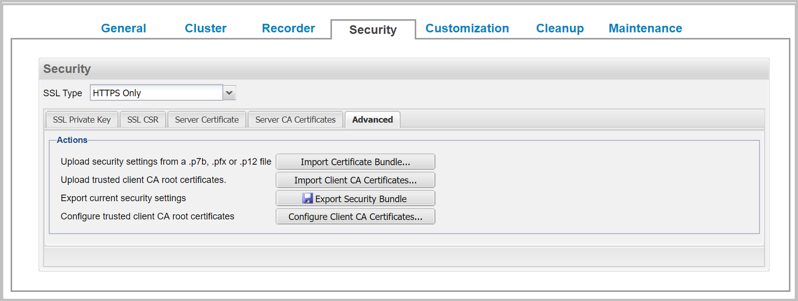
Import Client Root CA Certificates from the Advanced tab
The Advanced tab is used to upload trusted Client Root CA Certificates. This includes all Intermediate and Root Certificates.
|
Note If your system requires trusting other secure systems such as LDAPS and Secure SMTP Server, their certificates must also be uploaded in this tab. The Advanced tab is also used to Upload and Import Security Settings and to Reset Security Settings. See Import or export certificates from the Advanced tab and Reset your security configuration to factory defaults. |
To upload Client Root CA Certificates from the Advanced tab:
- Log in to the VidyoReplay using the default Super account.
- Click the Settings link.
- Click the Security tab.
- Click the Advanced subtab.
- Click Import Client CA Certificates.
- In the Select file dialog box, select either the Replace existing or Append to existing radio buttons.
- Replace existing – Replaces any previously uploaded Client Root CA Certificates.
- Append to existing – Any uploaded Client Root CA Certificates are added to your existing ones.
- Click the Select File icon to locate the server certificate file on your computer (may also be referred to as the Domain Certificate by your Certificate Authority) or local network.
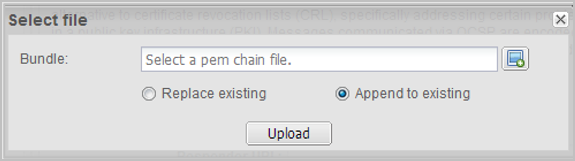
- Click Upload to upload the client root CA certificate file. An Uploading file progress bar is shown while the system applies your certificates. If the upload is successful, a Confirmation dialog box displays indicating that your “Upload successful. Do you want to reboot the server now?”
- Click Yes.
|
Note A single file may contain multiple Client Root CA Certificates. |
Enable SSL Types
When you have completed the steps for securing your VidyoConferencing system, then you can select your SSL Type. Do not Enable HTTPS Only mode until you are certain HTTPS is working properly.
See Secure your VidyoReplay system with SSL and HTTPS.
Enable an SSL Type
To enable an SSL Type:
- Log in to the VidyoReplay using the default Super account.
- Click the Settings link.
- Click the Security tab.
- From the SSL Type drop down select any of the following three options:
- HTTPS+HTTP (default) – This is the default option already enabled.
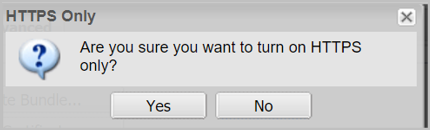
- HTTPS Only - Before you enable HTTPS Only, you must configure your components to work with HTTPS on your VidyoPortal. For more information, refer to Configure your components to work with HTTPS in the VidyoPortal and VidyoRouter Administrator Guide. If you don’t configure your components to work with HTTPS first, you can still enable HTTPS Only, however, this may result in “DOWN” component statuses.
- When you select this option, a pop-up will display this message, “Are you sure you want to turn on HTTPS only?”
- HTTPS+HTTP redirect:
- When you select this option, a pop-up will display this message, “Are you sure you want to enable HTTP to HTTPS redirect?”
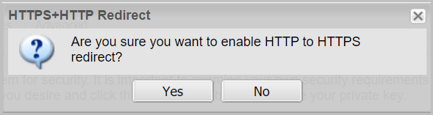
- Click Yes and your SSL setting is set.
|
Note Browse to your VidyoReplay Admin portal to confirm that HTTPS is working properly and that the browser does not post any security errors. Be sure to include the HTTPS header in the URL (for example, https://[FQDN]). Verify that HTTPS displays on the left side of the address bar and that a lock icon displays (typically in the lower right corner). Some browsers emphasize an HTTPS session with a color like green or blue. You can also verify your signed certificate by displaying information for it in your web browser. See the documentation that came with your web browser for information. If your browser generates a root certificate error, first check that your operating system has the latest root certificates update applied. |
If you are successful browsing to your Vidyo server using HTTPS and you do not receive any browser errors, continue with the next procedure.
|
Note If you are unable to connect to your Vidyo server over HTTPS, see Secure your VidyoReplay system with SSL and HTTPS. |
Import or export certificates from the Advanced tab
You can also import or export certificate bundles using the Advanced tab.
Import certificates from a certificate bundle
|
Note You can import from .p7b and .pfx standard formats. |
To upload security settings from a certificate bundle:
- Log in to the VidyoReplay using the default Super account.
- Click the Settings link.
- Click the Security tab.
- Click the Advanced subtab.
- Click Import Certificates Bundle.
- In the Select bundle dialog box, click the Select File icon to locate the bundle file.
- If using the .pfx format, enter the password.
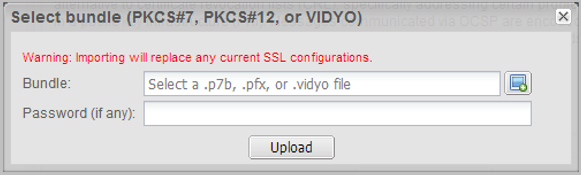
- Click Upload to upload the bundle file. If the upload is successful, the File Upload Success dialog box displays.
|
Note Depending on which bundle format you used, the appropriate Private Key, Server Certificate, Server CA Certificates, and Client Root CA Certificates data is loaded in to your Vidyo server. |
Export a security bundle containing your certificate configuration
To export a security bundle containing your certificate configuration:
- Log in to the VidyoReplay using the default Super account.
- Click the Settings link.
- Click the Security tab.
- Click the Advanced subtab.
- Click Export Security Bundle. Your browser then downloads security_bundle.pfx file to your computer which contains your security configuration for transfer or backup purposes.
Reset your security configuration to factory defaults
To reset your security configuration to the factory defaults:
- Log in to the VidyoReplay using the default Super account.
- Click the Settings link.
- Click the Security tab.
- Click the Advanced subtab.
- Click Reset Security. Your security configuration is then restored to the factory default settings.
Configure client CA certificates
Vidyo servers ship with a default trusted CA list and is enabled by default. This Advanced tab function allows you to enable or disable the use of this list.
To configure client CA certificates:
- Log in to the VidyoReplay using the default Super account.
- Click the Settings link.
- Click the Security tab.
- Click the Advanced subtab.
- Click Configure Client CA Certificates. The Configure Client CA Certificates dialog box displays.
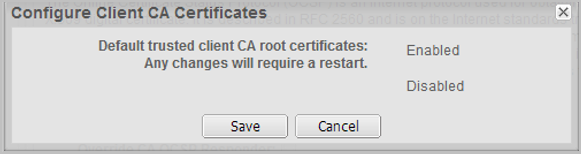
- Click Save. The VidyoReplay server reboots. After rebooting, your CA root certificates are applied.
Configure customizations
You can use the Customization tab to reset the logo and modify the default share link, about us, and support information for all tenants.
|
Note You can only access the Customization tab from a Standalone VidyoReplay or from the Active or Standby Controllers in a VidyoReplay cluster. |
Super Admins establish your company’s logo, and provide Share Link Email Body, Share Link Email Disclaimer, About Us, and Support field information using the VidyoPortal. Tenant Admins can refresh a logo updated on the VidyoPortal by the Super Admin. Also, Super Admins may allow Tenant Admins to override Share Link Email Body, Share Link Email Disclaimer, About Us, and Support field information.
To configure your customizations:
- Log in to the VidyoReplay using the default Super account.
- Click the Settings link.
- Click the Customization tab.
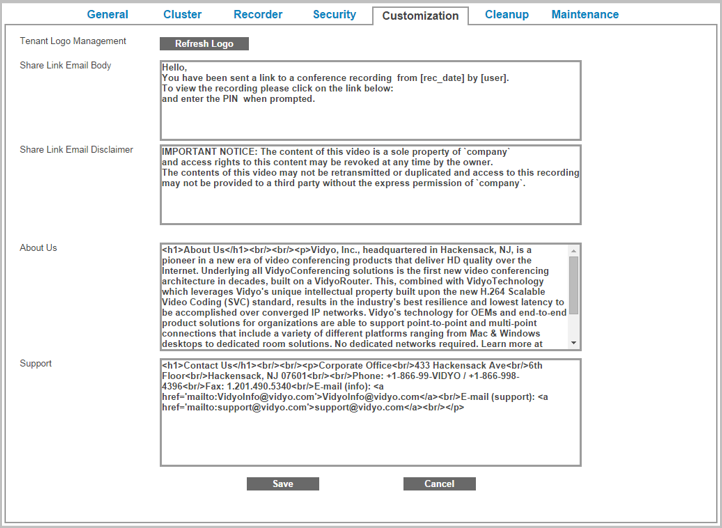
- Click Refresh Logo to update the logos on all tenants in your system with the one configured on your VidyoPortal in the Super Admin portal.
- In the Share Link Email Body field, change the default text, if desired.
- In the Share Link Email Disclaimer field, change the default text, if desired.
- In the About Us field, change the default text, if desired.
- In the Support field, change the default text, if desired.
- Click Save. A system notification indicates that the “Settings were updated successfully”.
|
Note This is an invitation to watch a pre-recorded webcast or other pre-recorded video from the VidyoReplay Library, not to participate in a live webcast. |
Clean up the VidyoReplay Library
The Cleanup tab allows the Super Admin to delete older video recordings to free up system space.
|
Note You can only access the Cluster tab from a Standalone VidyoReplay or from the Active Controller in a VidyoReplay cluster. |
To clean up the VidyoReplay Library:
- Log in to the VidyoReplay using the default Super account.
- Click the Settings link.
- Click the Cleanup tab.
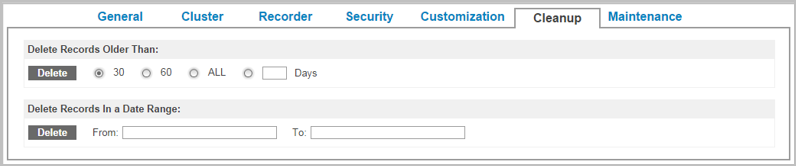
- To delete records older than a certain number of days, do the following:
- Select 30, 60, All, or enter a custom number of days.
- Click Delete. The Tenants and Locked Records confirmation dialog box displays.
- To delete recordings in a date range, do the following:
- Enter the first date in the From field.
- Enter the end date in the To field.
- Click Delete. The Tenants and Locked Records confirmation dialog box displays.
- In the Tenants drop-down, select All, Default, or a specific tenant for deletion.
- Select the Include Locked Records checkbox to delete the locked videos from the ones chosen.
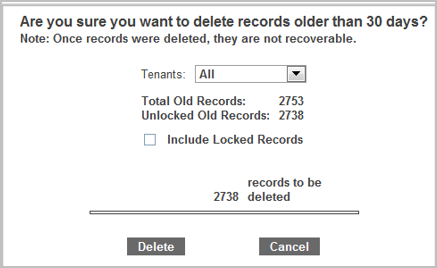
- Click Delete.
Maintain your VidyoReplay
In the Maintenance tab, you can upgrade, restart, and download logs from your VidyoReplay. In version 19.1.0 and later, you can also upgrade your VidyoReplay quickly and easily without first having to switch your system into Maintenance mode.
|
Note To move nodes into Maintenance mode, see View VidyoReplay component statuses. |
Upgrade your VidyoReplay
If you are upgrading to VidyoReplay version 22.3.0 or later (which has the multiple Super users feature), follow the instructions in Upgrade your VidyoReplay cluster to version 22.3.0 or later.
Upgrade your VidyoReplay cluster
To upgrade your VidyoReplay cluster:
- Log in to the VidyoReplay using the default Super account.
- Click the Settings link.
- Click the Maintenance tab. The Upgrade subtab displays by default.
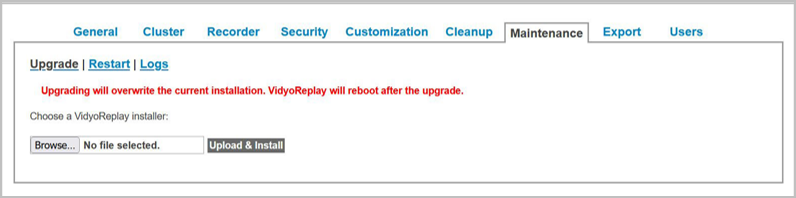
- Click Choose File.
- Locate the .vidyo file on your computer or network location.
- Click Open.
- Click Upload & Install.
Upgrade your VidyoReplay cluster to version 22.3.0 or later
VidyoReplay version 22.3.0 or later offers the ability to have multiple Super users. Because of this feature, the procedure for upgrading is slightly different due to the database changes required when there are multiple Super users.
Before performing this procedure, be sure to review the following:
- For information about multiple Super users, see Configure multiple Super users.
- For information about clusters, see VidyoReplay clusters and Configure clusters.
- For information about how to turn Maintenance mode on or off, see View VidyoReplay component statuses.
To upgrade a VidyoReplay cluster to version 22.3.0 or later:
- Upgrade all the VidyoReplay recording nodes in the cluster as described in the previous section, Upgrade your VidyoReplay.
- Log in to the Active Controller (Controller 1) and put the Standby Controller (Controller 2) in Maintenance mode.
- Log out of the Active Controller (Controller 1).
- Log in to the Standby Controller (Controller 2) and perform the upgrade. When the upgrade completes, the system reboots.
- Log in to the Active Controller (Controller 1) and take the Standby Controller (Controller 2) out of Maintenance mode.
- Put the Active Controller (Controller 1) in Maintenance mode and perform the upgrade. When the upgrade completes, this Controller (Controller 1) will become the Standby Controller.
- Log in to Controller 2 (which is now the Active Controller) and take Controller 1 (which is now the Standby Controller) out of Maintenance mode.
- Log out of Controller 2. You can now log in via the UI to any Controller.
|
Note At this point in the procedure, login via the UI is not possible. |
|
Note At this point in the procedure, login via the UI is not possible. |
Restart or shut down your VidyoReplay
To restart your VidyoReplay you no longer need to take it out of Maintenance mode.
To restart or shutdown VidyoReplay:
- Log in to the VidyoReplay using the default Super account.
- Click the Settings link.
- Click the Maintenance tab. The Upgrade subtab displays by default.
- Click the Restart link.
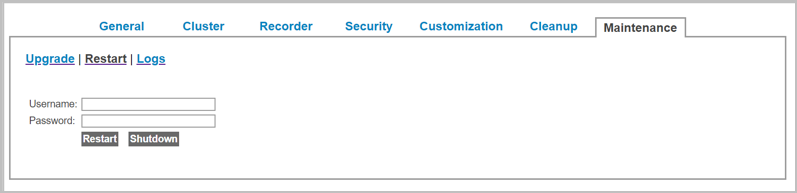
- Enter a username and password, and then click Restart. The VidyoReplay system will restart.
View VidyoReplay Recorder statuses and download logs
The Status link allows you to capture logs of recordings occurring on your VidyoReplay. You can download and view logs for debugging analysis and view the statistics of a single recording. You can also view the data directly on the VidyoReplay if desired.
To view VidyoReplay Recorder statuses and to download logs:
- Log in to the VidyoReplay using the default Super account.
- Click the Settings link.
- Click the Maintenance tab. The Upgrade subtab displays by default.
- Click the Download Logs link.

- Click Download Logs. A dialog box asks you if you to confirm that you want to download the logs as it may take some time.
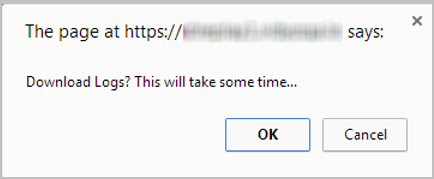
- Click OK. Your browser downloads a .tar.gz file containing your log file for debugging analysis.
Configure multiple Super users
With VidyoReplay version 22.3.0 and later, you can configure multiple Super users. This feature also:
- Enables you to add users with Super permissions as well as edit and delete them.
- Allows you to further strengthen the installation by maintaining more strict control over passwords for users with Super permissions.
|
Note Due to database changes required when there are multiple Super users, the procedure for upgrading an existing VidyoReplay cluster is different starting with VidyoReplay version 22.3.0. See the Upgrade your VidyoReplay cluster to version 22.3.0 or later section. |
Add a Super user
To add a Super User:
- Log in to the VidyoReplay using the default Super account.
- Click the Settings link.
- Click the Users tab.
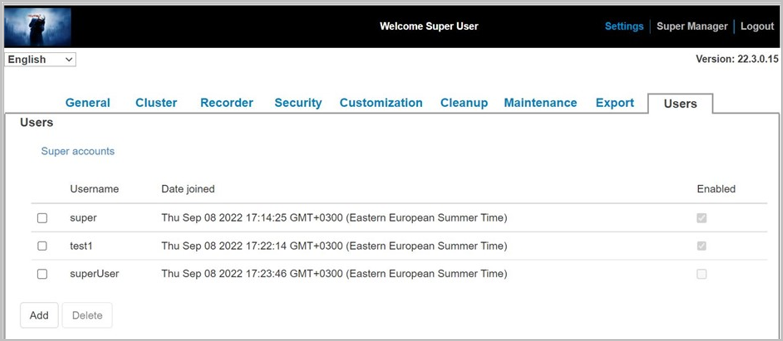
- Click Add. The Add Super User Account pop-up appears.
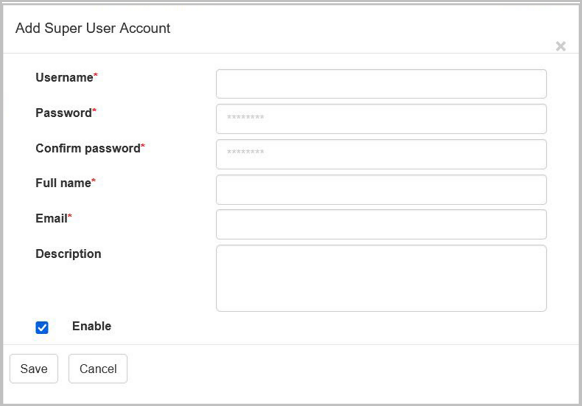
- Enter the username, password, and other information about the new Super user. All fields are mandatory except for the Description field. By default, the new user is enabled; therefore, the Enable checkbox is already selected.
- Click Save. The new Super user is added to the database and is displayed in the list of users on the Users tab.
Edit a Super user
To edit a Super user:
- Log in to the VidyoReplay using the default Super account.
- Click the Settings link.
- Click the Users tab.
- Hover your cursor over the username of the user you want to edit. The cursor changes from an arrow to a hand when you hover over the username.
- Click to select the user. The Update Super User Account pop-up appears.
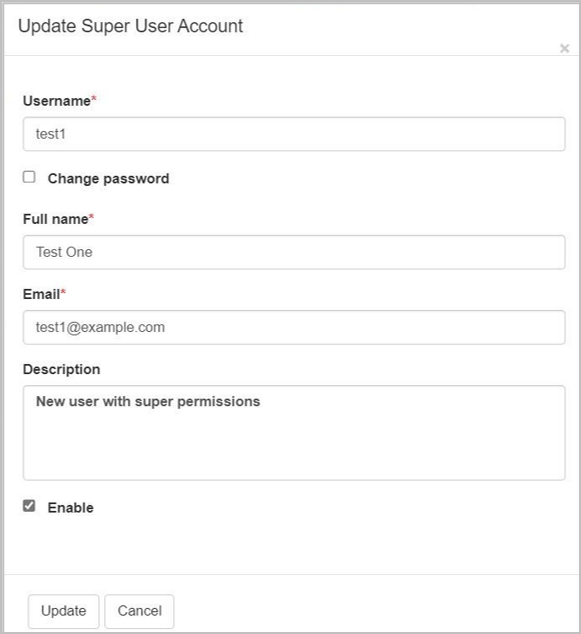
- Edit the username, full name, and other information about the Super user.
- If you select the Change password checkbox, the pop-up redisplays with these additional fields: Current user password, Password, and Confirm password.
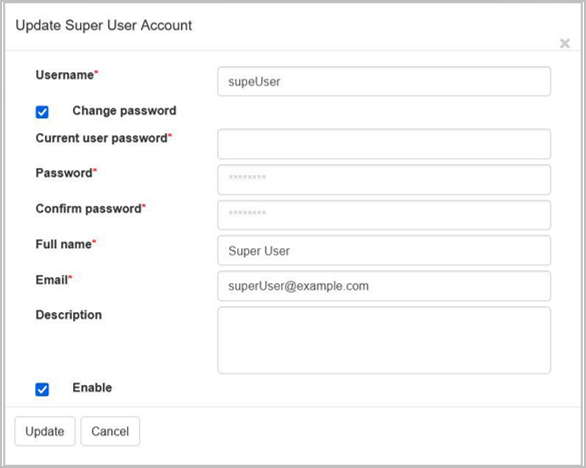
- Enter the user’s current password in the Current user password field. If you are changing your own password, enter the password that you want to change. If you are helping another Super user who has forgotten their password to reset it, enter your current password.
- Enter the new password for the user in the Password field.
- Enter the new password again in the Confirm password field.
- Click Save. The changes are stored in the database. If a user’s password was changed, that user will be able to log in with the new password (as long as that user is enabled).
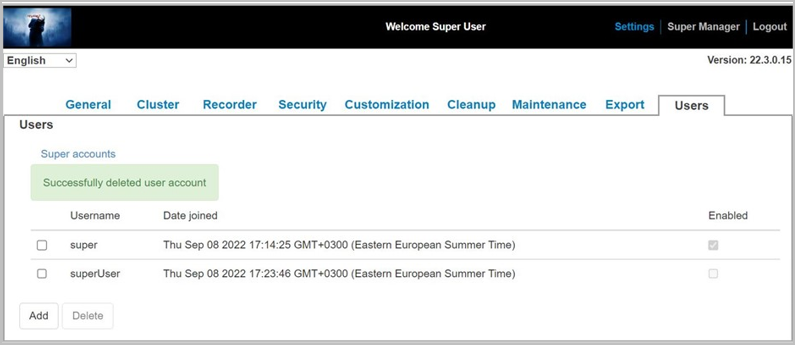
Delete a Super user
To delete a Super user:
- Log in to the VidyoReplay using the default Super account.
- Click the Settings link.
- Click the Users tab.
- Select the checkbox next to the name of the Super user that you want to delete.
- Click Delete. The Users page refreshes and indicates that the user account was successfully deleted.