3. Configure the system using the Admin UI
This chapter describes how to configure the VidyoConnect Room or VidyoRoom using the Admin user interface (Admin UI).
After you first boot up the VidyoConnect Room or VidyoRoom, the Home page typically appears. If you have more than one display, you will see the IP address of the system on one of the displays. You use this IP address to access the Admin UI. Alternatively, you can go to the Settings page of the On-Screen UI to obtain the IP address.
|
Note If you need the IP address of the system once you are already logged into the Admin UI, click the Identify button on the Display Layout page. You can also use the CTRL + I keyboard command to get the IP address. |
Log in
To log in to the Admin UI:
- Enter the IP address or FQDN of the VidyoConnect Room or VidyoRoom in the URL bar of your web browser: [https://IP address or FQDN]
- The Admin UI Login page appears.

- Enter the default log in credentials:
- Username: admin
- Password: password
- Click Login. The rest of the Admin UI tabs display.
|
Note Starting with version 23.1.0, when certificates are available, the application listens only on port 443; therefore, you must explicitly enter https://. When certificates are not available, the application will fall back to listening on port 80; in such cases, you must explicitly enter http://. |
Log out
If you are already logged in, the Login tab enables you to log out of the VidyoConnect Room or VidyoRoom.
To log out of the Admin UI:
- Click the Login tab.
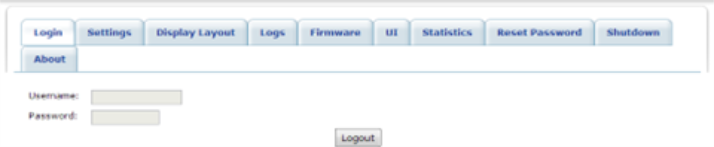
- Click Logout. All the tabs except for the Login tab disappear. You can then login again or exit your browser.
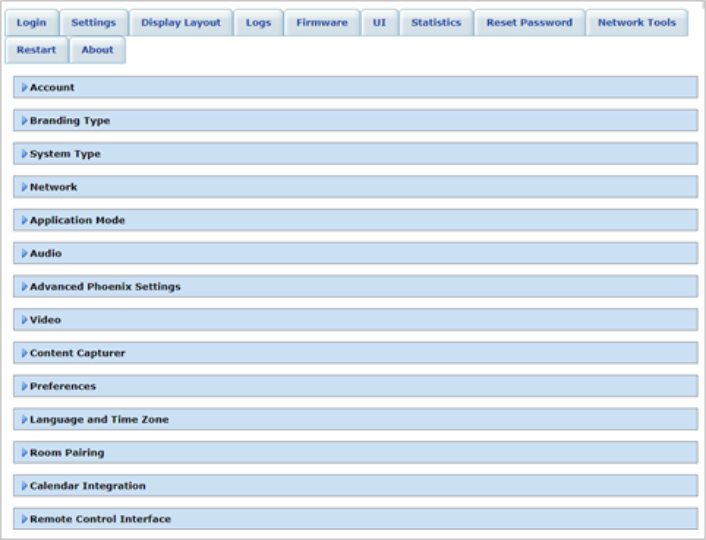
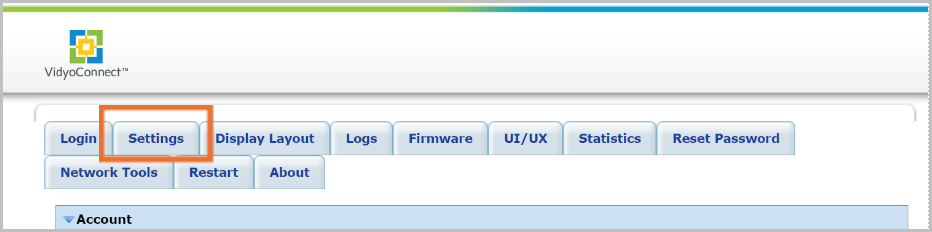
Configure the settings
From the Settings tab, you can configure various VidyoConnect Room or VidyoRoom settings and options, including VidyoPortal account settings, branded types, system types, network settings, audio and video preferences, and other options. You should configure these settings immediately after logging in to the Admin UI for the first time.
After you make changes to the settings on the Settings tab, click the Save button. Unless otherwise stated, you do not have to reboot the VidyoConnect Room or VidyoRoom in order for the settings to be applied.
Configure the account settings
To configure the account settings:
- Click the Settings tab.
- If necessary, click the blue triangle next to the word Account to view the account settings.
- Enter the VidyoPortal FQDN in the VidyoPortal field.
- Enter your VidyoPortal username (as created on the VidyoPortal) in the Username field.
- Enter your VidyoPortal password (as created on the VidyoPortal) in the Password field.
- Click Apply.
|
Note If a secured VidyoPortal is being used and port 80 is not open, you must explicitly add https:// to the VidyoPortal FQDN; otherwise, the VidyoConnect Room or VidyoRoom will be unable to log in to the VidyoPortal. |
Configure the branding type (VidyoConnect Room only)
In version 20.2.0 and later, the VidyoConnect Room UI comes with a default standard Home Screen background page (.jpg file) for the two system types (General Collaboration and Healthcare), as well as many screens that are branded with the “Vidyo” name and logo. If you prefer to remove the “Vidyo” name and logos from all the different system application screens, you can use this page to do so.
To upload your own customized logos, screen saver, home screen, and help page, see Upload UI backgrounds.
To configure the branding type:
- Click the Settings tab.
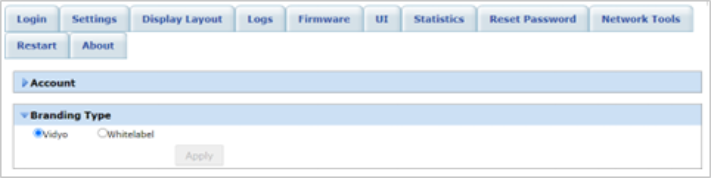
- If necessary, click the blue triangle next to the word Branding Type to view the branding types.
- Select one of the following:
- If you want to display the Vidyo name and logos in the VidyoConnect Room UI, click Vidyo.
- If you want to remove all the Vidyo names and logos from the VidyoConnect Room UI, click Whitelabel.
- Click Apply.
Configure the system type (VidyoConnect Room only)
For VidyoConnect Room, you must configure the system type of the UI as either a Healthcare or General Collaboration video experience. If you choose the Healthcare system type, you must also select a Healthcare system sub-type as either a Patient Room (only for patients) or a Medical Cart (only for healthcare/medical personnel).
Vidyo’s telehealth solution supports the Thinklabs One digital stethoscope, which enables a remote physician to hear auscultations during a visit, as well as the JEDMED Horus Scope, which is a hand-held video system that uses interchangeable attachments to take still images or videos for multi-discipline medical applications.
To configure the system type:
- Click the Settings tab.
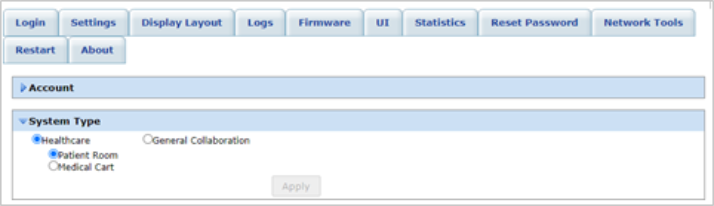
- If necessary, click the blue triangle next to the word System Type to view the system types.
- Select one of the following:
- If you want to configure the UI as a Healthcare system type, click Healthcare. If you select this option, you must further select one of the following:
- Patient Room: Allows the user access to limited functionality and fewer pages, such as the Home, Settings, and Help pages.
- Medical Cart: Allows the user full access to all functionality and all pages, such as the Contacts, Search, and Settings pages, and more.
- If you want to configure the UI as a General Collaboration system type (which is the default), click General Collaboration. (Note: This feature is available starting with version 20.3.0.)
- Click Apply. A pop-up displays the "An application restart is required to configure the right system type!” message.
- Click Ok or Cancel. The application will restart when changing the system type; however, your computer will not restart.
Configure the network settings
|
Note If you are running VidyoConnect Room SE as a Standard User, the Network settings will be disabled since changing Network settings requires an Administrator account. In addition, if you are running in Application mode, the Network settings will be disabled whether you are a Standard User or an Administrator. |
When configuring the network settings as described in this section, you should also consider the following:
- VidyoConnect Room and VidyoRoom are automatically configured to respond to Wake-on-LAN (WoL) packet requests. Review your current firewall settings and make sure they permit WoL requests over ports 7 and 9.
- To ensure proper functioning of the system and to support all of its features, the following ports are opened on the VidyoConnect Room or VidyoRoom side: 8090, 60777, and 63459. Please ensure that no firewall or other restriction is blocking these ports in your network. In addition:
- If you are using VidyoConnect Room or VidyoConnect Room SE and certificates are available, the application will listen only on port 443; therefore, you must ensure that port 443 is not blocked.
- In all other cases, either port 80 or port 443 can be blocked, but they cannot both be blocked at the same time.
To configure the network settings:
- Click the Settings tab.
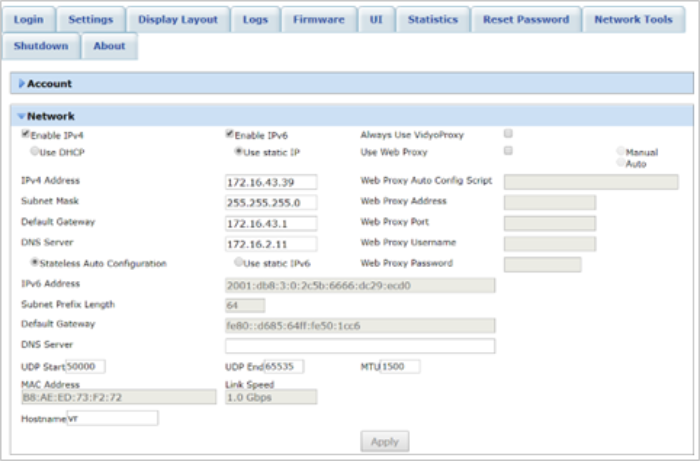
- If necessary, click the blue triangle next to the word Network to view the network settings.
- Select the Enable IPv4 checkbox, the Enable IPv6 checkbox, or both if your network uses IPv4 and/or IPv6.
- Click either the Use DHCP radio button, or if you selected the Enable IPv4 checkbox in the previous step, click the Use static IP radio button. If you click the Use static IP radio button, you must enter the following information:
- IPv4 Address
- Subnet Mask
- Default Gateway
- Primary DNS Server
- Click either the Stateless Auto Configuration radio button, or if you selected the Enable IPv6 checkbox, click the Use static IPv6 radio button box. With either selection, you must enter the primary DNS Server. However, if you click the Use static IPv6 checkbox, you must also enter the following information:
- IPv6 Address
- Subnet Prefix Length
- Default Gateway
- Enter values in the UDP Start, UDP End, and MTU (Maximum Transmission Unit) fields if needed. The MAC Address and Link Speed fields are read only and cannot be changed.
- Enter the machine’s hostname in the Hostname field. You can change the hostname of the VidyoConnect Room or VidyoRoom machine if you prefer to monitor and track the system by its hostname and not its IP. This field is disabled for VidyoRoom SE models.
- Select the Always Use VidyoProxy checkbox if you want the VidyoConnect Room or VidyoRoom to connect via the assigned VidyoProxy. A VidyoProxy routes all data signals through a single port in order to traverse a firewall.
- Select the Use Web Proxy checkbox if you want the VidyoConnect Room or VidyoRoom to connect via the assigned Web Proxy.
- Select the Manual radio button or Auto radio button, and then enter the following information as needed:
- Web Proxy Auto Config Script (only required when Auto has been selected).
- Web Proxy Address (only required when Manual has been selected).
- Web Proxy Port (only required when Manual has been selected).
- Web Proxy Username and Web Proxy Password must be entered if you enter a Web Proxy address that requires authentication.
- Click Apply.
Configure the application mode
|
Note This section only applies to VidyoConnect Room SE and VidyoRoom SE customers using Windows 10. In addition, if you are running VidyoConnect Room SE as a Standard User, the Application Mode settings will be disabled since changing the Application Mode settings requires an Administrator account. |
When running Windows 10 with VidyoConnect Room SE or VidyoRoom SE, you can use the Admin UI Settings tab to set the Application mode to the following:
- Kiosk — prevents the VidyoConnect Room SE or VidyoRoom SE application from modifying the OS and allows users to exit the app from the On-Screen UI. This mode is the default.
- Appliance — locks down the system by preventing Windows updates from automatically occurring, disables certain Windows notifications, creates inbound firewall rules for sharing, disables some special keys on the keyboard, hides the taskbar, and affects other functionality as described in the table later in this section.
- Application — enables you to run VidyoConnect Room SE as an application (this mode is not available for VidyoRoom SE). When in this mode, the VidyoConnect Room SE functions like other apps do. For example, you can minimize and maximize the VidyoConnect Room SE application, move it behind other apps, view the taskbar, work in other apps using the mouse and keys, and more.
To configure the Application mode for Windows 10:
- Click the Settings tab.
- If necessary, click the blue triangle next to the word Application Mode to view the Application Mode settings.
- Select the Kiosk, Appliance, or Application radio button.
- Click one of the following:
- Apply and Restart Machine – This option is available for all three modes; however, there are different responses based on the mode you select:
- Kiosk or Application — If you select the Kiosk or Application radio button and then select Apply and Restart Machine, your machine restarts with the application running in the mode you selected.
- Appliance — If you select the Appliance radio button and then select Apply and Restart Machine, your machine restarts in Appliance mode. For impacted functions and system responses, see Appliance mode below.
- Restart Application – This option is available for all three modes. When you select this option, the application restarts in the currently used mode. Note that if you want to change modes, you must click Apply and Restart Machine; clicking Restart Application restarts the application but it does not change the mode.
- Exit Application – This option is available for all three modes; however, there are different responses based on the mode you select:
- Kiosk — If you select Exit Application when in Kiosk mode, you exit the VidyoConnect Room SE or VidyoRoom SE application, and the computer then becomes available for other uses. On reboot, the application restarts in Kiosk mode.
- Appliance — If you select Exit Application when in Appliance mode, you exit the VidyoConnect Room SE or VidyoRoom SE application, and the computer then unlocks and becomes available for other uses. On reboot, the application locks again and restarts in Appliance mode.
- Appliance — If you select Exit Application when in Appliance mode, you exit the VidyoConnect Room SE or VidyoRoom SE application, and the computer then unlocks and becomes available for other uses. On reboot, the application locks again and restarts in Appliance mode.
Appliance mode
If you select Appliance mode and click Apply and Restart Machine, certain functions will be set or disabled. The table below outlines the impacted functions and system responses.
| Appliance mode impacted function | Appliance mode system response |
| Task Manager | This function will be disabled and Ctrl + Alt + Del will not work to access the Task Manager. |
| Notification Center | The pop-up from the Notification Center will not display. |
| Disable Push Notification | The Windows pop-up for push notification will not display. |
| User Account Control | The administrator consent prompt will be disabled when starting the application in Appliance mode. |
| Sound Effects | All sound notifications will be disabled, such as calendar sound notifications. |
| Taskbar | The taskbar will be hidden. |
| Inbound Firewall Rules | You cannot create inbound firewall rules, such as file and printer sharing. |
| Windows Auto Update | Automatic Window updates will not occur in Appliance mode; therefore, your system will not be interrupted during calls. You need to manually update Windows as per your company policy. |
| Display Scaling | The display will be set to 100%. |
| Special Keys on Keyboard |
The following keys will be disabled in Appliance mode: // Left Alt // F7 // Prev Track // Next Track // Mute // Calculator // Play/Pause // Stop // Eject/Audio Preset // Vol Down // Vol Up // Web: Home // Right Alt // Left Win Key // Right Win Key // Application Menu // Power // Sleep // Web: Search // Web: Favorites // Web: Refresh // Web: Stop // Web: Forward // Web: Back // My Computer // Web: Mail // Web: Media |
Configure the audio settings
To configure the audio settings:
- Click the Settings tab.
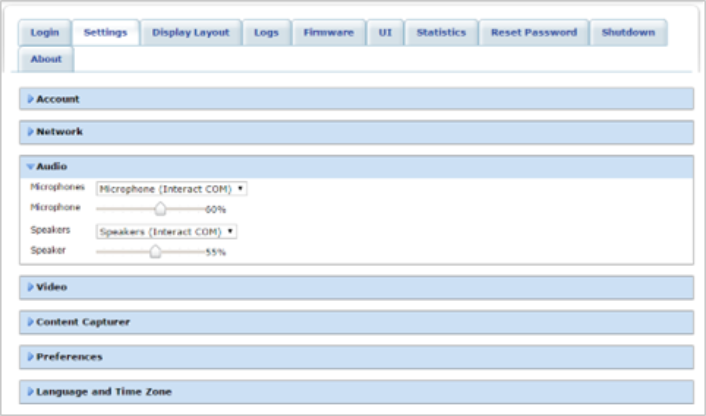
- If necessary, click the blue triangle next to the word Audio to view the audio.

- Select the microphone device that the VidyoConnect Room or VidyoRoom will use from the Microphones drop-down.
- Slide the Microphone slider bar left or right as needed to decrease or increase the microphone volume.
- If you have a stethoscope connected to the VidyoConnect Room or VidyoRoom, select the device from the Stethoscopes drop-down. (This feature is only available in version 19.2.0 and later.)
- Select the speaker device that the VidyoConnect Room or VidyoRoom will use from the Speakers drop-down.
- Slide the Speaker slider bar left or right as needed to decrease or increase the speaker volume.
Configure the advanced Phoenix settings
Up-to-date firmware for the Phoenix PowerHub and Quattro is needed to support this functionality.
|
Note The settings described in this section are not applicable to VidyoRoom HD-230 Rev A and Rev B or to VidyoRoom SE running on any hardware. |
To configure the advanced Phoenix settings:
- Click the Settings tab.
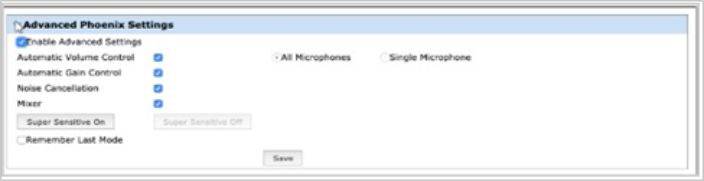
- Click the blue triangle next to the word Advanced Phoenix Settings to view the advanced Phoenix settings if necessary. By default, Phoenix Super Sensitive Mode is disabled, thereby enabling the Automatic Volume Control, Automatic Gain Control, Noise Cancellation, and Mixer settings. Deselecting the Automatic Gain Control, Noise Cancellation, and Mixer checkboxes enables Phoenix Super Sensitive Mode. If you do not want to retain these default settings, then you can always make configuration changes to meet your specific needs.
- Deselect the Automatic Volume Control checkbox if you do not want to adjust the volume or loudness of the audio signal.
- Deselect the Automatic Gain Control checkbox if you do not want to automatically control the gain of the audio signal.
- Deselect the Noise Cancellation checkbox if you do not want to reduce background noise.
- Deselect the Mixer checkbox if you do not want to route or change the volume level and dynamics of the audio signal.
- Click the Super Sensitive On button if you want the audio to be received in its native state.
- Click the Super Sensitive Off button if you want the audio to be processed by the Phoenix Quattro device. The remote control API can still be used to enable or disable Phoenix Super Sensitive Mode. Phoenix Super Sensitive Mode remains in effect until the end of the call. Since Phoenix Super Sensitive Mode is automatically disabled by default, it has to be re-enabled at the beginning of each call.
- Select the All Microphones radio button if you want audio to be heard from all microphones on the Phoenix Quattro device
- Select the Single Microphone radio button if you want audio to be heard from only one microphone on the Phoenix Quattro device. The Admin UI does not allow you to select a specific microphone. The second microphone inside the Phoenix Quattro device is selected as the single microphone by default when the Single Microphone radio button is selected.
- Select the Remember Last Mode checkbox if you would like the next call to start with the last user setting. If Remember Last Mode is disabled, all new calls start with the Super Sensitive mode disabled. (This feature is only available in version 19.2.0 and later.)
- Click the Save button.
- If Write Protection Mode is enabled, Phoenix Super Sensitive Mode will automatically be disabled after clicking the Save button. After the VidyoConnect Room or VidyoRoom system is rebooted, Phoenix Super Sensitive Mode will revert to its previous state prior to Write Protection Mode being enabled.
|
Caution You should only adjust the advanced Phoenix settings if you have the knowledge and expertise to make configuration changes. Otherwise, consult an expert or retain the default system configurations. |
|
Note If the Phoenix Quattro device is connected to a Phoenix PowerHub, then the All Microphones and Single Microphone radio buttons will not display. |
|
Note Selecting the Single Microphone radio button is only allowed when the Phoenix Quattro device is plugged directly into the VidyoRoom system instead of being daisy chained via the Power Hub. |
|
Note Changes made here are not applied to the Phoenix device until the Save button is clicked. |
Configure the video settings
To configure the video settings:
- Click the Settings tab.
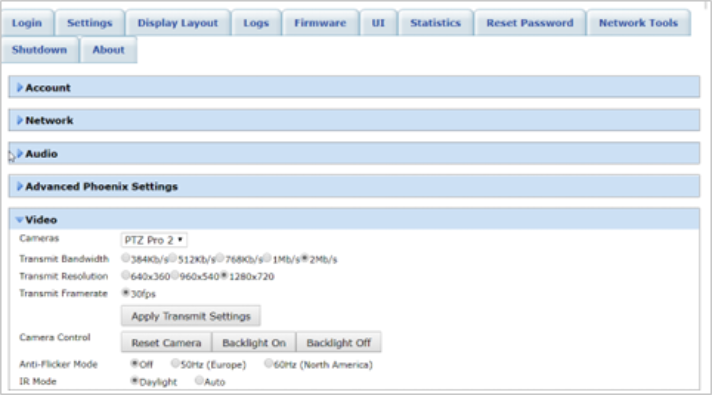
- If necessary, click the blue triangle next to the word Video to view the video settings.
- Select the camera that the VidyoConnect Room or VidyoRoom will use from the Cameras drop-down.
- Select one of the Transmit Bandwidth radio buttons to set the maximum video transmit bandwidth. The options available depend upon the VidyoConnect Room or VidyoRoom model.
- Select one of the Transmit Resolution radio buttons to set the video transmit resolution. The options available depend upon which Transmit Bandwidth you selected.
- Select one of the Transmit Framerate radio buttons to set the frames per second of the camera. The options available depend upon which Transmit Bandwidth you selected.
- Click Apply Transmit Settings.
- Do any of the following for Camera Control if necessary:
- Click Reset Camera to reset the camera.
- Click Backlight On or Backlight Off as needed to compensate for backlighting.
- Select one of the following Anti-Flicker Mode radio buttons:
- Select the 50Hz radio button if your VidyoConnect Room or VidyoRoom system is located in Europe.
- Select the 60Hz radio button if your system is located in North America.
- Select the Off radio button to turn Anti-Flicker Mode off.
- Select the Auto-reboot if INOGENI is not detected checkbox if you have a VidyoRoom HD-40 Revision B system with an INOGENI device.
- Select one of the following IR Mode radio buttons:
- Select the Daylight radio button for daytime use.
- Select the Auto radio button for nighttime use. This is useful in cases where you want to see in low-light situations, such as when you need to monitor a patient in their room during the night.
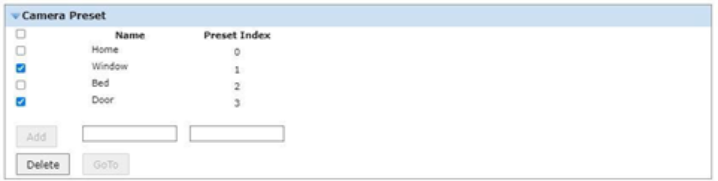
Configure the camera presets
Camera presets allow you to store specific camera settings, such as the camera’s position and PTZ settings, so that you can quickly move the camera to those stored positions. For example, you may want the camera on a VidyoConnect Room system in a patient's room to point at the bed, the monitor, and the doorway.
This feature enables you to configure and name up to 16 presets per VISCA camera (numbered from 0 to 15).
To use this feature, you must have:
- A VISCA camera
- VidyoConnect Room or VidyoRoom version 22.3.0 or later
- VidyoPortal and VidyoRouter version 22.3.1 or later
To configure camera presets:
- Click the Settings tab.
- If necessary, click the blue triangle next to the word Camera Preset to view the camera preset settings. The camera preset named “Home” with Preset Index 0 automatically appears in the list, and you do not have to set it up. This preset points the camera to the center position.
- To add a new preset, move the camera to the position you want, enter a Name and Preset Index for the preset, and then click Add. For example, if you move the camera so that it points at a window, you can use “Window” as the Name and use 1 as the Preset Index.You can use the numbers from 0 through 15 as the Preset Index numbers. If you select a number outside of that range or if you select a Preset Index that’s already being used, an error message appears.
- To move the camera to a preset position, select the checkbox to the left of the preset you want to move the camera to and then click GoTo. For example, to move the camera so that it points at the patient’s bed, select the checkbox near the preset named “Bed” and then click GoTo.
- To delete a preset, select the checkbox to the left of the preset you want to delete and then click Delete.
- If you want to delete more than one preset at a time, simply click the checkbox to the left of each preset you want to delete and then click Delete.
Configure the content capturer
This feature enables you to play local audio and video content when not in a call at native resolution and frame rate.
To configure the content capturer:
- Click the Settings tab.
- Click the blue triangle next to the words Content Capturer to view the content capturer settings.

- From the Devices drop-down, select the content capturing device that the system will use, or select None if no content capturing device will be used. The options available depend upon which content capturing device you selected from the Devices drop-down. In addition, depending upon which device you select, the other fields in the Content Capturer section may or may not display.
- Select one of the Transmit Bandwidth radio buttons to set the maximum transmit bandwidth of the device. For the best audio/video projection experience, select 4Mb/s if available.
- Select one of the Transmit Resolution radio buttons to set the transmit resolution of the device. The available options depend upon which Transmit Bandwidth you selected.
- Select one of the Capture Framerate radio buttons to set the frames per second.
- If applicable, select the Enable Horus scope Operation checkbox and then select a camera from the Enable Horus scope Operation drop-down. This option is only available in version 19.2.0 and later.
- Click Apply Transmit Settings.
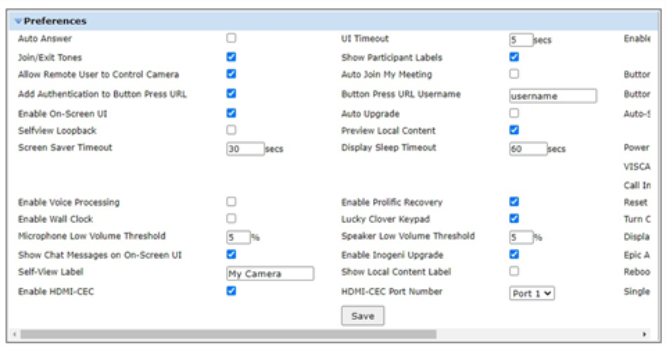
Configure preferences
To configure preferences:
- Click the Settings tab.
- Version 21.2.0 — left side of Preferences:
- Version 21.2.0 — right side of Preferences:
- If necessary, click the blue triangle next to the word Preferences to view the preference settings.
- Select the Auto Answer checkbox if you want the VidyoConnect Room (Modern UI) to automatically answer incoming calls in 5 seconds (default value).
- If you want the call answered quicker or you want to increase the seconds before answering, enter the new value in the Auto Answer field.
- If you have a VidyoRoom Classic UI (older system), you can select the Auto Answer checkbox, but you cannot configure the seconds.
- Select the Join/Exit Tones checkbox if you want to hear a tone whenever someone joins or exits a conference.
- Select the Allow Remote User to Control Camera checkbox if you want to allow remote users to control your camera. For this option to work, the camera must be capable of pan, tilt, and zoom.
- Select the Enable On-Screen UI checkbox if you want the VidyoConnect Room or VidyoRoom to display the on-screen user interface.
- Select the Selfview Loopback checkbox if you want to view the loopback of your self-view from the VidyoRouter (as opposed to your local self-view) when you are the only one in the conference.
- Enter the number of seconds after which the screen saver will display in the Screen Saver Timeout field or enter 0 if you do not want the screen saver to display.
- Select the RIP Listener Service checkbox if you want to enable the RIP listener service. (Not available for VidyoRoom SE.) Some corporate networks may have firewall rules that cause the VidyoConnect Room or VidyoRoom system to scan for all available routes. As a result, the VidyoConnect Rooms or VidyoRooms can take up to five minutes to log into the VidyoPortal after reboot. For such environments, you can disable the RIP Listener Service to allow the VidyoConnect Room or VidyoRoom to log into the VidyoPortal as soon as it is up after reboot.
- Select the Enable Voice Processing checkbox if your VidyoConnect Room or VidyoRoom audio device has audio quality issues and external voice processing is needed. Once you determine the correct setting for Enable Voice Processing, test the audio device with this new setting. (If your audio is already working well, you do not need to select Enable Voice Processing.)
- Select the Enable Wall Clock checkbox if you want a clock to be displayed at the bottom center of the screen during video calls.
- Select the SNMP checkbox if you want to enable the SNMP interface. (Not available for VidyoRoom SE version 20.2.0 and later.) When enabled, a third party can use the SNMP protocol to configure and control VidyoConnect Room or VidyoRoom with their UI.
- Enter a threshold percentage value in the Microphone Low Volume Threshold field for the Microphone volume. The default is 5%. If the Microphone volume is less than the configured, a notification will always display in the UI (for VidyoConnect Room only).
- Select the Show Chat Messages on On-Screen UI checkbox if you do want chat messages to display on the On-Screen UI. This option is available only for VidyoConnect Room version 20.2.0 and later.
- In the Self-View Label field, enter the label you want to display on your self-view tile. If you selected a UI language other than English and you want to see your label displayed in that language, enter translated text into this field.
- Select the Enable HDMI-CEC checkbox if you want to use VidyoConnect Room or VidyoRoom to switch your TVs that are connected using a Pulse-Eight USB-CEC adapter on and off. This will work for most TV models.
- By default, the HDMI-CEC feature is enabled and Port 1 is selected. If your Room System is connected to any other HDMI port, change the HDMI port on the TV to Port 1 or change the HDMI-CEC Port Number field to the connected HDMI port on the TV (For example: Port 2).
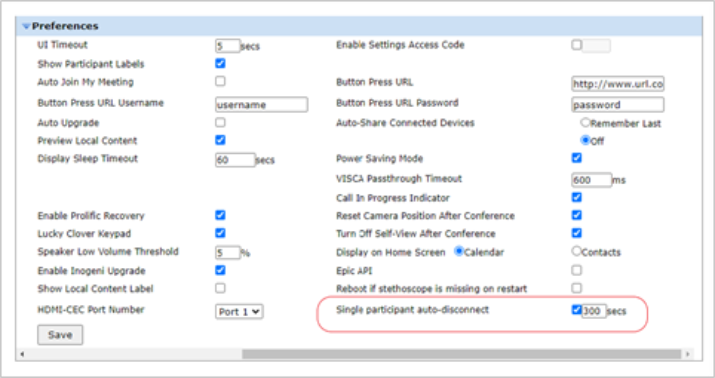
- To automatically disconnect a VidyoConnect Room from a single party conference after a specified time, select the Single participant auto disconnect checkbox and enter duration (for example, 300 secs). When auto-disconnect is enabled, the auto-disconnect timer starts as soon as the last participant leaves the conference IF the VidyoConnect Room is the only participant remaining in the call. Once the specified time is reached, the VidyoConnect Room automatically disconnects from the conference.
- In the UI Timeout field, enter a number from 1-30 to specify the number of seconds after which the UI will return to the home page when there is no activity. For example, if you enter 10, the amount of time before the UI returns to the home page is 10. The default value is 5. (Available only for VidyoConnect Room version 20.2.0 and later.).
- Select the Show Participant Labels checkbox if you want to display the participants’ names on-screen during conferences.
- Select the Auto Join My Meeting checkbox if you want to automatically join your room whenever you log in.
- Select the Auto Upgrade checkbox if you want to automatically upgrade your VidyoConnect Room or VidyoRoom whenever a new version is available on the VidyoPortal.
- Select the Preview Local Content checkbox if you want to preview locally shared content before sharing it with other sites.
- Enter the number of seconds in the Display Sleep Timeout field and select the Power Saving Mode checkbox if you want the displays to go to sleep after a specified number of seconds of inactivity. If you do not want the displays to go to sleep, deselect the Power Saving Mode checkbox.
- Once the displays go into Power Saving Mode, you can wake them up by pressing any button on the remote control or by joining a room using the VidyoControl app. Incoming calls will also wake up the displays.
- Select the Enable Prolific Recovery checkbox if you want your VidyoConnect Room or VidyoRoom system to automatically reboot in order to recover the camera when an issue occurs with a VISCA cable.
- Select the Lucky Clover Keypad checkbox if you want to use the Lucky Clover remote control keypad, which is an alphanumeric character input method for your VidyoConnect Room or VidyoRoom infrared remote control.
- Enter a threshold percentage value using the Speaker Low Volume Threshold field for the speaker volume. The default is 5%. If the speaker volume is less than the configured value, a notification will always display in the UI. (Available only for VidyoConnect Room UI.)
- Select the Enable Inogeni Upgrade if you want your system to upgrade to the firmware version provided in the VidyoConnect Room or VidyoRoom software. If you do not want the Inogeni upgraded with the firmware version that comes with the VidyoConnect Room or VidyoRoom software package, deselect this checkbox.
- Select the Show Local Content Label checkbox if you want to see a label when content is being shared. If you don’t want a label to be shown, deselect this checkbox.
- In the HDMI-CEC Port Number field:
- If you have selected the Enable HDMI-CEC checkbox because you want to use VidyoConnect Room or VidyoRoom to switch your TVs that are connected using a Pulse-Eight USB-CEC adapter on and off, use the HDMI-CEC Port Number drop-down to select the port to which your Room System is connected. For more information, see step 15.
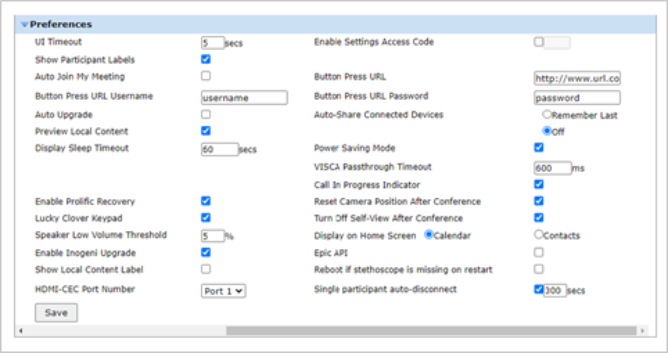
- Select the Disable Ringtone checkbox if you do not want an audible ringtone.
- Select the Enable Settings Access Code checkbox and then enter an alphanumeric access code in the field if you want to set an access code so that only those people who know the code can make change. From the VidyoConnect Room UI, the Settings page will open without the access code, but the Settings > Network page and Settings > Reboot page will require the user to enter an access code.
- If you are using an older VidyoRoom UI, the user will need to provide the access code to access the Settings screen itself.
- Select the Phoenix Super Sensitive Mode checkbox if you want the audio to be received in its native state; otherwise, leave the Phoenix Super Sensitive Mode checkbox unselected if you want the audio to be processed by the Phoenix device.
- Leave the Button Press URL field blank in most cases. However, if you have a custom application that uses a dedicated button to activate a URL, enter the URL in the Button Press URL field and select a Method, POST, or GET from the drop-down to use to invoke the request. The default method is POST.
- Select one of the following Auto-Share Connected Devices radio buttons:
- Select the Remember Last radio button if you want the VidyoConnect Room or VidyoRoom to remember the content share status from the last conference. For example, if content was being shared in a conference and the conference ended without stopping the content share, when the next conference started, sharing would start automatically if you selected the Remember Last radio button.
- Select the Off radio button if you do not want VidyoConnect Room or VidyoRoom to automatically share when a conference starts. For example, if you selected the Off radio button, sharing would not start automatically. This option is not applicable for the VidyoRoom HD-40.
- Edit the default 4000 ms value in the VISCA Passthrough Timeout field if you want to change the VISCA passthrough timeout value. The four-second (4000 ms) VISCA passthrough timeout was added to prevent the VidyoConnect Room or VidyoRoom from returning “buffer full” messages in response to VISCA commands.
- Select the Call In Progress Indicator checkbox if you do want the Call In Progress indicator to display during active calls; otherwise, deselect it.
- Deselect the Reset Camera Position After Conference checkbox if you want the camera position to remain unchanged at the end of each call. In order to use this feature, besides selecting the Reset Camera Position After Conference checkbox, you must also have a Sony camera and you must have set the camera Preset 1 and 2 positions using the camera controls. If you have done so:
- When the user joins a conference, the camera will move to Preset 2 and the message “RECALL 2 OK” will be displayed both locally and remotely for one or two seconds.
- When the user disconnects from a conference, the camera will move to Preset 1 and the message “RECALL 1 OK” will be displayed locally only for about a half second.
- Select the Turn Off Self-View After Conference checkbox if you want the self-view tile to close at the end of every call. Deselect the checkbox if you want the self-view tile to remain open if it was open at the end of the call and remain closed if it was closed at the end of the call.
- Select the Calendar option to display the calendar on the Home page on startup or select Contacts to display the Contacts page on the Home page on startup. This field is available only when using the VidyoConnect Room UI.
- Select the Epic API checkbox if you are an Epic API user, and then select either the Production or Test radio button (the default is Test). Based on your selection, the linked Client ID will be used in a custom header when Button Press URL is also used. This field applies to all system types except General Collaboration.
- Select the Reboot if stethoscope is missing on restart checkbox if you are using a stethoscope device and, if the stethoscope is not detected during room system reboot, you want the system to automatically restart one more time. Deselect this checkbox if you do not want the room system to reboot even if the stethoscope is not detected during the initial reboot.
|
Note This upgrade is not the image upgrade, which you must manually initiate using either the Firmware tab or the Recovery Console. For more information about the Firmware tab, see Update the firmware. For more information about the Recovery Console, see Use the Recovery Console. |
|
Note If enabling Phoenix Super Sensitive Mode, ensure that the Enable Audio Processing checkbox is not selected; otherwise, the audio will be processed by the VidyoConnect Room or VidyoRoom system. The Super Sensitive fields only display if you have a Phoenix PowerHub or Spider connected to your system. |
|
Note If a VISCA communication issue occurs with the camera, the VidyoConnect Room or VidyoRoom system will reboot once the conference is over in order to recover the camera. Note that when this issue occurs, the camera control may or may not work correctly, and there will be no indication of the cause of the reboot on the On-Screen UI. |
Configure the language and time zone
|
Note If you are running VidyoConnect Room SE as a Standard User, the Language and Time Zone settings will be disabled since changing these settings requires an Administrator account. In addition, if you are running in Application mode, the Language and Time Zone settings will be disabled whether you are a Standard User or an Administrator. |
To configure the language and time zone:
- Click the Settings tab.
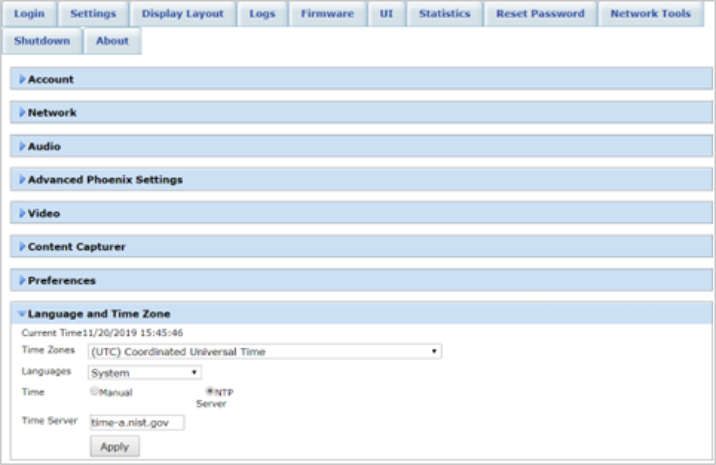
- If necessary, click the blue triangle next to the words Language and Time Zone to view the language and time zone settings.
- Select the time zone from the Time Zones drop-down in which the VidyoConnect Room or VidyoRoom is located.
- Select the language that you want to display on the VidyoConnect Room or VidyoRoom user interface from the Languages drop-down.
- Select System if you want the VidyoConnect Room or VidyoRoom to display in the system language selected on the VidyoPortal.
- In the Time section, select Manual or NTP Server. The Time Server will populate with information.
- Click Apply.
Configure VidyoRoom and VidyoConnect room pairing
This section is comprised of two subsections: "Configure pairing with VidyoRoom" and "Configure pairing with VidyoConnect Room". Please refer to the subsection that corresponds to the type of room you want to pair.
Configure pairing with VidyoRoom
The VidyoRoom pairing feature enables you to use the cameras from two or more VidyoRoom systems in your conference. This feature is especially useful in larger conference rooms where you might want to use more than one camera to capture the active speaker.
We recommend this feature only for use at sites that have a device that can balance and route the transmitted audio (such as a Biamp).
To configure VidyoRoom Pairing:
- Click the Settings tab.
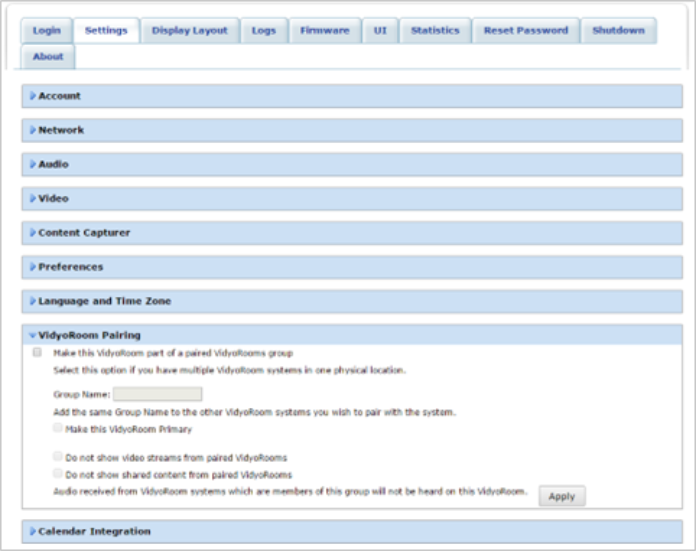
- Click the blue triangle next to the words VidyoRoom Pairing to view the VidyoRoom pairing settings if necessary.
- Select the Make this VidyoRoom part of a paired VidyoRooms group checkbox if you want to pair this VidyoRoom with other VidyoRoom(s).
- Enter a name for the group of paired VidyoRooms in the Group Name field. You must give the same group name to the other paired VidyoRooms in the group. For example, if you want to pair an HD-230 and another VidyoRoom that are both located in Conference Room A, you must give both the HD-230 and VidyoRoom the same group name, such as “Conference Room A.”
- Select the Make this VidyoRoom Primary checkbox if you want this to be the Primary VidyoRoom among the paired VidyoRooms. If you select Make this VidyoRoom Primary for a particular VidyoRoom, only that VidyoRoom will broadcast the incoming audio.
- Select the Do not show video streams from paired VidyoRooms checkbox and the Do not show shared content from paired VidyoRooms checkbox if you want only the Primary VidyoRoom to show video or shared content. These checkboxes give you more control over what the VidyoRooms display. For example, if the Primary VidyoRoom has a large screen, you may want it to display only shared content, while the other VidyoRooms display video.
- Click Apply.
|
Note To ensure clear audio, you should use this feature only if your configuration includes a device that can balance and route transmitted audio (such as a Biamp). |
Configure pairing with VidyoConnect Room
|
Note If you are running VidyoConnect Room SE as a Standard User, the Pairing settings will be disabled since changing these settings requires an Administrator account. |
The VidyoConnect Room pairing feature (available on VidyoConnect Room version 20.3.0 and later) enables you to see a greater number of remote video tiles in your conference by pairing multiple VidyoConnect Room systems into a group.
This feature is especially useful in larger conference calls where you want to increase the number of participants that you can see on your displays while you are in a call. For example, you could pair an HD-3 with four displays and an HD-3C with four displays into a group and see 128 participants on the eight displays. The maximum is 16 tiles per screen and a total of 192 tiles displayed per conference.
- When you create a paired group of systems, you select one system in the group as the Primary. Only the Primary system can be controlled by the user. All the other Secondary systems in the group will be passive, meaning that users cannot interact with them directly (such as with a remote control), and they will be completely controlled by the Primary system.
- Different physical room models can be in the same group (such as one HD-2 system with two HD-3C systems, for example).
- Audio devices (mic and speakers), video devices (cameras), and content share devices (such as INOGENI or AV.io) can be connected to the Primary room system only. Secondary systems will not detect those devices even if the devices are physically connected to them.
- The purpose of the Secondary systems is simply to join meetings that the Primary system is joining and display the video tiles from remote participants. If the Primary system is not up and online, Secondary systems cannot join calls. Conversely, the Primary system can join calls when the Secondary systems are off.
To configure VidyoConnect Room pairing:
- Click the Settings tab.
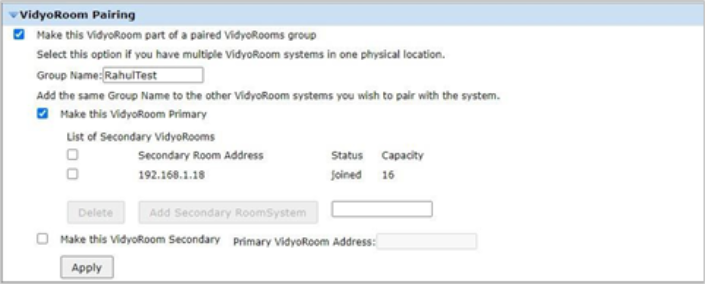
- If necessary, click the blue triangle next to the words VidyoRoom Pairing to view the pairing setting.
- Select the Make this VidyoRoom part of a paired VidyoRooms group checkbox if you want to pair this VidyoConnect Room with other room systems to form a group.
- Enter a name for the group of paired VidyoConnect Rooms in the Group Name field. To form a group, you must give the same group name to the other paired systems. For example, if you want to create a group from an HD-3 and an HD-3C that are both located in Conference Room A, you must give both the HD-3 and HD-3C the same group name, such as “Conference Room A.”
- To set up the Primary room system, do the following (to set up a Secondary system, go to the next step):
- Select the Make this VidyoRoom Primary checkbox to select this VidyoConnect Room to be the Primary system among the paired room systems in the group. The system you select as the Primary will be the only one that broadcasts the incoming audio, and only that system can be controlled by the user with the VidyoControl app and/or the physical remote control. Users will be able to join meetings from the Primary system only, and when the Primary joins a call, it will automatically pull the Secondary systems in the group into the call.
- Enter the IP address or FQDN of another room system that you want to add to the group as a Secondary system, and then click Add Secondary Room System.
- Continue entering the IP address or FQDN of each Secondary room system that you want to add to the group and click Add Secondary Room System for each room system that you add.
- Click Apply.
- Click OK on the confirmation pop-up. The VidyoConnect Room application restarts and the system comes up as the Primary system.
- To set up a Secondary room system, do the following on the Admin UI of each system you want to set up as a Secondary (to set up the Primary system, return to the previous step):
- Select the Make this VidyoRoom Secondary checkbox to select this VidyoConnect Room to be a Secondary system among the paired room systems in the group.
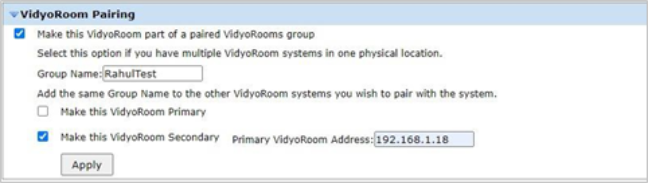
- In the Primary VidyoRoom Address field, enter the IP address or FQDN of the VidyoConnect Room system that you previously set up as the Primary system in the paired group.
- Click Apply.
- Click OK on the confirmation pop-up. The VidyoConnect Room application restarts and the system comes up as a Secondary system.
RS232 integration with TVs
This section outlines how to enable direct control of capable TVs using our VidyoRooms through the RS232 interface.
To configure the RS232 integration:
- Click the Settings tab.
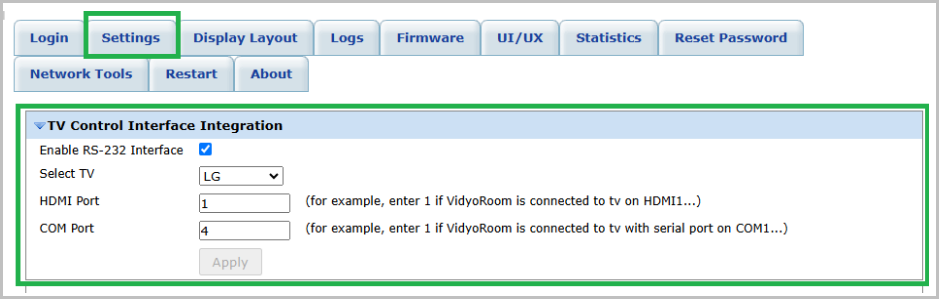
- Scroll down to the TV Control Interface Integration section.
- Enable the integration by selecting the Enable RS-232 Interface checkbox.
- Select TV: Select the brand of the TV you are using. This is critical since it controls how we interact with the TV. This feature will not work without selecting the correct TV.
- HDMI Port: Select the HDMI port the VidyoRoom SE is connected to. For example, if the VidyoRoom SE is connected to HDMI 1, select 1 in this drop down.
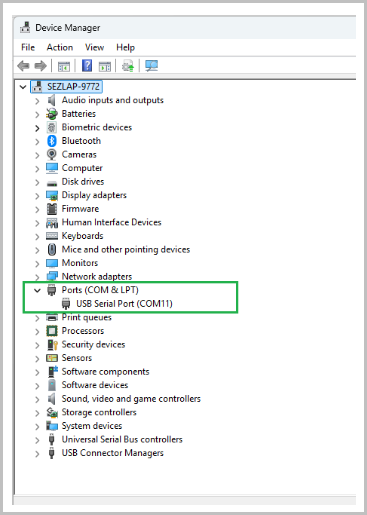
- COM Port: Select the COM port your USB to RS-232 cable is connected to. You can confirm this using the Device Manager in your Control Panel. Here’s an example screenshot from our test system where the COM port was 11. In this case you will select 11 in the COM port drop down.
- For more details on the feature, please read all about our RS232 integration here.
- The HDMI-CEC integration and the Sonifi integration are disabled when enabling RS232.
- Your TV supports RS232 control.
- You are selecting the correct COM port.
|
Note Please ensure: |
Sonifi integration for Epic Monitor
|
Note This feature is available for Version 24.1.0 and later. |
This version introduces support for integrating with Sonifi Entertainment Systems.
To activate the Sonifi intergation for Epic Monitor:
- Log into the Admin UI for the VidyoRoom.
- Click on Settings.
- Scroll down to the section called Sonifi Integration and enable the checkbox called Enable Sonifi Integration to start configuring the feature.
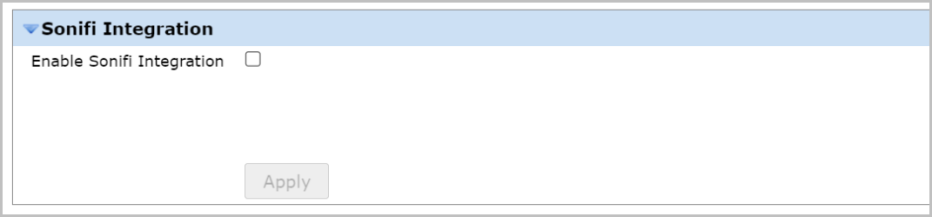
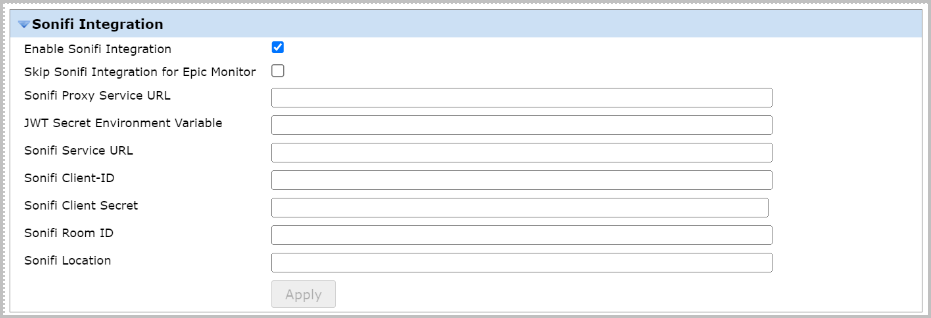
- Skip Sonifi Intergation for Epic Monitor prevents the Room from switching to the HDMI port the VidyoRoom is connected to. It also prevents the VidyoRoom from turning on the TV.
- For the text configurable fields, there are two main buckets; configuration that is provided by Vidyo and Configuration that is provided by Sonifi.
- Configuration provided by Vidyo:
- Sonifi Proxy Service URL
- JWT Secret Environment Variable
- Configuration provided by Sonifi:
- Sonifi Service URL
- Sonifi Client ID
- Sonifi Client Secret
- Sonifi Room ID
- Sonifi Location
Allow upload of custom ringtone
|
Note
|
This feature lets the admin upload an audio file to be used as a ringtone for incoming calls.
To upload custom ringtones:
- Log into the admin for the VidyoRoom.
- Click on the UI/UX tab.
- Next to Choose a new Ringtone File click on Choose File.
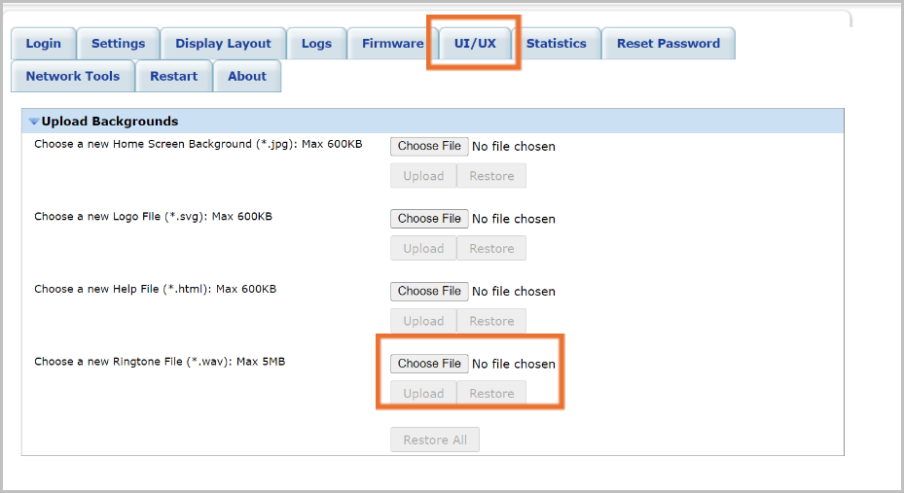
- Select a .wav file of maximum size 5MB and press Upload to upload the file.
To revert to stock ringtone:
- Log into the admin for the VidyoRoom.
- Click on the UI/UX tab.
- Click on Restore All to restore the ringtone to the stock audio.
Disable UI and hotkey for local stethoscope
|
Note This feature is available for Version 24.2.0 and later. |
The local UI and hotkey can be disabled for a connected stethoscope from the admin settings. You can disable this to prevent accidental triggering that can cause audio to be muted between the doctor and the patient.
- This impacts both VidyoRoom SE and hardware rooms.
- This will not impact the control from the remote side.
To disable the UI and hotkey for the local stethoscope:
- Log into the Admin UI for the VidyoRoom.
- Click on Settings.
- Scroll down to the section marked Preferences.
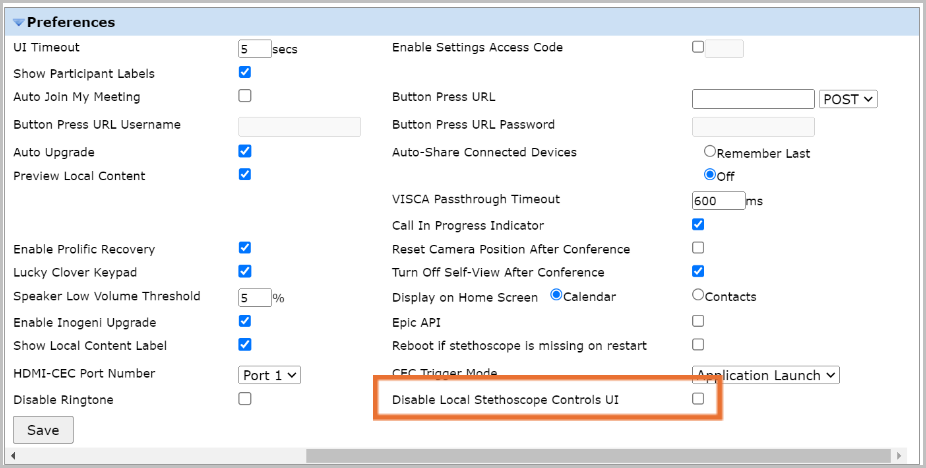
- Find the setting named Disable Local Stethoscope Controls UI and tick the checkbox.
To enable the UI and hotkey for the local stethoscope back:
- Log into the Admin UI for the VidyoRoom.
- Click on Settings.
- Scroll down to the section marked Preferences.
- Find the setting named Disable Local Stethoscope Controls UI and untick the checkbox.
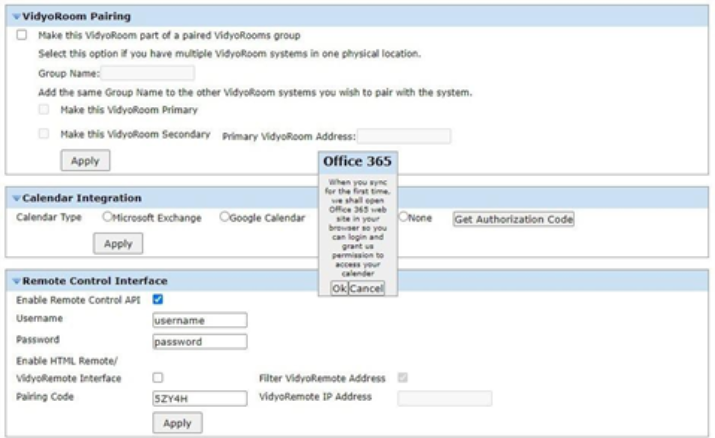
Configure calendar integration
The calendar integration feature enables the VidyoConnect Room or VidyoRoom to display upcoming scheduled meetings from a Microsoft Exchange calendar, Google Calendar, or Office 365 calendar that you specify. This feature enables the system to display meetings that are taking place up to three hours in the future and up to one hour in the past, as well as display or hide meeting details.
Configure Microsoft Exchange calendar integration
For the Microsoft Exchange calendar integration to work, the Microsoft Exchange Auto Discover service must be enabled. For more information about this service, refer to the Microsoft documentation.
The Microsoft Exchange calendar integration feature has been tested and qualified to work with Microsoft Exchange Server 2010, Microsoft Exchange Server 2013, and Office 365 Exchange. It may run successfully in environments other than these; however, only these have been tested and are supported by Vidyo.
To configure Microsoft Exchange calendar integration:
- Click the Settings tab.
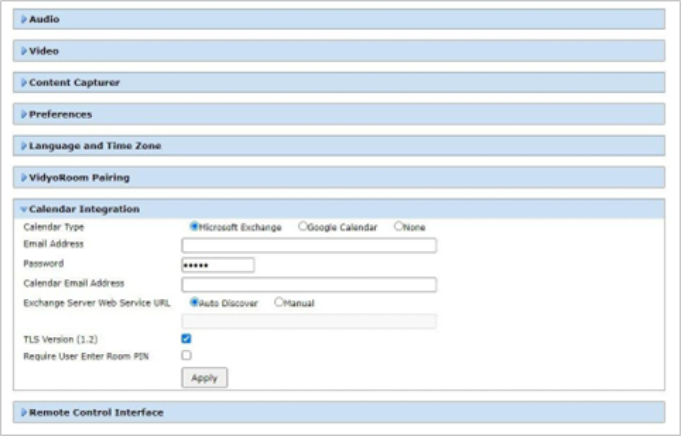
- If necessary, click the blue triangle next to the words Calendar Integration to view the Calendar Integration settings.
- Select the Microsoft Exchange radio button for the Calendar Type if you want the system to display meetings from a Microsoft Exchange calendar.
- Enter the credentials of the account in the Email Address and Password fields that has access to the calendar that you want to synchronize with the VidyoConnect Room or VidyoRoom (typically, this is the email address and password of the calendar administrator).
- Enter the email address of the calendar that you want to synchronize with the VidyoConnect Room or VidyoRoom in the Calendar Email Address field (this is needed if the email address you entered is associated with more than one calendar resource). The meetings from this calendar are the ones that will display on your VidyoConnect Room or VidyoRoom home screen.
- Select one of the following Exchange Server Web Service URL radio buttons:
- Auto Discover
- Manual (If you select Manual, you must enter the URL.)
- Leave the TLS Version (1.2) checkbox selected if you want your system to connect to Microsoft Exchange via TLS version 1.2. If you do not have TLS 1.2 enabled on your Microsoft Exchange server, deselect the checkbox to connect with TLS version 1.0 instead.
- Select the Require User Enter Room PIN checkbox if a room PIN is included in a calendar invite and you want to force users to enter the PIN when joining that meeting.
- Click Apply.
Configure Google Calendar integration
The Google Calendar integration feature has been tested and qualified to work on Google Chrome web browsers on Windows and Mac OS X only. It may run successfully in environments other than these; however, only these have been tested and are supported by Vidyo. Both personal Google accounts and Google Apps accounts have been tested and qualified to work.
To configure Google Calendar integration:
- Ensure that you are logged into the Google account whose calendar you want to synchronize with the VidyoConnect Room or VidyoRoom.
- Navigate to the Admin UI using a new tab within the same browser window.
- Click the Settings tab.
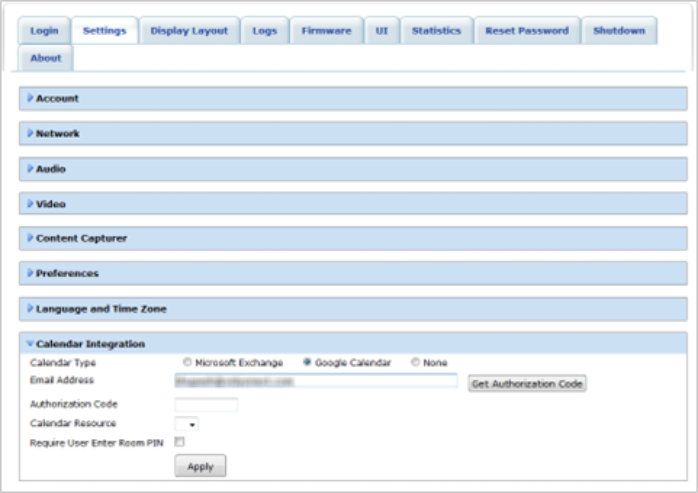
- Click the blue triangle next to the words Calendar Integration to view the Calendar Integration settings if necessary.
- Select the Google Calendar radio button for the Calendar Type if you want the system to display meetings from the Google Calendar.
- Enter the email address of the Google account that you want to synchronize with the VidyoConnect Room or VidyoRoom in the Email Address field. The meetings from this calendar are the ones that will appear on your home screen.
- Click Get Authorization Code. By default, your browser will block the pop-up that you need to access.
- Click the red X that appears in your browser address bar. The “The following pop-ups were blocked on this page” pop-up appears.
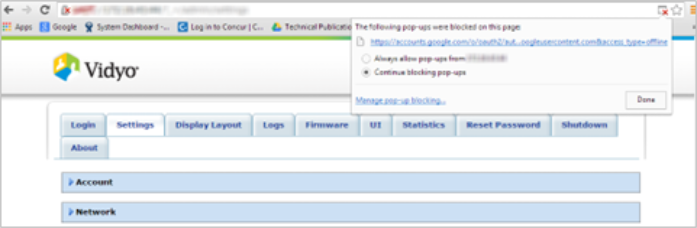
- Select Always allow pop-ups from [IP Address] and then click the link that appears in the pop-up. The “VidyoRoom would like to” pop-up appears.
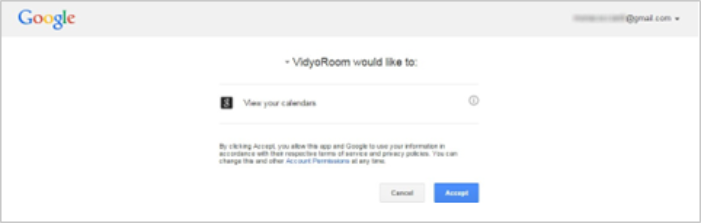
- Click Accept. You will be provided with an Authorization Code.

- Click Ctrl-A or Command-A to select all and copy it to the clipboard.
- Return to the Admin UI Settings screen and paste the code into the Authorization Code field.
- Select the appropriate calendar from the Calendar Resource drop-down that you want to synchronize with the VidyoConnect Room or VidyoRoom. This is needed if the email address you entered is associated with more than one calendar resource. The meetings from this calendar are the ones that will appear on your VidyoConnect Room or VidyoRoom home screen.
- Select the Require User Enter Room PIN checkbox if a room PIN is included in a calendar invite and you want to force users to enter the PIN when joining that meeting.
- Click Apply once.
- The meetings will now display on the On Screen UI. If the meetings do not display, start this procedure again at step 6. You can also go to the Logs tab as described in the Obtain log files section and view the GoogleCalendar.log which contains information about any failures.
|
Note If you click Apply twice, the authorization code will be invalidated. |
Configure Microsoft Office 365 calendar integration
The Microsoft Office 365 calendar integration feature integrates your Microsoft Office 365 calendar with VidyoConnect Room. This feature enables the VidyoConnect Room to display upcoming scheduled meetings from your Microsoft Office 365 calendar.
|
Note Office 365 integration is not available for Windows 7-based VidyoRoom systems. |
To configure Microsoft Office 365 calendar integration:
- Click the Settings tab.
- If necessary, click the blue triangle next to the words Calendar Integration to view the Calendar Integration settings.
- Select the Office 365 radio button as the Calendar Type if you want the system to display meetings from a Microsoft Office 365 calendar. Selecting Office 365 activates the Get Authorization Code button.

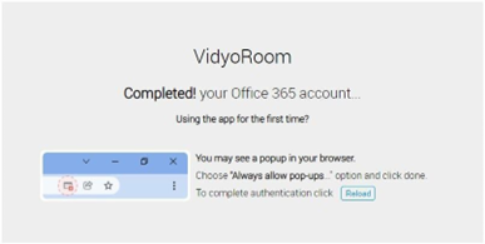
- Click Get Authorization Code. The Office 365 pop-up displays. This pop-up explains what happens when you press Ok to sync your calendar for the first time.
- Click Ok in the Office 365 pop-up. A new tab opens in your browser, displaying the Microsoft Sign-in page.
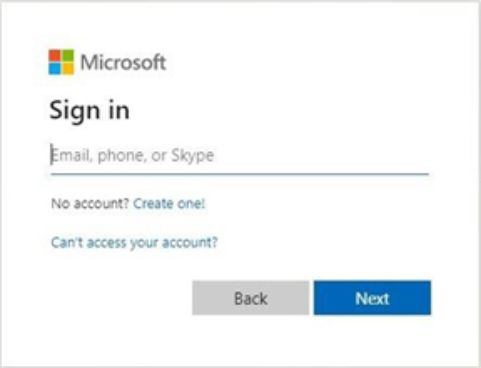
- Enter your login credentials. VidyoConnect Room then starts to authorize your Office 365 account. However, to continue, you may need to allow pop-ups in your browser. If so, you’ll see messages like the ones shown here:
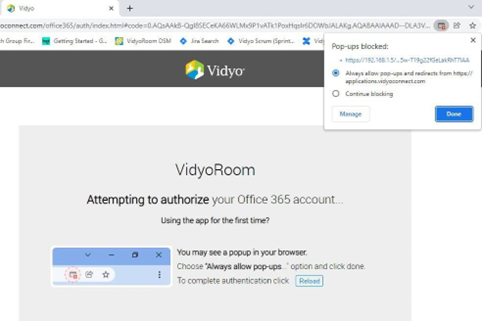
- If you see messages such as these, click Always allow pop-ups…, click Done, and then click Reload to complete the authentication. When VidyoConnect Room successfully integrates your Office 365 calendar, a message appears indicating that the integration was successful.
- Click Apply.
Configure the remote control interface
|
Note If you are running VidyoConnect Room SE as a Standard User, the Remote Control Interface settings will be disabled since changing these settings requires an Administrator account. |
The settings in this section provide external applications, such as the VidyoControl app or third-party applications, with the ability to integrate with the VidyoConnect Room or VidyoRoom system.
To configure the remote control interface:
- Click the Settings tab.
- If necessary, click the blue triangle next to the words Remote Control Interface to view the remote control settings.
- Select the Enable Remote Control Interface API checkbox if you want to provide developers and/or applications with the ability to connect and control the VidyoConnect Room or VidyoRoom using Remote Control APIs.
- Enter the username that the developers and/or applications will need to use in order to authenticate with the system in the Username field.
- Enter the password that the developers and/or applications will need to use to authenticate with the system in the Password field.
- Select the Enable HTML Remote/VidyoRemote Interface checkbox if you want to connect to and control the VidyoConnect Room or VidyoRoom using the VidyoConnect app or the older HTML Remote/VidyoRemote Interface.
- In the Pair Code field, enter the pairing code that will be used to connect your VidyoConnect app with your VidyoConnect Room or to connect your VidyoRemote 3 app with your VidyoRoom system. After a user downloads and opens the VidyoControl app or the VidyoRemote 3 app on their iOS or Android device, the app prompts them to enter a pairing code to connect their device with their VidyoConnect Room or VidyoRoom system. The pairing code the user must enter on their device is same the pairing code you enter in this field.
- Select the Filter VidyoRemote Address checkbox if, for added security, you want your VidyoConnect Room or VidyoRoom system to communicate solely with the iOS or Android tablet that you are using for your VidyoControl or VidyoRemote app. If you select this checkbox, you must then enter the IP address of the iOS or Android tablet in the VidyoRemote IP Address field. Once you have done this, the VidyoConnect Room or VidyoRoom will ignore traffic from sources other than the VidyoConnect app, thereby helping to prevent hackers or others with malicious intent from accessing private communications.
- Click Apply.
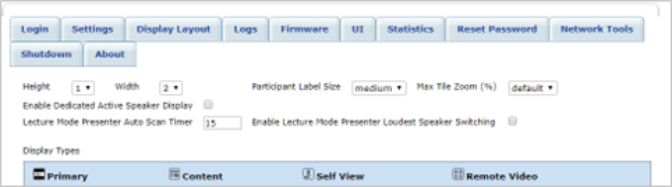
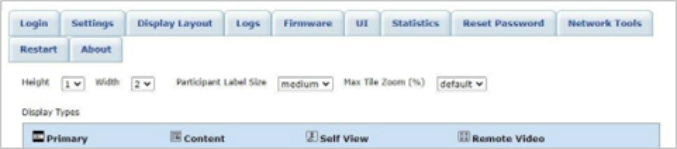
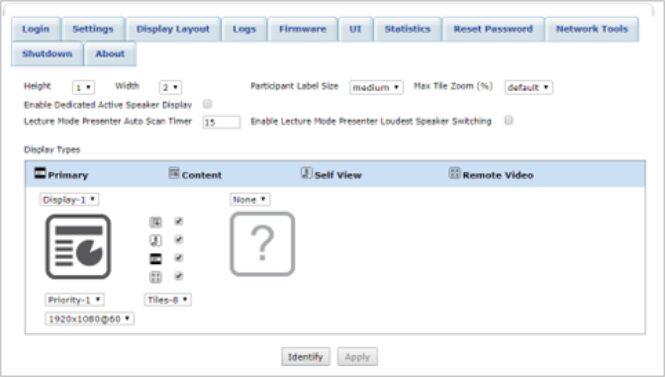
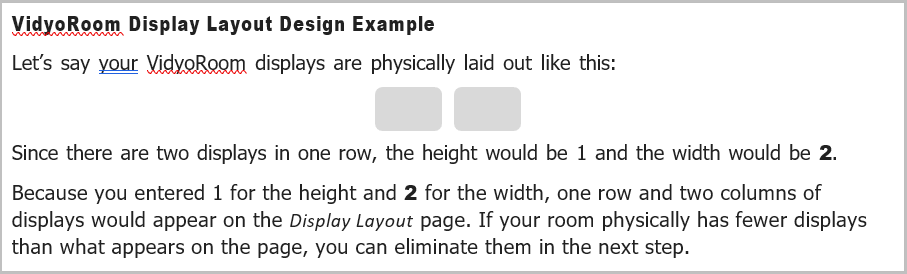
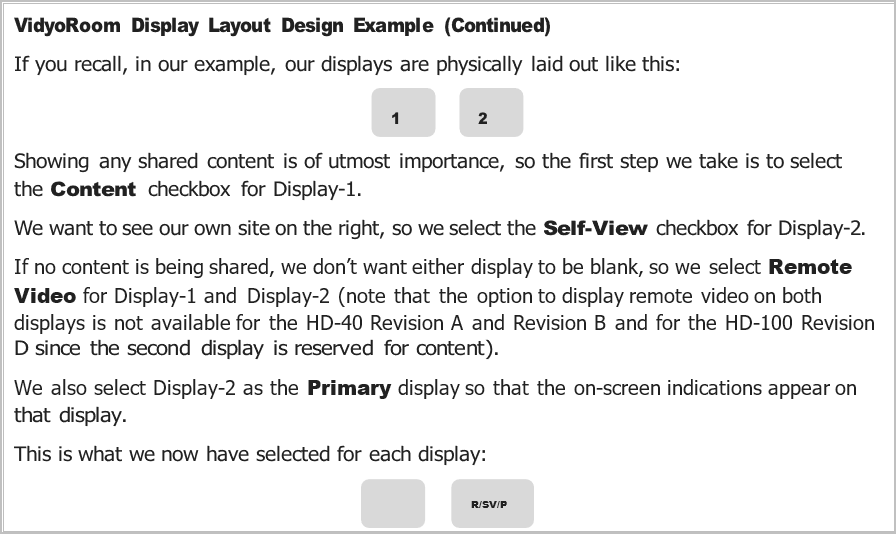
Design the display layout
The Display Layout tab enables you to design the layout of the displays. You should carefully read this section before you begin designing your layout.
To design the display layout:
- Click the Display Layout tab.
- VidyoRoom and Primary Display of VidyoConnect Room:
- Secondary Display of VidyoConnect Room Version 20.3.0 and later:
- Click Identify at the bottom of the Display Layout page. The Identify button indicates the display IDs and also shows the IP address of the VidyoConnect Room or VidyoRoom. It’s important to view the display IDs before and during the display layout design for these reasons:
- The display IDs can change if you plug the displays in and out of the back of the Vidyo server. Therefore, before and during the display layout configuration, you should click Identify to make sure your configuration is mapping to the displays as you intend.
- You should remove any Mini DisplayPort to DVI adapters from ports where there is no display connected. If you leave these adapters connected (even with no displays connected to the adapters themselves), the displays will display as if they are connected since these are active adapters.
- Irrespective of which ports you connect the displays and adapters to, the display IDs are sequential. There is no correlation between the physical ports on the back and the virtual display IDs that you see on the screens. Therefore, if you connect a display to port 5 and 6, the display IDs will be 1 and 2. We recommend that when connecting displays, do not leave gaps between the ports and always start with port 1. For example, if you have three displays, connect the displays and adapters to ports 1, 2, and 3, and leave ports 4, 5, and 6 empty.
- Select the numbers that reflect the physical layout of your displays from the Height and Width drop-downs. When you enter the height and width, the corresponding number of rows and columns of displays appears on the Display Layout page.
- VidyoRoom and Primary Display of VidyoConnect Room:
- Secondary Display of VidyoConnect Room Version 20.3.0 and later:
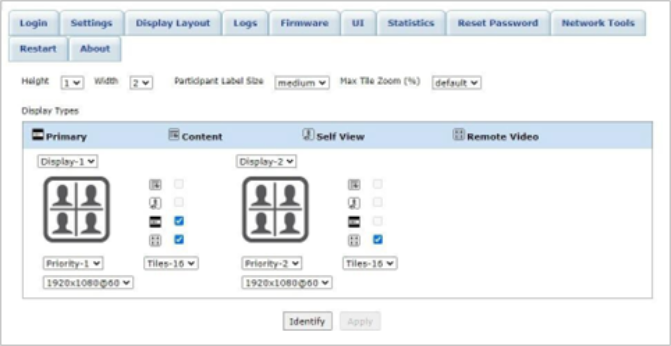
- Select whether you want the participants’ names to appear small, medium, or large on the displays during the conferences in the Participant Label Size field.
- Select the percentage at which you want to zoom low-resolution content from the Max Tile Zoom (%) drop-down. For example, if a participant using a mobile device sends content at a low resolution to an Ultra HD 4K VidyoRoom screen, that participant’s video will zoom in 16 times (1600%). If this is not desirable for you, you can use this drop-down to cap the zoom at a 200, 300, or 400%.
- Do one of the following:
- For VidyoRoom systems and for the Primary display of VidyoConnect Room systems: Select the Enable Dedicated Active Speaker Display checkbox if you want the active speaker to be displayed in the single stream Remote Video display that has the highest priority. In other words, selecting this checkbox enables you to dedicate a display for showing the active speaker.
- For the Secondary display of VidyoConnect Room systems: The Enable Dedicated Active Speaker Display checkbox does not display.
- Do one of the following:
- For VidyoRoom systems and for the Primary display of VidyoConnect Room systems: Enter the number of seconds to wait before displaying a different participant in the Lecture Mode Presenter Auto Scan Timer field. For example, if you enter 15 in this field, a different participant would be displayed on-screen every 15 seconds. Therefore, if you configured your layout to display a maximum of 12 participants, but there are 20 participants in the conference, one of the 12 currently displayed participants would be replaced by one of the remaining 8 participants every 15 seconds. This feature enables the presenter to view all the participants who are listening to the presentation over time. For more information about configuring Presenter Mode, refer to the VidyoPortal and VidyoRouter Administrator Guide.
- For the Secondary display of VidyoConnect Room systems: The Lecture Mode Presenter Auto Scan Timer field does not display.
- Select the number of the display in the Display-# drop-down for each display. None appears automatically if your system supports additional displays but you do not have any physically connected. You can also select None if you have an additional physical display connected but you do not want anything to be displayed on it.


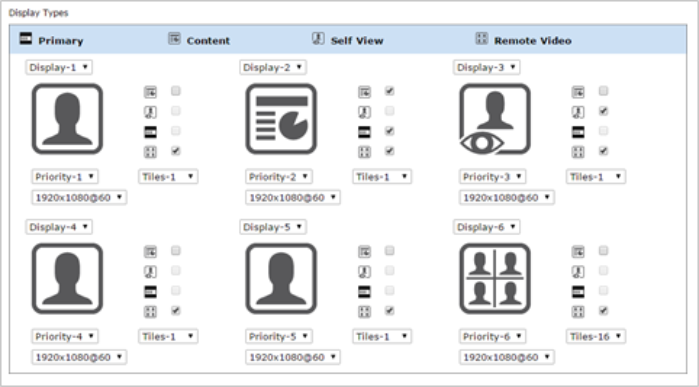
- Select the checkbox near the stream type for each display on the page that you want to assign to that display: Primary, Content, Self-View, or Remote Video.
- Primary: A Primary stream shows on-screen indicators, such as the speaker and microphone mute icons. You can designate only one screen as the Primary screen.
- For VidyoConnect Room systems: When you create a paired group of systems, you select one system in the group as the Primary. The system you select as the Primary will be the only one that broadcasts the incoming audio, and only that system can be controlled by the user with the VidyoControl app and/or the physical remote control. Users will be able to join meetings from the Primary system only, and when the Primary joins a call, it will automatically pull the Secondary systems in the group into the call. For more information, see Configure pairing with VidyoConnect Room.
- Content: A Content stream shows any content shared from the local or remote sites.
- For VidyoRoom systems: The second display for the VidyoRoom HD-40 Revision A and Revision B and for the HD-100 Revision D is set to display content only and cannot be changed.
- For the Secondary display of VidyoConnect Room systems: This field is disabled.
- Self-View: A Self-View stream shows the video from the camera at your local site (that is, a view of yourself or your site).
- For the Secondary display of VidyoConnect Room systems: This field is disabled.
- Remote Video: A Remote Video stream shows video from a remote site.
- For VidyoRoom systems: The second display for the VidyoRoom HD-40 Revision A and Revision B and for the HD-100 Revision D is set to display content only and cannot be changed; therefore, you can select Remote Video for only one display. However, if you have a VidyoRoom model that supports video on more than one display (such as the HD-230), you can select the Remote Video checkbox for both displays so that you can view video from the remote sites on both displays when no content is being shared.
- You can select more than one checkbox per display, but as you do so, keep in mind that VidyoRoom determines what gets shown on the displays based on this sorting order:
- Local content
- Remote content
- Local video
- Remote video
- In other words, if one display has the Content checkbox selected, content will be shown whenever content is being shared. If you want a display to show content when a site is sharing content, but to show video when no content is being shared, then you should select both the Content and Remote Video checkboxes for that display.
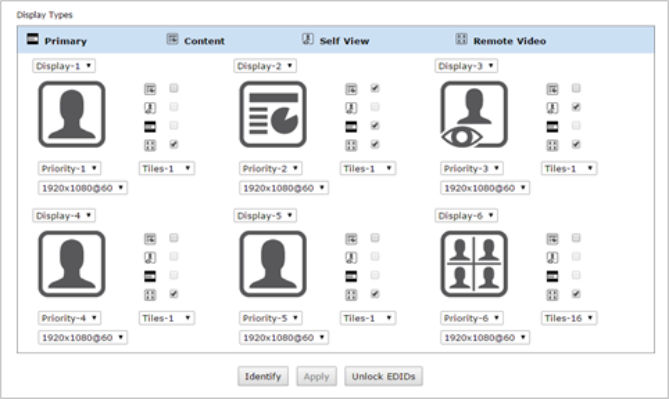
- Select the order in which the displays will be populated as video and content streams are received from the Priority drop-down. When selecting the Priority, remember that content is always displayed before video. If you selected the Enable Dedicated Active Speaker Display checkbox and no content is being shared, the single stream Remote Video display with the highest priority display will show the active speaker. If content is being shared, the single stream Remote Video display with the next highest priority display will show the active speaker. The stream from each site is shown in a tile.
- Select the maximum number of tiles that you want to show on the display from the Tiles drop-down for each display. For example, if you select 4, you can show video from four different sites on that one display.
- For VidyoRoom systems: The number of tiles you can select depends on which VidyoRoom model you have. For more information, refer to the datasheet for your model or the VidyoConnect Room and VidyoRoom Release Notes.
- For VidyoConnect Room systems: The maximum is 16 tiles per screen and a total of 192 tiles displayed per conference (achievable when you create a paired group of room systems). For more information, see Configure pairing with VidyoConnect Room.
- Select the resolution and frame rate from the drop-down for each display. The drop-down lists every available resolution and frame rate that the TV display supports.
- Click Apply. At this point, you may want to make a call to see if you like the display layout that you just set up. If you do not like it, you can make changes on the Display Layout tab, and then make another call. Continue making changes and checking them in a call until the layout is the way you like it.
- Click Lock EDIDs. Vidyo highly recommends that you click this button after configuring your display layout—especially when using 4K monitors. Not doing so may cause issues such as the displays not getting detected when they come back from sleep mode, the display order changing, etc. If you need to unplug a display from the VidyoConnect Room or VidyoRoom setup, we recommend following these steps:
- Click Unlock EDIDs.
- Add, remove, or change the order of the displays.
- Reboot the VidyoConnect Room or VidyoRoom system.
- Configure the displays with the desired settings.
- Click Lock EDIDs.
Obtain log files
The Logs tab enables you to set the system time, set the reboots to take place on a recurring schedule, and obtain log files for the VidyoConnect Room or VidyoRoom.
Set the system time
To set the system time:
- Click the Logs tab.
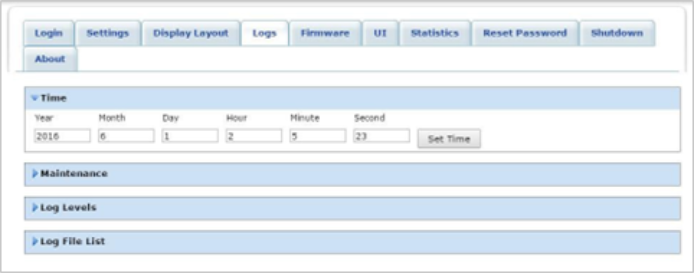
- Click the blue triangle next to the word Time to view the time settings if necessary.
- Enter the system time of the VidyoConnect Room or VidyoRoom.
- Click Set Time.
|
Note If the CMOS battery fails, the system date reverts back a few years. When you attempt to manually change correct the system date via the Admin UI, the CMOS Battery Warning notification may appear to remind you to check if the CMOS battery needs to be replaced. |

Configure the reboot maintenance schedule
This Maintenance section enables you to schedule your reboots on a monthly or weekly basis or by the number of days since the last reboot.
To configure the reboot maintenance schedule:
- Click the Logs tab.
- If necessary, click the blue triangle next to the words Maintenance to view the maintenance settings.
- Select the Enable Reset Maintenance checkbox to set a recurring reboot schedule:
- Select the Monthly radio button and select a number to set your system to reboot after that number of months has elapsed.
- Select the Weekly radio button and select a day to set your system to reboot on that day each week.
- Select the Days since last system reboot radio button and select a number to set your system to reboot after that number of days has elapsed.
- Select the hour and minute at which you want the system to reboot from the Time drop-down.
|
Note If Write Protection Mode is enabled in the Firmware > Update section, the number of days since the last system reboot cannot be set to more than seven days. |
|
Note To prevent the system from rebooting while your users are using it, the reboot only occurs if the system has been idle for at least 10 minutes. If 24 hours pass from the time the reboot was scheduled to occur and the system is not idle for at least 10 minutes during that 24-hour period, the reboot is skipped. For example, if a reboot is scheduled for every Tuesday at 1 AM, but the VidyoConnect Room or VidyoRoom is in a call on Tuesday at 1 AM, the reboot does not occur. The system would then wait for the VidyoConnect Room or VidyoRoom to be idle for 10 minutes so that it could reboot. However, in this case, the VidyoConnect Room or VidyoRoom continues to have users joining and leaving calls every 5 or so minutes until Wednesday at 1 AM. At that time, the reboot window would pass, and the VidyoConnect Room or VidyoRoom would not attempt to reboot until the following Tuesday at 1 AM (that is, six days later). |
Set the log levels and access the log files
The VidyoConnect Room or VidyoRoom system creates log files that you can download. For example, you can download Recovery Console logs which contain timestamped information about actions performed in the Recovery Console (e.g., rebooting, changing the Admin UI settings, restoring factory settings, upgrading, etc.).
|
Note For HD-40 Rev A, B, and C, HD-100 Rev D and Rev 4A, and HD-230, the ability to download Recovery Console logs is available only when the VidyoConnect Room or VidyoRoom systems are running Recovery Console versions 5.0.28 and later. Earlier versions of the Recovery Console will not make the logs available for download. For HD-2 and HD-3 systems, the Recovery Console logs are available via the Admin UI Logs tab. |
A new log file is created when the file size reaches 110 MB.
To set the logs levels and access the log files:
- Click the Logs tab.
- If necessary, click the blue triangle next to the words Log Levels to view the log level settings.
- Enter the log name and click either Apply Permanently or Apply Temporarily.
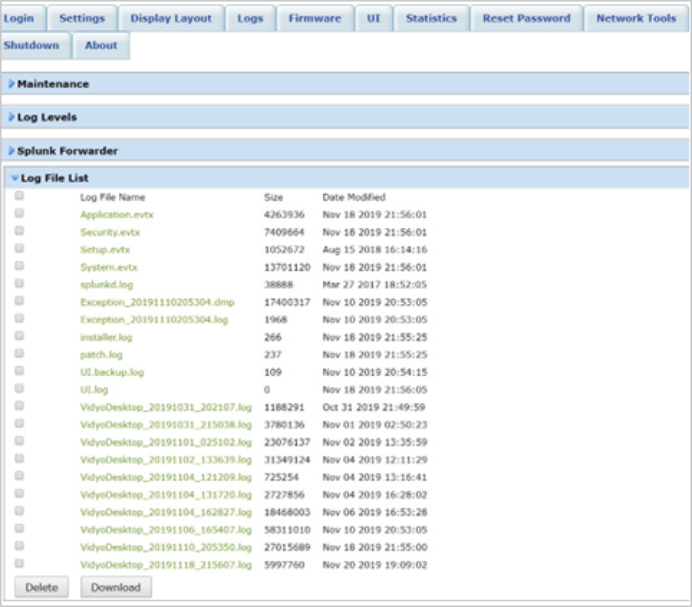
- If necessary, click the blue triangle next to the words Log File List to view the list of log files.
- Do any of the following:
- Select the checkbox to the left of the specific file that you want to delete, and click Delete. If Write Protection Mode is enabled, the Delete button will be grayed out. Therefore, to delete the file, you must first disable Write Protection Mode. For more information, see Update the firmware and Use Write Protection Mode.
- Select the checkbox to the left of Log File Name, and then click Delete if you want to delete all the log files except for the last one (which is the currently active log file).
- Select the checkbox to the left of the file(s) you want to download, and then click Download. If Write Protection Mode is enabled, the Download button will be grayed out. Therefore, to download a file, you can either click on the file name of the specific log file at the bottom of the download list that you want to download, or you can disable Write Protection Mode. For more information, see Update the firmware and Use Write Protection Mode.
The system will download a compressed package of the selected logs called vrlogs.tar. The TemperatureLog.csv file will be included in the vrlogs.tar package. The VidyoConnect Room or VidyoRoom system updates the TemperatureLog.csv file every five minutes. If the temperature of the VidyoConnect Room or VidyoRoom CPU rises above a particular high or critical level, a temperature reading appears in Celsius at the top of the Admin UI page that is currently being accessed with the word “Critical” or “High” in front of it.
![]()
The following table specifies the temperatures at which the word “High” or “Critical” appears per VidyoRoom model.
| VidyoRoom model | High (temperature in Celsius) | Critical (temperature in Celsius) |
| VidyoRoom HD-2, HD-3, HD- 40 Revision B, and HD-230 Revisions A and B | 90° or above | 99° or above |
| VidyoRoom HD-40 Revisions A, C, and D | 95° or above | 104° or above |
| VidyoRoom HD-100 Revision 4A | 77° or above | 85° or above |
| VidyoRoom HD-100 Revision D | 83° or above | 91° or above |
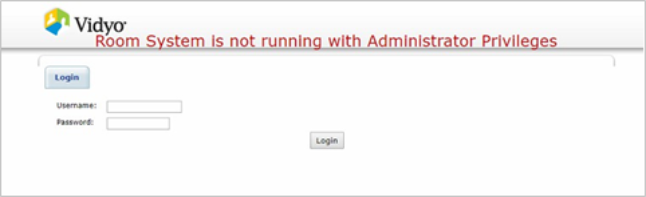
If you are running VidyoRoom SE version 19.3.0 without Administrator privileges, the “Room System is not running with Administrator Privileges” message will display.
Update the firmware
The Firmware tab enables you to upload a new image file or a new certificate file to the VidyoRoom local disk (for VidyoRoom version 19.3.0 and earlier). If you use VidyoRoom SE version 19.3.0, you cannot upload a new image file.
Normally, the client installer is downloaded from the VidyoPortal to the VidyoRoom; however, you can use the Firmware tab as another option for uploading the client. This is useful when the VidyoPortal does not have a client installer file available or when the VidyoPortal version does not support uploading the client.
Configure Internet Explorer settings
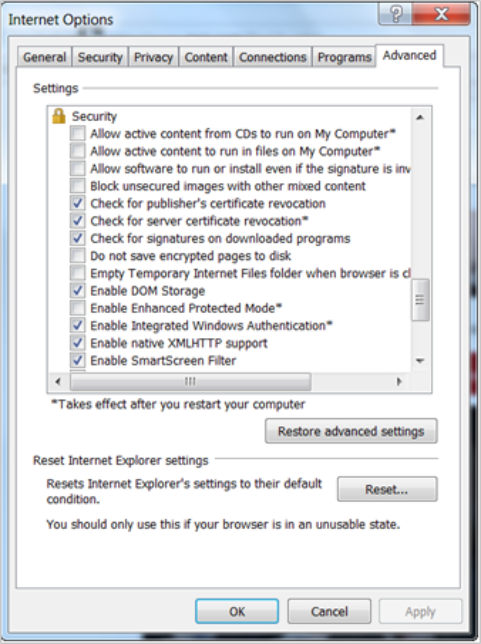
You must do the following prior to uploading an image or client installer file if you are accessing the Admin UI via an Internet Explorer browser:
- Navigate to Internet Options > Advanced > Security.
- Ensure that the Enable SmartScreen Filter and Send Do Not Track requests to sites you visit in Internet Explorer* checkboxes are selected.
- Click OK.
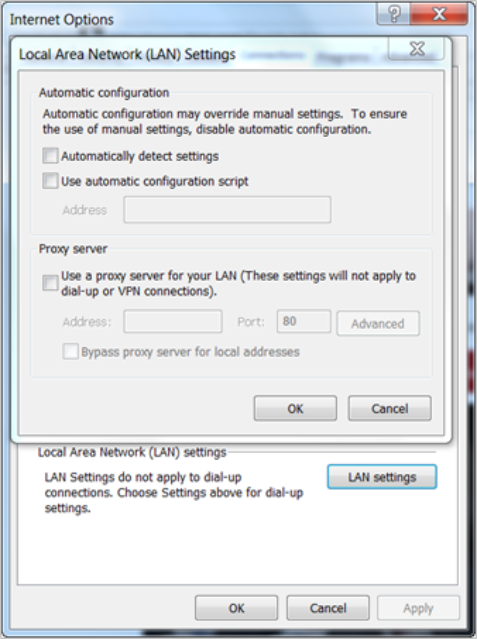
- Navigate to Internet Options > Connections.
- Click the LAN Settings button. The Local Area Network (LAN) Settings pop-up appears.
- Ensure that the Automatically detect settings, Use automatic configuration script, and Use a proxy server for your LAN (These settings will not apply to dial-up or VPN connections) checkboxes are deselected.
- Click OK.
Perform the firmware update
Once you have uploaded an image file, you can also use the Firmware tab to update the image. Alternatively, you can re-image the system using the Recovery Console. However, using the Firmware tab is generally preferable because you can perform the upgrade remotely and while the system is running. For more information, see Use the Recovery Console.
|
Caution Starting with VidyoRoom version 3.2.5, five days after uploading a new image, that image automatically becomes the factory default base image the system reverts to when using the Restore to Factory Image feature. Therefore, if you perform a factory restore within five days of applying a new image for the VidyoRoom, it will revert to the image that was originally on the system. If you perform a factory restore after five days, it will revert to the last image uploaded for that VidyoRoom. |
To update the firmware:
- Click the Firmware tab.
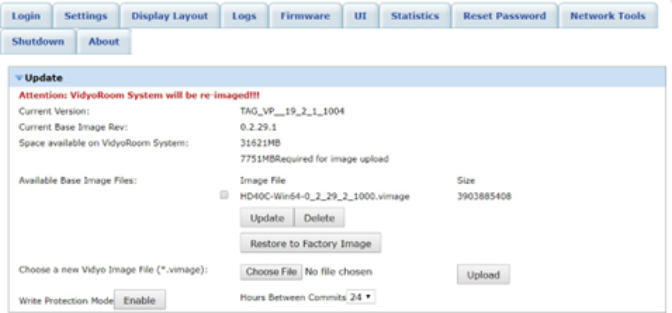
- VidyoRoom Systems Using Windows 7:
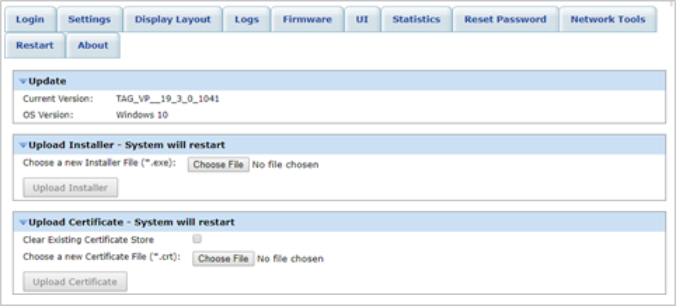
- VidyoRoom SE Version 19.3.0 and Later Using Windows 10:
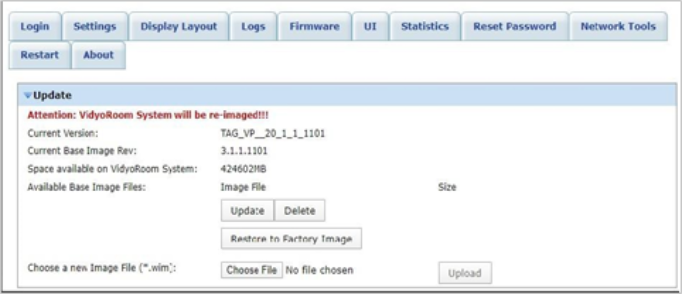
- VidyoRoom Version 20.1.1 Using Windows IoT:
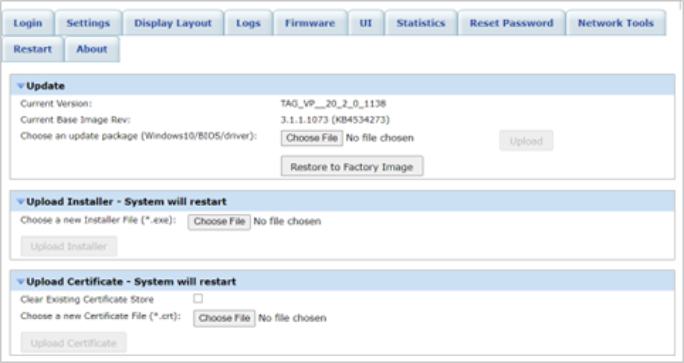
- VidyoConnect Room and VidyoRoom Version 20.2.0 and Later Using Windows 10 IoT:
- Click the blue triangle next to the word Update if necessary.
- Select the checkbox next to the file you want to update or delete if there is more than one image file listed.
- Click either Update to update the image or click Delete to delete the file from the local disk.
- Click Restore to Factory Image if you want to restore the VidyoConnect Room or VidyoRoom system to the factory image. Please read the caution on the previous page if you are performing a factory restore after installing the Vidyo image file.
- Upload a new image file if necessary:
- Click Choose File and choose the image file that you want to upload based on your VidyoConnect Room or VidyoRoom version and Windows version:
- Windows 7 hardroom systems – Upload a .vimage file.
- Windows 10 IoT hardroom systems using version 20.1.1 – Upload a .wim file.
- Windows 10 IoT hardroom systems using version 20.2.0 and later: Upload an update package provided by Enghouse Vidyo, such as Windows 10 IoT, Bios, or Drivers.
- Select 1, 2, 3, 4, 6, 8, 12, or 24 from the Hours Between Commits drop-down to specify the number of commits per day. Here are examples of the time intervals when the following values are selected:
- 1: A commit takes place every hour. For example, 1:15, 2:15, 3:15, etc.
- 2: A commit takes place every two hours. For example, 2:15, 4:15, 6:15, etc.
- 3: A commit takes place every three hours. For example, 3:15, 6:15, 9:15, etc.
- 4: A commit takes place every four hours. For example, 4:15, 8:15, 12:15, etc.
- 6: A commit takes place every six hours. For example, 6:15, 12:15, 18:15, etc.
- 8: A commit takes place every eight hours. For example, 8:15, 16:15, 0:15, etc.
- 12: A commit takes place every 12 hours. For example, 12:15, 0:15, etc.
- 24: A commit takes place every 24 hours. For example, 0:15.
- 6. Enable Write Protection Mode to prevent Windows corruption if necessary:
- Click Enable.
- Click Yes in the Reboot Required pop-up that appears.

- The system reboots. For the reboot process to fully complete, you are not allowed to click the Enable button more than once.
- 7. Upload a new Installer file if necessary:
- Click the blue triangle next to the words Upload Installer.
- Click Choose File and choose the Installer file that you want to upload.
- Click Upload Installer.
- 8. Upload a new Certificate file if necessary:
- If necessary, click the blue triangle next to the words Upload Certificate.
- Select the Clear Existing Certificate Store checkbox if you want to clear the existing certificate upon uploading the new one.
- If you select this checkbox, only the new certificate bundle will be effective.
- If you do not select this checkbox, the new certificate will be appended to the one that already exists for the VidyoConnect or VidyoRoom system.
- Appending is limited to the current session of the system image. That is, if you ever need to re-image the system, only the latest certificate file uploaded via the Admin UI will then be effective and any other previously appended certificates will not be preserved.
- The default is that this checkbox is unselected; therefore, the new certificate will be appended to the existing one.
- Click Browse to browse to the Certificate file that you want to upload.
- Click Upload Certificate. As soon as the certificate is uploaded, the system will reboot. You cannot cancel the reboot once it begins.
|
Note If you need more information about upgrading your system to Windows 10 IoT, refer to Upgrade VidyoRoom to Windows 10 IoT in the Vidyo Help. This article describes how to upgrade and re-image your VidyoRoom system from Windows 7 to Windows 10 IoT. If you are running Windows 10 using VidyoRoom SE version 19.3.0 and later, you can only view the Current Version and OS Version in this window. You will not be able to update the image or restore to factory image. Update the image or delete the image file that has been uploaded to the local disk if necessary. |
|
Note To upload an image file, Write Protection Mode must be disabled. For more information about Write Protection Mode, see the steps below and Use Write Protection Mode. |
|
Note The Hours Between Commits drop-down is inactive when Write Protection Mode is enabled. |
|
Note If the VidyoConnect Room or VidyoRoom is busy in a call at the time of a scheduled commit, then the commit will initiate after the call ends. Additionally, if the VidyoConnect Room or VidyoRoom is occupied with a long duration call, then one or more scheduled commits may be skipped; however, one commit will be initiated after the call ends. |
|
Note To upload a new installer, Write Protection Mode must be disabled. For more information about Write Protection Mode, see the steps above and Use Write Protection Mode. |
|
Note If you are running VidyoConnect Room SE as a Standard User, the Upload Certificate settings will be disabled since changing these settings requires an Administrator account. |
|
Note To upload a new Certificate file, Write Protection Mode must be disabled. For more information about Write Protection Mode, see the steps above and Use Write Protection Mode. |
Use Write Protection Mode
When Write Protection Mode is enabled, all configuration changes and new logs are kept in a cache. Logs are automatically saved to the hard drive at 2:00 AM daily, or upon restarting the VidyoConnect Room or VidyoRoom system. If your VidyoConnect Room or VidyoRoom system loses power prior to the next commit, all logs that have not been saved will be lost. Additionally, configuration files will not be saved and the system will restart with the previously saved configuration before Write Protection Mode was enabled.
For more information about restarting the VidyoConnect Room or VidyoRoom system, see Shut down or restart.
If the VidyoConnect Room or VidyoRoom system attempts to download a new Installer from the VidyoPortal but there is not enough room in the write cache (93 MB for 32-bit systems and 154 MB for 64-bit systems), the VidyoConnect Room or VidyoRoom will not download the Installer. Instead, it will continue to check every three hours, and it will download the Installer when there is enough room.
Additionally, when Write Protection is enabled, the log files are named as follows: VidyoRoom.0 – VidyoRoom.9. The limitation on the file size is 110 MB. Therefore, when the log file size reaches this level or upon restarting the VidyoConnect Room or VidyoRoom system, a new log file is created.
Lastly, when Write Protection Mode is enabled, a message appears at the top of every page of the Admin UI indicating that Write Protection Mode is enabled.
Upload UI backgrounds
The UI tab enables you to upload backgrounds for the Home screen and Settings screen. Users can then choose the image they want from among the uploaded images to set as their background image. The maximum resolution for an uploaded image is 3840 x 2160, and the size must be less than 10 MB.
To upload UI backgrounds:
- Click the UI tab.
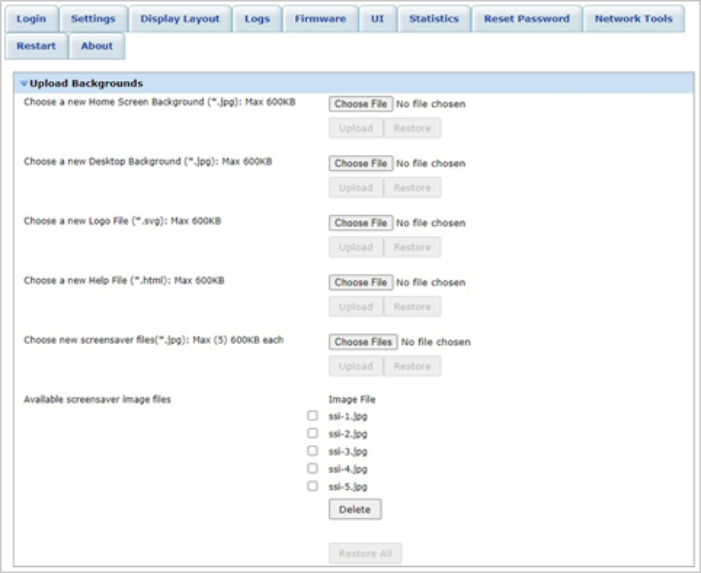
- Click the blue triangle next to the word Upload Backgrounds to view background settings.
- Upload a new Home Screen Background to replace the background image of the VidyoConnect UI Home screen (Calendar screen), if necessary:
- Click Choose File and then click Open to select the .jpg file that you want to upload.
- Click Upload to upload the new .jpg file.
- Click Restore to return to the original Home Screen Background.
- Upload a new Desktop Background to replace the Vidyo image screen which displays during a reboot of your system, if necessary:
- Click Choose File and then click Open to select the .jpg file that you want to upload.
- Click Upload to upload the new .jpg file.
- Click Restore to return to the original Desktop Background.
- Upload a new Logo file to display on the upper-left corner above the Home Menu button of the Home page, if necessary:
- Click Choose File and then click Open to select the .svg file that you want to upload.
- Click Upload to upload the new .svg file.
- Click Restore to return to the original logo.
- Upload a new Help .html file to display helpful contact information (for example, phone numbers, emails, web pages, troubleshooting details, etc.) for your users on the Help page, if necessary:
- Click Choose File and then click Open to select the .html file that you want to upload.
- Click Upload to upload the new .html file.
- Click Restore to return to the original help file.
- Upload a new Screensaver file to display as your screensaver, if necessary:
- Click Choose File and then click Open to select the .jpg file that you want to upload.
- Click Upload to upload the new .jpg file.
- Click Restore to return to the Screensaver file.
- Click Restore All if you want to revert to the default backgrounds.
|
Note You are permitted to use the system default screensaver images or your own screensaver images; however, you cannot use of mix of the default and your own screensaver images. You can delete up to three of the default screensaver images. You must have at least two of the five screensavers to avoid screen burn-in. If you want to upload your own screensavers, you can upload the maximum of five images and must at least upload two images to avoid screen burn-in. |
View the statistics
The Statistics tab enables you to view statistics about the system.
- The Information portion of the tab indicates if you are in a conference, if you are using the VidyoRouter, VidyoProxy, or a Web Proxy, and if you are using a secured connection.
- The Bandwidth portion of the tab provides statistics for both the actual and available send and receive bandwidth for video, audio, and content.
- The Video portion of the tab provides statistics about the send video (such as the source that’s sending the video, the resolution, the frame rate, and so on) and the receive video (such as which participant is receiving the video, the resolution, the frame rate, and so on).
- The Content portion of the tab provides statistics about the send content (such as the source that’s sending the content, the resolution, the frame rate, and so on) and the receive content (such as which participant is receiving the content, the resolution, the frame rate, and so on).
- The Audio portion of the tab provides statistics about the send audio (such as the source that’s sending the audio, the bit rate, and so on) and the receive audio (such as which participant is receiving the audio, the bit rate, and so on).
- The Resource portion of the tab provides information about the CPU state of your system in real time. It shows the current CPU usage for a time span of 100 seconds.
To view the statistics:
- Click the Statistics tab.
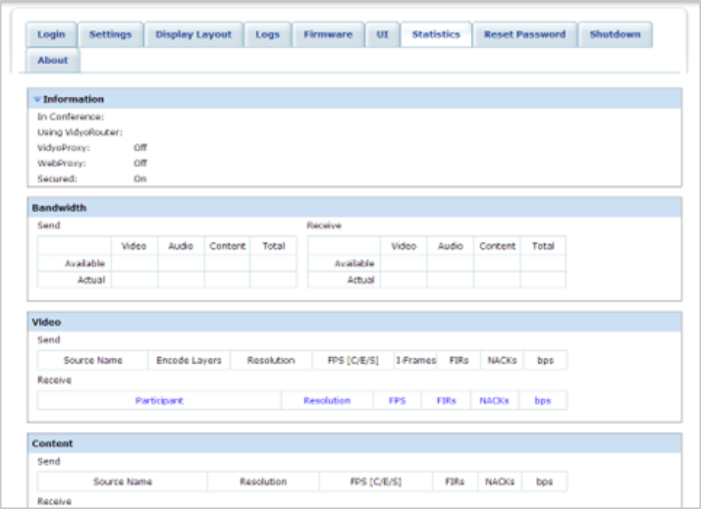
- Click Start (located at the bottom of the page) to start viewing the statistics.
- Click Stop (located at the bottom of the page) to stop viewing the statistics.
Reset the password
The Reset Password tab enables you to change the Admin UI password for the VidyoConnect Room or VidyoRoom.
To reset the password:
- Click the Reset Password tab.
- Enter the current password you use to log in to the Admin UI in the Current Admin Password field. The default password is password.
- Enter the new admin password for the VidyoConnect Room or VidyoRoom in the New Admin Password field.
- Enter the new admin password again in the New Admin Password (repeat) field.
- Click Reset Admin Password.
Use the network tools
The Network Tools tab provides you with access to the Ping and TraceRoute network tools.
To use the network tools:
- Click the Network Tools tab.
- Enter the IP address or host name of the system that you want to ping or that you want to trace the path of in the IP address or host name field.
- Click Ping or TraceRoute. The results appear on the page.
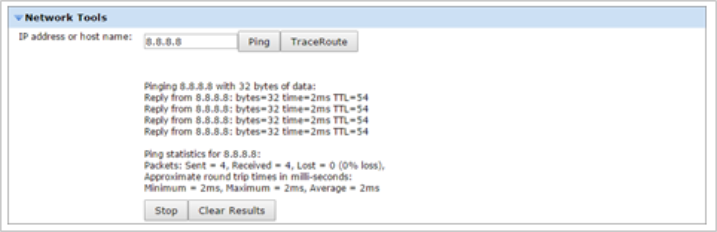
- Click Stop to stop the ping or traceroute command. The Ping, TraceRoute, and Clear Results buttons are grayed out while a ping or traceroute command is in progress. You must click Stop or allow the command to complete in order to enable these buttons.
- Click Clear Results to remove the results from the page.
Shut down or restart
The Shutdown tab enables you to shut down or restart the VidyoConnect Room or VidyoRoom.
|
Note Customers using VidyoRoom version 19.3.0 will no longer see this tab in the Admin UI. |
To shut down or restart the VidyoConnect Room or VidyoRoom:
- Click the Shutdown tab.
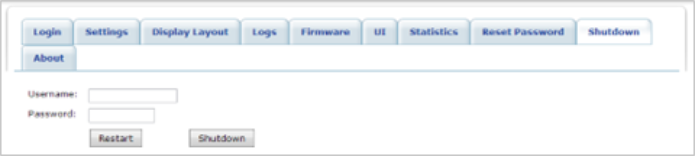
- Enter the user name you use to log in to the Admin UI in the Username field.
- Enter the password you use to log in to the Admin UI in the Password field.
- Click Restart or Shutdown.
View the About information
The About tab provides information about the system VidyoConnect Room or VidyoRoom. The information displayed on the screen varies depending on the model.
To view the About information:
- Select the About tab.
- VidyoRoom version 19.2.1 and earlier:
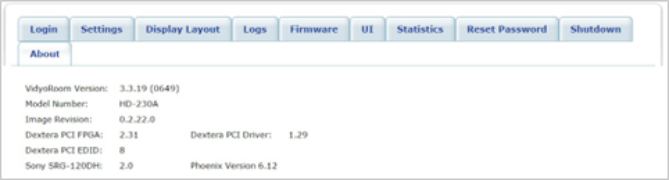
- VidyoConnect Room or VidyoRoom version 19.3.0 and later using Windows 10:
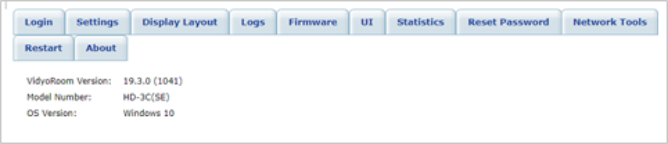
- View the following information:
- For all VidyoRoom models except HD-230 systems:
- Version
- Model Number
- Image Revision
- For VidyoRoom HD-230 systems:
- Version
- Model Number
- Image Revision
- Dextera PCI FPGA
- Dextera PCI Driver
- Dextera PCI EDID
|
Note When the Phoenix Quattro, Spider, or Power Hub devices and certain cameras (such as the Sony SRG or Minrray UV950A) are connected, the firmware version appears on the About tab as well. |
