6. Enable the management interface
VidyoPortal, VidyoRouter, and VidyoGateway allow for the configuration of a secondary Ethernet interface that can be used to access the management capabilities of the system. The secondary Ethernet interface is typically on a segregated network from the main production interface.
You can move the following configuration pages so that they are only accessible over the Management Interface:
- VidyoPortal and VidyoRouter vr2conf
- VidyoPortal Super Admin
- VidyoPortal Tenant Admin
- VidyoGateway Admin
As shown in the following table, the Management Interface is referred to by different names on the physical interface of the server, in the System Console, and in the Applications page of the Super Admin interface:
|
Management interface table |
|
|---|---|
|
Physical interface |
System console and super admin applications page |
|
G1 |
PRODUCTION |
|
G2 |
MANAGEMENT |
|
Note If the Management Interface is enabled, SNMP is only available on the Management Interface. The Management Interface should not be used to transfer any media. Doing so will result in failed calls. |
The following sections show you how to enable the management interface in the system console and then move VidyoPortal, VidyoRouter, and VidyoGateway applications to the Management Interface.
To enable the Management Interface:
- Log in to the System Console.
- Enter option 1 to configure IP Address.
- Enter y to change the current settings.
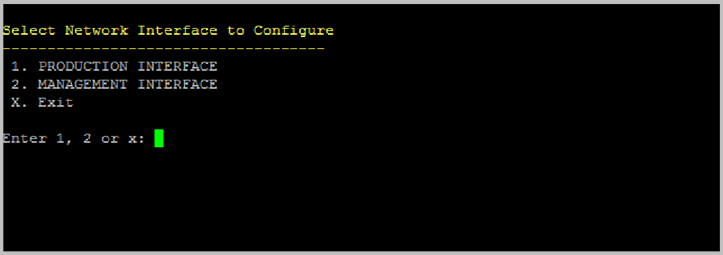
- Enter 2 to select the MANAGEMENT INTERFACE option.
- Enter the IP address and Subnet Mask for the Management Interface.
- Enter y to save the configuration.
- Enter 14 to reboot the server.
|
Note Press the Enter key after each prompt. |
|
Note The Management Interface supports only IPv4 addresses. |
Move VidyoPortal applications to the Management Interface
After enabling the Management Interface on a VidyoPortal, all applications will still reside on the Production Interface unless explicitly moved to the Management Interface.
|
Note Unlike applications which you must explicitly move to the Management Interface, SNMP will be automatically moved to the Management Interface as soon as the Management Interface is enabled on the VidyoPortal. |
To move VidyoPortal applications to the Management Interface:
- Log in to the Super Admin portal using your Super Admin account.
- Click the Settings tab. The Upload System License page displays by default.
- Click the plus icon to the left of Security on the left menu.
- Click Applications from the submenu.
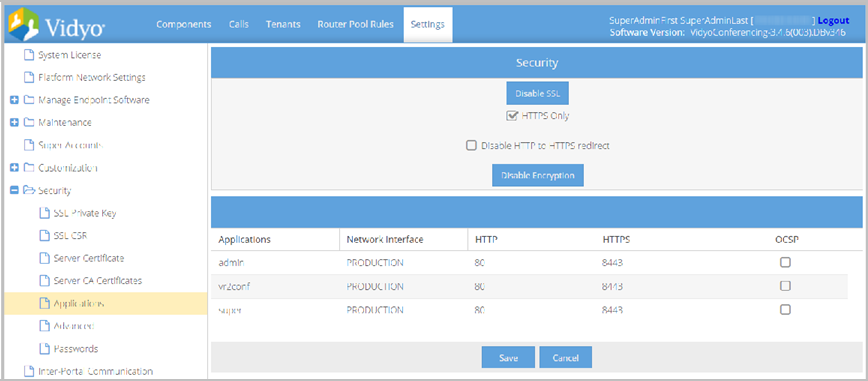
- Look in the Applications column for the application you want to move to your VidyoPortal Management Interface, and then select MANAGEMENT from the drop-down in the Network Interface column. You can select and move multiple applications at the same time.
- Click Save. Changes are applied immediately; therefore, if the Super application is moved, you are logged out and it is no longer accessible from the Production Interface (PRODUCTION).
|
Note The User portal (user application) cannot be moved to the Management Interface. It must remain on the Production Interface (PRODUCTION). |
Optionally, you can also change the Port to which an application is bound. In the preceding screenshot, some applications are bound to port 443.
Management Interface on VidyoRouter and VidyoGateway
Move your VidyoRouter applications to the Management Interface
Now you can explicitly move your VidyoRouter applications to the Management Interface.
|
Note Unlike applications which you must explicitly move to the Management Interface, SNMP will be automatically moved to the Management Interface as soon as the Management Interface is enabled on the VidyoPortal. |
To move your VidyoRouter applications to the Management Interface:
- Log in to your VidyoRouter using your system console account. The URL of each VidyoRouter is typically a subdomain followed by your domain name and the address of the VidyoRouter Configuration Pages: [yourVidyoRouter.yourorganization.com]/vr2conf
- Click the Settings tab. The Upload System License page displays by default.
- Click the plus icon to the left of Security on the left menu.
- Click Applications from the submenu.
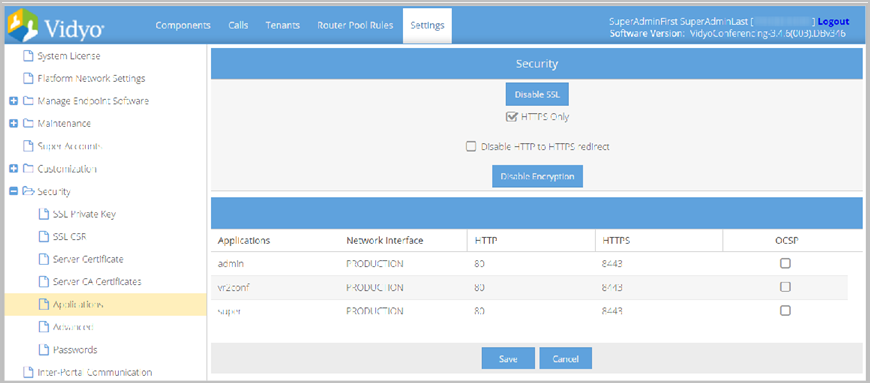
- Look in the Applications column for the application that you want to move to your VidyoRouter Management Interface, and then select MANAGEMENT from the drop-down in the Network Interface column.
- Click Save.
You can select and move multiple applications at the same time.
|
Note The User portal (user application) cannot be moved to the Management Interface; it must remain on the Production Interface (PRODUCTION). |
Optionally, you can also change the Port to which an application is bound.
In the preceding screenshot, some applications are bound to port 443.
Changes are applied immediately; therefore, if the Super application is moved, you are logged out and it is no longer accessible from the Production Interface (PRODUCTION).
Move your VidyoGateway application to the Management Interface
Now you can explicitly move your VidyoGateway application to the Management Interface.
|
Note Unlike applications which you must explicitly move to the Management Interface, SNMP will be automatically moved to the Management Interface as soon as the Management Interface is enabled on the VidyoPortal. |
To move a VidyoGateway application to the Management Interface:
- Log in to your VidyoGateway using your system console account. The URL of your VidyoGateway is typically a domain name: [vidyogateway.example.com]/.
- Navigate to Maintenance > Security.
- Click the Ports subtab.
- Select MANAGEMENT from the Interface drop-down.
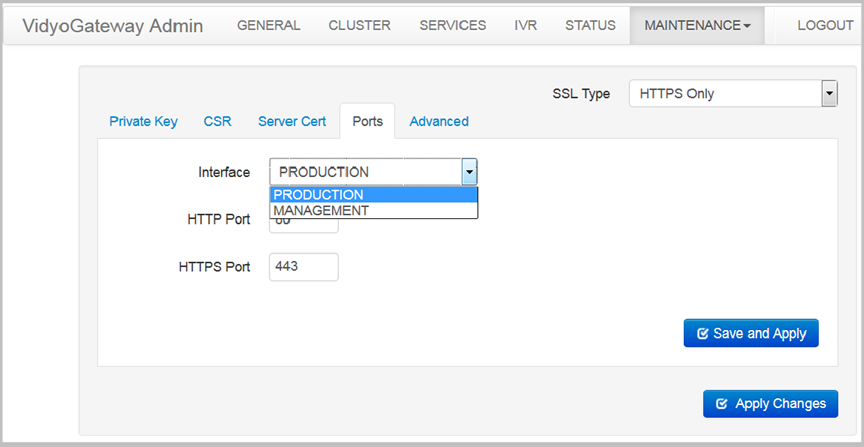
- Click Save and Apply.
Optionally, you can also change the Port to which your VidyoGateway is bound. In the above screenshot, the VidyoGateway is bound to port 443.
Changes are applied immediately; therefore, if your VidyoGateway Admin is moved, you are logged out and it is no longer accessible from the Production Interface (PRODUCTION).
Add static network routes
With the addition of the Management Interface capability, the System Console allows you to add static network routes to the system.
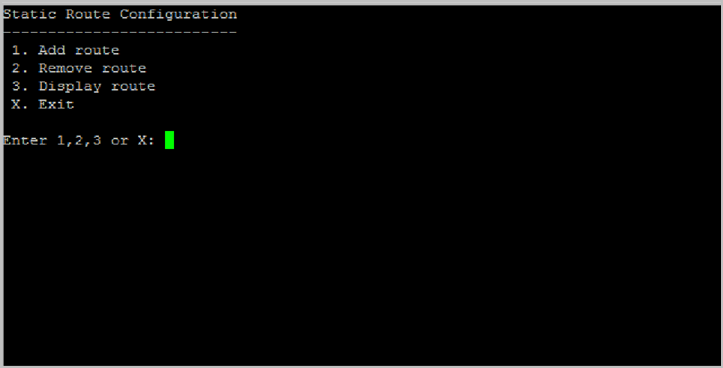
To add static network routes to the system:
- Log in to the System Console.
- Enter m for more options.
- Enter A for Advanced Options.
- Select 2 to select the Network Route Management option.
- Enter 1 to add a new route.
- Enter the Destination IP or Network (using Slash notation for the subnet mask).
- Enter the IP address of the route you want to use.
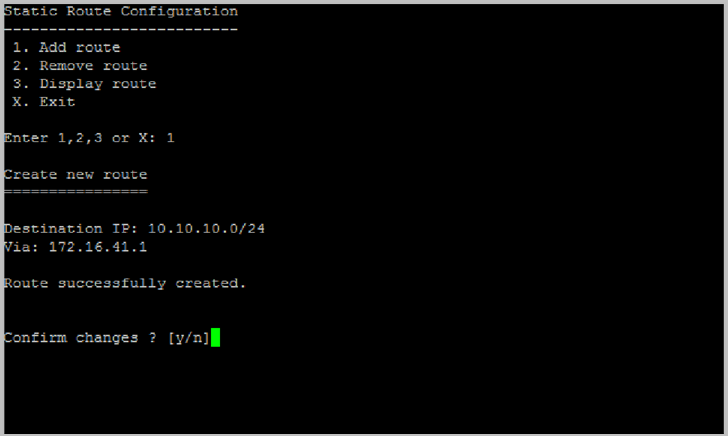
- Select y to confirm your changes.
|
Note Press the Enter key after each prompt. |
