4. Legacy TytoCare integration
This section contains information to help you configure a legacy TytoCare integration.
- Prerequisites
- Super Admin: Configure TytoCare integration
- Tenant Admin: Configure TytoCare integration
- TytoCare integration troubleshooting
- Use the TytoCare REST APIs
- Visit APIs
The TytoCare integration with VidyoConnect enables remote clinicians to virtually meet with their patients via secure and reliable video conferencing. The integration enables the TytoCare solution to act as a robust extension of the remote clinicians’ diagnostic capabilities by allowing them to see and speak with patients while conducting virtual stethoscope, otoscope, skin, and other basic medical exams.
Prerequisites
The TytoCare integration requires VidyoPortal and VidyoRouter version 18.4.0 or later as well as version 19.1.0 or later of the VidyoConnect desktop application.
In addition, if you want to use TytoCare integration, you must first enable it in the Super Admin portal. Then, you must configure it in each Tenant Admin portal as described in Tenant Admin: Configure TytoCare integration.
Super Admin: Configure TytoCare integration
- Log in to the Admin portal using your Super Admin account.
- On the top menu, click Settings.
- On the left panel, expand Feature Settings and click TytoCare Integration. The TytoCare Integration page displays.
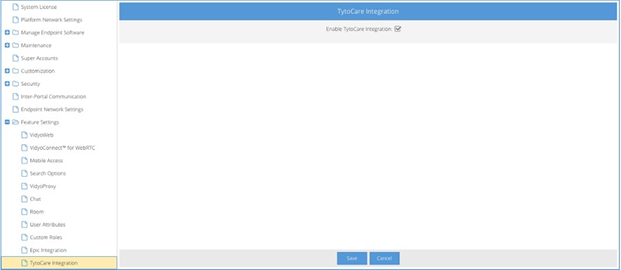
- Select the Enable TytoCare Integration checkbox.
- Click Save.
Tenant Admin: Configure TytoCare integration
If you are an on-premises customer and want to use TytoCare integration, you must first ensure that the Super Admin has enabled TytoCare as described in Super Admin: Configure TytoCare integration. Next, you can configure TytoCare in each Tenant Admin portal.
|
Note Before enabling the TytoCare integration for your Tenant, you must:
|
To configure the TytoCare integration:
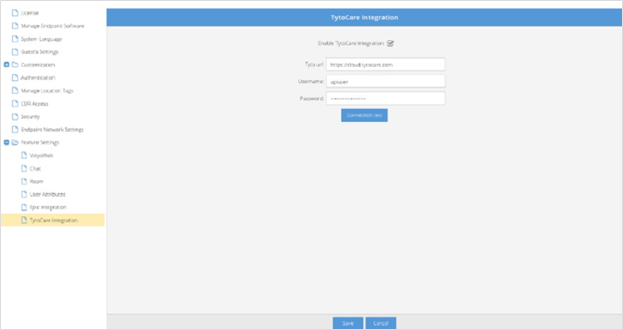
- Log in to the Admin portal using your Admin account.
- On the top menu, click Settings.
- On the left panel, expand Feature Settings and click TytoCare Integration. The TytoCare Integration page displays.

- Select the Enable TytoCare Integration checkbox.
- Enter the Tyto URL. In most cases, the URL is https://app-cloud.tytocare.com; however, you should verify this with the TytoCare team for your organization.
- Enter your TytoCare Username and Password.
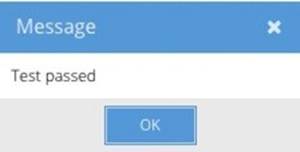
- Click Connection test to confirm that your Tenant can access TytoCare using the information you provided. If the test is successful, the Test passed message displays.

- Click Save.
|
Note If your organization’s firewall blocks outbound requests to the Internet from your VidyoPortal, you will need to whitelist requests to the Tyto URL. Please check with your IT team. |
TytoCare integration troubleshooting
Starting with VidyoPortal and VidyoRouter version 19.1.0, the TytoCare integration includes:
- More informative error messages. For example, we display the relevant error codes when the Connection test is run.
- More details in the TytoCare Audit and App logs. For example, we log the HTTP status codes for all Tyto REST API calls.
Connect test
From the Tenant Admin portal, you can perform a connection test to confirm that the Tyto server is reachable using the URL and credentials provided.
- Log in to the Admin portal using your Admin account.
- On the top menu, click Settings.
- On the left panel, expand Feature Settings and click TytoCare Integration. The TytoCare Integration page displays.
- Ensure that the Enable TytoCare Integration checkbox has been selected and that the Tyto url, Username, and Password fields have been filled out.
- Click Connection test to confirm that your Tenant can access the TytoCare server using the information you provided.
|
Note In most cases, the URL is https://app-cloud. tytocare.com; however, you should verify this with the TytoCare team for your organization. If your organization’s firewall blocks outbound requests to the Internet from your VidyoPortal, you will need to whitelist requests to the Tyto URL. Please check with your IT team. |
If the test succeeds
If the connection test is successful, a message that the Test passed displays.
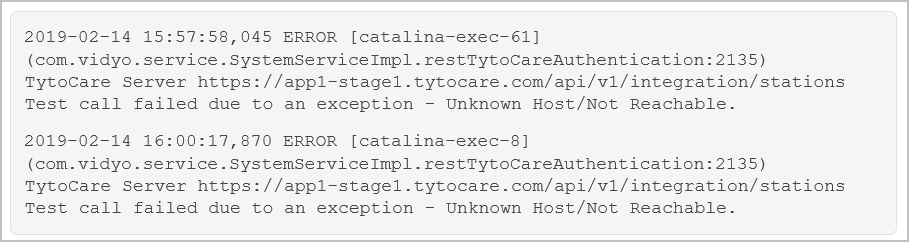
If the test fails
If the connection test fails, one of the following failure pop-up messages displays with the appropriate HTTP status code, and the details are logged in admin-app.log.
- Connection test failed. HTTP Status Code 401:
- The username and/or password are incorrect or the portal's IP address is not whitelisted on the Tyto server.
- Corresponding admin-app.log messages:

- Connection test failed. HTTP Status Code 408:
- The portal cannot resolve the Tyto server address or the address is unreachable.
- Corresponding admin-app.log messages:
Use the TytoCare REST APIs
This section describes the TytoCare integration APIs and their error scenarios. Each API section lists the HTTP error codes possible for each specific API as well as the sample log message for the scenario.
- Station APIs
- Visit APIs
Station APIs
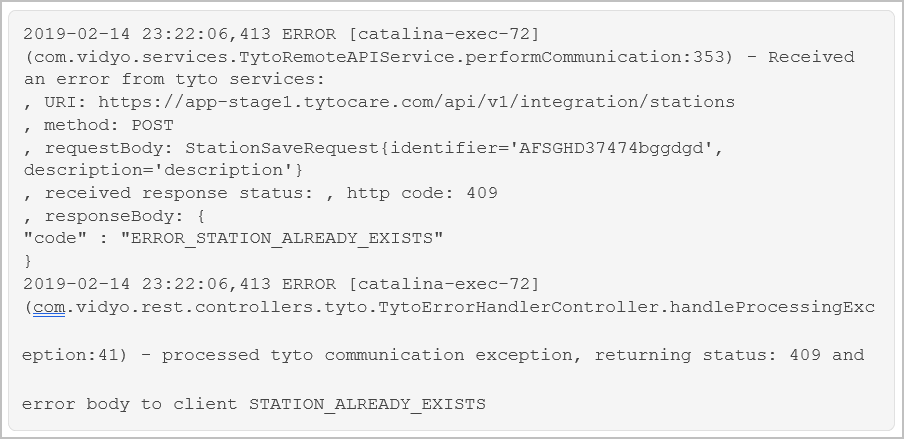
Create station

Possible error messages
HTTP 409 - Station Already Exists
Corresponding user-app.log messages:
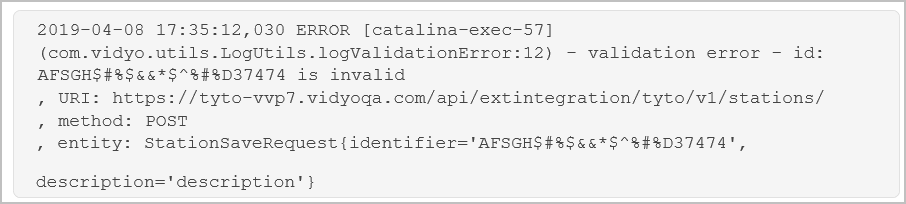
HTTP 400 - Invalid Format of Station Identifier [Unsupported special characters] Corresponding user-app.log messages:
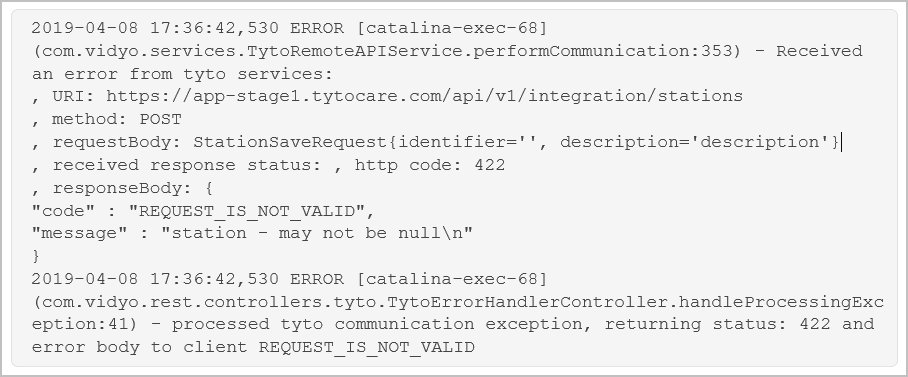
HTTP 422 - Invalid Format of Station Identifier [Empty Identifier] Corresponding user-app.log messages:
Retrieve station
GET - https://{portal-FQDN}/api/extintegration/tyto/v1/stations/{identifier}
Possible error messages
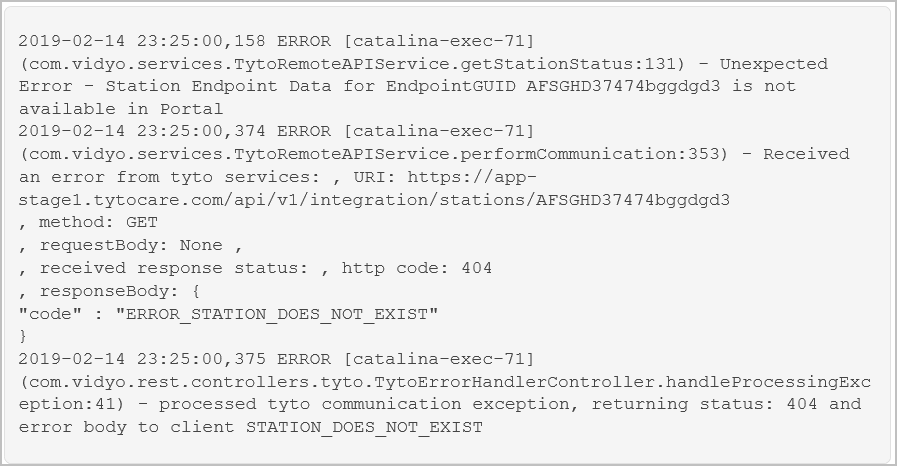
- HTTP 404 - Station does not exist.
- Corresponding user-app.log messages:
- HTTP 400 - Invalid Station Id format [Unsupported characters in the Identifier]
- HTTP 405 - Invalid Station Id format [Empty Station Identifier]
Pair Tyto device with station

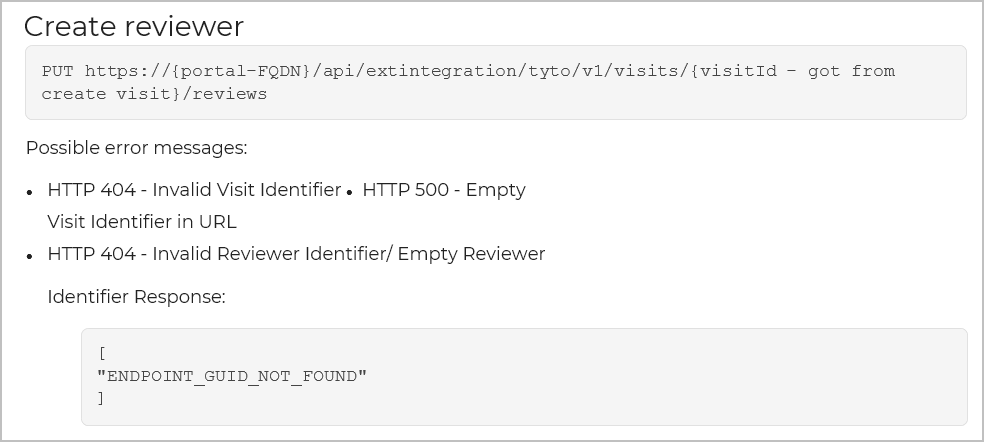
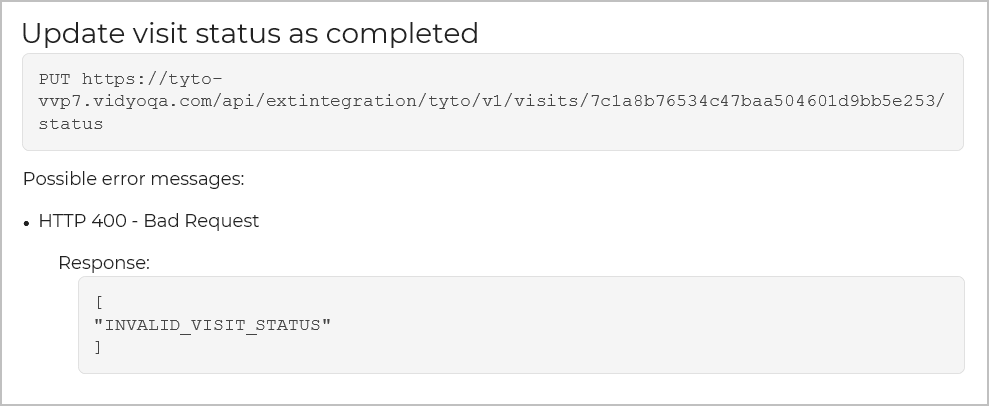
Visit APIs
Possible error messages
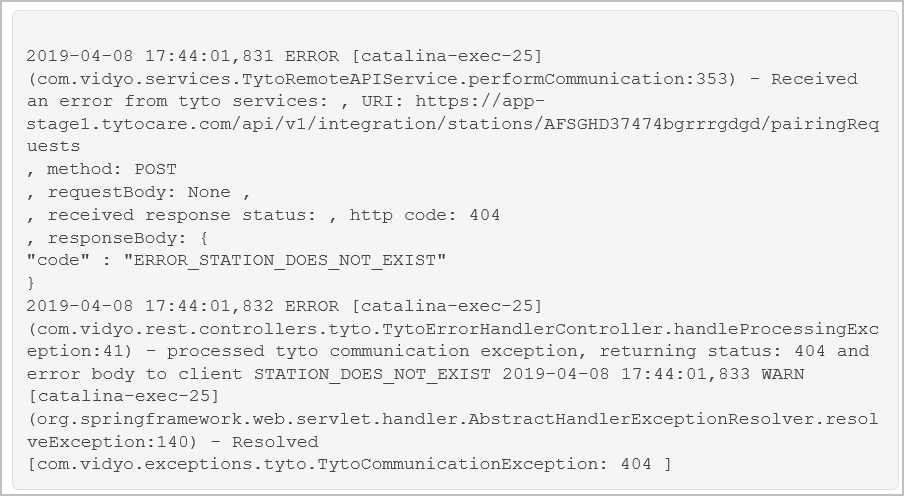
- POST - HTTP 404 - Station does not exist Corresponding user-app.log messages:
- POST - HTTP 400 - Invalid Station Id format [Unsupported characters in the Identifier]
- POST - HTTP 500 - Invalid Station Id format [Empty Identifier]
Create or update clinician
Possible error messages:
- PUT - HTTP 404 - Clinician does not exist [Empty Identifier]
- PUT - HTTP 404 - Clinician does not exist [Invalid Identifier]
- PUT - HTTP 400 - Clinician Identifier format invalid [unsupported special characters]
Visit APIs
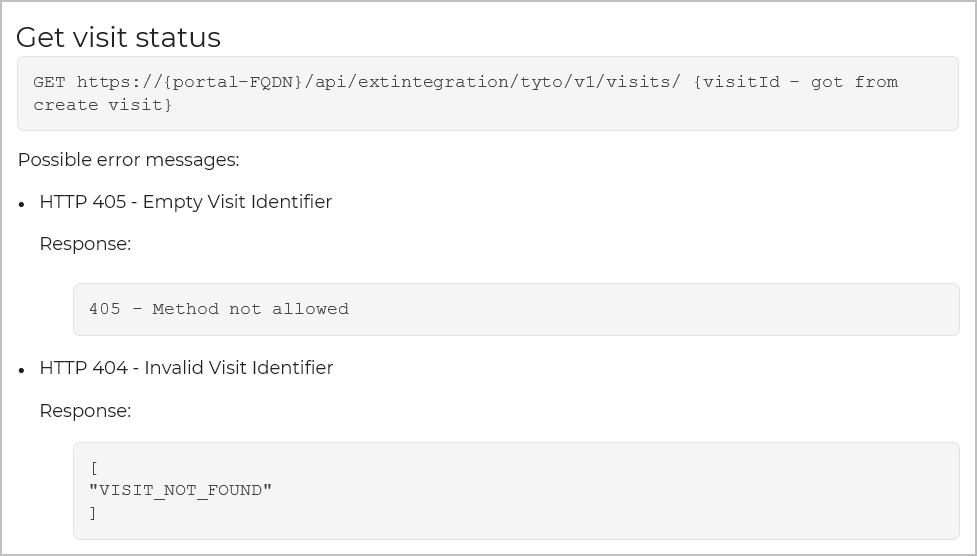
Create visit

Possible error messages:
- HTTP 422 - Invalid Format of Visit Identifier [Empty Identifier]. Sample request:

- Response:

- HTTP- 400 - Invalid Visit Identifier [Unsupported characers/exceeding max length of 140 characters] Response:

- HTTP 404 - Invalid Clinician Identifier/Empty Clinician Identifier Response:

- HTTP 404 - Invalid Station Identifier/Empty Station Identifier Response: